Introduction
This guide shows how to remove and replace worn out brake pads and brake rotors on an eighth‑generation Toyota Camry.
Perform this service when pad thickness is low, rotors are warped or scored, or you feel vibration during braking.
Several of the fasteners are important parts of the braking system, so pay attention to torque values.
-
-
Once the car is up on jackstands, use an impact wrench to remove both wheels. Otherwise, before you raise the car, loosen the lug nuts slightly so you can get the wheels off once the car is lifted and put on stands.
-
.Use a 14 mm socket to unfasten the caliper bolt while holding the caliper pin flats with a 17 mm wrench.
-
Back both 14 mm bolts completely out to free the caliper from the caliper bracket.
-
-
-
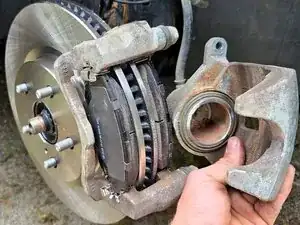
Use a 3/8" ratchet and a 17 mm socket to remove the two 17 mm bolts that secure the caliper bracket to the steering knuckle and lift the bracket away.
-
-
-
Press down on each brake pad ear to release it and pull the pads out of the bracket.
-
Pry the stainless hardware clips out of the bracket and discard them.
-
-
-
Pull the rotor off the hub; if it is seized, strike the rotor face with a rubber mallet. Use a circular or alternating pattern for the blows to break it free.
-
-
-
Brush rust from the hub face so the new rotor seats flat.
-
Wipe the hub clean with a rag or paper towel, and spread a thin coat of anti‑seize on the center pilot of the hub to prevent future rotor sticking.
-
-
-
Snap the anti‑rattle spring clip onto the top edge of each new pad, seating it in the groove.
-
Repeat for both inner and outer pads and make sure the clips lie flat.
-
-
-
Hold the rotor against the hub and slide the bracket over the rotor.
-
Thread both 17 mm bolts by hand, then tighten them with a torque wrench to 79 ft‑lb (107 N·m).
-
-
-
Slide the outer pad into the bracket with its spring clip at the top.
-
Push the inner pad into the bracket, also keeping the spring clip at the top.
-
-
-
Remove the master‑cylinder cap to let fluid return while the piston is compressed.
-
Place an old pad against the piston and squeeze it in with a clamp until the piston is fully seated.
-
-
-
Wipe the caliper face clean of debris before assembly.
-
Slide the caliper over the new pads and onto the bracket.
-
Thread the upper and lower 14 mm bolts, hold the slider flats with a 17 mm wrench. Use a 14 mm socket and 3/8" rachet and snug up the bolts.
-
Use a torque wrench with a 14 mm socket and torque each 14 mm bolt to 25 ft‑lb (34 N·m). You will need to hold the slider flats with a 17 mm wrench.
-
-
-
Now you can repeat this process for the other wheel. If you have done both wheels, go to the next item.
-
Reinstall the reservoir cap.
-
Firmly pump the brake pedal until it feels solid before driving, then test drive at low speed to confirm proper operation.
-
With both front corners finished and the brake pedal pumped firm, check wheel lug nut torque, remove any jacks, and enjoy restored, confident braking on your Camry.
Repair didn't go as planned? Ask our Answers Community for help.