Introduction
This guide shows how to change the six spark plugs in a 2018–2024 Jeep Wrangler (JL) equipped with the 3.6 L Pentastar V6.
The 3.6 L V6 hides its spark plugs beneath the plastic intake manifold, so routine ignition service can look intimidating. This guide walks you through safe manifold removal, correct torque procedures, and every connection that must be unplugged and re‑seated. Follow along to restore smooth idle, fuel economy, and performance whenever misfires appear or factory mileage intervals are reached.
-
-
Use a 10 mm socket and ratchet to loosen the nut on the negative battery post.
-
Wiggle the cable free and set it aside where it cannot contact the terminal.
-
-
-
Remove the two 10 mm bolts that hold the air box to the fender.
-
Loosen the 8 mm hose clamp at the throttle body until the tube rotates freely.
-
Squeeze the spring clamp and disconnect the small breather hose from the tube.
-
Pull upward to release the three push‑clips and lift the snorkel and air box out.
-
-
-
Slide the red lock on the throttle body connector rearward to unlock it.
-
Depress the tab and unplug the throttle body wiring harness.
-
Disconnect the vacuum hose at the rear of the intake by pressing its release tab and pulling back.
-
-
-
Use a trim‑clip removal tool to pop off the Christmas‑tree fasteners securing the harness to the manifold.
-
Work along the top and side of the manifold until every clip is free.
-
-
-
Pry out the push‑clips and lift away the black foam insulator sitting on top of the manifold.
-
-
-
Remove the four 10 mm bolts securing the metal bracket that carries the AC line and wiring on the right head.
-
Set the bracket aside to expose the remaining intake manifold fasteners.
-
-
-
Break all seven 10 mm manifold bolts loose with a small ratchet; they are only tightened to 8–9 N·m.
-
Reach the hidden rear‑corner bolt with a wobble extension.
-
Remove each bolt and leave them in the manifold to avoid dropping them.
-
-
-
Rock the manifold upward, guiding the bolts past the bracket and fuel rail.
-
Watch the rear EVAP hose; disconnect it if it becomes taut.
-
Lift the manifold clear of the engine and set it safely on the bench.
-
-
-
Press the tab on each coil connector and unplug it from the coil.
-
Remove the coil hold‑down screw with an 8 mm socket.
-
Wiggle and pull the coil straight upward to break the seal and remove it.
-
-
-
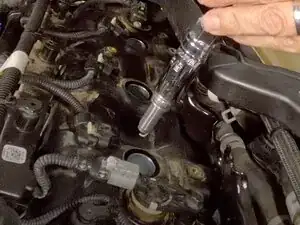
Secure a 5/8‑inch spark plug socket to an extension with tape so it cannot detach inside the well.
-
Seat the socket on the spark plug and turn counter‑clockwise until the threads are free.
-
Retrieve the plug with the socket or a magnetic pick‑up tool if it stays in the well.
-
-
-
Hand‑thread the new plug into the head using the taped extension to avoid cross‑threading.
-
Torque the plug to 13 ft‑lb (144 in‑lb) until the torque wrench clicks.
-
-
-
Push each coil fully onto its plug until it bottoms out.
-
Install the hold‑down screw and torque to 84 in‑lb using a criss‑cross pattern.
-
Reattach every coil connector and confirm each latch clicks.
-
-
-
Guide the manifold onto the dowels and lower it evenly into place.
-
Start the long upper and short lower bolts by hand.
-
Torque each bolt to 8–9 N·m following an even center‑out pattern.
-
-
-
Reinstall the AC line bracket and torque its four 10 mm bolts.
-
Snap every wiring harness clip and vacuum hose back into its original location.
-
Plug the throttle body connector back in and push the red lock fully home.
-
-
-
Position the air box and snorkel, aligning the three locating pins with the radiator shroud.
-
Tighten the two 10 mm air box bolts and the 8 mm throttle body hose clamp.
-
Reconnect the breather hose and ensure its spring clamp is seated.
-
-
-
Reattach the negative battery cable and tighten the 10 mm nut.
-
Start the engine and listen for vacuum leaks or misfires.
-
Your Wrangler should now idle smoothly and accelerate without hesitation. Record the mileage so you know when the next ignition service is due.
Replacement didn't go as planned? Ask our Jeep Wrangler JL Answers Community for help.