Inleiding

  1. 3jETuMAJGuYOyrM1
    3jETuMAJGuYOyrM1
    lENxZXOSlnxhjUKM

    Verify your model. The back of the Cellular model just says GPS, so be sure to check the groves where the watch band goes to determine you model. I made the mistake of just reading the back of the device and since I’d been gifted the device didn’t know it was cellular. Cellular has a different type of touch force gasket, different screen, and different battery connections.

    Ryan Holt -

    From what I just read on Apple, the only differences in watch series 3 is 38mm and 42mm.

    mcr4u2 -

    As a consumer all you need to know are 38mm and 42mm

    Michael Adoga -

    The back will say GPS LTE if it’s the cellular version. If it doesn’t say LTE it is only the GPS version. The displays are different whether or not it is LTE(cellular).

    themepark -

    This alternative method only reboots the watch.

    Gregg Stanley -

  2. dAlO5MlADoI4aHmQ
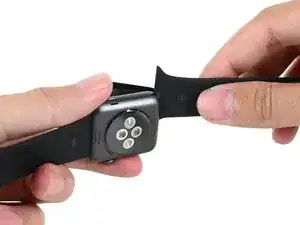
    • Bereid een iOpener voor (of pak een föhn or warmtepistool) en verwarm daarmee het gezicht van de horloge totdat het net te warm is om aan te raken.

    • Laat de iOpener minstens een minuut op de horloge liggen om het scherm volledig op te warmen en daarmee de lijm te verzachten die het scherm aan de behuizing bevestigt.

    • Het kan zijn dat je de iOpener opnieuw moet verwarmen, of dat je het op verschillende plekken op het scherm moet toepassen omdat bepaalde delen afkoelen, om het warm genoeg te krijgen om los te maken.

    I have heated up the iOpener to 165 degrees and left it on for more than a minute. No way I can lift the screen off with the exact knife. Tried different angles in various places, but no go. I also used a hair dryer un til the watch screen was too hot to touch and even tried a very hard cutting tool blade and also no go. Could n ever get the blade under the face I applied enough force where I could see that the blade left small marks, not very big, but could never get anything to move or lift. What am I doing wrong? I spent 47 years at a global computer company and I am used to taking apart small things and applying force when required. I don’t know what I am doing wrong. Please help me.

    Rafael Blanco -

    Getting the initial gap is not easy. Maybe a playing card could work its way in the tiny gap and cut some adhesive. After that there might be some success with an exacto knife. Or you want to try a piece of aluminum foil (folded for more rigidity) for cutting the adhesive. Be aware of the force touch gasket and that it might get damaged during that procedure.

    Tobias Isakeit -

    I finally used a hot air gun set to 150 deg. C heating up the edges by slowly spinning the watch around before the technique worked. Difficult is the level noted and it’s correct. Finally worked and watch perfectly functioning.

    Chris Giavotto -

    I used a heat gun, too. I was worried after reading comments that it would burn up the LCD, so I heated it a little bit at a time, rotating it like you did, and checking to see if I could get my knife under it. I must have hit one of the buttons because it did turn on, but that did reassure me that the display was okay.

    It's open. Now that the watch and I have had a few minutes to cool down, I'm ready for the next step. Not as difficult as I thought it could be. Tomorrow, I'll be replacing the battery in an iPod Touch 6th Gen.

    bester -

    I had to heat the iOpener 2 times and leave it on top of the watch for 10 minutes.

    Axel Trujillo -

  3. TiPIaVjFQZ6OJlTT
    TiPIaVjFQZ6OJlTT
    6hNke1uI3WvUQ3Im
    yys2M1eO4GHOURDx
    • Omdat de ruimte tussen het scherm en de body van de horloge zo klein is, heb je een scherp mesje nodig om ze van elkaar te scheiden. Lees de volgende waarschuwingen goed door voordat je doorgaat.

    • Bescherm je vingers door ze weg te houden van het mes. Als je er niet zeker op bent, bescherm je hand dan met een zware handschoen, zoals een leren of tuiniershandschoen.

    • Zorg ervoor dat je niet te veel druk uitoefent, aangezien dit ertoe kan leiden dat je met het mes uitschiet en daarmee jezelf of de horloge beschadigt.

    • Draag oogbescherming. Stukken van het mes of het glas kunnen breken en gaan rondvliegen.

    • Voel je vrij om de horlogeband vast te maken of juist te verwijderen om zo meer controle te krijgen tijdens het repareren.

    Don’t cut your finger off!

    Mike -

    The Watch 3 stainless Steel has an additional Frame. Where do i have To Open it?

    asteffen@me.com -

    I wore thick gardening gloves just to be safe 😅 and it took a while but the screen did come off.

    Axel Trujillo -

  4. ZkWMSNMJYG6IZhkL
    ZkWMSNMJYG6IZhkL
    NQIDl3ZOwVEC44ZA
    oZFcsBuOlJ6JyOK3
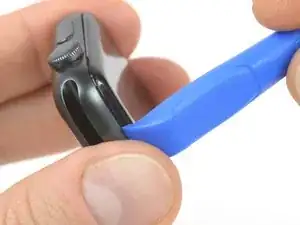
    • Plaats een kant van een aflopend mes in de enge ruimte tussen het scherm en de buitenste behuizing. Begin aan de korte kant van het scherm, het dichtst bij de digital crown.

    • Druk je mes stevig en recht omlaag in de enge ruimte.

    • Als je mes er eenmaal in zit, kun je het mes lichtjes kantelen om zo het scherm rustig omhoog te krijgen.

    • Steek je mes niet verder dan 1/16de van een inch, of ongeveer 2 mm in het toestel.

    It’s difficult to grip case in a way that keeps fingers safe from the blade but doesn’t hit the side buttons and turn the device on!

    If it’s a struggle to get the display to release, warm case for a few more minutes.

    Kyle Powderly -

    I have tried so may times to get the display to release but nothing works. Should have bought a new watch LOL. Kept the iOpener on 2 times for 10 minutes and it still won't open. There must be a better way.

    Susan E. White -

    Hi Susan,

    if you're struggling to get the adhesive loose enough a hair dryer, heat gun, or hot plate may also be used, but be careful not to overheat the device. The edge should feel slightly too hot to the touch.

    Dominik Schnabelrauch -

    It's no way to place the edge of a curved blade into the thin gap between the display and the outer case!! The blade is far too think to place into the thin gap for mine😭 already heated the watch with hair dryer for like 10minutes..

    Melody M -

  5. AjRJCyCiMOCZ3rad
    AjRJCyCiMOCZ3rad
    ARGTNpwjNblelqda
    • Als je een kleine ruimte met je mes hebt gemaakt, verwijder je het mes en kun je de dunne kant van een openingstool erin steken.

    • Duw je openingstool in de vrijgekomen ruimte en gebruik daarna je duim als een soort hefboom om vervolgens het scherm verder open te krijgen.

    • Probeer het scherm nog niet volledig te ontkoppelen of uit de behuizing te krijgen.

  6. R4FIOpCBksWgGmXY
    R4FIOpCBksWgGmXY
    XUMQGYuCDf4DO6MI
    GWW1SH1I4KqcmfKr
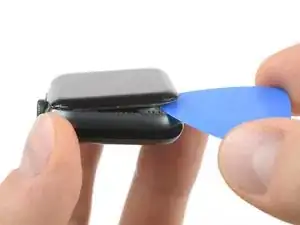
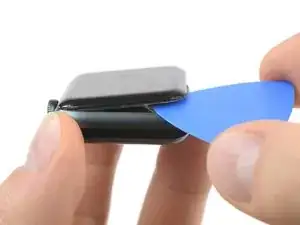
    • Steek een openingsplectrum onder het scherm en scheid op voorzichtige wijze de Force Touch afdichting van het scherm.

    • iFixit scherm- en batterijreparatiekits bevatten een vervangende Force Touch pakking, zodat je je geen zorgen hoeft te maken over het beschadigen ervan.

    • Een manier om de Force Touch pakking heel te houden is door voorzichtig onder de hoek van het scherm te wrikken. Als de Force Touch pakking loslaat bij het omhoogtillen van het scherm, of als je de lagen van de pakking van elkaar scheidt, zul je de pakking alsnog moeten vervangen.

    • Schuif je openingsplectrum rondom het scherm om de lijm tussen de Force Touch afdichting en het scherm los te krijgen.

    • Nogmaals: steek je openingsplectrum niet dieper dan 1/16e inch oftewel 2 mm in het toestel.

  7. rPZ1tKy2Hq2hQToM
    rPZ1tKy2Hq2hQToM
    vdTqXtcOWsXKFMeh
    x5qVggWBkbWBMNls
    • Voorkom dat je de schermkabels beschadigt door het scherm nog steeds niet volledig te openen of los te maken.

    • Open het scherm totdat je ongeveer een hoek van 45° graden heb en gebruik een pincet om de lijm tussen het scherm en de Force Touch pakking te verwijderen.

    • Dirigeer de lijm om de horloge heen en langs de schermkabels om deze volledig te verwijderen.

    There seems to be something attached to this end that I am supposed to open looks like something metal which isn’t showing on your photos, whatever it is doesn’t want disconnect and I am worried about forcing it in case I break something . Mine are a a series 3

    Pat gordon -

  8. y1fV1Nd2PZhidSJy
    y1fV1Nd2PZhidSJy
    iJkqEdVVY2YdLKMo
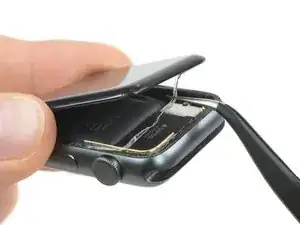
    • Gebruik een Y000 schroevendraaier om de Tri-point schroef, die het metalen beschermpaneeltje op de batterijaansluiting bevestigt, los te maken.

    • Verwijder het paneeltje.

  9. rCcSY1GiFOR2oeRP
    rCcSY1GiFOR2oeRP
    USkmJGVUcoYa1Oal
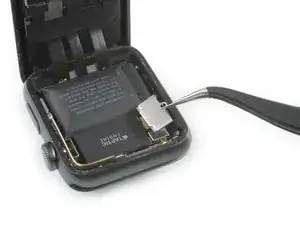
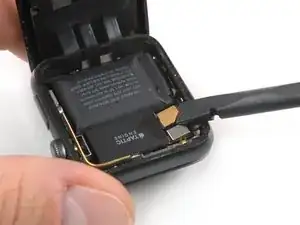
    • Ontkoppel de batterij door de batterijaansluiting in een rechte beweging omhoog te tillen uit het contact met behulp van een wriktool.

    • Buig de batterijaansluiting lichtjes omhoog zodat je zeker weet dat deze niet per ongeluk contact gaat maken.

Conclusie

Om je toestel weer in elkaar te zetten, volg je deze instructies in omgekeerde volgorde.

Tobias Isakeit

Lid sinds: 31/03/14

125832 Reputatie

0 commentaren