
Inleiding
Gebruik deze handleiding om de lijm van je Apple Watch Series 2 te vervangen en je horloge weer sluitend te maken. De waterdichtheid van je Apple Watch zal mogelijk niet volledig worden hersteld na deze procedure.
-
-
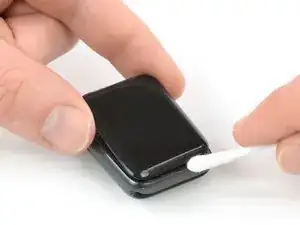
Dien een klein beetje isopropyl alcohol (>99%) toe op een wattenstaafje of gebruik een cleaning pad om op voorzichtige wijze de lijmresten bovenop de force touch pakking te verwijderen.
-
-
-
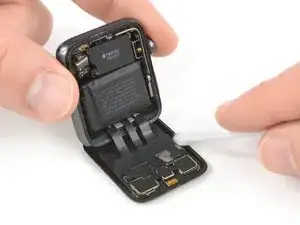
Draai de Apple Watch ondersteboven zodat het scherm plat op de grond ligt terwijl je de behuizing omhoog tilt.
-
Verwijder de resten aan de achterkant van het scherm.
-
-
-
Gebruik een pincet om de vervangende pakking heel voorzichtig aan het blauwe beschermlipje van het papier op te tillen.
-
-
-
Houd de vervangende pakking schuin om deze zo over het scherm heen te kunnen tillen.
-
Duw het scherm een klein beetje naar voren om zo de nieuwe pakking op de juiste positie te kunnen brengen, op een lijn met het frame.
-
Positioneer de vervangende pakking bovenop de force touch afdichting en gebruik het puntige eind van een spudger om deze op de juiste plaats te drukken.
-
-
-
Sluit de batterij weer aan zoals is uitgelegd in de handleiding waar je zojuist vandaan komt.
-
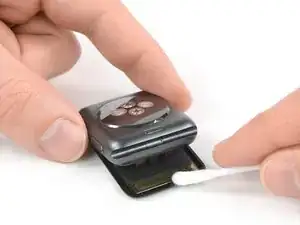
Verwijder de beschermlaag van de nieuwe pakking.
-


7 commentaren
Will the new adhesive be water proof?
or will the watch after replacement no longer be water proof?
The Apple Watch isn’t waterproof, but water resistant. After opening and resealing it there is no guaranty that the resistance is the same as before. More on that topic can also be read on Apples website (“Apple Watch can't be rechecked or resealed for water resistance.“). But when resealed properly (using heat and pressure without damaging the force touch gasket in the opening process and cleaning off old residue) there shouldn’t be any concern for a normal daily use like washing hands or taking a shower. It might even work for a swim in a pool or an ocean, but I wouldn’t count on that 50M ISO rating ;)
This one was a bugger! Dang…getting this over the display w/o sticking to everything is an exercise puzzle. The first one also didn't release correctly and I ended up installing just the blue adhesive backing…then realized that the adhesive was still on the other backing, which I then had to very carefully remove with a tweezers, then navigate the puzzle of an exercise getting it over the display and in to position. I did it, but as other commenters noted, it is not sealed anything like it originally was. In fact, it came up in a few days and I had to use the iRemover to heat it back up and press it back into place. I also use an iWatch bumper guard all the time now to protect it from popping off. For this older series 2 iWatch I’m ok.
Thank you iFixIt for top notch parts, instructions and tutorials. I’ve been an IT tech/specialist for many years, but still approach new repairs with caution, especially on Apple products, until I’ve done it at least once.
Yes, resealing the Apple Watch is a tough one. It is either disconnecting the display and go without the "exercise puzzle" but risk damaging cables and having to reconnect the display vs. keeping a steady hand and feeding the adhesive around the display.
I edited the guide to apply pressure on the closed watch for a longer time now. A few hours under some heavy books might do a better job.
Oh, and congrats on the repair.
Adhesive gasket/strip did not fit. It was slightly undersized :( I ended up cutting tiny strips to fill the gaps. :(
I bought 6 adhesive strips expecting to foul up some. I tried following this procedure on three of the sets, but on each set I ended up with one corner not quite long enough to seat properly. On the fourth set I altered the procedure and it finally worked the first time.
1. Take off the screen. Yes I know, but do it anyway.
2. Take off only the blue adhesive around the periphery. Do not remove center area.
3. Place sticky side on force gasket. Seems small, but fit perfectly.
4. Remove entire inner rectangular portion of adhesive strip
5. Replace screen
6. Re-Attach battery
7. Follow rest of procedure
marilyntlinton -
The isopropyl alcohol can only remove so much of the old adhesive. After the first pass with the q-tip use an iFixit Opening Tool to carefully scrape off the old adhesive. There is always some left on the case.
Vangelis Angelakis -
Do not waste your money - did not fit my watch at all. Absolutely useless .
George L -