Inleiding

Gebruik deze handleiding om een gebarsten of niet langer goed functionerend scherm in je Apple Watch Series 4 te vervangen.

Zorg dat je je Apple Watch update naar watchOS 5 of latere updates (en de gecombineerde iPhone naar iOS 12 of latere updates) om connectiviteitsproblemen te voorkomen nadat je het scherm hebt vervangen.

Het vervangen van het scherm kan problemen veroorzaken met Apple Pay. Om zo veel mogelijk problemen met Apple Pay te voorkomen verwijder je, als dit mogelijk is, alle informatie gerelateerd aan je Apple Pay-account voordat je aan de vervanging begint en voer je alle informatie weer opnieuw in nadat je het nieuwe scherm hebt geïnstalleerd.

Deze handleiding toont je de procedure van de standaard, GPS-only versie van de horloge, maar de cellulaire/LTE versie komt overeen.

  1. TDmmj111IrE2meG4
    TDmmj111IrE2meG4
    Cpp6tfMVL2vSSYE5

    Hi. I changed the screen on an apple watch series 4, now the screen works, whcih is great, but when I charge it, the green snake comes on but never charges. It heats up the bottom, gets very warm. Could it be the battery itself? Maybe needs a new one? Is rthere anything else that woudl be causing the battery to not charge and or heat up on the bottom when chaging the screen?

    Derrick Brewer -

  2. dHFOZE3GFSGxBhhH
    dHFOZE3GFSGxBhhH
    NvPAbIu3kDqSQsda
    Ot2VBZWEmrXNxt3H
    • Omdat de opening tussen het scherm en de body van de horloge zo dun is, heb je een scherp mesje nodig om de twee van elkaar te scheiden. Lees de volgende waarschuwingen grondig door voordat je verdergaat.

    • Bescherm je vingers door deze weg te houden van het mes. Als je twijfelt, bescherm dan je vrije hand met een zware handschoen zoals een lederen handschoen of een handschoen voor tuinwerkzaamheden.

    • Wees voorzichtig en let erop dat je niet te veel druk zet aangezien dit ervoor kan zorgen dat het mes wegschiet en in je huid of hand snijdt of de horloge beschadigt.

    • Draag oogbescherming. Het mes of het glas kan breken en ervoor zorgen dat er scherpe deeltjes in het rond vliegen.

    • Bedenk of je de band van de horloge wilt laten zitten of verwijderen om het jezelf zo makkelijk mogelijk te maken om reparaties uit te voeren.

  3. NwJjsTnJXVlpRVDB
    • Maak een iOpener klaar (of gebruik een föhn of een warmtepistool) en verwarm het oppervlak van de horloge om het kleefmiddel rondom het scherm te verzachten.

    • Laat je iOpener minimaal twee minuten op de horloge liggen om het scherm volledig te verwarmen en de lijm die het scherm aan de behuizing bevestigt te verzachten.

    • Het kan zijn dat je de iOpener opnieuw moet verwarmen en dit proces een aantal keer moet herhalen voordat het kleefmiddel rondom het scherm zacht en zwak genoeg is geworden.

  4. k3IDd4hsbkDqtrmd
    k3IDd4hsbkDqtrmd
    S4R1wEIwOJQ4UviI
    YqAXTDrCDtvIkckK
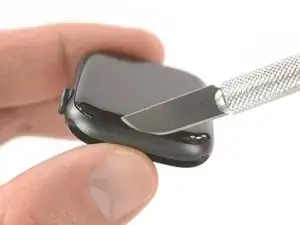
    • Plaats de zijkant van een gebogen mes in de dunne opening tussen het scherm en de buitenste behuizing. Begin aan de korte kant van het scherm, het dichtst bij de digitale kroon.

    • Druk het mes recht naar beneden in de opening.

    • Als je mes er eenmaal in zit, kantel je voorzichtig je mes om het scherm lichtjes omhoog te duwen.

    • Steek het mes niet verder dan ongeveer 2 mm in de opening om te voorkomen dat je de Force Touch-sensor beschadigt.

    This part is REALLY hard! Even after using the iOpener to warm the watch I had to use A LOT of force to get the blade in between the glass and the case. Be very careful when prying the display. I applied way too much force and my blade shot into the case under the display. I don’t think I damaged anything, but I did replace the force touch gasket to be sure.

    mdhicksmdhicks -

    I have a stainless steel case, not sure if that makes a difference, and was unable to do this without breaking the screen. Be very careful. Followed instructions but could not get the screen to release no matter how hot I got the watch.

    Jason Michel -

    I am moderately experienced at opening Apple devices having replaced batteries in several iPhones, iPods, and an iPad. I could not get the watch open with the x-acto knife blade as shown. I found other sites showed using a 0.1mm thick tool. I bought one and found it relatively easy to open the watch. It has the advantage of going in horizontal rather than vertical so it went between the glass and the force sense gasket. Force sense gasket wasn't disturbed at all. iFixit should add this type of tool to their offering.

    Dan Kelly -

    yea this step took a little longer than I thought, the knife that came in the kit sliced a chunk of my thumb off and had to go get stitches. So it added about an hour and a half of time to the repair.👍 Maybe an exacto knife isn't the best tool to supply as the pry tool. But what do I know.

    Isaac A -

  5. KuNPi1Z2VHKphUto
    KuNPi1Z2VHKphUto
    5PKygwrOcmTYAmap
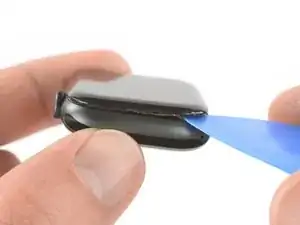
    • Als je eenmaal een kleine opening hebt gecreëerd met je gebogen mes, verwijder je het mes uit de opening en steek je de dunne kant van een openingstool in de opening.

    • Duw de openingstool in de opening, waarbij je je duim gebruikt als een hefboom waarop je het scherm iets verder opent.

    • Probeer het scherm nog niet volledig te openen of los te maken.

  6. jK3rFdOpwMSaI2xw
    jK3rFdOpwMSaI2xw
    IPWpgQVoSf3uuXPC
    L1HVgo24JpO2pwUi
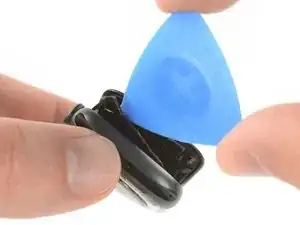
    • Er bestaat een kans dat de Force Touch-sensor aan het schermframe blijft plakken in plaats van aan de body van de horloge. Als dit het geval is, kun je een openingsplectrum onder het scherm steken en de Force Touch-pakking voorzichtig van het scherm scheiden.

    • Om de Force Touch-pakking te behouden voor hergebruik, duw je voorzichtig onder de zijkant van het scherm. Als de Force Touch-pakking splijt tijdens het optillen van het scherm, of als je de verschillende lagen van de pakking scheidt, zul je de Force Touch-pakking in z'n geheel moeten vervangen.

    • Schuif je plectrum rondom het scherm om de lijm tussen de Force Touch-pakking en het scherm door te snijden.

    • Steek je openingsplectrum niet verder dan ongeveer 2 mm in de opening om zo te voorkomen dat je andere onderdelen beschadigt.

    This impossible for me. I just left the force touch gasket attached to the display side. I was able to bend the display back with the gasket still in place.

    mdhicksmdhicks -

    See first the instructions for replacing the force touch gasket to familiarize yourself with parts that need separating. These instructions will seem unclear if you don't know what the force touch gasket looks like.

    Adam Richman -

    Be very careful with this step. I accidentally tore the Force Touch gasket, and while trying to replace it, then tore the display flex cable, thereby ruining the watch.

    John -

  7. bbxyCNV5BNVXKwXf
    bbxyCNV5BNVXKwXf
    ACKAUAw2LSxO66kG
    oIvY2Pr1WE5ZKKG6
    • Open het scherm nog niet helemaal om te voorkomen dat je de schermkabels scheurt of laat breken.

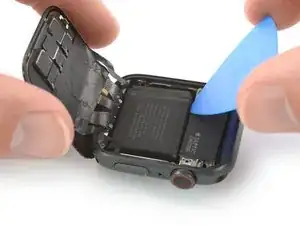
    • Open het scherm totdat deze maximaal een hoek van 45° beschrijft en gebruik vervolgens een pincet om de kleefstrip tussen het scherm en de Force Touch-pakking eraf te trekken.

    • Begeleid de kleefstrips rondom en achter de schermkabels langs om deze van de horloge te verwijderen. Aangezien de kleefstrips toch moet worden vervangen, kun je deze ook doorsnijden als dat het verwijderen ervan significant veel makkelijker maakt.

    • Zorg dat je bij dit punt terugkomt als je de horloge weer in elkaar zet en ga dan pas verder met de hersluitprocedure.

    Be careful to remove just the adhesive and not the force touch gasket itself!

    John -

  8. T5IFtANCaFRiUVYI
    T5IFtANCaFRiUVYI
    BK2wAaN2YsSvQ3Gd
    • Kantel het scherm op voorzichtige wijze helemaal achterover totdat je genoeg ruimte hebt om de batterij eruit te wrikken.

    • Probeer te voorkomen dat er druk of spanning op de schermkabels komt te staan als je het scherm naar achteren duwt.

    • Steek een openingsplectrum tussen de batterij en de trilmotor.

    • Een normale openingsplectrum werkt prima bij de 44 mm-versie van de Apple Watch Series 4. Echter, als je de 40 mm-versie hebt en je niet genoeg ruimte hebt, kun je je openingsplectrum met een schaar op maat knippen.

    If you are just replacing the screen then there is no need to remove battery.

    anonymous 1930 -

    When removing the screen I tore the two outer cables attached to the lcd screen. What are their purpose? I read somewhere they are just some sort of shield. Will my watch function normally without them?

    thanks

    Mike Bahlman -

  9. llONwk1nUgKFZnnM
    llONwk1nUgKFZnnM
    axbIaUl6OxxySNYE
    ZAn2JGQiaGGy5JBm
    • Schuif je openingsplectrum langs de zijkanten van de batterij om de lijm aldaar door te snijden.

    • De kleefstrip die de batterij op z'n plek houdt is zacht. Echter, als je moeite ervaart met het eruit wrikken van de batterij, dan kun je een verwarmde iOpener op de achterkant van de horloge leggen om de lijm nog meer te verzachten. Leg de iOpener gedurende minstens twee minuten op de horloge.

    • Gebruik een constante, stevige druk om de batterij langzaam omhoog te duwen en het van de lijm die het aan het system board verbindt te scheiden.

    • Houd wel rekening met de schermkabels en in het bijzonder de Force Touch-kabel, welke in een hoek over de batterij heen loopt. Zorg dat je deze kabels ten koste van alles niet beschadigt bij het omhoog en losduwen van de batterij.

    • Zorg dat je de batterij niet doorboort of in enige mate vervormt, aangezien een batterij in die gevallen in brand kan vliegen en/of kan exploderen.

    • Probeer de batterij nog niet volledig te verwijderen, aangezien deze nog steeds aan de horlogemodule vast zit.

  10. ALceSRAHdGngFTyL
    ALceSRAHdGngFTyL
    nAqFMHnFgCmFH5nS
    • Til de batterij voorzichtig omhoog en breng deze in een hoek van ongeveer 75°.

    • Gebruik een pincet om de zwarte sticker van het metalen plaatje, dat de batterijaansluiting beschermt, af te trekken.

    Nothing is said about replacing the black sticker over the connector. I set it aside and found its adhesive was good enough to stay in place and put it back on during reassembly.

    Dan Kelly -

  11. LKGMeHb4RbqTwZsm
    • Verwijder de Y000 schroef (1.2 mm lang).

  12. 6wAKJpuVmXmYqPWg
    6wAKJpuVmXmYqPWg
    MDQaLHLfD6B2TM4F
    • Gebruik een pincet om het metalen plaatje over de batterijaansluiting te verwijderen.

  13. 4GFQSOoiaEAYvpwO
    4GFQSOoiaEAYvpwO
    RYFJORynT6iX2hUQ
    • Gebruik de punt van een spudger om de flexkabel van de batterij omhoog te duwen en los te koppelen.

  14. rKtPysGpWHjSVRDm
    rKtPysGpWHjSVRDm
    bhPYhpOIvBFhOKsK
    • Verwijder de batterij.

    • Zorg dat je de beschermfolie op de batterij verwijdert zodat de lijm wordt blootgesteld, voordat je de batterij op z'n plek aanbrengt.

    • Herinstalleer nooit een beschadigde of vervormde batterij, aangezien dit tot een potentieel veiligheidsgevaar kan leiden.

    • Als je je oude batterij tijdens het weer in elkaar zetten van je toestel hergebruikt, kun je de bestaande kleefstrip ook hergebruiken. Als deze niet meer bruikbaar is, kun je de oude lijmresten verwijderen met isopropyl alcohol en een stuk doek om vervolgens een stuk dubbelzijdige tape (zoals Tesa 61395) of een vloeibare lijm (E6000) te gebruiken.

    When installing the new battery be aware that the sidewall of the watch directly above the contacts and cover screw hole is magnetized. This was shock to me and a little frustrating. Every time I attempted to place the cover with a tweezers it was pulled toward the sidewall. I pushed the plate in place with a spudger, then attached the screw to the tip of the screwdriver. I was then able to insert the screw with minimal disturbance to cover plate.

    mdhicksmdhicks -

  15. VSlgxaPJnhAPatmF
    VSlgxaPJnhAPatmF
    U2SBrHXsea6qnRJc
    • De zwarte folie die de schermaansluitingen beschermt is erg fragiel en kan makkelijk scheuren. Om de tape intact te houden terwijl je deze eraf trekt, is het noodzakelijk om hooggeconcentreerde isopropyl alcohol of een iOpener te gebruiken.

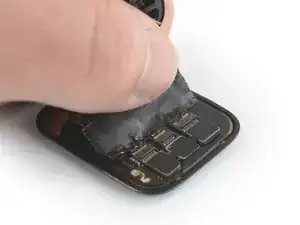
    • Dien wat hooggeconcentreerde isopropyl alcohol (>99%) toe op een wattenstaafje en breng deze aan op de kleeffolie. Laat deze gedurende twee minuten intrekken.

    • Als alternatief kun je een verwarmde iOpener gebruiken aan de bovenkant van het scherm om de lijm eronder te verzachten. Leg ook de iOpener gedurende twee minuten op je toestel.

  16. 5fqSJ2qekPSpVOqV
    • Gebruik een pincet om de tape die over de drie schermkabelaansluitingen zit, voorzichtig los te trekken.

  17. 16OXZKDugoxUvBdI
    16OXZKDugoxUvBdI
    22nZ4JLW5NcrmOwX
    psVHqZtqJnPAPF2p
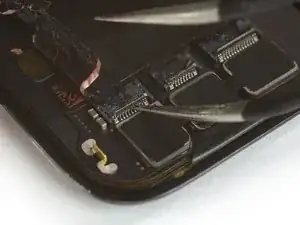
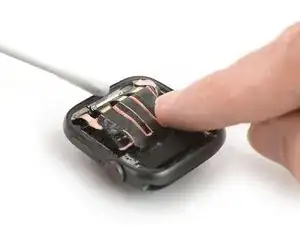
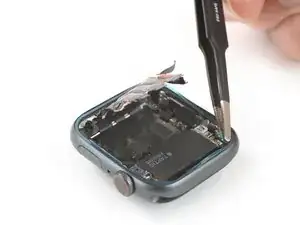
    • Gebruik een kant van een pincet om de drie ZIF-aansluitingen aan de achterzijde van het scherm voorzichtig open te klappen.

  18. wxOOPCPtjeSXReAo
    wxOOPCPtjeSXReAo
    j3bHnEM5aLPruGfb
    yIhZPmqXvLktGtJL
    • Gebruik een pincet met botte uiteindes om beide kanten van de zwarte folie, welke de kabel aan de achterkant van het scherm bevestigt, los te trekken,

    Be very careful not to damage the copper-colored ribbon cables at either end of the display flex cable. I found it impossible to remove the black foil without tearing these ribbons, and as my repair was ultimately unsuccessful, I have no doubt that this mistake was the cause of my failure. I wish this step had emphasized how difficult removing the foil could be. If you make the same mistake as I did, it will require advanced soldering to replace the display flex cable. That's a bridge too far for me with a 5+ year old watch, so it's off to the trash bin for it. Shame...

    John -

  19. JS4TcTrPwGxeZNCQ
    JS4TcTrPwGxeZNCQ
    dDBhLRGF5vHcjJmi
    g6aLYfetWPZqkjyP
    • Til de body van de horloge op en schuif een spudger op voorzichtige wijze onder de flexkabel van het scherm om daar de lijmresten los te maken.

    See my comment to step 18.

    John -

  20. VEAiBkCtQPiIuuJl
    VEAiBkCtQPiIuuJl
    WvPry21qcXaZNrQS
    EEjX5tmtTRy31BYg
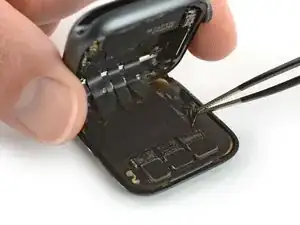
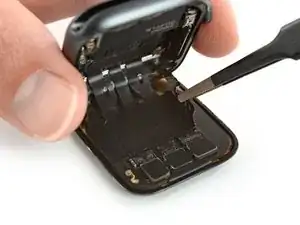
    • Trek de flexkabels van het scherm voorzichtig uit de ZIF-aansluitingen.

    • Zorg dat je de flexkabel van het scherm tijdens deze procedure vasthoudt en voorkom dat je enkel aan de body van het horloge trekt. In dat geval kan het zijn dat de schermkabel breekt.

    • Scheid de horlogemodule van het scherm.

  21. JIqN1mwITZJTpo2u
    JIqN1mwITZJTpo2u
    aLauwG5RPZCWDZJk
    DqR2kpKBghVWuFUO
    • De volgende stappen beschrijven hoe je de vervangende kleefstrip toedient voordat je je horloge weer in elkaar zet.

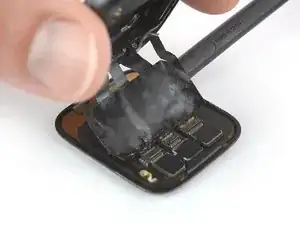
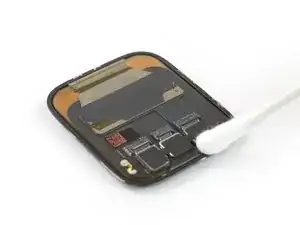
    • Breng een klein beetje hooggeconcentreerde isopropyl alcohol (>99%) aan op een wattenstaafje of gebruik een schoonmaakdoekje om de overgebleven lijm boven op de Force Touch-pakking te verwijderen.

  22. wjHjZuKQxVrev2sU
    • Gebruik een pincet om de vervangende kleefstrip met de blauwe folie van het papiertje af te halen.

  23. qvsOqOHrJqnhDN1U
    qvsOqOHrJqnhDN1U
    q64xXHyosZjdqZHE
    CxGHl2fDiQgVbFJi
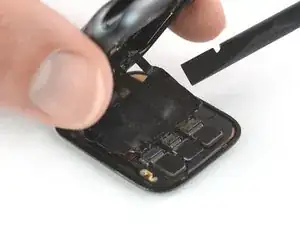
    • Houd de vervangende kleefstrip schuin om deze over de schermkabel heen te begeleiden.

    • Positioneer de vervangende kleefstrips bovenop de Force Touch-pakking.

  24. I3XFMgdUNkZQSPls
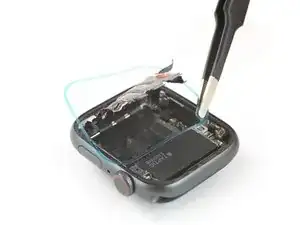
    • Gebruik de punt van een spudger om de laatste aanpassingen te maken qua positie en druk de kleefstrip daarna goed aan.

    Don’t remove the blue protective film until you’ve got the screen connected to the ribbon cables. You’ll almost guaranteed to need a third hand to get the ribbon cable back in. Don’t forget to flip up the connector locks on the case side and flip them back down after inserting the cable.

    anonymous 1930 -

Conclusie

Om je Apple Watch Series 4 weer in elkaar te zetten, volg je deze instructies in omgekeerde volgorde om dhet scherm en de batterij weer te bevestigen.

Breng je e-afval naar een R2 of e-Stewards gecertificeerde recycler.

Ging je reparatie niet zoals gepland? Check dan onze antwoordencommunity voor hulp bij het oplossen van je probleem.

Dominik Schnabelrauch

Lid sinds: 23/11/16

236585 Reputatie

17 commentaren

Do not buy does not come with all the pieces needed to make the screen repair all the connections are not possible

jachs780 -

Can you tell me what the black adhesive tape with flex ends that covers the flex ribbons is used for and can it be replaced ?

Sheila Blackwell -

That is for shielding and grounding purposes. If you get a spare you can of course replace it. But be careful not to damage the display cables.

Tobias Isakeit -

Sheila, this you can purchase on Aliexpress. i tried to get it elsewhere, seems noone else stocks it. cost approx $10. i found it here: https://www.aliexpress.com/item/10050019...

palokiller -

I have replaced an original screen from another apple watch and everything seems to have gone well. But when I try to pair with the iphone it doesn't succeed. Is it because I didn't put the NFC chip from the original apple watch? What can be?.

It is an apple watch series 4 44 mm + cellular.

Thank you very much.

ihsack -

I would like to change the screen of my smart watch series 4. Could you tell me all the tools I need? Will the battery I have stop working? Thank you.

Asiel AD -

Do you have to replace the black flex ribbons when preparing the apple watch or can you leave them out?

Meghan McNeely -

Very difficult repair, indeed. Be very careful about the side wires, they can be very easily be cut when opening the screen. I just hope having a contact supper to supper will be enough… Response in some hours.

This tutorial could be completed with an advice about how to bring the screen wires back to their connectors. That was the most difficult part for me. I was afraid to cut or destroy them.

Concerning the parts, I found the adhesive ring very thick compare to the adhesive I had to remove. What I had as parts did not correspond to what was shown in the repair tutorial. The watch is getting pressed now so I can’t judge if the adhesive is ok or too thick.

It was also very difficult to separate to only get the ring.

Anyway, thanks for this tutorial. Without it, impossible to repair the first time.

panazyde -

Sorry for replying after such a long time: I have cut the smaller side wires (both, I'm very proud of myself ;) ), did you have any problems using the watch with such wires cut? It seems very difficult to find replacement parts for such components.

matbottin -

Replaced screen and testing before closing everything back up. Screen comes on, but it doesn’t respond to touch. Is this due to a cable not connecting properly, or is this a bad screen? Comes on and looks great, but not touch responsive. -dw

Andrew -

Hi Andrew, yes, there might be a cable not sitting correctly in its connector. Those tiny cables are hard to handle and need to be inserted all the way in their connectors. Hopefully that solves the issue.

Tobias Isakeit -

Quick question: the two wire cables at the sides of the black foil (Step 18) are of any use? I have broken mine (both) while opening the watch, and I am wondering if I have to throw everything in the garbage (I was replacing the battery) or I can still use the watch after battery replacement (I have to order the battery yet)

matbottin -

Pareil les 3 connecteurs impeccable mais un des deux stickers aux extrémités s'est cassé ... Est-ce pour cela que ma montre ne s'allume pas ?

Baptiste LUCK -

Bonjour, j'ai respecté toutes les étapes une par une ... Et rien ne se passe dans ma montre ... Montre non utilisée pendant plus d'un an du coup j'ai choisi de changer la batterie ... Rien de plus ... La montre "chauffe" donc la charge semble fonctionner mais l'écran est noir et aucun éclair ou autre a l'écran ^^

Baptiste LUCK -

Are there any news on Apple Pay function after replacing the screen? As I can remember at some time there was a disclaimer at this guide that there is currently no easy fix to get NFC and Apple Pay working after replacement. I thought if only changing the screen it's 100% not working but now it sounds like it could succeed or not. Is that right?

Albert -

We haven’t tested it recently. So all we can say is in the introduction:
"Replacing the display can cause issues with Apple Pay. If possible, to reduce the likelihood of problems, delete all your Apple Pay account info before the replacement, and then re-enter it with the new display installed."

Tobias Isakeit -

Oh boy I'm not exited for this repair... Hopefully it goes well...

Crosby Grim -