Inleiding

Let op: verwijder altijd eerst de stekker uit het stopcontact voordat je gaat demonteren.

Dit zijn de video's die me hebben geholpen tijdens de vier demontages die ik om verschillende redenen heb uitgevoerd en die ik je aanraad te bekijken samen met de aantekeningen die ik op basis van mijn ervaring in deze gids heb geschreven.

https://www.youtube.com/watch?v=caAoilie...

https://www.youtube.com/watch?v=QCPoPBZh...

  1. GWEYMCtTUIpwBLsn
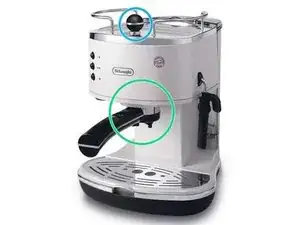
    • Verwijder de zeef (groene markering) voordat je met de reparatie begint. Trek de stoomknop (blauwe markering) stevig omhoog

    • Trek de stekker uit het stopcontact en plaats het apparaat op een werkoppervlak dat beschermd is met doeken, aangezien er wat water uit zal lopen tijdens het demonteren.

  2. gfIBxCXOrGG5NUGu
    gfIBxCXOrGG5NUGu
    WJLIKEhvbTF3PS1U
    OepO1JXAE5RXsnUx
    • (Blik op de achterzijde) Wanneer het transparante waterreservoir is verwijderd, kunnen de twee onderste schroeven (groene markering) worden losgedraaid. Verwijder ook de twee bovenste schroeven (rode markering) zodat u later het metalen deksel aan de bovenkant kunt verwijderen.

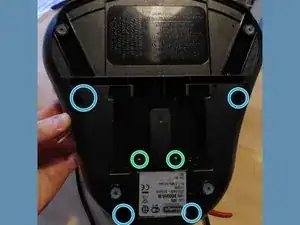
    • (Blik op de bodem) Verwijder de vier schroeven met zeskantkop (lichtblauwe markering) en de twee kruiskopschroeven (groene markering) van de grondplaat.

    • Verwijder de zwarte bodemplaat. Verwijder de plastic slangen (donkerblauwe markering) van de watertank naar het verwarmingselement.

    the blue ones are T20, 5the other 2 are phillips.

    robthebrew -

  3. sxZSOwtOqLWDM5DD
    sxZSOwtOqLWDM5DD
    KATyZBrU3fcSnaQb
    DTEHKZLZJZkbyDaU
    • De bovenkap kan nu worden verwijderd. Draai de drie schroeven aan de onderkant los. (groene markering)

    • Verwijder het metalen filterrooster. (oranje markering)

    • Verwijder de klep van het waterreservoir met een platte schroevendraaier. (gele markering) Als je alleen dit onderdeel wilt verwijderen, hoef je de bodemplaat niet te verwijderen.

    They are phillips and there are 5 not 3.

    robthebrew -

  4. Y6wkOMoubDNLmhDV
    • Leg de bovenklep opzij en verwijder de stekker uit de groen/gele kabel. (groene markering)

    • Draai de schroef los (paarse markering) zodat je het bedieningspaneel (inschakel-, koffie-, stoomknop) kunt verwijderen.

    • Trek de metalen klemmen los (gele markering) en maak de harde plastic slang los die van het waterreservoir naar het verwarmingselement loopt.

    • Open ook de metalen slangklemmen (donkerblauwe markering) op de zachte plastic slang tussen het verwarmingselement en de stoomuitlaat (rechts). Duw ze op de slang en trek de slang los.

  5. WDbiyb5mYrBMKFiQ
    WDbiyb5mYrBMKFiQ
    BXWsOiQBbinxBxbE
    3sFO5YwvuJYFxUtr
    • Draai de vier schroeven (rood gemarkeerd) los waarmee het verwarmingselement vastzit.

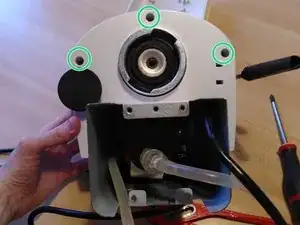
    • Vervolgens kun je ook de vier inbusschroeven in de vier hoeken van het verwarmingselement losdraaien. (paarse markering) Deze stap is nodig als je kalk in het verwarmingselement wilt verwijderen.

    Was für einen Schrsubenxieher brauch ich ? Ich bekomme die Schreiben nicht auf

    A. BEKR -

    @abekr Rote Markierung: Kreuzschlitzschrauben. Violette Markierung: wahrscheinlich Inbus (Allen Key) @voobee Can you help?

    VauWeh -

    The purple ones are hexagonal, so you should use the Allen keys of the proper size as @vauweh suggested.

    VooBee -

  6. n5qfYqIVElXHUWKZ
    n5qfYqIVElXHUWKZ
    OMRUobDfqhQ1TENT
    • Als het verwarmingselement open is, kunt u defecte onderdelen vervangen: het onderste gedeelte (rode pijl), de afdichting (oranje pijl), het bovenste gedeelte (gele pijl).

    We’ll written. I got as far as the internals removal before finding this and reassembled. Thanks, will have another go following your excellent procedure.

    Norman -

    Vielen Dank für die Beschreibung.

    Ich habe eine Frage zum Erhitzer: Ich möchte die Wasserzufuhr und die Dichtung im Erhitzer tauschen. Ich habe alle Schritte befolgt, bekomme den Behälter jedoch nicht geöffnet, um die Teile auszutauschen.

    Kann es sein, dass er stark verkalkt ist, oder muss ich noch etwas lösen – obwohl ich eigentlich nichts mehr sehe, was ich noch lösen könnte?

    Vielen Dank für die Unterstützung!

    Kiddylen -

    Thank you for the instructions.

    I have a question about the heater: I want to replace the water supply and the gasket inside the heater. I have followed all the steps, but I can't open the container to replace the parts.

    Could it be that it is heavily calcified, or is there something else I need to loosen – even though I don’t see anything left to unscrew?

    Thank you for your support!

    Kiddylen -

Conclusie

Voer de stappen in omgekeerde volgorde uit om het apparaat weer in elkaar te zetten.

VooBee

Lid sinds: 18/03/20

574 Reputatie

16 commentaren

Great, clear instructions and easy to follow. I've been looking to into this machine, and tons of scale in the boiler. works fine now! Cheers

Charlie & Donna Ryan -

Muss man vor dem zerlegen eig den (wenn vorhanden) Boiler oder Erhitzer entleeren, dass kein restwasser entweicht beim auf-den-Kopf-stellen? Wenn ja, wie geht das? Danke schon mal für den obigen, ausführlichen Bericht!

Longisher -

Hi, I think you can empty the boiler (the one depicted in step 6) before disassemblying the coffee machine. Just try to remove the water container (the one on the back of the machine) and try to "make a coffee". The machine should try to empty the residual water in the tubes, but probably some water will remain inside the boiler.

Either way you can open the boiler (step 6) on a sink so that the residual water won't wet your working space.

VooBee -

Guten Tag, wie bekommt man das Ventil aus der Maschine um es auszutauschen? Ich bekomme es einfach nicht hin. Muss dafür der Erhitzer ausgebaut werden?

Kimberley M. -

Hello,

if you are referring to the valve in step 3 - yellow circle - you can remove it with a flat screwdriver but it's not necessary if you don't need to replace that specific valve.

VooBee -

leider greift der torx scglüssel nicht für die Bodenplattenschrauben. Hat jemand einen Tipp???

Ute Lübbe -

Hello,

if you are referring to the hexagonal screws in step 2: yes, they are the worst! I had to drill one of those to push it so that it broke the small plastic base on which it stood. Of course you can't do it to all the 4 screws or you will have a non stable base!

VooBee -

Passen Inbusschlüssel?

Do Allen keys fit?

VauWeh -

Hi, vielen Dank für die sehr gute Anleitung. Hat alles so Step by Step funktioniert. Ich habe den Assy Boiler (fully) ausgetauscht. Ich habe nur leider ein Problem und kann den Grund nicht finden: nach dem Zusammenbau läuft das Wasser nicht unten durch das Sieb in die Tasse, sondern das Wasser kommt irgendwo oben heraus. Habe die Maschine schon zweimal auseinander und wieder zusammen gebaut, immer wieder das gleiche Problem. Vielen Dank für einen Tipp, was ich ggf. falsch gemacht habe.

Arnd -

Hi. The only thing I can think of are those metal clips that tighten the water pipes (step 4, blue circle). Did you put them back on? Are they loose?

VooBee -

Thanks so much. It is so clear, I followed the steps and succeeded in doing a good job for my machine, but unfortunately, I did not succeed in getting the wires back in their proper location. Can anybody help? jak.jak45@yahoo.com

Jaky Polyn -

Hi, step 4 and 5 shows the right way the electrical wires are connected, but the only electrical wire I removed is the yellow/green one (ground).

Did you remove any other electrical wire?

VooBee -

Hi. I’ve recently used your excellent guide to replace a pump in a De’Longhi Icona machine. I got stuck at step 4 removing the keypad module. On my UK machine (ECOV310.AZ) there are two screws, not one. Otherwise, an excellent guide. Thank you.

Grytr

Grytr -

Welchen Schraubenzieher brauche ich denn ?

A. BEKR -

Hi, in the descriptions I wrote the type of screws I found: cross (Philips) and hexagonal (Allen).

I don't remember the exact size for each of the screws, but I used only one Philips screwdriver and one Allen key.

VooBee -

Thank you so much for your tutorial. Very well organized and helpful. I was sble to replace the OPV and get my crema back. Belisimo!

Eliezer Pinchovski -