Inleiding

Wat fijn je weer te zien! Vandaag gaan we de Jura Impressa A9 – je bekroonde machine voor je favoriete kopje koffie – uit elkaar halen.

Wat is er vervelender dan op kantoor aankomen en je verheugen op een lekkere latte macchiato doppio, maar dan zien dat de machine niet maalt of zet, of er niet in slaagt de melk goed te stomen? Tijd om je laatste caffeïnereserves op te roepen en die bron van ochtendscherpte te repareren. Het is slooptijd!

Waar gaat het over? Ontdek het door ons te volgen op Facebook, en zorg ervoor dat je ons op de hoogte houdt door jouw laatste reparatieverhalen te delen op Instagram en [https://twitter.com/iFixit|Twitter.

  1. AjStPK2ecHZfEYlt
    AjStPK2ecHZfEYlt
    oKZ1ayydRGYgidtT
    • Deze machine maakt koffie met één druk op de knop het scherm. Hier zijn enkele hoogtepunten rechtstreeks van Jura:

    • Touchscreen-scherm

    • Twaalf soorten koffie

    • Bonenmaler met hoog rendement.

    • In hoogte verstelbare dubbele uitloop met fijnschuimtechnologie

    I used this guide on an Jura Impressa A1 for a repair and I’ll post more comments below. Thanks for the nice guide!

    Ben Berman -

    Dear fellow Jura lovers ,

    Your Teardown article was very helpful exactly at the time I needed guidance with my wonderful Jura , thanks

    Gabriel Steinfeld -

  2. ZLhTCgVyBR3MI1TM
    ZLhTCgVyBR3MI1TM
    pQkpGSTHfE4fx24m
    • Als eerste beginnen we met de basisonderdelen die door de gebruiker vervangen kunnen worden.

    • Het verwijderen van de lekbak aan de voorkant en het waterreservoir aan de achterkant is een makkie.

    • Dit kun je waarschijnlijk al half slapend doen, zelfs voordat je 's ochtends je eerste kopje drinkt.

  3. PEDUeZqMfPZ4ZQb4
    PEDUeZqMfPZ4ZQb4
    IAOZnHZ5B1IIDZcj
    GCKgNxtWY1KFxWPH
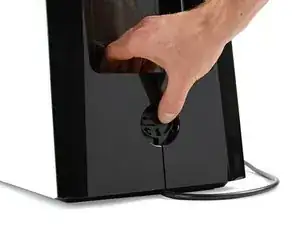
    • Vervolgens verwijderen we aan de achterzijde het embleemplaatje (gebruik eventueel een zuignap) van de Jura door de knop een klein stukje tegen de klok in te draaien en dan zitten we ineens in een een lastige situatie..

    • Deze ovale schroef is niet uniek, maar zeker een zeldzaamheid. We moesten onze 64 Bit en Macro Bitset doorspitten voordat we de juiste ovale bit vonden in onze universele bitset. Als je alleen de ovale bit nodig hebt, dan vind je die hier.

    • We waren voorbereid op een dergelijk obstakel deze keer, maar als we weer op veiligheidsschroeven stuiten (waar een eenvoudige kruiskop zou volstaan) is dat altijd frustrerend.

    • Nu de veiligheidsschroef is verwijderd, schuiven we de vergrendeling van de zijpanelen omhoog en gaan we verder.

    I have A9 P.E.P. The Jura cover plate is flush. I can’ t grasp it enough (even with rubber gloves) to twist it. Afraid it will break if I pry it. How do I proceed?

    Bob -

    Use two strips of sticky tape, align horizontally. Stick one at location of 12 o'clock on the face of Jura cover, and another one at 6 o'clock, in a way that you have extra length on each strips to pull the strips horizontally to spin the Jura cover counterclockwise.

    Just one pull and the cover is released.

    Will C -

    There are very small slots located in the outermost ring of the Jura logo. You can put an electronics-sized flat head screwdriver into the slot hole and use that for leverage to rotate counterclockwise. Then, after removing the oval screw with an oval bit key, pull very firmly upwards on the horizontal plastic ledge inside the revealed plastic circle to “unlock” this back clip.

    Ben Berman -

  4. l2CCxYuSETPA1HJA
    l2CCxYuSETPA1HJA
    yGgxULQP2BVUbPwi
    • Zelfs met de vergrendeling los, willen de zijpanelen niet bewegen, dus we richten nu eerst onze aandacht op de bovenkant van de behuizing voor meer aanwijzingen.

    • Onze slanke en stevige Jimmy is het gereedschap bij uitstek om het mechanisme dat aan beide zijden onder de afdekplaat zit aan te pakken.

    If you just plan on doing a repair inside, you need access to the screws hidden by this panel, but you do not have to remove the electronics.

    Ben Berman -

    To release the right side I slipped a thin screw driver in where the picture shows the jimmy, and pressed a release toward the middle. Then I repeated for the left side. After both sides are released slide the panel rearward to lift it up.

    Mikhail Banovich -

  5. f3VdEauOwuMEithY
    f3VdEauOwuMEithY
    c4dbsMvcuVdkKIOT
    QS4eHSZjs51fG42I
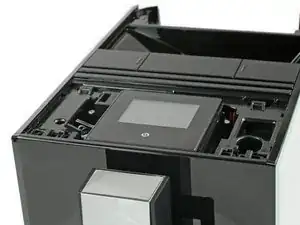
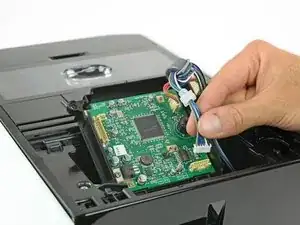
    • Laten we even een korte pauze nemen om het scherm te bekijken, dat een soort servicepoort lijkt te hebben om informatie te verzamelen in geval van een storing.

    • We draaien hem om, draaien twee kleine kruiskopschroeven los en ontdekken het brein van dit stukje moderne koffietechnologie:

    • Renesas R5S72660W144FP 32-bit microcontroller

    • Macronix MX25L12835F 128Mb serieel multi-I/O NOR-flashgeheugen

    • Unisonic Technology MC34063A DC-DC-omvormer

    • STMicro-electronics L7805CV 1,5A spanningsregelaar

    • Oscillator

    Microphone? Are you sure it's a microphone? Looks like oscillator to me.

    netaroblackmage -

    Thanks, we fixed it!

    Jasper Fleischhauer -

    The microcontroller inside is a Renesas R5S72660W144FP#V0 I bet -- this is based on a SH2A SuperH RISC core. Bit of an oddball part, but it certainly has more than enough heft for controlling a coffee machine. Product folder: https://www.renesas.com/en-us/products/m...

    ThreePhaseEel -

    What kind of touch panel does it use?

    Andrey -

  6. acRIcPGUPTVXhlEU
    acRIcPGUPTVXhlEU
    EefiajpwMJXWnosP
    CpahXtI3FLtBBfIp
    • Nu hoeven we alleen nog maar de machine vast te pakken, de bovenste vergrendeling los te maken, de onderste vergrendeling los te maken en het zijpaneel naar achteren te schuiven. Toch?

    • Ondanks al het gepor, gewrik, het doen van de hokey pokey en het gedraai om onze as, weigert het paneel te bewegen.

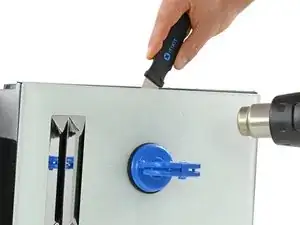
    • Omdat we weinig opties hebben, halen we het grote geschut tevoorschijn om ons een weg naar binnen te banen.

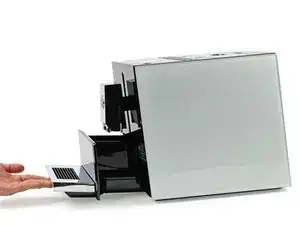
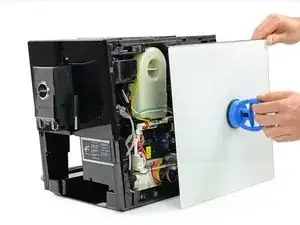
    • Met de juiste toepassing van warmte en kracht slagen we er uiteindelijk in om het glazen paneel van de machine af te duwen. De glazen zijpanelen zitten nl. met dubbelzijdige tape vast aan het zijpaneel wat zich eronder bevindt, zie foto 3.

    Which way should I be pulling? Got this far but this panel will not come off

    benfreeman -

    This teardown is not a guide (just to clear things up ;) That being said, pulling towards the back will release the side. Take a look at the next step to get an idea of the procedure. It is not easy but with four hands a some patience I think you can do it. If this won’t work, you might want to try the same way we went with the first side (heat gun/hair dryer to loosen the glue and get the glass front off to see the latches).

    Tobias Isakeit -

    The “official” way is not to disengage the glasspanel. As you can see in step 7 the panel is held by two locks. It´s really difficult, but you can open them using a very long screwdriver. Lay the device on one side, there are openings on the bottom in which you can insert the scrwedriver and hopefully find the two locks…

    VauWeh -

    Remove the screws on top of the water reservoir. To get to these two locks, look for two small openings on the bottom and the top of the unit along the edge of the side panels. These holes are located closer to the front of the device. If you look through them on a piano white unit, you’ll see white ABS plastic tabs. These can be disengaged easily with a long screwdriver, I used a long Allen wrench. Then, as Tobias mentioned, pull towards the back. You will notice this piece starting to give much easier as soon as you disengage one of the two tabs. There also appears to be a plastic pull-away anchor that is normally under the control panel’s plastic U frame which may or may not play a role in removing the side panel.

    Ben Berman -

    Be aware that you also need to remove 2 torx screws that are located at the back of the machine (topside) near the water reservoir.

    30 april 2020 - Gerben Landman

    g landman -

  7. 5URFqAfkBXLd2I1c
    5URFqAfkBXLd2I1c
    2KoBcNKlvwJcs6Mb
    SuPaBSPXH1QcfYmR
    • Nu het glazen paneel dat voor het clip-in mechanisme zat weg is, kunnen we precies zien waar we ons op moeten richten.

    • De tweede keer loont onze inspanning wel... voilà, het zijpaneel is eraf!

    • Geen drama meer met een hittepistool aan de andere kant. We kunnen dit gerust toevoegen aan de lijst van demontagevaardigheden die we onder de knie hebben.

  8. plPBVVfcOA3gDy4d
    plPBVVfcOA3gDy4d
    sQpxLa2dpLkXsWFb
    oQGuRXiU3TTIruJo
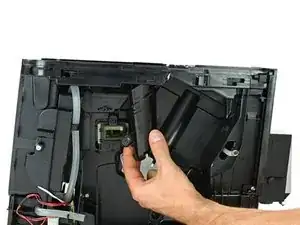
    • Na al dit gedoe vinden we tot onze opluchting een handvol Torx-schroeven waarmee de brouwmodule aan de linkerkant van de machine is vastgezet.

    Bonjour,

    J'ai une Jura A5 qui a la même architecture mise à part les parroies latérales en aluminium et le pupitre de commande à boutons.

    À cette étape numéro 8, contrairement à ce que vous citez, ce n’est pas le broyeur mais l'ensemble presseur de café / chambre d'infusion.

    D'ailleurs, cet ensemble est démontable pour nettoyage et changement des joints… il y a quelques sous ensembles à l'intérieur.

    Ma machine remplissait systématiquement le bac à Marc d'eau, et les quantité de liquide se voyaient à la baisse dans les tasses. Un nettoyage intégral après 3 ans d'utilisation n'étant pas un luxe…

    Les dépôts de Marc se collent partout et ont un peu de mal à s'evacuer. Du coup l'étanchéité au niveau de la chambre d'infusion est altérée par ces dépôts et ne permettent plus un bon fonctionnement.

    David Roch -

    Bonjour David  :) Merci beaucoup pour votre remarque. Vous avez entièrement raison. J’ai donc corrigé en utilisant le terme infuseur qui permet de rester fidèle à la longueur du texte d’origine. La prochaine fois, n’hésitez pas à corriger vous-même le texte en cliquant sur Traduire, en haut à droite de l’étape. J’espère que vous avez pu et démonté et nettoyé votre machine avec succès. Encore merci pour les yeux de lynx et bonnes réparations ! Claire

    Claire Miesch -

    These are the first screws that use a finer twist than all the other parts in the machine, so take care not to mix them up with anything else. This part kind of works like an electric Aeropress - the long column-shaped small diameter gear on the brew group connects flush with the primary motor inside the Jura, a motor that pushes water through the grounds. You’ll observe the coffee grounds bowl will shift into a “drop into basket” position as you rotate the column and cause the coffee press to assume different positions. There’s a small plastic frame near the water flush you will also pull out. Otherwise it is pretty safe to handle.

    Ben Berman -

  9. YUZ6Yf2Hid4SydWT
    YUZ6Yf2Hid4SydWT
    XLnEJUS1ovsYKINf
    K5TKopq4NNL4sgWV
    • Nadat we eerst het brein achter het scherm hebben gevonden, is dit meer het hart van de machine, dat elk onderdeel van stroom voorziet.

    • Na het loskoppelen van een aantal kleurrijke connectoren en het verwijderen van drie Torx-schroeven, kunnen we deze printplaat demonteren.

    • Het zal een uitdaging zijn om die er weer in de juiste volgorde op te krijgen, dus nemen we een vooraf een foto.

    • STMicro-electronics L7805CV 1,5A/5V regelaar

    • ON Semiconductor (voorheen Fairchild Semiconductor) MOC3062M optocoupler voor de triacs

    I think you should highlight the brand names of capacitors and relays too, as well as other power components. These are often the parts that determine the quality and longevity of the finished product.

    In this here coffee machine the relays are Matsushita (Panasonic) - a quality brand

    The capacitors though are Su'scon - a typical no-name brand of questionable quality with some reports of them failng.

    Køøl Düderino -

  10. 4lWLbdfc4utADLnQ
    4lWLbdfc4utADLnQ
    uulKF3fOySk6r1Ly
    VTp6FVMRnrIVMsoS
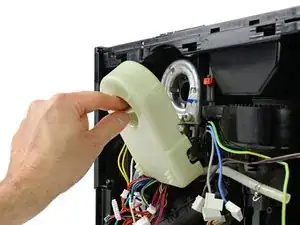
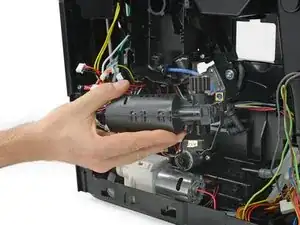
    • Vervolgens richten we ons op de pomp. Na het openen van de metalen klem maken we de slang los die van de pomp naar het thermoblok loopt.

    • De slang aan de onderkant kan eenvoudig met de hand worden losgetrokken wanneer de module wordt verwijderd.

    Comment se nomme la piece au dessus de la pompe et alimentant en eau le thermobloc? Merci

    christophe.ozaine -

  11. jevkvHxLSLaCkP4D
    jevkvHxLSLaCkP4D
    pSIJtGErPxhrMokT
    QWN3WgIQb1JrAiiU
    • We gaan rustig verder en verwijderen het deksel van het thermoblok dat vastzit met kleine plastic klemmen.

    • Het thermoblok zelf kan worden verwijderd door het tegen de klok in te draaien. Er zitten geen schroeven in dit kleine thermoblok.

  12. e55QpFFTh5yNI2VU
    e55QpFFTh5yNI2VU
    FTKEXpEFJ1R2kOeP
    dY5Rcvnc5XRFRPfB
    • Hoewel het de bedoeling is dat we de maalmolen gaan verwijderen, moeten we eerst even de andere kant van de machine bekijken.

    • Hier verwijderen we de poedergoot voor voorgemalen koffie, evenals de trechter en de geleidebuis voor de poedergoot.

  13. o1ungIoyBOTISRgi
    o1ungIoyBOTISRgi
    VE1DymP6PfkcLYW3
    • Dit onthult een klein plastic frame dat omhoog moet worden bewogen om de molen te ontgrendelen.

    Observe how the motor is positioned here with a void where the brew group’s gear column goes. You’ll want to make sure the brew group is seated as deep and neatly into this column void as possible when you put it back in. Put the screws into the brew group’s four holes first before putting it in.

    Ben Berman -

  14. oIAR2BRQ1mUvICwC
    oIAR2BRQ1mUvICwC
    MjNfGt16UtareTSt
    gKjLNuYBSqU51mX3
    • Terug naar de andere kant van de machine, waar we een pennetje en drie Torx-schroeven verwijderen zodat de molen eruit komt zetten.

    There is a 90c heat sensing fuse the back side of the grinder. Where does it go please when replacing the grinder?

    Dave Sky -

  15. JF3faoiCtY2yAEXC
    JF3faoiCtY2yAEXC
    S5VaGkMExKOWoSY5
    • De aandrijfmotor inclusief de encoder zit vast met slechts twee Torx-schroeven.

    Another component that often leads to failure if it is of low quality - the motors. It would be cool if you showed the make and model of all motors. Especially the gear motor and grinder motor which are the most prone to failure.

    The ceramic valve uses a mabuchi (Japan) RS-545SH-18150 motor with carbon brushes - A good product from a quality brand

    The drainage motor is a Saia (Switzerland) stepper motor

    Køøl Düderino -

  16. QJpJITn2XXoIOOT1
    QJpJITn2XXoIOOT1
    PeroUFZKHZ1nRhAA
    • De aansluiting van de afwateringsmotor kan gemakkelijk worden losgekoppeld. Maak nog twee Torx-schroeven los en de motor is vrij.

  17. RWSE3nGt1HQKKsFi
    RWSE3nGt1HQKKsFi
    Vf6PBfvQXVpD4TrB
    fPv3jDMOXNbjsXLb
    • De keramische klep is iets lastiger te verwijderen. We moeten een paar kleine buisjes en twee schroeven aan de onderkant verwijderen, waar we ook met een paar plastic inkepingen moeten dealen om hem er uiteindelijk uit te kunnen schuiven.

  18. LoIuPXAEmVmiXncr
    LoIuPXAEmVmiXncr
    TXAeiSWCykaIGMHs
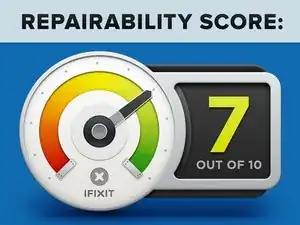
    • Met het grootste deel van de modules verspreid over onze slooptafel, zijn de overgebleven ingewanden niet meer dan een paar slangen en leidingen. Wij hebben een kop koffie verdiend en de Impressa A9 een repareerbaarheidsscore van 7 uit 10 (10 is het makkelijkst te repareren).

    • Het koffiezetapparaat bestaat uit modulaire onderdelen die afzonderlijk kunnen worden onderhouden. Alle schroeven binnenin zijn standaard Torx-schroeven.

    • Er zijn geen lijm (behalve bij de zijpanelen) of eenrichtingsklemmen gebruikt in de machine. De zijpanelen met hun glazen voorkant en kleine, onzichtbare haakjes vormen echter een grote belemmering (zelfs bevoegde technici kunnen hier moeite mee hebben).

    • De ovale schroef achter het logoplaatje is een schroef te veel. Het enige doel ervan is om mensen af te schrikken en uit de machine te houden.

    • Er is geen officiële documentatie voor reparaties van interne onderdelen.

Tobias Isakeit

Lid sinds: 31/03/14

125811 Reputatie

14 commentaren

I agree that its an oscillator / clock. The X1 screen printed on the PCB next to the item outlined in green, usually denotes X for Xtal (Crystal)

Geo -

Thanks, we fixed it!

Jasper Fleischhauer -

Amazing work, but I have the Jura ena9 model. Is it a similar rigmarole?

Helen Price -

Vielen Dank für die sehr schöne und detailierte Beschreibung. Sie hat mit heute sehr dabei geholfen, die Brüheinheit auszubauen und zu reinigen.Im Wesentlichen, ihr überhaupt durch die Seitenwände 'auf die Pelle zu rücken'. Hätte ich ohne die Anleitung wohl nicht geschafft bzw. gewagt!!!

Bernd Gröhbühl -

Hallo Bernd,

freut uns zu hören, dass dir der Teardown helfen konnte.

Tobias Isakeit -

Hallo und Danke auch für diese Anweisung.

Ein wertvoller Tip wäre die Seitendeckel von vorne nach hinten wegschieben,

dies geht aber sehr schwer - also vorne an der Kante flach ein Stück Holz anlegen und mit einem Hammer nach hinten klopfen.

Das klappt dann wunderbar.

LG und viel Spaß

Joe Shorty -

Amazing. thank you for the breakdown! My Jura Impressa A9 shuts off in the middle of a cup. The first time it happened I though I had tripped a breaker. Now it seems, I can make one cup but after that all attempts to use the machine results in it turning off. Not sure what part needs to be replaced or where to purchase it. Please advise

Thanks!

Seth

seth -

Mine was dispensing about 1/2 the requested coffee, and the other half in the drain. Milk and hot water seemed fine, so I thought there was a clogged coffee hose. This was after a dormant month (and it's in the tropics, where all machinery left sitting dies quickly). Within a week after my return, it went from 1/2 expected to zero coffee output.


Upon disassembly [thank you for these great instructions! ... I found another video that helped get the sides off: https://www.youtube.com/watch?v=fiy17KTY... which shows a ENA Micro, similar to an A9], there were no lines squirting coffee, nothing obviously plugged.


I ran the rinse cycle repeatedly looking. Best I could tell, the brew unit, when dispensing the puck, also released the water that wasn't coming out.

I also noticed that the hot water was "spitting" too, although seemed to dispense the correct amount.

I removed the hose above the pump, and started a rinse cycle, and it spit out there too: so am assuming it's the pump: 1/2 price unit at Amazon.

Chris Worley -

Corrections to the above: the pump was definitely an issue, but the brew group seems to be the main reason why it's only dispensing approximately half expected coffee beverages. In the YouTube video I mentioned above, he says "the brew group is the source for most problems".

Rebuilding the brew group is covered here: https://www.youtube.com/watch?v=m1DJ1dzH...

... the rebuild kit is about $20. I found a rebuilt brew group for $100 on EBay.

Chris Worley -

perhaps the power button micro switch?

https://www.jura-parts.com/Jura-A-C-E-D-...

Where is that exactly? I didn’t notice it in the video or on the teardown table

Thanks!

seth -

Nice tear down guide. Looks like good explanations and photos. But where is the service manual? This is alluded to at the beginning, but there isn’t a link.

Lisa W -

Hello Lisa, thanks for pointing that out. Unfortunately we don’t have repair guides available for this device. The note at the beginning should read differently. I’ll forward your input.

Tobias Isakeit -

Is there a coffee counter in the a9?

Ben Kayfetz -

Gentlemen, your pictures and narrative are great, but could you be more specific regarding how to work the side-panel clips in steps 6 and 7? It seems no matter if the top clip is pushed or pulled nothing wants to move.

Neil Ahle -