
Inleiding
Als je Switch Pro Controller D-Pad te gevoelig is en onbedoelde richtingsaanslagen veroorzaakt, is dit de gids die je kunt volgen!
-
-
De linker en rechter handgreepschroeven worden op hun plaats gehouden met elk één J00-schroef. Nadat de schroef is verwijderd, schuift de handgreep er recht af.
-
-
-
Verwijder de vier J00-schroeven die de achterplaat op zijn plaats houden.
-
Zodra deze zijn verwijderd, komt de achterplaat met weinig tot geen kracht omhoog.
-
-
-
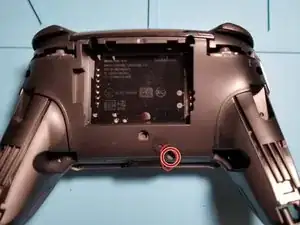
Verwijder een extra J00-schroef.
-
Verwijder nog eens vier J00-schroeven. De twee in het batterijcompartiment zijn heel gemakkelijk te missen!
-
Een close-up van de randschroeven (ook heel gemakkelijk te missen!).
-
-
-
Gebruik wrikgereedschap of je vingernagel om de twee helften van de controller voorzichtig uit elkaar te trekken. Pas op voor de lintkabel die de twee kaarten verbindt!
-
Dit is een ZIF-connector. Het zwarte lipje op de connector komt recht omhoog, zodat je de kabel voorzichtig recht uit het slot kunt trekken. Ik heb met de stuurknuppels de kabel van het bord verwijderd.
-
-
-
Koppel de lintkabel los die de printplaat met de controllerkaart verbindt.
-
Verwijder daarna de twee zwarte J00-schroeven waarmee de plaat op de printplaat is bevestigd.
-
-
-
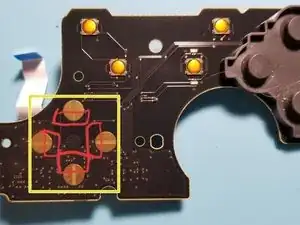
Voila! Hier zijn de D-Pad-aanraaksensoren. Ik heb het gebied dat je gaat bedekken rood omlijnd.
-
Gebruik tape (ik raad zwarte isolatietape aan, maar anderen hebben gezegd dat het werkt met doorzichtige scotch- of verpakkingstape, houd er rekening mee dat deze na een tijdje omhoog kan trekken en ervoor kan zorgen dat knoppen blijven plakken!), bedek de gemarkeerde gebieden. Dit vermindert echt het per ongeluk indrukken van knoppen.
-
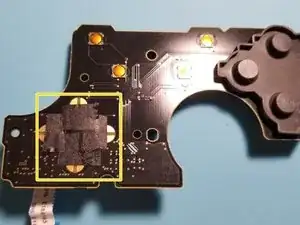
Na wat testen heb ik de tape op de bovenste en onderste touch-connectoren aangebracht. Dit resulteerde in de soepelste bediening met de minste onbedoelde druk op de knop. Zorg er altijd voor dat je het apparaat eerst test (en zorg ervoor dat je het prettig vindt!) voordat je het weer in elkaar zetten voltooid.
-


Om je (dure) controller weer in elkaar te zetten, volg je eenvoudigweg deze instructies in omgekeerde volgorde.
Hopelijk was deze handleiding eenvoudig en gemakkelijk te volgen, net zoals de daadwerkelijke oplossing. Voor mijn controller is het dag en nacht verschil wat de gevoeligheid betreft!
Fijne dag en veel herstelplezier!
13 commentaren
Thanks!! I got a bit confused on the 2nd ribbon cable because I wasn’t sure if it was a latch like the first but it worked out. Also reassembling the ribbon cables was a bit difficult and I wasn’t exactly sure how much I had to “plug” them in before closing the latch but I figured it out, thank you! Controller works wonderfully now.
Glad to hear it! Thank you for your comment!
Any issues using kapton tape instead of electrical tape?
Mirleis -
Not to my knowledge (I don’t have any on hand to test with though). May be worth a shot!
It should be noted that the official iFixit kit is recommended for the back screw removal (especially the ones at 11 and 1 o clock by the battery compartment) or you should have a screwdriver that is skinny enough to get it straight on. I barely got it with the iFixit kit and maybe left them a little bit loose because of that. Otherwise, this guide is very good for disassembling and cleaning.
Definitely! I swear by the official iFixit kit! I didn’t think I could get to those screws at first!
My ifixit J00 bit didn’t fit mine. J000 was closer, but PH0 (Philips) was the best fit.
daprice -
Agreed; this is not a J00 screw. PH0 also worked well for me, but I fully stripped my first screw :(((
Paul Fisher -