
Inleiding
De JBL Charge 3 heeft twee voorluidsprekers die afzonderlijk of samen kunnen worden vervangen. Als je luidsprekers zijn opgeblazen, vervang ze dan met behulp van deze handleiding.
Onderdelen
-
-
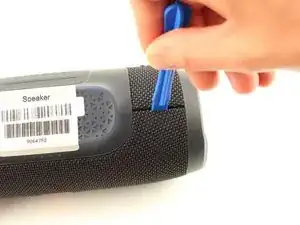
Draai je luidspreker ondersteboven en steek het plastic openingsgereedschap verticaal in de gleuf in de voorklep.
-
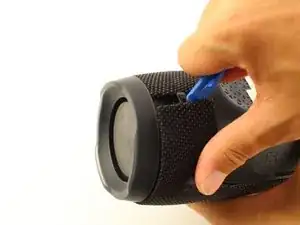
Trek het plastic openingsgereedschap langzaam naar buiten om de vier clips te verwijderen die de bekleding op zijn plaats houden.
-
Herhaal dit proces voor alle vier de randen van de voorkant
-
-
-
Trek de voorkant aan beide kanten voorzichtig uit elkaar en verwijder deze van de luidsprekerbehuizing.
-
-
-
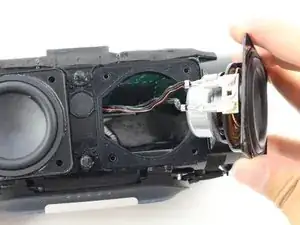
Trek voorzichtig aan een van de luidsprekers zodat deze zich buiten de behuizing bevindt. Wees voorzichtig, want deze is nog steeds met de draden aan het moederbord bevestigd.
-
-
-
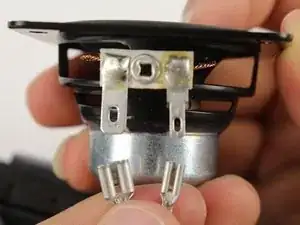
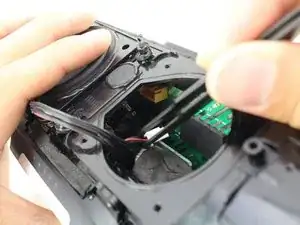
Druk met een kruiskopschroevendraaier #000 op het kleine metalen lipje op de luidsprekerconnector en trek de connector voorzichtig uit elkaar.
-
Markeer de draden met L (Links) en R (Rechts), zodat je tijdens de montage weet welke connector waar zit
-
-
-
Nu de tweede luidspreker is losgekoppeld van het moederbord, trek je de luidspreker en de draden uit de behuizing.
-


Volg deze instructies in omgekeerde volgorde om je apparaat weer in elkaar te zetten.
33 commentaren
Where I can buy the same jbl speaker ?
Ekinox -
I need to replace my JBL charge 3 speaker
Where can buy the small speakers? Helpp
I have to pull out the motherboard to get those speakers out.
Sometimes disassemblers forget that the first time they disassembled the item it didn’t want to give up easily: I didn’t like the forces I was having to apply at all, so I switched to two plastic prying tools per “corner” and one in-between them (total 5, you could use plectrums…) before I was happy the the forces were low enough not to break anything.
Frank Puranik -
the front grill is supposed to be first not the back the back has longer while the front has shorter clip
Water Bass Tester (Water BT) -
There are two Phillips head screws to remove before prying the cover off
jason -
Where in south Africa can I buy jbl charge3 port bay replacement
Donovan Fransman -
There appears to be different versions of the Charge 3. If you find it difficult to pry open a second side the two small screws mentioned by Jason will need to be removed but it also indicates that there will be some additional changes to this tear down that I will try to convey in the comments as well.
john Ramirez -
Sadly I damaged the latches on my charge 3. There was more to it than just prying the front cover up. First, there is a small latch on both sides that you need to push down before pulling the front cover towards you that release the clips holding the front cover in place. Pull only slightly forward because… Second, in the front cover there are 6 circular notches connected to the front cover in tue four corners including the middle corners, you need to squeeze the front cover a little bit gently removing the notches so they dont break (like mine did).
ralphkeneth_gomz -
Definitely had to watch about 10 videos and still couldn’t get it to pop out easily.. Took a look at the first picture in the next step and really took note of where the little hole that lets you through to push down the tab is. Once I took a look at that and combined the techniques I’d seen in some of the videos it finally popped off easily. https://www.youtube.com/watch?v=u7i0_nD9... I only watched the first minute of this video but it helped a good bit if anyone else is having trouble.
Rowan Darko -
How do you know if the speakers or one of them is burned or broken.. i notice that one speaker is playing much less hard then the other one.. I wonder now if maybe there is another problem with my device.. Battery problem?
Bukowski101 -
Bonjour,
changement de batterie effectuée ce jour avec ce tuto trop bien.
J'ai utilisé une batterie made in china (8200 mAh 24€ ) et tout fonctionne très bien.
Merci encore pour votre aide, sans quoi je n'aurai jamais essayer de réparer ma JBL Charge 3.
Bravo !!
Jean-Marie K -