Inleiding

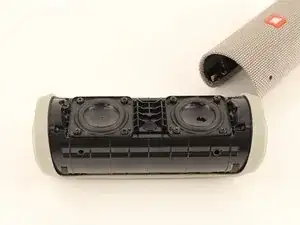
Als je speaker problemen heeft met opladen of als de USB-poort los lijkt te zitten, zijn de elektrische aansluitingen voor de voeding mogelijk beschadigd. Een vervanging van de USB-poort kan nodig zijn. Deze handleiding begeleidt u bij het verwijderen van de USB-poort.

  1. TPdTjBXgaNNyAUQE
    TPdTjBXgaNNyAUQE
    uyxjyBvlQ5EvE4JM
    SXsnMdYGMSiQt6TY
    • Steek het plastic openingsgereedschap in de spleet tussen het deksel en de rubberen rug met de aan/uit knop.

    • Wrik de behuizing los, te beginnen met de zijkant zonder de volume- en bluetooth-knoppen.

    • Bij het loswrikken van de behuizing maken de zes clips (drie langs elke kant van de rubberen rug) die de hoes aan de luidspreker bevestigen klikkende geluiden.

    • Pas op dat u de clips aan de kant van de knoppen niet beschadigt, wrik voorzichtig open.

    • Trek het deksel eraf met uw duimen.

    Important suggested edit to these instructions - make sure to pry off clips/ridges from BOTH sides before attempting removal of the cover.

    I interpreted these instructions as saying you only needed to pry clips from one side - then peel off cover. Doing this broke a clip from the other side. Bummer. I'd like others to avoid that.

    k9612 -

    If you do break a clip - save it. They are relatively easy to glue back into the cover.

    k9612 -

    My Flip4 had a single long clip on the non-button side that ran the entire length of the rubber spine. The other side (with play/ vol buttons) had three seperate clips (middle and both sides) as mentioned above.

    takentrashout -

    What if my speaker battery dies very fast and makes weird crackling noise, is it counted as faulty battery?

    Jayden Koh -

    Yes. I first thought one of the drivers was defective.

    Paul Sommer -

    What was the fix in the end ?

    Jack Mulcahy -

    I used the flared edge of a metal measuring spoon handle since I didn’t have an opening tool. Worked great! Replacement battery from iFixit is on order. Thanks for the guide!

    Greg -

    My battery was glued. Tried it anyway to remove. Battery exploded!!!!

    Don't go on if the battery is glued.

    darthvader007 -

  2. MqSuoCcPNBeHtZpb
    MqSuoCcPNBeHtZpb
    bRHK1IRZthrIHwUj
    YFp1hjI2RBYUSP5B
    • Verwijder vier 13 mm JIS #0-schroeven waarmee de rubberen rug aan de luidspreker is bevestigd, aan beide zijden van de binnenkant van de luidspreker.

    • Gebruik het plastic openingsgereedschap om de clips los te maken die het centrale deel van de rubberen rug vasthouden.

    • Wrik het ene uiteinde van de rubberen rug weg met je duimen en deze zou dan los moeten komen.

    • Het loswrikken van de rubberen rug wat moeilijk gaan.

    • De speakers zijn sterke magneten. Houd ze uit de buurt van andere gevoelige elektronica.

    Suggested Edit : Be careful when removing the screws that they don't get attracted to the speaker (magnet). They can scratch the speaker.

    k9612 -

    Note : screws don't need to be removed from their “channel” (it’s quite difficult). Just unscrew fully and leave in channel.

    k9612 -

    Note or precaution: Place a piece of cardboard over the speaker or use a plastic/rubber/nonmetalic handled screwdriver when loosening/removing the 13 mm screws. The speaker magnets are so powerful that the end of my metal jewelers phillips screwdriver was pulled into the speaker, tearing the plastic/rubber cone. I destroyed two speakers in the process of replacing the battery. Had to buy the speakers from JBL ($16 each).

    Clark Brown -

    The rubber spine was fixed with glue strips.

    Jaider -

    I have 2 Flip 4's bought approx. a year apart. The older speaker was exactly as described here. The newer speaker does not have the 5 end screws, instead it has a twist to lock end plate. Make sure the top screws that secured the rubber end are removed, as these will prevent end cap twisting. I used rubber gloves to get a grip and twist end cap counter-clockwise to unlock. I found that if you grip end cap too tight it makes it even harder to twist off. Someone may find a better solution, like prising the tags around circumference, but be warned these look flimsy.

    Phil -

    Great guide. Only problem is that the battery on mine was in a neoprene sheath and had swollen. It was a bit of a problem to get out. There didn’t seem to be room to fit something to push it out without damaging wires or the motherboard. At the risk of a fire, I worked it back and forth and pulled with a pair of needle nose pliers. Yes there were sparks and some smoke. I did it outside and knew I was risking the whole thing catching on fire. Luckily it went ok.

    Q Switch -

    Great guide! I have a model with the twist-off caps (not 5 screws) with helpful, though subtle, lock/unlock icons on the plastic. Only other problem was replacing the white neoprene battery retainer cover (2 screws). One screw slipped off my screwdriver and fell into the unit - probably stuck to a speaker magnet now. But it doesn't seem to be affecting the sound. iFixit is the best!!

    Jen Morris -

    Una duda tienen la tapa que lleva al principio la bici en la parte de afuera

    Alexis Jesus -

    on the version w/o the five screws: Make sure that you push the lid at the cap where it says “R”to the outside far enough to be able to turn off the cap.

    The Beginner -

    In my case the screws where very tight and i couldnt access them very nice. i had to remove the speakers to get a better angle

    Melvin -

  3. pG2pjcBNnP6P2ZfZ
    pG2pjcBNnP6P2ZfZ
    urdHPnDVFVKxSQaE
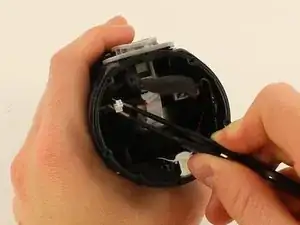
    • Verwijder de vier 9 mm Phillips #1-schroeven waarmee de grijze USB-poort vastzit.

    • Maak de grijze behuizing van de USB-klep los met uw handen.

    Minor point: the colour of the USB port and casing is whatever colour the speaker is. Mine was red so never had a gray USB port or casing.

    Yuri Silkin -

  4. mOf1PZsTlV4InLL1
    mOf1PZsTlV4InLL1
    Sxm3rSbnmVaGjo16
    • Verwijder de vijf 9 mm Phillips #1 schroeven om de eindkap te verwijderen.

  5. flkWSqhZepyd2LPR
    flkWSqhZepyd2LPR
    yqsrrgaAk1RRhSwC
    • Trek de draad bedekt met donkergrijs schuim uit de ruimte waar hij is weggestopt en verplaats hem uit de weg.

  6. AcWg4YrSmwgQdVhM
    AcWg4YrSmwgQdVhM
    iWSWpPZjO5wKC6KH
    EoBrDIQnucXLEnwp
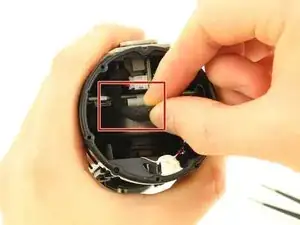
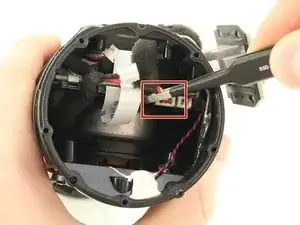
    • Haak de witte stekker los die is bevestigd aan de kleine printplaat die aan de grijze micro-USB-behuizing hangt met behulp van de ESD-veilige stompe neuspincet.

    • Schuif de stekker uit de weg door hem door de opening in de grote printplaat te trekken om bij de volgende stekker erachter te komen.

    JBL has upped their “security” I see. On mine, this plug is glued in place and the ribbon cable nearby is completely covered in tape so I can’t unhook it.

    Melinda Rabenstein -

  7. lthIEglBEQQSyLJ2
    lthIEglBEQQSyLJ2
    RM6uGfCLg2KhfU4t
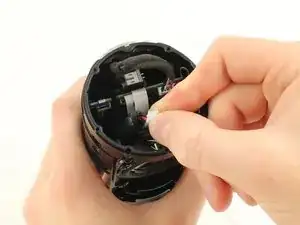
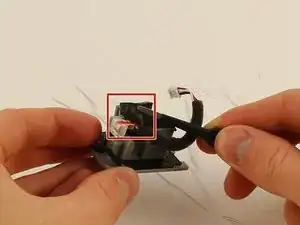
    • Maak de andere kleinere witte stekker achter de vorige stekker los van dezelfde kleine hangende printplaat met behulp van het pincet.

    Whit is the this function this plug

    BMW Racing Malaysia -

  8. EnRQ3iS2BL6TmayO
    • Trek de grijze USB-poort uit de behuizing.

    • Trek niet aan dit onderdeel omdat het nog met draden is bevestigd.

  9. eVFG6FMjQCxyWNZP
    eVFG6FMjQCxyWNZP
    RmHoCwWXXYRtGXt2
    4GEusiHTGhgkbWjt
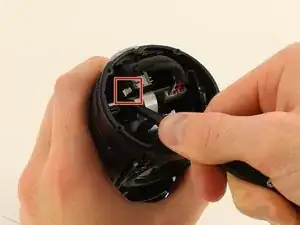
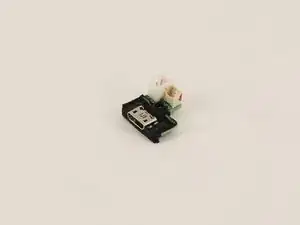
    • Maak de kleine witte stekker los die is bevestigd aan de hoofdprintplaat die de USB-poort aan de luidspreker vasthoudt.

    • Verwijder de USB-poortcomponent uit de behuizing.

  10. UDETSTqpCPQULho3
    UDETSTqpCPQULho3
    WXASE3ieHwcgJWmf
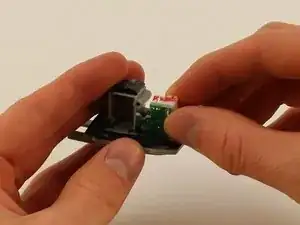
    • Verwijder drie 9 mm Phillips #1-schroeven waarmee de twee kleine printplaten aan de USB-poortcomponent zijn bevestigd.

    • Wrik de bovenste kleine printplaat los met het plastic openingsgereedschap.

    • U zult enige kracht moeten gebruiken om deze print te verwijderen omdat deze is vastgelijmd.

  11. VTYI4CScAKLbMuXk
    VTYI4CScAKLbMuXk
    OkVyFPwQy4KTGGN2
    • Trek de zwarte lijm aan de onderkant van het onderdeel los met het pincet en verwijder de draden eronder.

    • Verwijder de eerste kleine printplaat en de aangesloten draden.

  12. BpODGuMVHSbW2255
    BpODGuMVHSbW2255
    pgpqfYmLTvbvNkJn
    • Verwijder de tweede printplaat door er aan te trekken.

    • Het kan zijn dat u hard moet trekken aan deze kleine printplaat, omdat deze ook op sommige plaatsen is vastgelijmd.

    Well presented. Needed. Wire pin descriptions. Thanks

    Nard Curedlard -

Conclusie

Volg deze instructies in omgekeerde volgorde om uw apparaat weer in elkaar te zetten.

Philip Pang

Lid sinds: 08/10/18

1356 Reputatie

12 commentaren

Hi, I need to replace this circuit board where the charging port mounts.

While trying to remove damaged micro usb port, I damaged the tiny wires from the circuit board.

I tried to find this online but no luck so far.

Do you know the code for this PCB?

Thank you,

alex garcia -

hi, where can i buy new circuit board for micro usb charging port?

joseph celerio -

please i need 1… thank you.

joseph celerio -

I have a question on the small circuit board (charge port), one of the female port on it is for power (+5v), but what is another one? Is it D+, D- ?

P.S. I’ve measure that port with micro usb connected to power source, turns out there has no voltage measured, but the bigger one does has 5v measured.

Thanks!

馮會鈞 -

https://www.ebay.com/itm/184156589848

Just ordered one of these. Told it’ll be delivered by August 1st.

Ryan Crammer -

Would be so great if you could tell us where we could obtain a replacement USB port that INCLUDES the little circuit board. All replacement parts I have found are the port itself and not the port including the little circuit board and plugs.

Brett Strydom -

Hi I discovered water on the inside of the on button rubber layer how do I access it?

Benedict Fong -

Thanks. Brought this speaker back to life. Reconnecting the wires was a little bit of a challenge but got it done in the end.

Dave Swindells -

Hello, great guide thanks! Although I am not quite sure what to buy as a connector. I found two different part available the TL and GG on Aliexpress for instance, does anyone know the difference? Does it matter?

jeremykung -

Does anyone know what the values are on the 2 capacitors on the USB board? I took readings on mine and there's nothing.

A BIT -

Me pasa que al conectar el poder este se va a 0 y no carga el altavoz a que se debe, me paso despues de actualizar la version del flip 4

Juan Betancur -