Inleiding
Let op: verwijder altijd eerst de stekker uit het stopcontact voordat je gaat demonteren.
De holle punctienaald die de bovenkant van de K-Cup doorboort, kan verstopt raken door vervuiling. Als je deze probeert door te spoelen door gereedschap of vloeistof in de uitgang van de naald te duwen, loop je het risico dat je de terugslagklep beschadigt. Deze handleiding laat zien hoe je net genoeg van de kop kunt demonteren om de bovenste naald vanaf de inlaatzijde schoon te maken.
Gereedschap
-
-
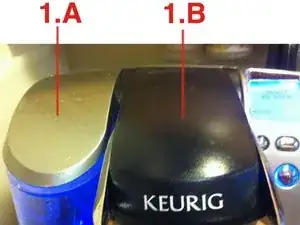
De onderdelen identificeren: 1.A is het deksel van het waterreservoir. 1.B is de “kop”. Hierin zit de punctienaald die de K-Cup doorprikt.
-
-
-
Til het deksel van het waterreservoir eraf, en onthul 2.A: "de overloopuitloop".
-
Als de punctienaald verstopt is, zal bij het gebruik van de Keurig het meeste hete water uit de overloopuitloop komen, terug in het waterreservoir, in plaats van door je koffie. Dat symptoom laat je weten dat je misschien baat hebt bij het volgen van deze procedure.
-
-
-
Richt de punt van je Philips-schroevendraaier omhoog en verwijder de twee schroeven aan de onderkant van de kop. (omcirkeld). Pas op dat je ze niet laat vallen en verliest!
-
-
-
Knip de kabelbinder af en let op dat je niet in de kunststof slang knipt.
-
Maak de kunststof slang los.
-
Verwijder de twee rood omcirkelde schroeven.
-
Nu kun je de punctienaald door de onderkant van de kop verwijderen. Let op! De naald is zeer scherp.
-
-
-
Montage: voer de demontagestappen in omgekeerde volgorde uit. Let wel op: de achterkant van het deksel van de kop kan er op twee manieren op. Stop het dicht tegen de kop aan, anders kun je het apparaat niet sluiten. Raad eens hoe ik daar **achter ben gekomen**.
-


Voer de stappen in omgekeerde volgorde uit om de machine weer in elkaar te zetten.

12 commentaren
I discovered that if you pinprick the lid in the center, where the needle goes, just before placing the cup in the machine, the frequency and severity of plugging is reduced by a factor of 10. Try it and comment back. (Helps to also close the top slowly).
I called Keurig about the clogging problem, and they claimed that manually forcing the cup to be pierced by the bottom needle when placing the cup in the holder will help to reduce clogs, but I am not sure why this is any better than using the handle. I still have problems with clogging, and I have had to use the included Keurig 2.0 Brewer Top Needle Cleaning Maintenance Accessory, but that is only a temporary fix.
Joe Hunt -
There were a couple of items omitted from this post. 1. When you remove the first two screws, the cover is still connected to the lower assembly by two posts that are pressed into the lower part. Holding the cover near the back and wiggling the sides up and down will pull the posts out so you can move it. 2. On my version of the keurig, there is an assembly that holds a one way valve. That was the problem with mine. I removed the assembly, tried to blow through it and couldn't. I pushed on the back of the valve and it came loose. Problem solved. I took a picture of the valve assembly but couldn't figure out how to attach it here. I'll add it elsewhere if I can figure it out.
Hate my Keurig. It's four months old and I've had to use the maintenance cleaning kit so often I've lost count. And it never cleans the coffee out of the needle with 5 up and downs as it states it should. It sually takes me up to 5 attempts which can take a lot of time in the mornings when all you want is a coffee so you can get to work.
beemusic -