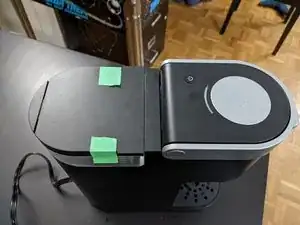
Inleiding

De volgende handleiding geeft weer hoe je een Keurig K-mini kan demonteren.

Voer de stappen in omgekeerde volgorde uit om de machine weer in elkaar te zetten.

  1. q6Zm3JEXutP6hnBx
    q6Zm3JEXutP6hnBx
    CmKvCAtsoMUnC61q
    • Haal de stekker uit het stopcontact.

    • Tape het deksel van de watervulopening vast.

  2. VfFt6pDWGCIa4D15
    • Verwijder twee kruiskopschroeven aan de onderkant.

    This step needs a Philips #1 screwdriver, #0 was too small when I tried.

    Edward Davis, Jr. -

  3. X4cGP3p3CVJNGUhn
    • Steek een kunststof wrik gereedschap in de zijkant en ga langzaam langs de zijkant van het apparaat om de clips eruit te halen.

    • Herhaal dit aan de andere zijde.

  4. 2ZvhIpZyXSWLqqTU
    2ZvhIpZyXSWLqqTU
    Zd2faAOh1cTJG5HW
    4MRMGxguepAIhBVU
    • Deze clip aan de achterkant van het apparaat is bijzonder lastig te verwijderen, maar hij kwam los toen alle andere chassisclips waren verwijderd en opengehouden, terwijl je hem naar achteren trok.

    • Er zijn 3 clips aan elke verticale kant, 2 in het midden bovenaan en 2 in het midden onderaan.

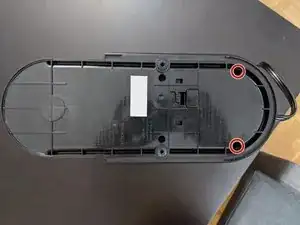
    • Hier zitten de schroeven in. Ze moeten worden losgehaakt van de bodem om hem naar achteren en eraf te kunnen trekken.

    • Het chassis eraf halen was bijzonder lastig, ik raad aan om een tweede paar handen te lenen als dat mogelijk is.

    Got chassis OFF. Want to find clog or whatever has made it stop working. What is next step,after #4?

    lindsay cable -

  5. 2QCAqPZiqNPdTNAs
    • Koppel de waterpomp los van de achterste printplaat voordat je het bovenste gedeelte demonteert.

    What is the Blue capacitor like in the above photo (MOV1)? Is it a thermistor or varistor? and what is its value? The above photo is blue, But mine is red. It got burned and its face was blown away, so identifying its value cannot be made.

    Frankie Fulgar -

    Hello, does anyone know how to reset the thermostat? my keurig doesn't turn on

    Jorge Garcia -

  6. HmGtgsMsHqrLJVGr
    HmGtgsMsHqrLJVGr
    AthHhuUC3PgtLjna
    • Draai het apparaat ondersteboven.

    • De bovenkant van het apparaat wordt vastgehouden door een klem bij de printplaat en klemmen rond de tuit van het kopje.

    • Houd het apparaat ondersteboven en wrik de kromming van de bovenkant los.

    • Zodra de voorkant eraf is, kunt u het bovenste gedeelte bewegen en komt het los van de onderkant.

  7. jGCU5sRQbeiKJQOU
    • De lintkabel voor het deksel is vastgelijmd en het deksel kan niet worden verwijderd tenzij er speling is om aan te trekken.

    • Trek voorzichtig aan de klodder siliconenlijm en deze komt aan de randen omhoog. Schuif het langs de lintkabel naar beneden.

  8. qGTJTYeKRlZFWNOJ
    qGTJTYeKRlZFWNOJ
    3ebhSeLZ6A46cbtO
    • Er zijn zes clips rond het gebogen gedeelte en vier clips langs het scharnier die de bovenkant van het deksel op zijn plaats houden.

    • Breng kunststof wrikpennen aan rond het gebogen gedeelte van het deksel totdat het midden eruit getrokken kan worden.

    • Wees heel voorzichtig dat je je niet bezeert aan de pennen/naalden.

    • Als het gebogen gedeelte eraf is getrokken, zit het deksel nog steeds vast aan het scharniergedeelte. Sluit het deksel en wrik langs de achterkant van het scharnier en duw de bovenkant van het deksel weg van het water vulgedeelte tot het deksel loskomt.

    where can I get the pry-tools? thx.

    Randy

    Randy -

    Right here on the iFixIt store. They are included in most kits.

    James Clutterbuck -

  9. GHSnwf5H4q6V3iAR
    GHSnwf5H4q6V3iAR
    4VVeTj2mjLDpeUlS
    • De witte doos heeft clips rond de rand die gemakkelijk kunnen worden losgewrikt met een kunststof wrikpen.

    • Verwijder de K-knop en de aan/uit-knop. Onder de K-knop zitten vier veren om hem te stabiliseren.

    • Onder de witte rubberen afdekking zit de kleine vergrendelingsconnector voor de lintkabel van het deksel.

    it takes me sometimes like 10 times to open/close the lid before K button is activated. Has anybody run into the same problem?

    John Troy -

  10. iZ1CAKipoantLtUb
    iZ1CAKipoantLtUb
    YsOKNDhbfKuxiLnP
    QYKuophEyQHNfreJ
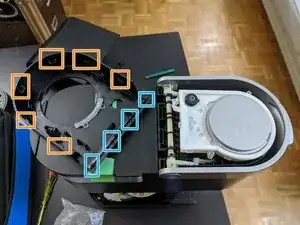
    • Zijaanzichten van de interne onderdelen.

    • Zorg er bij het opnieuw in elkaar zetten voor dat je alle draden op de juiste plaats vastklemt, zodat ze niet in contact komen met hete onderdelen en mogelijk smelten!

    • De lintkabel van het deksel heeft een kleine klem in de bovenkant van het frame om hem opgeborgen te houden.

    Have NO energy left to try to solve problem on this cheap plastic piece of junk. Waste of $. No wonder there are so MANY used, for sale.am throwing it OUT

    lindsay cable -

    Circuit marked D8 components part value

    Shumail Gill -

James Clutterbuck

Lid sinds: 15/03/21

181 Reputatie

21 commentaren

I plugged mine into 220V

Can I change the fuse?

How ?

and where can I find the part

Hattan Talaqi -

There is a heavy current heater circuit. These machine are not dual voltage. Machine is made for local voltage and modification is unlikely possible. There is a thermal fuse for safely right after the main, hiding in red sleeve, but I did not open and inspect the rating. Circuit continuity can be verified easily.

Lawrence Law -

I don’t recall seeing a fuse, but maybe it’s there. Take it apart and find out.. then document it here ;-)

James Clutterbuck -

Took it apart, power button and strong button comes on but brewing button does not work (no light seen). Can this be the board that controls the switches or is it a defective strip?

Ryan Bissoon -

I accidentally plugged my Keurig K-mini to 220V. when I opened it, I found out that the R7 resistor (10 ohms) and the MOV1 parts got burned and blown, makings its identity no longer visible. Does anyone know if this is a thermistor or a varistor? and its correct value? I couldn't find a Keurig K-mini circuit diagram online. Would highly appreciate a response. Thank you in advance.

Frankie Fulgar -

I looked on mine and it's a S10 K150 Varistor

Daniel Vakulich -

My mini works, but no lights. Good thing I remembered the sequence. My neighbor gave me his old unit for parts, but it too works, but no lights. In your tear down did you notice a low voltage circuit on the main PCB? Maybe a DC rectifier? Do you know of this problem?

Eric overn -

Hi, I think my K mini has the water reservoir filter broken. I tested it unplugged and it liked on the side (the black plastic thing were the water from the reservoir gets in the heating circuit). Any ideas how to FIY? Warranty is expired.

catwoman_3679 -

Where do I plug in the ribbon cable on the bottom section? Is that why my power would stop working?

Needcoffee -

Thanks for this! I haven't taken it all the way apart yet, I assumed I would see trash in the tubes but I don't. The symptom of hours is that the pump seems weak. Any idea where I should try first?

DeeDee Brickner -

I inherited a k-mini that leaked the water out the top, after heating and before the cup. Your instructions were instrumental to opening the unit and finding the loose hose. It now works like it was new, and I didn't break anything in the process. Thank you, James.

Richard Shellhammer -

My mini is not powering on. There is a small panel on the bottom that can be uncapped. You can see an empty plug in it. Is this where some sort of fuse should be?

MikeLWill45 -

I'm wondering too! I can't find any info on it

Lisa Majernik -

Hi. I just found this. My Keurig mini Jonathon Adler version power button does not turn on. What should we do

anna -

I diligently but too robustly cleaned my K-mini. It now blows the wall fuse after taking the water from the reservoir. I would imagine I got water inside the electronics causing the shorting of the unit. I will try disassembling it using your instructions but maybe it might be time to buy another unit that can give me more than 1 cup at a time. Thoughts?

Brian Miller -

Hi. I have a Keurig K mini that was accidentally plugged to 220V. I have replaced the MOV and the 10-ohm resistor. After I plug the unit the 10 ohm resistor burns. I discovered that D2 is shorted. Does anybody know the value of D2? Would appreciate it if anybody could share the schematic diagram.

Edgar David -

Hi, I am looking to access the limit switch for the handle (in order to trigger the circuit from an Arduino), assuming I've already got control of the power and brew buttons. Can I get to this by just prying the top cover off? Thanks.

Hayden S. -

Hi. There is some sort of gasket in the top around the pod cover. Our is ripped. Is there any way to replace it?

Catherine L Hackert -

I'm looking for a repair guide for replacing the handle on my Keurig MINI K900. Thank you for all your help

Jon -

Hi. My Keurig K mini is not working. Is it possible to have a replacement board? Where can I buy from?

Arvind Parboteeah -

Is it possible that the circuit board on my Keurg single serve brewer has burned out.

Lanette Tolar -