Inleiding

Vooraf vereiste handleiding voor het loskoppelen van het logic board van een MacBook Air uit 2019.

  1. mCpNcwDmVvCIexvU
    mCpNcwDmVvCIexvU
    WCiJUh1bJboPNur2
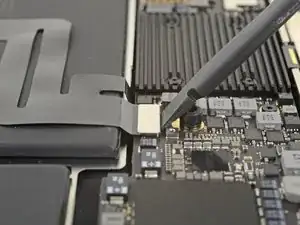
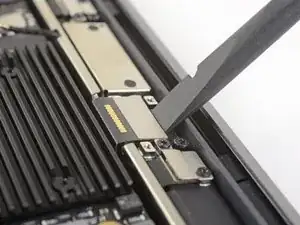
    • Gebruik een T3 Torx-schroevendraaier om de twee 1.4 mm lange schroeven die de beugel over de trackpadaansluiting bevestigen los te schroeven.

    • Verwijder de beugel over de trackpadaansluiting.

    My machine used T4 screws

    johann beda -

    Me too! I tried with T3 and it wasn’t working.

    Rose Alshuaibi -

    I stripped my screws trying to get them out with a t3 driver...

    Aubrey Corcoran -

  2. Sw6VN6VuYRYAnW2T
    Sw6VN6VuYRYAnW2T
    iGLvdxo4pDlVZOh6
    • Gebruik het platte einde van een spudger om de kabelaansluiting van het trackpad uit het contact omhoog te duwen.

  3. 2ANOeBCRlLS1Elpu
    2ANOeBCRlLS1Elpu
    gVBNK32AwYwuWQFx
    hRm4xZQXbIkkT4O5
    • Schuif de punt van een spudger onder de speakerkabel en duw deze in een rechte beweging omhoog om de speaker los te koppelen.

    • Als je de aansluiting los hebt gekoppeld, schuif je het platte einde van je spudger onder de kabel om deze te scheiden van de lijm die het aan het logic board bevestigt.

    I think step 15 was a mistake because it’s a repeat of step 10.

    Ryan R -

    Yeah, the speaker is already removed at this point.

    Jason _ -

    el punto 15 queda anulado. se realizó en el punto 10.

    E. Parra -

  4. IHRbrlPXF2JApiqk
    IHRbrlPXF2JApiqk
    LyZ1foqy1wvBlOiv
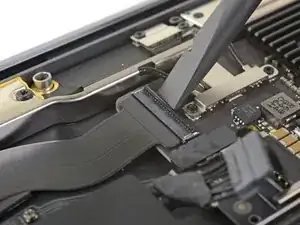
    • Gebruik een T3 Torx-schroevendraaier om de twee 1.3 mm lange schroeven die de beugel over de USB-C poort aansluiting bevestigen los te schroeven.

    • Verwijder de beugel over de USB-C poortaansluiting.

    There is no need to remove the logic board!!

    Skip steps 16 through 28 and go to step 29 to release the trackpad cable from the battery. then follow steps to 30 through 33 to release the battery. The battery can be removed by slipping it counter-clockwise under the trackpad cable. The new battery can be slipped in place in the same way.

    Much easier!!

    josephgray -

    Agreed. Took me a minute to realize that I had to slide the top right screw bracket between the logic board and the case to get enough clearance for the rotation. Many thanks.

    w98fxr -

    Removing a few of the logic board screws allowed me to get the to right screw bracket under the logic board to give enough clearance as w98fxr mentioned.

    johann beda -

    This can be done, but it's very tight. Still, beats removing the logic board and the possibilities of breaking something in the process.

    maccentric -

  5. M3RvYGtmREQuaLZ2
    M3RvYGtmREQuaLZ2
    B6AMphVrIvwKpisH
    • Gebruik het platte einde van een spudger om de kabelaansluiting van de USB-C poort omhoog te duwen en deze uit het contact op het logic board te verwijderen.

    please reconsider removing the logic board and and usb-c connector as is recommended in the prior step. i had a very difficult time reconnecting the usb-c connector

    Mario Obejas -

    It should be cautioned that this connector is very easily bent, meaning a bend in the length of the metal surface you press against to reconnect (or pry against for removal). Once bent it becomes very hard to establish a good connection.

    James Tropauer -

  6. BjgmhIFsgtdRtuUi
    BjgmhIFsgtdRtuUi
    hgUoCSOomRaZZNMa
    XNTm2JBIuDLHFUKi
    • Gebruik een spudger om de kleine sluitklem op de ZIF-aansluiting van de geluidskaartkabel omhoog te wippen.

    • Schuif de kabel van de geluidskaart uit de ZIF-aansluiting.

  7. RK65AOeFDCjfyyWv
    • Trek de zwarte tape die over de kabelaansluiting van de ventilator heen zit geplakt los.

  8. EvCAoAoChgdZSUpP
    EvCAoAoChgdZSUpP
    VORkbyxUw5mQoLXP
    EBqFtxhhx5MFDscb
    • Gebruik de punt van je spudger om de sluitklem op de ZIF-aansluiting van de ventilatorkabel omhoog te duwen.

    • Schuif de ZIF-aansluiting van de ventilatorkabel uit het contact.

    There may not be a locking flap. If not, just pull the fan cable out of the ZIF connector.

    rmilton -

  9. tXgZY3PV2kPaADlE
    tXgZY3PV2kPaADlE
    WAgCyw6YIrvC3RQH
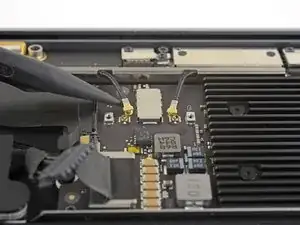
    • Gebruik een T3 Torx-schroevendraaier om de twee 1.4 mm lange schroeven die de beugel over de antennekabel bevestigen te verwijderen.

    • Verwijder de beugel van de antennekabel.

    These are T4 screws

    Richard Arnett -

    The MBA I just finished with were T3. I'm fairly confident with my tools as I recently updated/upgraded nearly my entire set with WiHa. I should also mention the many tools acquired from iFixit over the years have all been were exceptional lasting years. There's no doubt iFixit would have been my source but a close friend went to work for WiHa. His discount(s) & being motivated to help him was a major impact. For anyone not having such an advantage IMHO tools from iFixit are one of the best values anywhere. Let's not forget; buying from iFixit will also help to push "Right to Repair" forward. Here in Minnesota Right to repair ALMOST PASSED. Many believe it will become law during the next session! I can't tell you how proud this would make me. I would obtain as many service manuals as possible and post them all online!!! What a great dream...

    admin -

  10. SIwpML6D2V1THnvW
    SIwpML6D2V1THnvW
    HSbt4VrCJOZJWJeX
    vMkn5IqQ1LgQrMRK
    • Steek de punt van een spudger onder een van de antennekabels, zo dicht mogelijk bij de aansluiting. Duw de kabel vervolgens recht omhoog om de kabel los te koppelen.

    • Herhaal dit bij de andere antennekabel.

    Be SUPER SUPER CAREFUL pulling off the gold WiFi antenna connectors! As described, use the spludger to press up the black cable just behind the metal connector. I tried to ping them off from the bottom of the gold connector where it clips into the socket on the motherboard and ended up pulling off the SMD sockets from the motherboard - huge and costly mistake that will probably render it useless.

    Neale Whyatt -

  11. JwduCSLFH2CcraAQ
    JwduCSLFH2CcraAQ
    kTylWJvDOGiAPbQS
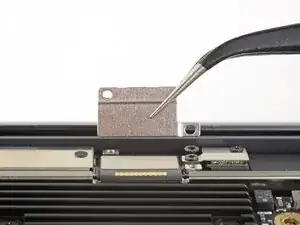
    • Gebruik een T3 Torx-schroevendraaier om de twee 1.5 mm lange schroeven die de beugel over de schermkabelaansluiting bevestigen te verwijderen.

    • Verwijder de beugel over de schermkabelaansluiting.

  12. cELhRfbeZrcbMPps
    cELhRfbeZrcbMPps
    kHkPDOnxWduTqHLa
    • Gebruik het platte einde van een spudger om de schermkabelaansluiting omhoog te duwen.

    How do I reconnect display connector??

    Kris Queck -

    Just align the plug section of the display flex with the socket on the logic board and gently press it in until it locks in place. Do not force it but just ensure it’s correctly aligned before pushing it into the socket.

    Peter Newman -

    Pro tip: You can remove the two T5 screws on the LCD connector side (located to the right of the display connector and to the left of the heat shield). From there, tilt the whole skinny LCD board towards the logic board connector and gently pinch the connector in to the socket. Before laying the skinny board back down, screw in the shield from Step 15 so it doesn’t pop out of the socket again.

    jason4 -

Conclusie

Om je toestel weer in elkaar te zetten, volg je deze instructies in omgekeerde volgorde.

Adam O'Camb

Lid sinds: 11/04/15

212588 Reputatie

0 commentaren