Inleiding

Gebruik deze handleiding om de antennebalk van een MacBook Air uit 2019 te vervangen.

  1. 4a1VSQBgdQXAZah2
    • Je zult, voordat je met deze procedure begint, de Auto Boot-functie van je Mac uit moeten schakelen. Auto Boot schakelt zich in als je het scherm van je MacBook opent en kan per ongeluk worden geactiveerd tijdens het demonteren van je laptop. Gebruik deze handleiding of volg de ingekorte instructies hieronder om Auto Boot uit te schakelen.

    • Schakel je MacBook Air uit en haal deze van de oplader voordat je met deze reparatie begint. Sluit het scherm en draai de laptop om zodat deze met de onderkant naar boven wijst.

    • Gebruik P5-schroevendraaier om de volgende schroeven te verwijderen:

    • Twee 7.9 mm lange schroeven

    • Twee 7.1 mm lange schroeven

    • Zes 2.6 mm lange schroeven

    If the first thing you do is disconnect the battery, is it really an issue if you don’t (or can’t) disable auto-boot?

    maccentric -

    I agree, why disable Auto-Boot when the lid is closed and the battery is disconnected immediately? – I've never had an issue since 2016 when the feature was introduced.

    stevebsiegel -

    On my machine, the longest two screws were in the corners, while the other two long screws were in the middle. Perhaps previous service in the past had them replaced into the wrong place? In any case, the longest screws do seem to fit in either place. I guess 0.8mm is not very much of a difference. Seems like poor design if they could have used one size of screw.

    johann beda -

    Just did one, and it also had longest screws in the corners.

    maccentric -

    Just did another, and the long ones were in the middle. Definitely poor design and quality control.

    maccentric -

  2. 4Kra6VLGEa3eGmd6
    • Duw je vingers tussen het scherm en de onderste behuizing en trek deze omhoog om de onderste behuizing van de MacBook Air los te maken.

    • Verwijder de onderste behuizing.

    Das geht etwas schwer, da das Unterteil mittig noch von 2 Druckverschlüssen gehalten wird.

    facebook -

    translated and true:
    This is a bit difficult because the lower part is still held in the middle by 2 pressure fasteners.

    Tom -

    Are there any suggestions to removing the pressure fasteners more easily?

    Drea Mastromatteo -

    I used a suction cup to lift up the cover. I mean those to lift up an iPhone display. Worked like charm.

    Juergen Stawska -

  3. xVJrmDjjKX3L1VEp
    • Trek de tape die over de batterijaansluiting heen zit ver genoeg los om de batterijaansluiting bloot te leggen.

  4. NZT3TL4hoGyeLE6L
    NZT3TL4hoGyeLE6L
    XZ2jGZmJoO1c5OHn
    • Gebruik een spudger om de batterijaansluiting uit het contact op het logic board te schuiven. Zorg dat je de aansluiting parallel aan het logic board uit het contact trekt.

    Before the battery can be fully disconnected, the battery disconnect button needs to be held down. There is a gold button just above the battery socket, along with a small LED much like the 12” machines. Once this has been held down and the LED has switched off it is safe to remove the battery.

    Aaron Dalziel -

    This seems like an important step?

    maccentric -

    Also, seems like this should be done after the battery is disconnected, not before? Otherwise, wouldn’t the battery re-charge it?

    maccentric -

    What if the white LED dosent light up after pressing the yellow button again?

    Iron05 -

    I just performed this repair on my late 2018 mac air. I did click the gold button but saw no LED illuminated or otherwise. Question- after reassembly does the button get pressed again to connect the battery? Please clarify if this button is to be pressed and if it needs pressing again after the repair.

    All said - I pressed again after the battery connector clicked, assembled the back and all worked perfectly. The original issue was one dead port (no charge, no communication). The battery charge lightening bold icon was acting funny too. Genuis bar guy in Naperville said it was likely a logic board too. But it was not. The port was apparently confusing the logic board with regards to the charge function. Thanks Adam for saving me $440 and sending my computer back to Apple. I am 71 yrs young - who says an old dog can’t learn new tricks with good training!!

    William Lane -

    I didn't see Aaron's comment before completing the battery replacement. Afterwards, the computer would not turn on despite multiple SMC reset procedures. Upon double-checking the comments I see the importance of pressing the gold button. I pressed the gold button before disconnecting the new battery, then pressed it again after reconnecting for good measure. Computer booted!

    It would be good of iFixit to add this important step as most people probably don't open up every single comment on (seemingly) simple steps.

    Corey Matsumoto -

    Seconding Corey's comment. If paid more attention to the comment section, I would have avoided 15-30 minutes of panic. (BTW I did not notice any LED, but the golden button was easy to find).

    Lorenzo Sorbo -

    Where is the gold button? I replaced my battery and my laptop will not start

    Candace Williams -

  5. U51iKfsITWSYPNdE
    U51iKfsITWSYPNdE
    GKqUvRL4EusRftSC
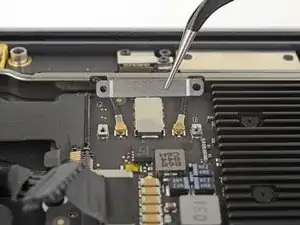
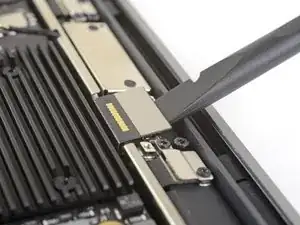
    • Gebruik een T3 Torx-schroevendraaier om de twee 1.4 mm lange schroeven die de beugel over de antennekabel bevestigen te verwijderen.

    • Verwijder de beugel over de antennekabel.

    It is a T4 not a T3

    Jean Senellart -

  6. hFcA2sXImUUTXMid
    hFcA2sXImUUTXMid
    oXCWQapjaAmhjSaL
    CGI4OVJm2DtZAY1r
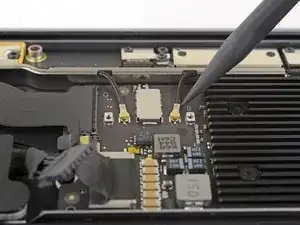
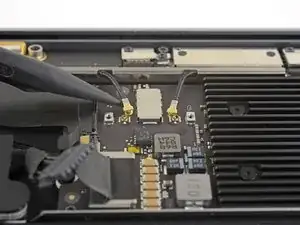
    • Steek de punt van een spudger onder een van de antennekabels en plaats deze zo dicht mogelijk bij de aansluiting.

    • Duw je spudger vervolgens omhoog om de kabel los te koppelen.

    • Herhaal dit bij de andere antennekabel.

    As you are putting everything back together, it is a bit wonky trying to reconnect these antenna. Patience is necessary and it helps if you reshape the cables so that the cables are like the picture.

    Brent Porter -

  7. xjnRX6OhBQATPKTU
    xjnRX6OhBQATPKTU
    QWyBte2qiFdXNLew
    • Gebruik een T3 Torx-schroevendraaier om de twee 1.5 mm lange schroeven die de beugel over de schermkabelaansluiting bevestigen te verwijderen.

    • Verwijder de beugel over de schermkabelaansluiting.

  8. PwAbDmRWJxP3iIl2
    PwAbDmRWJxP3iIl2
    ifpZWLODTMm2PVVY
    • Gebruik het platte einde van een spudger om de schermkabelaansluiting omhoog te duwen.

  9. WscuOwGYhTc6FOKb
    • Gebruik een T5 Torx-schroevendraaier om de volgende schroeven te verwijderen:

    • Vier 7.4 mm lange schroeven

    • Twee 4.5 mm lange schroeven

    The tool list does not list a T5.

    William Meyers -

  10. GlVOqgcgTgW4rFKY
    GlVOqgcgTgW4rFKY
    VuSbX6GpXdw4FBhh
    DHHmwBUxMYBMOgL3
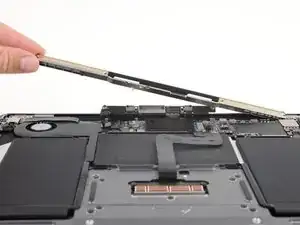
    • Til de antennebalk in een rechte beweging omhoog en uit de behuizing. Wees voorzichtig dat je de antennekabel hierbij niet breekt op nog vastzittende kabels of aansluitingen.

    • Het kan zijn dat je wat weerstand ontmoet van de klemmen in het midden van de antennebalk, welke de balk aan de behuizing bevestigen. Je kunt hard aan de balk trekken zonder schade te veroorzaken, als je maar zorgt dat je in een rechte beweging omhoog trekt, loodrecht ten opzichte van de behuizing.

    • Verwijder de antennebalk.

    Tip: keep the six big lid anchor screws in place until after you remove the antenna bar. You may have to use your plastics spudger to wedge underneath the vents and get leverage off the underside of the lid along the hinge area. I also had to remove the Logicboard so I could get the plastic spudger underneath the antenna bar and lift it up. It felt like it was going to break. Did not want to have to remove the logic board, but seemed that was the only way I could get underneath and pry the antenna out.

    Chris Leeds -

    Felt like I was going to break it! It will come out but it requires patience and light touch

    Go to 12:02 on this Video:

    https://youtu.be/AvS3Dl712zQ

    Subscribe to this dude’s channel! I donated because he has taught me a lot with his videos!

    Macrepair SF -

    Lamar's suggestion to view the video is excellent. Though I saw it only in arrears, it was quite valuable. I found a spudge, used to GENTLY pry both side first, then begin lifting on your right side (with back of laptop facing you) while gently twisting slightly inward to do the trick.

    Probably the worst moment in this repair.

    DLC

    dlcatftwin -

Conclusie

Vergelijk je vervangende onderdeel met het originele onderdeel — het kan zijn dat je meerdere onderdelen mee over moet zetten of beschermlagen voor de lijm moet verwijderen voordat je het nieuwe onderdeel kunt installeren.

Om je toestel weer in elkaar te zetten, volg je deze instructies in omgekeerde volgorde.

Breng je e-afval naar een door R2 of e-Stewards gecertificeerde recycler.

Ging je reparatie niet zoals gepland? Check dan ons Antwoordenforum voor hulp bij het oplossen van je probleem.

Adam O'Camb

Lid sinds: 11/04/15

212588 Reputatie

0 commentaren