Inleiding
Gebruik deze handleiding om de solid-state drive (SSD) van je MacBook Pro 13" uit begin 2015 te vervangen of te upgraden. Deze MacBook Pro maakt gebruik van een propriëtaire opslagschijf-aansluiting en is daarom niet compatibel met de doorgaans voorkomende M.2 schijven zonder het gebruik van een adapter.
Zorg dat je een back up maakt van je huidige opslagschijf alvorens je met deze reparatie begint. Zorg dat je daarna uitvindt hoe je een herstel via internet uitvoert of maak een opstartbare externe harde schijf aan zodat je macOS op je nieuwe schijf kunt installeren en je oude data naar je nieuwe SSD kunt verplaatsen.
Tot slot raden we je ten sterkste aan om macOS 10.13 High Sierra (of een nieuwere versie van macOS) te installeren voordat je de originele SSD van je MacBook Pro vervangt. De meeste nieuwe SSD's vereisen ge-update opslag-drivers die vaak niet in macOS-versie voor High Sierra te vinden zijn.
-
-
Verwijder de volgende tien schroeven die de onderste behuizing aan de bovenste behuizing bevestigen:
-
Twee 2.3 mm lange P5 Pentalobe schroeven
-
Acht 3.0 mm lange P5 Pentalobe schroeven
-
-
-
Wring het topje van je vingers tussen de bovenste en de onderste behuizing.
-
Trek de onderste behuizing rustig en op voorzichtige wijze weg van de bovenste behuizing om deze te verwijderen.
-
-
-
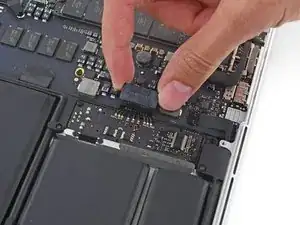
Gebruik het platte einde van een spudger om de batterijaansluiting in een rechte beweging uit het contact op het logic board omhoog te duwen.
-
-
-
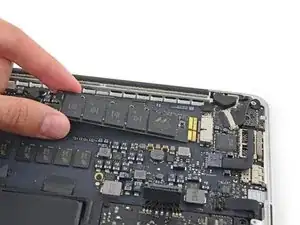
Til de loszittende kant van de SSD een beetje omhoog en trek de SSD vervolgens recht uit het contact op het logic board.
-


Om je toestel weer in elkaar te zetten, volg je deze instructies in omgekeerde volgorde.
100 commentaren
If not disconnecting battery before replacement of ssd, will ssd be damaged for sure, or is it just a precaution and not likely?
Chris -
This is recommendation. I never disconnect battery and no issues occur so far.
Oleg -
Yes, damage can occur. Always disconnect any kind of power before removing different boards. After removing battery connector, it can be a good idea to discharge capacitors by pressing the power button on your mac. This ensures theres no latent current passing through the circuits.
I know this is an old comment but it is the top one, so this is a note for other people :)
You don’t only risk the SSD, you also risk damaging the rest of the computer.
Also please only use a plastic tool to lift off the battery connector, shorting out the pins can damage your SMC!
Which SSD can i use for upgrade? Can it be a normal like from Samung or else? Or has it to be from Apple?
Same question here...
Same question here...
OWC now has SSD upgrades up to 1TB for this model: https://eshop.macsales.com/shop/ssd/owc/...
rtwdanl -
NVME.2 for any brand as you want.
Apple doesn’t sell standalone SSD’s but you can’t youse a normal one from Samsung because Samsung doesn’t make mini PCIe drives for retail. To my knowledge, and that’s what I used the only solution is the OWC Aura Pro X2 SSD upgrade kit. comes in 240, 480, 1TB and 2TB’s of storage. ( I recommend you to buy the upgrade kit and not the SSD only because then you can repurpose your old SSD as an external drive.) Unfortunately, I can’t provide you a link.
Devnol -
Supports M.2 NVME / AHCI SSDs such as Samsung 960 EVO, Samsung 970 EVO/PRO, WD Black, Crucial P1, HP EX920, ADATA SX8200, NVME SSD Intel 600p series and so on. You are kindly reminded that macOS failed when it stopped hibernation with some NVME SSDs of some brands (some are Samsung but not sure). For me I used the Intel 760p.
No, it, unfortunately, cannot be from Samsung. Apple uses a proprietary SSD type. You can get an SSD from OWC. They offer up to 2TB SSD options. They are a bit pricy, but the upgrade is worth it if you are upgrading from say a 128 or 256GB SSD.
There are ways to run a normal SSD but they require special connectors. OWC is probably your best bet for a Macbook pro compatible drive. It is mac proprietary. I believe with a normal M.2 you won’t be able to get it to wake up from Sleep mode. But not sure.
There is a firmware update in the latest macOS 10.14 Mojave (or newer) Security Update with an updated NVMe driver that fixes hibernation issues. If your Boot ROM doesn’t update with the 3rd party one installed you can put the stock one back in do the firmware update and then put the 3rd party one back in.
mdgm -
I believe it can be normal, as long as you have the adapter stated at the beginning of the tutorial.
A man accused of choking a woman unconscious, driving her to a secluded location and raping her has accepted a plea deal and faces 17 years and four months in prison, according to court records and prosecutors.
OWC now sells replacement SSD's so you can drop a higher capacity in. Up to 1TB
That's what I just installed :)
So again the questions stand, do we only have the option of using OWC or can we use Samsung (which is way cheaper)?
You can’t use Samsung it’s not compatible. Samsung is m.2 and OWC is mini PCie
Devnol -
For all the screws you use the P5 pentalobe screwdriver?
Carlos -
Pentalobe is only for the screws on the bottom cover. The Torx screw driver is for the remainder.
Fredrik -
I never, ever, ever considered using anything but the correct tool on the Pentalobe screws. Too easy to strip and void your warranty (if still in effect), as well as make it almost impossible to get inside later for another upgrade or repair. The Wiha P5 Pentalobe screwdriver fits like a glove and costs only about $11 (a fraction of your drive's price)at Amazon.com. Get it!
marketing -
I followed this exactly and was able to replace my broken trackpad. I did not have to replace the ribbon OR the battery. However I would suggest getting the ribbon since it’s fairly cheap, as for the batteries I was able to do it with a card only. I didn’t use any heat or the liquid but it takes some time. You really have to work the card in there to release the glue. Also you must be very careful not to bend the batteries or damage them, if you do you must replace with new. This took me about 1.5hrs and my computer works like new. Apple cost for this job was around $450, I did it for $120. Big ups to ifixit for this awesome tutorial, tool set and parts!
On a side note, only use quality tools, the cheap ones will break or strip the screws.
Dustin Steward -
Note that the eight 3mm screws have a shoulder under the head, while the two 2.3mm screws are “full thread”, i.e., there is no shoulder under their heads. It’s important to put the two screws with no shoulder at the hinge of the cover.
All ten screws require a P5 Pentalobe screwdriver, preferably with a magnetized tip to help hold and position the screw.
All of the screws have blue “Loctite” thread locker compound on their threads. This is to help prevent the screws from working loose and falling out. Don’t attempt to clean the Loctite from the screws — leave it in place, and it will continue to help prevent the re-inserted screws from working loose.
When replacing the bottom cover, it is a good technique to insert and BEGIN tightening all ten screws BEFORE fully tightening any one screw. After all the screws have been started, then go around and finish tightening all of them. By doing this, you make it easier to feel that each screw has been started properly, and is not “cross-threaded”.
doubleclutch -
This is what I found on my MBP mid-2014 13” Retina. All 10 used the same screwdriver. I didn’t see the blue “loctite” but I also got my computer refurbished.
Evan Shulman -
A good technique for starting to thread the screws when replacing them is to position and align the screw, and with the driver, gently turn the screw in the REMOVAL direction until you feel and hear a slight click. This click happens when the leading thread of the screw drops off of the leading edge of the thread in the hole — this is the point at which the threads are properly positioned for engagement. You can now turn the driver and screw in the TIGHTENING direction. This technique will help prevent accidental “cross-threading” of the screw, which will damage the threads permanently.
Note that this is a useful technique when installing ANY threaded fastener.
doubleclutch -
Hi peeps,
I have a wifi problem on this MBP 13” early 2015 and was pleasently surprised to find your guide to changing the airport card.
However upon closer inspection it seems that on my MBP (purchased new or so I thought) the 3 antennae seem so have been soldered together at the point where they are clamped to the chassis. I have photos but cannot post here. Can anyone conform that where the 3 antennae wires are held to the chssis by the 2 scew metal support (just before disappearing into the screen hinge), the support is not meant to short the 3 wires together. This makes no sense for 3 seperate antennae wires.
Any advice /close up photos is welcome here.
dom
colonel mustard -
Tip: Use post-it notes to keep track of screws
1. Pack of post it notes
2. Stick screws to the sticky part of the post it note
3. Write on the post it note which step and what kind of screw it is
ibash -
Hi, in order to drain the battery I am running:
yes > /dev/null
in 4 terminals, so the CPU maxes out at almost 99%.
I hope this speeds up the battery draining process.
And the backlight is at maximum brightness :-)
You can see the cpu load in Activity Monitor.
Its draining at 20% per 15 minutes.
Any concerns about draining the battery in this way?
Andre van der Ham -
Something I’ve been curious about, is it possible to upgrade a late 2013 Retina model MacBook Pro, with the improved 16gb ram and i7 processor logic board from the 2015 retina model? I’d be interested to try but not ready to shell out the $500+ to be the first lol
Chat Dawgie -
Without rehashing what others have said, I would highly recommend reading through the steps *and* the comments for each before tackling your replacement for tips. Highlights for me were: only disconnecting what actually needed to be disconnected, rotating the spudger to release the track pad cable, a hair dryer worked perfectly fine, and the pencil outline of the battery before you remove. You got this!
N DesRochers -
Installation of replacement AirPort card was easier than I had expected thanks to this guide. Thank you.
chaslaw -
I use replaced SSD and it was super easy and working great. I can finally upgrade Mac OS with plenty of room to spare and no more low memory alerts. Well worth investment and didn’t have to buy new laptop
Pete James -
It's interesting that this tutorial is rated Moderate even though you need to remove the battery. The battery removal tutorial which is basically the same but with fewer steps is rated Difficult.
Marv Ruona -
when i pulled the screws out i arranged them in the same way they were in. the top 2 middle screws appeared to be shorter than the rest. in order to keep them in place i got a square of packing tape sticky side up, taped both sides down with 2 other pieces of tape. and then put the screws head down in the order i pulled them.
Jason Wade -
Excellent instructions although checking battery and speakers aligned before fixing batteries into place is essential. MacBook good as new!
John Foreman -
I find it helpful to spread a soft, slightly fuzzy cloth (like flannel) over my workspace before doing something with small parts. It keeps screws and things from rolling or bouncing away. A towel might be too plush, though, as a screw might get lost in it.
Richard KeslerWest -
I cannot get the two screws (that are different than the other ones) out and now they’re stripped. Any idea what to do without using a drill?
Honeybee94 -
DO NOT REMOVE SPEAKER CABLES!! The connectors are fragile. Just remove speakers and bend attached cable away from battery. Same for trackpad cable connector at front side. This cable crosses the middle of the battery. Just remove the one connector on the back side - leave front side connector attached and fold cable toward front of computer out of way of battery.
Paul Lebow -
Is there a mistake in the wrench size?
When I did it I used a 1.3mm one.
ちくわちくわ -
The Dutch site fixje.nl says (see under "Welke MacBook Pro A1502 batterij kopen?") that the A1582 battery, which is for the Early 2015 version of the A1502 13-inch MacBook Pro, will fit the Late 2013–Mid 2014 versions of the A1502 13-inch MacBook Pro.
The A5182 battery has a higher capacity (6559 mAh) than the A1493 battery (6330 mAh), which is for the Late 2013–Mid 2014 models.
Can anyone confirm that the Early 2015 battery will actually fit in and work with the earlier A1502 models?
Philip Dygeus -
Just finished the battery replacement for Macbook Pro 13 in Early 2015. Followed the instructions to the letter. Everything went back together perfectly and now waiting for the battery to charge. Very appreciative of the instructions and the tools provided to do this job! Thank you iFixit!!
LOL - now considering replacing the SSD hard drive...
Abraham Wick -