
Inleiding
Gebruik deze handleiding om de vastgelijmde batterij veilig uit je MacBook Pro te verwijderen met behulp van een batterij vervangingskit van iFixit. De lijmverwijderaar in je kit verzacht de lijm die de batterij bevestigt en zorgt ervoor dat je de batterij makkelijker kunt verwijderen. Als alternatief kun je de iOpener gebruiken om de batterij te verwarmen en de lijm eronder zo te verzachten.
De lijmverwijderaar van iFixit is licht ontvlambaar. Voer deze procedure daarom uit in een goed geventileerde ruimte, rook niet tijdens de reparatie en werk ook niet in de buurt van een open vuur.
Om het risico op schade te minimaliseren, ontlaad je de batterij van je MacBook voordat je met deze procedure begint. Een geladen lithium-ion batterij kan een gevaarlijke en oncontroleerbare brand veroorzaken als deze per ongeluk wordt doorboord. Neem, als je batterij gezwollen is, de juiste voorzorgsmaatregelen.
Let op: De vloeistof die je gebruikt om de lijm te verzachten, kan ook bepaalde soorten plastic aantasten, zoals de plastic speakerbehuizingen in je MacBook Pro. Wees daarom voorzichtig bij het toedienen van de vloeistof.
-
-
Verwijder de volgende tien schroeven die de onderste behuizing aan de bovenste behuizing bevestigen:
-
Twee 2.3 mm lange P5 Pentalobe schroeven
-
Acht 3.0 mm lange P5 Pentalobe schroeven
-
-
-
Wring het topje van je vingers tussen de bovenste en de onderste behuizing.
-
Trek de onderste behuizing rustig en op voorzichtige wijze weg van de bovenste behuizing om deze te verwijderen.
-
-
-
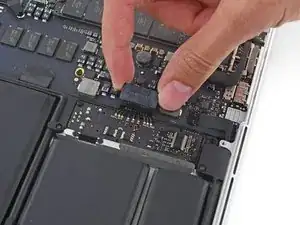
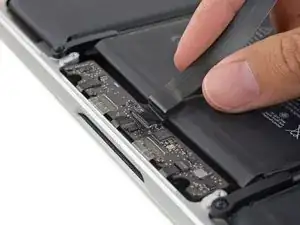
Gebruik het platte einde van een spudger om de batterijaansluiting in een rechte beweging uit het contact op het logic board omhoog te duwen.
-
-
-
Verwijder de twee 2.1 mm lange T5 Torx-schroeven die de kabelbeugel van het I/O-bord, aan de kant van het logic board, bevestigen.
-
Verwijder de kabelbeugel van het I/O-bord.
-
-
-
Gebruik het platte einde van een spudger om de aansluiting van het I/O-bord in een rechte beweging uit het contact op het logic board omhoog te duwen.
-
-
-
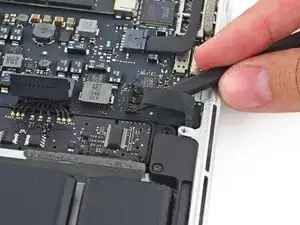
Steek de punt van je spudger voorzichtig onder de kabel van de rechterspeaker, dichtbij de aansluiting, en til deze vervolgens uit het contact op het logic board.
-
-
-
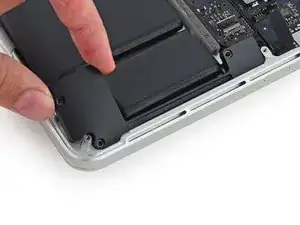
Verwijder de volgende schroeven die de rechterspeaker aan de bovenste behuizing bevestigen:
-
Eén 5.7 mm lange T5 Torx-schroef
-
Eén 6.5 mm lange T5 Torx-schroef
-
Eén 3.8 mm lange T5 Torx-schroef
-
-
-
Steek de punt van een spudger onder de kabel van de linkerspeaker, in de buurt van de aansluiting, en til deze uit het contact op het logic board.
-
-
-
Verwijder de volgende schroeven, die de linkerspeaker aan de bovenste behuizing bevestigen:
-
Eén 5.7 mm lange T5 Torx-schroef
-
Eén 6.5 mm lange T5 Torx-schroef
-
Eén 3.8 mm lange T5 Torx-schroef
-
-
-
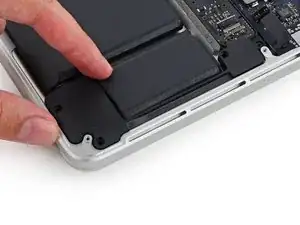
Til de hoek van de linkerspeaker omhoog en schuif deze om de batterij heen weg om te verwijderen.
-
-
-
Gebruik het platte einde van een spudger om de trackpadaansluiting in een rechte beweging uit het contact op het logic board omhoog te duwen.
-
-
-
Til de kabel van het trackpad omhoog van de batterij en maak deze daarmee los van de lijm die het op de batterij bevestigt.
-
-
-
Gebruik het einde van een spudger om de bevestigingsklem op de ZIF-aansluiting omhoog te klappen.
-
-
-
Trek de trackpadkabel in een rechte beweging uit het ZIF-contact op het controlebord van het trackpad.
-
-
-
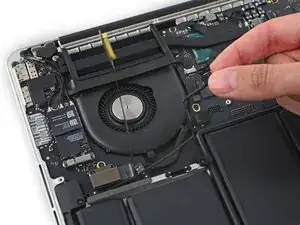
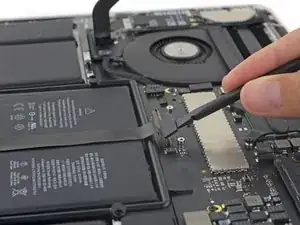
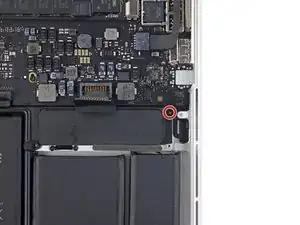
Verwijder de enkele 3.7 mm lange T5 Torx-schroef die het batterijbord aan de bovenste behuizing bevestigt.
-
-
-
Om je scherm te beschermen, kun je een laag aluminiumfolie tussen het scherm en je toetsenbord plaatsen zodat het de vloeistof tegenhoudt tijdens het werken.
-
-
-
Als je de alternatieve methode met de iOpener gebruikt, kun je de volgende drie stappen overslaan.
-
Draag oogbescherming bij het gebruiken en toedienen van de lijmverwijderaar. (Oogbescherming wordt ook met de kit meegeleverd.)
-
Er zitten ook beschermende handschoenen in de kit. Als je geen huidirritaties wilt, trek je nu je handschoenen aan.
-
-
-
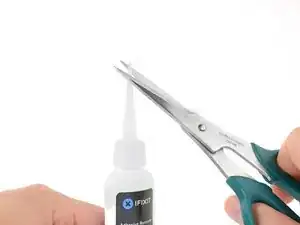
Trek de rubberen dop van de fles met lijmverwijderaar.
-
Gebruik een schaar om de verzegelde punt van de fles door te knippen.
-
-
-
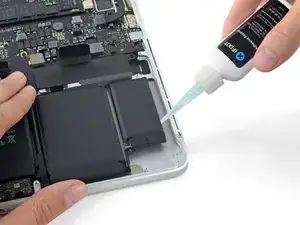
Dien een aantal druppels lijmverwijderaar in gelijke mate toe onder de zijkant van de meest rechtse batterijcel.
-
Wacht gedurende 2-3 minuten om de lijmverwijderaar in te laten trekken onder de batterijcel voordat je verdergaat.
-
-
-
Gebruik de hete iOpener om de helft van de twee meest rechte batterijcellen te bedekken.
-
Na ongeveer een minuut kun je de iOpener opnieuw verwarmen en deze naar de andere helft van de twee rechtse batterijcellen verplaatsen.
-
-
-
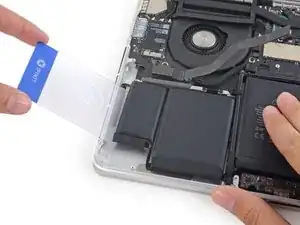
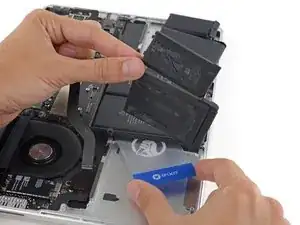
Duw een plastic kaart tussen de meest rechtse batterijcel en de bovenste behuizing en snijd de lijm ertussen door.
-
Als je na het gebruik van de iOpener nog steeds moeite hebt met het loswrikken van de batterijcellen, verwarm je de iOpener nog eens.
-
-
-
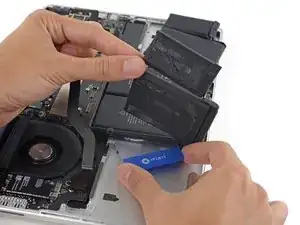
Herhaal deze procedure met de naastgelegen batterijcel:
-
Dien een kleine hoeveelheid vloeibare lijmverwijderaar toe onder de batterijcel en wacht gedurende 2-3 minuten om dit te laten intrekken en de lijm te verzachten.
-
Als alternatieve methode, kun je dit gebied met je iOpener verwarmen.
-
Duw een plastic kaart voor ongeveer twee centimeter tussen de batterijcel en de bovenste behuizing en wrik de cel voorzichtig omhoog om deze los te krijgen van de lijm.
-
-
-
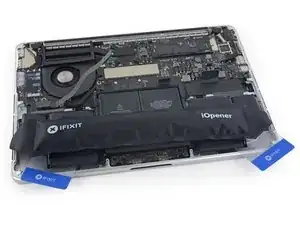
Laat je plastic kaart tijdelijk onder de twee meest rechtse batterijcellen zitten om te voorkomen dat de lijm zich opnieuw aan de cellen en de behuizing hecht.
-
Als je een iOpener gebruikt, verwarm deze dan opnieuw en leg deze opnieuw op de batterijcellen, deze keer de meest linkse.
-
-
-
Herhaal de bovengenoemde procedure om de twee linkse batterijcellen van de bovenste behuizing te scheiden.
-
Onthoud dat je een klein beetje lijmverwijderaar toedient onder iedere batterijcel en gedurende 2-3 minuten wacht om dit te laten intrekken.
-
Gebruik een tweede plastic kaart om de twee linkse batterijcellen van de bovenste behuizing te scheiden.
-
-
-
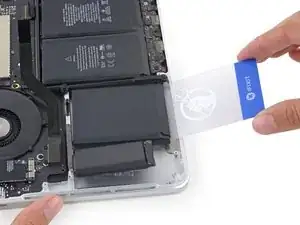
Steek je plastic kaart tussen de tweede batterijcel van links en de bovenste behuizing om de lijm door te snijden die de twee aan elkaar verbindt, en wrik de batterijcel vervolgens omhoog uit de behuizing.
-
-
-
Laat de tweede kaart in de hoek tussen de twee linker batterijcellen zitten.
-
Indien je een iOpener gebruikt, verwarm je deze nu opnieuw en leg je deze op de twee middelste batterijcellen.
-
Net zoals hiervoor laat je de iOpener gedurende ongeveer een minuut op dezelfde positie liggen, en verwarm je deze tussendoor opnieuw, om iedere helft van de middelste batterijcellen gelijk te verwarmen.
-
In de volgende stappen kun je een derde kaart of de kaart uit de rechterhoek gebruiken. De lijm in de rechterhoek zou inmiddels wel droog en koel genoeg moeten zijn dat de cellen losgetrokken kunnen worden wanneer nodig.
-
-
-
Als je lijmverwijderaar gebruikt, dien je nu weer een aantal druppels toe onder beide van de laatste twee middelste cellen.
-
Geef de lijmverwijderaar 2-3 minuten om in te laten trekken onder de batterijcellen.
-
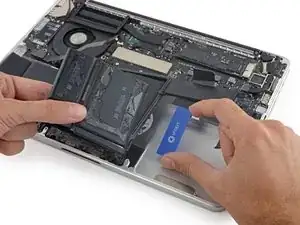
Steek, terwijl je de meest rechtse batterijcellen uit de weg houdt, een plastic kaart onder de rechter van de middelste batterijcellen.
-
Duw de kaart voor ongeveer de helft van z'n lengte onder de cel om de lijm die het aan de bovenste behuizing bevestigt door te snijden.
-
Laat de kaart op z'n plek zitten om te voorkomen dat de lijm zich opnieuw gaat hechten.
-
-
-
Herhaal dezelfde procedure bij de laatst overgebleven batterijcel.
-
Steek, terwijl je de buitenste batterijcellen uit de weg houdt, een plastic kaart halverwege onder de linker van de middelste batterijcellen en probeer daarbij opnieuw het bord van het trackpad te vermijden.
-
-
-
Vestig je aandacht weer op de kaart onder de rechter van de middelste batterijcellen en kantel deze om de batterij volledig los te krijgen van de bovenste behuizing.
-
Als de batterij er nog steeds niet gemakkelijk uit komt, kan het nodig zijn dat je je iOpener nog eens verwarmt en deze op de gebieden legt die nog vast zitten. Snijd de lijm vervolgens rustig door met je plastic kaarten.
-
-
-
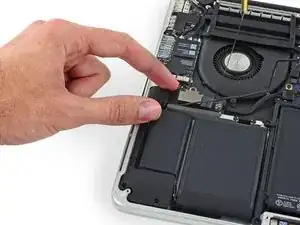
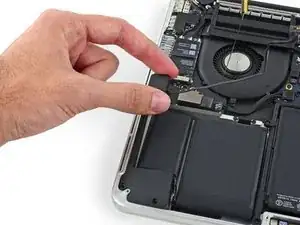
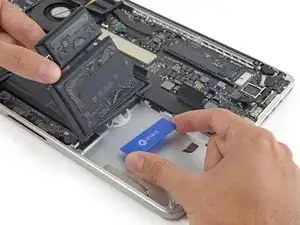
Verwijder de batterij.
-
Met een beetje geluk kun je alle kleefstrips er rustig met je vingers uit trekken.
-
Als dit niet lukt, kun je iedere sectie met lijm bevochtigen met wat lijmverwijderaar, waarna je deze in laat trekken gedurende ongeveer 2-3 minuten. Schraap de lijm er vervolgens uit met een openingsplectrum of een van de andere tools in je kit. Dit kan wat moeite kosten, dus wees geduldig.
-
Veeg mogelijk overgebleven lijmverwijderaar uit de laptop en geef je MacBook Pro wat tijd om te drogen.
-
Kalibreer je vers geïnstalleerde batterij: laad deze op tot 100% en laat 'm nog minstens twee uur doorladen. Haal je laptop van de oplader en gebruik deze totdat deze zichzelf uitschakelt vanwege een lege batterij. Wacht 5 uur en laad je laptop nog een keer ononderbroken op tot 100%.
-
Als je onverwacht of vreemd gedrag in je laptop ziet, of je hebt problemen nadat je je nieuwe batterij hebt geïnstalleerd, kan het handig zijn de SMC van je MacBook Pro te resetten.
-


Vergelijk je vervangende onderdeel met het originele onderdeel — het kan zijn dat je meerdere onderdelen mee over moet zetten of beschermlagen voor de lijm moet verwijderen voordat je het nieuwe onderdeel kunt installeren. Sommige nieuwe batterijen bevatten bijvoorbeeld vier rubberen puntjes op het frame. Deze zul je moeten verwijderen zodat je batterij in het toestel past.
Om je toestel weer in elkaar te zetten, volg je deze instructies in omgekeerde volgorde.
Breng je e-afval naar een R2 of e-Stewards gecertificeerde recycler.
Ging je reparatie niet zoals gepland? Bezoek de pagina over [[Troubleshooting Problems After a Repair|probleemoplossing] of doorzoek ons antwoordenforum voor hulp bij het oplossen van je probleem.
178 commentaren
is it possible to use MBP early 2015's battery on a late 2013 model?
No, they're different parts.
I wonder the same.
Amazon https://www.amazon.de/EGOWAY-A1493-A1582... claims to work for
Compatible with Laptop Models: Mac Book Pro 11.1 13" Retina A1502 ME864xx/A / ME865xx/A/ ME866xx/A - (Late 2013 Version) Mac Book Pro 13" Retina "Core i5" 2.4 Mac Book Pro 13" Retina "Core i5" 2.6 Mac Book Pro 13" Retina "Core i7" 2.8 MGX72xx/A / MGX82xx/A / MGX92xx/A - (Mid 2014 Version) Mac Book Pro 13" Retina "Core i5" 2.4 Mac Book Pro 13" Retina "Core i5" 2.6 Mac Book Pro 13" Retina "Core i7" 2.8 Compatible with Laptop Models: Mac Book Pro 12.1 13" Retina A1502 MF839xx/A / MF840xx/A/ MF841xx/A/ MF843xx/A - (Early 2015 Version) Mac Book Pro 13" Retina "Core i5" 2.7 Mac Book Pro 13" Retina "Core i5" 2.9 Mac Book Pro 13" Retina "Core i7" 3.1
Martin -
Thanks to this guide I saved my broken MacBook Pro from a coffee spill that killed the battery. It cost me about 30% compared to what it would have cost to have the battery changed at an Apple authorized repair center. It wasn't easy to do, but that just made it all the more satisfying.
One comment: the new battery pack I bought came attached to a thin film which had to be removed. I unfortunately tore off some of the strips of glue attached to the back of the battery cells, before getting the hang of it. No big deal. But if you have to do the same thing: peel slowly.
Fredrik -
After i replace the battery, the new battery is outofsync with osx battery indicator. When the indicator hit the 30% mark the macbook just shutdown completly. How do i syncroniz the new battery with osx?
The tutorial i saw only, tell you to fully charged the battery and let it depleet until the warning message pop up that your battery is low and your mac go into sleep mod. Problem my mac cant go into sleep mod because it thinks that it has 30% left of juice.
Is there any method to change the sleep setting or to force a recalibration?
I would download an application called coconut battery from here: http://www.coconut-flavour.com/coconutba...
This will indicate your battery's current health (I am not sure how accurate it is or how it measures the milliamps/hour) which might help you determine when you need to recharge it. I don't know what else you could do but I'd check the battery's health before anything since it might be causing the problem if it is faulty.
You can try resetting the SMC controller. I had the issue of run away fans and no battery detected, but after a quick reset of the SMC all working correctly.
The process is to turn of the MacBook completely, press and hold: SHIFT, CTRL, ALT and POWER for three-five seconds, then just reboot and see if that helps.
Works for lots of minor issues with clock, sleeping and battery issues.
For all the screws you use the P5 pentalobe screwdriver?
Carlos -
Pentalobe is only for the screws on the bottom cover. The Torx screw driver is for the remainder.
Fredrik -
I never, ever, ever considered using anything but the correct tool on the Pentalobe screws. Too easy to strip and void your warranty (if still in effect), as well as make it almost impossible to get inside later for another upgrade or repair. The Wiha P5 Pentalobe screwdriver fits like a glove and costs only about $11 (a fraction of your drive's price)at Amazon.com. Get it!
marketing -
I followed this exactly and was able to replace my broken trackpad. I did not have to replace the ribbon OR the battery. However I would suggest getting the ribbon since it’s fairly cheap, as for the batteries I was able to do it with a card only. I didn’t use any heat or the liquid but it takes some time. You really have to work the card in there to release the glue. Also you must be very careful not to bend the batteries or damage them, if you do you must replace with new. This took me about 1.5hrs and my computer works like new. Apple cost for this job was around $450, I did it for $120. Big ups to ifixit for this awesome tutorial, tool set and parts!
On a side note, only use quality tools, the cheap ones will break or strip the screws.
Dustin Steward -
Note that the eight 3mm screws have a shoulder under the head, while the two 2.3mm screws are “full thread”, i.e., there is no shoulder under their heads. It’s important to put the two screws with no shoulder at the hinge of the cover.
All ten screws require a P5 Pentalobe screwdriver, preferably with a magnetized tip to help hold and position the screw.
All of the screws have blue “Loctite” thread locker compound on their threads. This is to help prevent the screws from working loose and falling out. Don’t attempt to clean the Loctite from the screws — leave it in place, and it will continue to help prevent the re-inserted screws from working loose.
When replacing the bottom cover, it is a good technique to insert and BEGIN tightening all ten screws BEFORE fully tightening any one screw. After all the screws have been started, then go around and finish tightening all of them. By doing this, you make it easier to feel that each screw has been started properly, and is not “cross-threaded”.
doubleclutch -
This is what I found on my MBP mid-2014 13” Retina. All 10 used the same screwdriver. I didn’t see the blue “loctite” but I also got my computer refurbished.
Evan Shulman -
A good technique for starting to thread the screws when replacing them is to position and align the screw, and with the driver, gently turn the screw in the REMOVAL direction until you feel and hear a slight click. This click happens when the leading thread of the screw drops off of the leading edge of the thread in the hole — this is the point at which the threads are properly positioned for engagement. You can now turn the driver and screw in the TIGHTENING direction. This technique will help prevent accidental “cross-threading” of the screw, which will damage the threads permanently.
Note that this is a useful technique when installing ANY threaded fastener.
doubleclutch -
Hi peeps,
I have a wifi problem on this MBP 13” early 2015 and was pleasently surprised to find your guide to changing the airport card.
However upon closer inspection it seems that on my MBP (purchased new or so I thought) the 3 antennae seem so have been soldered together at the point where they are clamped to the chassis. I have photos but cannot post here. Can anyone conform that where the 3 antennae wires are held to the chssis by the 2 scew metal support (just before disappearing into the screen hinge), the support is not meant to short the 3 wires together. This makes no sense for 3 seperate antennae wires.
Any advice /close up photos is welcome here.
dom
colonel mustard -
Tip: Use post-it notes to keep track of screws
1. Pack of post it notes
2. Stick screws to the sticky part of the post it note
3. Write on the post it note which step and what kind of screw it is
ibash -
Hi, in order to drain the battery I am running:
yes > /dev/null
in 4 terminals, so the CPU maxes out at almost 99%.
I hope this speeds up the battery draining process.
And the backlight is at maximum brightness :-)
You can see the cpu load in Activity Monitor.
Its draining at 20% per 15 minutes.
Any concerns about draining the battery in this way?
Andre van der Ham -
Something I’ve been curious about, is it possible to upgrade a late 2013 Retina model MacBook Pro, with the improved 16gb ram and i7 processor logic board from the 2015 retina model? I’d be interested to try but not ready to shell out the $500+ to be the first lol
Chat Dawgie -
Without rehashing what others have said, I would highly recommend reading through the steps *and* the comments for each before tackling your replacement for tips. Highlights for me were: only disconnecting what actually needed to be disconnected, rotating the spudger to release the track pad cable, a hair dryer worked perfectly fine, and the pencil outline of the battery before you remove. You got this!
N DesRochers -
Installation of replacement AirPort card was easier than I had expected thanks to this guide. Thank you.
chaslaw -
I use replaced SSD and it was super easy and working great. I can finally upgrade Mac OS with plenty of room to spare and no more low memory alerts. Well worth investment and didn’t have to buy new laptop
Pete James -
It's interesting that this tutorial is rated Moderate even though you need to remove the battery. The battery removal tutorial which is basically the same but with fewer steps is rated Difficult.
Marv Ruona -
when i pulled the screws out i arranged them in the same way they were in. the top 2 middle screws appeared to be shorter than the rest. in order to keep them in place i got a square of packing tape sticky side up, taped both sides down with 2 other pieces of tape. and then put the screws head down in the order i pulled them.
Jason Wade -
Excellent instructions although checking battery and speakers aligned before fixing batteries into place is essential. MacBook good as new!
John Foreman -
I find it helpful to spread a soft, slightly fuzzy cloth (like flannel) over my workspace before doing something with small parts. It keeps screws and things from rolling or bouncing away. A towel might be too plush, though, as a screw might get lost in it.
Richard KeslerWest -
I cannot get the two screws (that are different than the other ones) out and now they’re stripped. Any idea what to do without using a drill?
Honeybee94 -
DO NOT REMOVE SPEAKER CABLES!! The connectors are fragile. Just remove speakers and bend attached cable away from battery. Same for trackpad cable connector at front side. This cable crosses the middle of the battery. Just remove the one connector on the back side - leave front side connector attached and fold cable toward front of computer out of way of battery.
Paul Lebow -
Is there a mistake in the wrench size?
When I did it I used a 1.3mm one.
ちくわちくわ -
The Dutch site fixje.nl says (see under "Welke MacBook Pro A1502 batterij kopen?") that the A1582 battery, which is for the Early 2015 version of the A1502 13-inch MacBook Pro, will fit the Late 2013–Mid 2014 versions of the A1502 13-inch MacBook Pro.
The A5182 battery has a higher capacity (6559 mAh) than the A1493 battery (6330 mAh), which is for the Late 2013–Mid 2014 models.
Can anyone confirm that the Early 2015 battery will actually fit in and work with the earlier A1502 models?
Philip Dygeus -
Just finished the battery replacement for Macbook Pro 13 in Early 2015. Followed the instructions to the letter. Everything went back together perfectly and now waiting for the battery to charge. Very appreciative of the instructions and the tools provided to do this job! Thank you iFixit!!
LOL - now considering replacing the SSD hard drive...
Abraham Wick -