
Inleiding
Gebruik deze handleiding om een kapotte schermmodule te vervangen.
Onderdelen
-
-
Verwijder de volgende tien schroeven:
-
Drie 14.4 mm lange Phillips #00 schroeven
-
Drie 3.5 mm lange Phillips #00 schroeven
-
Vier 3.5 mm lange geschouderde Phillips #00 schroeven
-
-
-
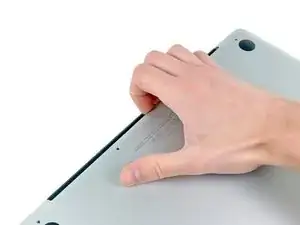
Gebruik je vingers om de onderste behuizing, van de body van de MacBook, in de buurt van de ventilatieopening, weg te wrikken.
-
Verwijder de onderste behuizing.
-
-
-
Gebruik de voor- of achterkant van een spudger om de batterijaansluiting uit het contact op het moederbord omhoog te wrikken.
-
-
-
Buig de kabel van de batterij weg van het contact op het logic board zodat het niet per ongeluk contact kan maken met het contact terwijl je aan het werk bent.
-
-
-
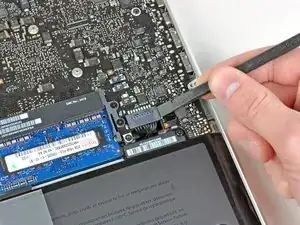
Gebruik het platte einde van een spudger om de lintkabelaansluiting van de AirPort/Bluetooth-module uit het contact op het logic board omhoog te duwen.
-
-
-
Duw de lintkabel van de AirPort/Bluetooth-module uit de weg en peuter de camerakabel los van het kleefmiddel dat het aan de subwoofer en de beugel van de AirPort/Bluetooth-module bevestigt.
-
Begeleid de camerakabel weg onder de vinger die de kabel vasthoudt en die in de beugel van de AirPort/Bluetooth-module is verwerkt.
-
-
-
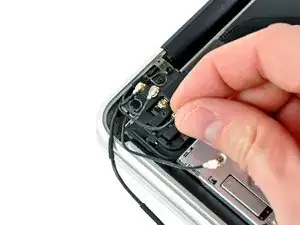
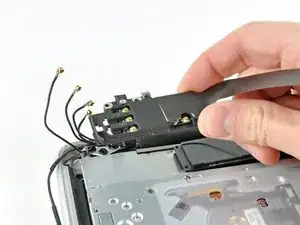
Gebruik de punt van een spudger om de antenne-aansluiting, die het dichtst bij het logic board zit, uit het contact op het AirPort/Bluetooth-bord omhoog te duwen.
-
Begeleid de antennekabel weg onder de klem die in de beugel van de AirPort/Bluetooth-module verwerkt is.
-
-
-
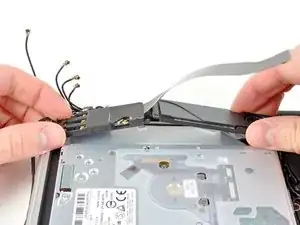
Koppel de resterende drie antennekabelaansluitingen met behulp van de methode die in de vorige stap is uitgelegd.
-
Begeleid de kabels weg uit de inkepingen die in de beugel van de AirPort/Bluetooth-module gesneden zijn.
-
-
-
Verwijder de volgende vijf schroeven:
-
Twee 10.3 mm lange Phillips schroeven
-
Twee 3.1 mm lange Phillips schroeven
-
Eén 5 mm lange Phillips schroef
-
-
-
Trek de AirPort/Bluetooth-module en de subwoofer omhoog richting het midden van de zijkant van de optische schijf totdat deze van elkaar loskomen.
-
-
-
Verwijder de AirPort/Bluetooth-module en wees daarbij voorzichtig voor de kwetsbare antenne-aansluiting in de buurt van de hoek van de bovenste behuizing.
-
-
-
Verwijder twee van de drie 6 mm lange T8 Torx-schroeven die de rechterkant van het scherm aan de bovenste behuizing bevestigen.
-
-
-
Pak de plasticen treklip die aan het slot van de schermdatakabel bevestigd is en draai deze in de richting van de DC in de computer.
-
Trek de schermdatakabel in een rechte beweging uit het contact op het logic board.
-
-
-
Verwijder de volgende twee schroeven:
-
Eén 8.6 mm lange Phillips schroef
-
Eén 5.5 mm lange Phillips schroef
-
Verwijder de houder van de schermdatakabel van de bovenste behuizing.
-
-
-
Verwijder het stuk schuimtape dat over de schroeven van het scherm zit, in de buurt van het MagSafe DC-In bord.
-
-
-
Verwijder twee van de drie 6 mm lange T8 Torx-schroeven die de linkerkant van het scherm aan de bovenste behuizing bevestigen.
-
-
-
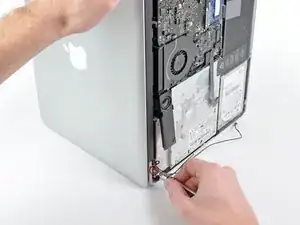
Open je MacBook Pro zodat het scherm haaks op de bovenste behuizing staat.
-
Plaats je geopende MacBook op een tafel zoals op de foto.
-
Verwijder, terwijl je het scherm en de bovenste behuizing met je linkerhand vasthoudt, de resterende T8 Torx-schroeven uit de onderste schermbeugels.
-
-
-
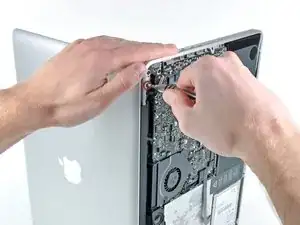
Pak de bovenste behuizing met je rechterhand vast en draai deze lichtjes in de richting van de bovenkant van het scherm, zodat de bovenste schermbeugel loskomt van de hoek van de bovenste behuizing.
-
Draai het scherm lichtjes weg van de bovenste behuizing.
-
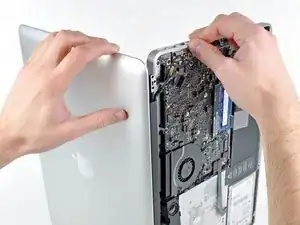
Til het scherm op en weg van de bovenste behuizing en wees hierbij voorzichtig dat je geen beugels of kabels kapot trekt.
-


Om je toestel weer in elkaar te zetten, volg je deze instructies in omgekeerde volgorde.

8 commentaren
Step 18 and 19 is easier if you place the bottom keyboard down, with the display hanging over the edge of a table. This stabilizes the bottom assembly, making teardown and reassembly easier for one person
Fantastic tip - I placed it in front of me so the display rested on my thighs while the base was flat on the table - very safe, no fear of dropping/slipping.
Annette -
Thank you Phillip for providing this Guide. I used it to replace a bad LCD assembly after a water spill damaged it. The last Step 20 is very difficult. I had the worst time trying to separate the two parts after I removed the final Torex screw. It took a while, trying different angles, but I finally got it. Putting in the new one was a trivial exercise...
fasthans -
Phillip, thank you so much for this excellent guide. I have no technical background at all but I found it very easy to use - and it saved me hundreds of dollars on a professional repair job. Keep up the good work!
How much weight can I save by removing the optical drive?
gunes314 -
You can save a lot of weight if lets say your installing a solid state drive or putting in a second hard drive but if you know that you use the CD/DVD disc drive a lot then you might just want to leave the drive alone.
Marshall WahlstromHelgren -
Tip: Use one of those weekday pill holders to have a cheep way to store screws you remove and each day of the week can be for different sizes or parts. It has been handy to have (much less expensive than the magnetic mat.
Robert Wacker -
Hello, where can I buy the screws I need in case I lose one of them?
taylornya -
iFixit sells a kit: MacBook Pro Unibody Lower Case Screw Set
Darrell Johnson -
I have one stripped screw... How opening without drill it?! Any suggestions please?
rodrigosady -
I also stripped a couple screws. I wasn’t able to open it up without drilling. After drilling the heads and removing the cover it was easy to hacksaw the tip and unscrew with a standard driver.
Michael Wilkens -
We have a guide for that!
Hoe verwijder je een doorgedraaide schroef?
Sam Omiotek -
My top tip - make sure you buy good quality Phillips screwdrivers and a magnetic holder. Cheap screwdrivers won’t get the screws undone safely. Without a magnetic holder you have no chance of getting the tiny crews in and out safely.
jeremyyoung -
A good Phillips 00 is your friend here. Also, when reinserting the screws, gently start anticlockwise and you wil feel a click at the start of the thread. This tells you you’re in the right place and less likely to cross-thread through force in the wrong place.
Iain Boyd -
I feel like these are 000 screws. Amazon sales describe them as such and my 000 screwdriver fits better
cam2000deluxe -
Before ordering a new Trackpad remove the existing battery and try clicking the Trackpad. If it clicks OK with the battery out the source of problem is likely a swollen battery, which should to be replaced even if it still works to some degree. From the side of the battery you will likely see the soft part of the battery bulging beyond the hard case.
Patrick Langvardt -
That’s absolutely correct as I can testify. With the battery removed I also adjusted the T6 set screw that adjusts the sensitivity of the trackpad click, evidently someone had cranked mine down tighter than the factory setting.
Gary Register -
Le quatrième paragraphe dans les instructions en français n’est pas correct : ce ne sont pas les 2 petites vis, mais les 7 petites vis qui sont inclinées. Et les 3 grandes sont bien verticales.
Degeorges -
Bonjour ! Merci de votre observation. J’ai corrigé la traduction. iFixit étant un wiki, n’hésitez pas à modifiez si vous remarquez une erreur :) Encore merci de votre attention et à bientôt !
Claire Miesch -
Tip: if you have a magnetic screw mat or similar, lay the macbook over the mat to make sure it catches any screws that may decide to fall of and hide under your table
Moritz -
Funny, it's not her hands that are doing the close ups. :)
Cinemated Man -
What's the difference between the shouldered and non shouldered screws? They look exactly the same to me.
MLNLRD -
the shouldered screws have a space where the threading stops and the head of the screw begins. i don't think the newer screw kits include them. i've lost most of my shouldered screws but the non shouldered screws will work, too. you just need to adjust everything carefully because a shouldered screw will stick out of the case instead of fitting flush if it's in a non-shouldered hole.
postjosh -
There are bateries labeled as "A1322" but marked as "High Performance" and rated 76.56WH/11.6V. Also sold as replacement for the MacBook Pro 13" mid 2012 Model A1278. Does the different rating, in particular the voltage, is compatible? Does it really provides some extra "performance" in any actual way?
Thanks
locutus -
does anyone know where to buy the shouldered 3.5mm screws? it looks like the current kit has substituted the non-shouldered version of the screw.
postjosh -
here's a comparison picture:
shouldered vs non-shouldered
postjosh -
My screws were in a slightly different configuration -- my macbook has never been opened before so I'm not sure why my screws were different from the diagram here. Anyways, the three long screws were in the same position, then, clockwise from the right-middle screw, with s = shouldered and r = regular, I had: s, s, r, s, r, r, s.
Spencer Pennington -