Inleiding

Gebruik deze handleiding om de vastgelijmde batterij in je 16" MacBook Pro te verwijderen met behulp van een iFixit-kit met lijmverwijderaar. De lijmverwijderaar is gemaakt om de lijm die de batterij op z'n plek houdt te verzwakken, waardoor je het met meer gemak kunt verwijderen.

De iFixit-lijmverwijderaar is licht ontvlambaar. Volg deze procedure in een goed geventileerde ruimte. Rook niet en werk ook niet in de buurt van een open vuur.

Om het risico op schade te minimaliseren, zet je je MacBook aan en laat je de batterij volledig leeglopen voordat je met deze procedure begint. Een geladen lithium-ion batterij kan een ongecontroleerde en gevaarlijke brand veroorzaken als deze per ongeluk wordt beschadigd. Neem, als je batterij gezwollen is, de juiste voorzorgsmaatregelen.

Let op: De vloeistof die wordt gebruikt om de lijm onder de batterij de verzwakken tast bepaalde soorten plastic aan. Volg alle instructies op en wees voorzichtig bij het toedienen van de lijmverwijderaar.

  1. dLTjRC36EADiCFBK
    dLTjRC36EADiCFBK
    FZYKkYtpGq1QwBO2
    YAOsWGKtCtOGVFRy
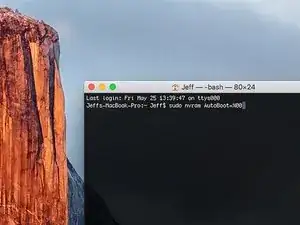
    • Voordat je de reparatie start, moet je de Auto Boot-functie van je Mac uitschakelen. Auto Boot zorgt ervoor dat je Mac opstart als je het scherm open doet en kan dus worden geactiveerd tijdens de reparatie. Gebruik deze handleiding of volg de ingekorte instructies hieronder om Auto Boot uit te schakelen. Het kan zijn dat deze command niet op alle Mac's werkt.

    • Zet je Mac aan en open Terminal.

    • Kopieer en plak de volgende command (of type het precies na) in Terminal:

    • sudo nvram AutoBoot=%00

    • Druk op [enter]. Wanneer de command is ingevoerd, voer je je adminwachtwoord in en druk je weer op [enter]. Note: je entertoets kan ook als "return" of ⏎ worden weergegeven.

    • Je kunt nu veilig je Mac uitzetten en de laptop openen zonder dat je laptop tijdens de reparatie uit zichzelf aan zal gaan.

    • Als je reparatie is voltooid en je Mac weer in elkaar zit, schakel de Auto Boot-functie dan weer in met de volgende command:

    • sudo nvram AutoBoot=%03

    Is this step necessary? I can’t perform this step as I am attempting to repair water damage and need to remove logic board & most likely replace the battery.

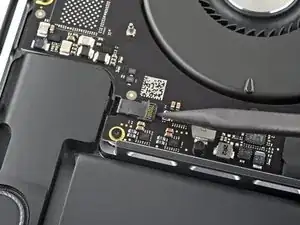
    Macrepair SF -

    @mac_medic You definitely don’t want the power coming on while the board is wet. In your case, I think powering on the machine to disable Auto Boot would do more damage than it prevents. I agree, skip this step and be prepared to disconnect the battery quickly if the laptop automatically powers on. Good luck!

    Jeff Suovanen -

    Thats right! You don't want power running while working on your logic board.

    Dan -

    This did not work when running High Sierra.

    Kyle B -

    Tried this on a 2018 MBP 13” Touchbar (there’s no iFixit guide for this model yet). Need to replace a broken screen.

    Luckily I managed to connect to an external screen (Cmd-Down Brightness to switch displays) and enter above command. Seems to work, but there’s another problem with this model - it powers up as soon as any key is pressed……. ffs <gnashes teeth>

    Cool_Breeze -

    I unscrew the battery first and wrap electrical tape over the logic board battery connector before attempting any repairs to the board. Haven’t had any problems yet and I’ve worked on about 10 of these models already. Also when you open the bottom case use a suction cup at the bottom and pull up then run a plastic spudger along the edges to disconnect the clips. Also only use a plastic spudger on the board. Saw a youtube video from a repair shop and he did not disconnect the power and used all metal tools during the entire process of removing the board. His last step was to disconnect the battery terminal.

    Brian -

    Is this step necessary if my mac can turn on? Battery fully dead(

    Nursat b -

    BEFORE YOU START: The included torx head stripped off before I was done (and you might need an additional T4) so stop now and go buy a good one. Also they fail to warn you above to get some blue threadlocker ahead of time.

    Jason Sherron -

    This command did not work for me and I read that sometime in later 2020 Apple stopped this command from working…any ideas on a work around?

    Patrick Machacek -

    Not able to do that with damaged screen

    richardjgreen -

    If you have a damaged screen you can still use a converter from thunderbolt (USB 3) to HDMI and plug your Macbook Pro to your TV as monitor display. Just make sure to chose the right Source (HDMI IN) in your TV. I did it and to make it work I unplug and plug again in my Macbook and so I could disable the Auto boot

    Roberto Sanchez Bustos -

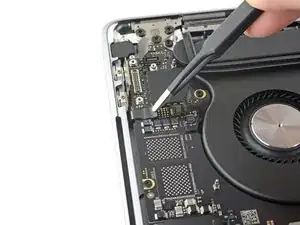
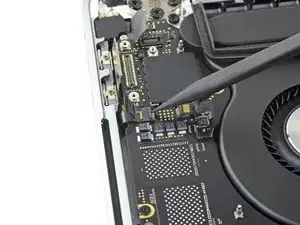
    Hi. This does not work on 2018 13” MacBook Pro with Touch Bar. I did exactly this to disable auto boot. But when I check by using nvram -p it says: auto-boot true. Am I doing something incorrectly? I did everything step by step. Copied and pasted the sudo command, pressed enter and then entered my password. I have Big Sur 11.1 installed. Is there any other way since I need to replace the screen. Thank you. Adrian

    Adrian Vizik -

    Hi everyone. This is also a little pointless if you can’t see anything on the screen, and you don’t have a display adapter to USB C to display it. I agree with Brian about removing the back and disconnecting the battery cable before you even think about opening the lid of the MacBook. Applying the insulation tape is also a handy little tip that just makes sure there is no way to discharge from either the board or battery.

    Roberto Enrieu -

    running `nvram -p | grep 'AutoBoot'` in terminal verifies that it was accepted

    result: `AutoBoot %00`

    Marek Polák -

    Running Big Sur 11.6.7 on a 2019 16" MBP, it's "auto-boot". So it's: nvram -p | grep 'auto-boot' to display the current state, the default is true - and then to change it, sudo nvram auto-boot=false which turns it off.

    Ed Mechem -

    This step is completely unnecessary if you follow the guide to disconnect the battery properly. Just put some tape between the battery and logic board connection to prevent it from accidentally touching and therefore powering on the laptop.

    Grant Ormsby -

    It took me a few tries to make this command work, as I was able to copy and paste the command into Terminal, but could not type in my laptop’s password. I finally typed my password into a text document, copied it (command C), and then pasted it into Terminal and it worked.

    tommy404 -

    I didn’t do this. Mine never auto-booted before I replaced the battery. Now it does.

    hatuxka -

    BEFORE YOU DO ANYTHING - CHECK THE BATTERY!

    I-fixit sent me a bad battery, which I didn’t realize until it was already install. They sent me a new one, but I wasted hours uninstalling and reinstalled.

    Get a volt meter and measure the voltage on the output of the battery pack. If it reads 0 V, SEND IT BACK. It should read over 2 V.

    bcardanha -

    I've just received my replacement battery and it reads 0,042V between the two main connectors. Do you think it's dead?

    peter sussex -

    When I did this from Terminal.app within Recovery Mode, the “sudo” was not recognized but I could invoke it without the sudo part. It seems to have been accepted when looking at “nvram -p”

    johann beda -

    When in Recovery Mode, you already have superuser powers. So you don't need to prefix commands with the sudo command to invoke them with root privileges; you already have them. Do a pwd (print working directory) after opening Terminal in Recovery Mode, and you'll see that you're in the root user's directory.

    Ed Mechem -

    I received the battery kit for my 2018 MacBook Pro and as per the above comment from bcardanha - Oct 12, 2021, I checked the voltage on the pads marked + and - . It was zero volts so I panicked a bit.

    I sent a message on the iFixiT Facebook page and I got no reply. I finally found the customer service email for Ifixit Europe and sent them an email voicing my concern as I was not keen to work for couple of hours just to discover that the battery is faulty. I had an almost instant reply on the email (kudos to them) and they adviced me to go ahead and install the new battery as the voltage measured when battery is not connected is not relevant.

    I took a leap of faith and after two hours… the new battery showed 50% charge and everything seems to be working just fine. I am happy it worked.

    Mircea Comanici -

    After removing the old battery and installing the new battery I powered up the MBP before screwing the bottom on. I discovered the my keyboard would not function. It took a few hours of investigation and frustration that I discovered the track pad power ribbon had become partially dislodged from the trackpad. I was able to see that this through the little machined slot where the battery sat. I had to remove the trackpad to reinsert the power ribbon back into the connector in the trackpad. after reassembling and reinstalling the battery etc the keyboard worked. Just food for thought if your run into the keyboard issue.

    Ed Mease -

    This should be the default. IMO I tell you to power on - not the lid.

    G Sena -

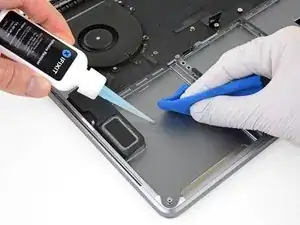
    Est ce que cela fonctionne sur un macbook pro 2017 sans touchbar ?

    maël muzelet -

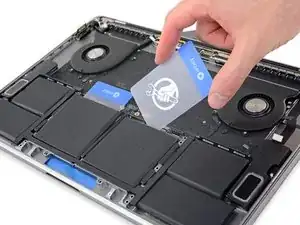
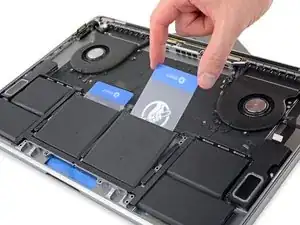
    Bonjour Maël, oui, ce tutoriel concerne "les MacBook Pro 2016 (et plus récents) et les MacBook Retina 12" 2017 (et plus récents)"

    Claire Miesch -

    Excellent instructions. I was able to follow and install the new screen. I recommend that you get a good set of tools before you begin. I started with an inexpensive repair kit bought online. The Penta and torx bits failed. I bought an IFIXIT kit with quality bits and I was able to do everything I needed.

    Tom Markham -

    If you're not running an admin account the sudo command won't work (which honestly, you should not be running admin). Rather than logging in to your admin amount via the OS, in the terminal type "login [admin username]," then the password and you'll be able to do the sudo command as described above. Once you're complete, type "logout [admin username]" and you'll be good to go. Obviously replace [admin username] with whatever the account name for your admin user is.

    arichard2401 -

    For those unable to complete this step because the screen is too damaged I recommend leaving your macbook on until the battery dies.

    Nicholas R Licato -

    Just replaced my 2018 15" MBP battery. Running Sonoma.
    I found no way to disable AutoBoot (The status can be checked in the Power section of system report).

    Anyway, i left my battery completely drain before opening the MBP, and had no issues during the process.

    Cédric Bontems -

    After sending this command in terminal when I checked what happens if I now open the lid, instead the screen lit slightly up (still black) then a battery symbol showing the charging state showed up.

    Now, after replacement of the battery, this is all I get to see.

    No reset of NVRAM nor PRAM helped.

    Currently the new battery charges (58% atm) and it feels like it‘s mocking me.

    webrockers -

    I suspected the keyboard or TouchID sensor wouldn’t work, so I went on and checked every connector.

    I missed connecting the left TouchID sensor from step 31.

    webrockers -

    Read the comments section at the bottom of the article before proceeding with the repair. It is unnecessary to remove the logic board. I actually removed the 45mm plastic bar to enable the cables to slip out then in. It is only there to frustrate repairers!

    Jack -

  2. rfpS1lY23qQ2uGNA
    rfpS1lY23qQ2uGNA
    jhYZMONxn1fcInPb
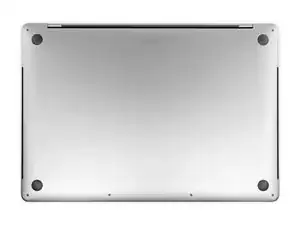
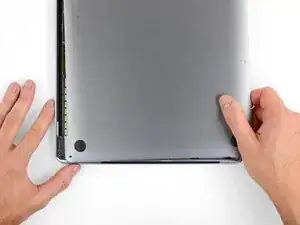
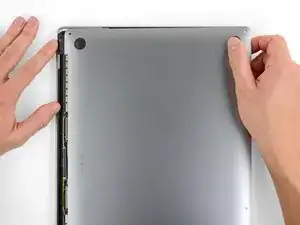
    • Schakel je MacBook Pro uit en haal deze van de oplader voordat je met deze procedure begint. Sluit het scherm en draai de laptop om, zodat de onderkant naar boven wijst.

    • Gebruik een P5 Pentalobe-schroevendraaier om de zes schroeven die de onderste behuizing bevestigen te verwijderen. Deze hebben de volgende lengtes:

    • Vier 3.7 mm lange schroeven

    • Twee 7.3 mm lange schroeven

    • Let erop dat de schroeven in een bepaalde hoek uit de laptop komen—je zult ze op dezelfde wijze terug moeten draaien.

    • Zorg dat je, tijdens deze reparatie, bijhoudt welke schroef waar vandaan kwam, zodat je kunt zorgen dat alles weer op de juiste plek terug geplaatst wordt en om zo te voorkomen dat je je toestel beschadigt.

  3. JxWADZjZRNv3tTwg
    JxWADZjZRNv3tTwg
    ZsMnYkYtDGaNRyJ3
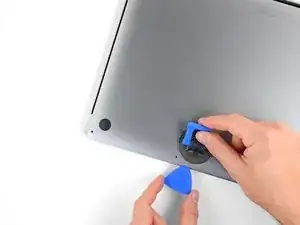
    • Druk een zuignap in de buurt van de voorkant van de onderste behuizing, tussen de twee schroefgaten.

    • Trek de zuignap voldoende omhoog om slechts een kleine opening te creëren tussen de onderste behuizing en de laptop.

  4. K5KJxLW61PIaHGFm
    K5KJxLW61PIaHGFm
    4sLDheruorEbigcP
    VbSPocnaxTOxJfVh
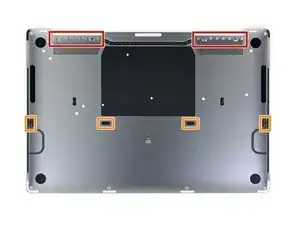
    • Schuif een hoek van een openingsplectrum in de opening die je zojuist met de onderste behuizing hebt gecreëerd.

    • Schuif je openingsplectrum langs de meest dichtbijzijnde hoek en vervolgens tot halverwege de zijkant van de MacBook Pro omhoog.

    • Dit zorgt ervoor dat de eerste van de verborgen klemmen los wordt gemaakt. Als het goed is, hoor en voel je de klem losklikken.

    I recommend being careful while sliding as you can scratch the speaker. The actual clip is about halfway up the side, whereas the speaker is closer to the front (further from the hinge). So stay very shallow with just the tip of the pick until you get halfway up the side.

    Eric Gauderman -

  5. 5gkToIk6cGQcJSt5
    5gkToIk6cGQcJSt5
    sPBYthJejaXj6Bsq
    tiLRpqKhwbBTVl54
    • Herhaal de vorige stap aan de andere kant met behulp van een andere openingsplectrum en zorg dat je de tweede klem losklikt.

    Same advice that I gave for the other side — be careful not to scratch the speaker which is close to the bottom. Keep the pick shallow until you get halfway up the side.

    Eric Gauderman -

  6. 3SQAoEUtGZVAPyYh
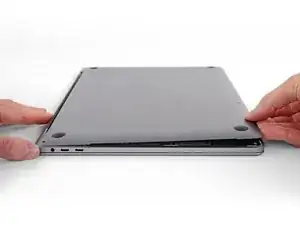
    • Til de voorkant van de onderste behuizing (de kant tegenovergesteld aan de kant van de scharnieren) voldoende op om je vingertoppen eronder te plaatsen voor een goede grip.

    • Twee extra verborgen klemmen bij het midden van de behuizing zouden op dit punt moeten loskomen, als ze nog niet los waren gekomen.

    • Til de behuizing echter niet meer dan 2 cm omhoog en probeer ook de onderste behuizing nog niet volledig te verwijderen.

  7. rjQR1RNrRWgO1xnF
    rjQR1RNrRWgO1xnF
    NdAxL5sp2joeGROI
    1v3ZfsNIYFukwknL
    • Trek met een stevige kracht om de onderste behuizing richting de voorkant van de MacBook te schuiven (weg van de scharnieren) om zo de laatste klemmen die de onderste behuizing bevestigen los te maken.

    • Trek eerst aan de ene hoek, dan aan de andere.

    • Trek naar de zijkant, niet omhoog.

    • Deze handeling kan aardig wat kracht vereisen.

    This was made a lot easier by using a lever in the hinge area in combination with pulling. The amount of force required was more than the grip I could get on the metal allowed for my macbook.

    James Andariese -

    Thank you for this comment! 🙏
    For me it was the same way, wasn't able to get enough grip to pull sufficiently - but gently levering near the hinge with a spudger to "push" the bottom panel away worked well!

    BavarianBamboo -

    There is no pulling required. Use an opening pick or a spudger at the hinge area to gently and easily nudge the bottom panel off the clips. It should be effortless.

    Marc Jacobson -

    If you do pull on the bottom case be careful of where you place the hand supporting the Mac, otherwise you'll make a blood sacrifice to the Mac gods! I placed my other hand too close to the feet on the bottom case and while removing it, the sharp edge of the bottom case sliced into my thumb.

    o355 -

  8. MFZgI6roy2jR2e3X
    MFZgI6roy2jR2e3X
    L5MhrQpCH1OjPEEE
    Q22wxmJEHD2VKKDE
    • Verwijder de onderste behuizing.

    • Om de onderste behuizing weer te installeren:

    • Breng je het op de juiste plek aan en zorg je ervoor dat de schuivende klemmen op de juiste positie naast de scharnieren van het scherm zitten. Vervolgens druk je alles naar beneden en schuif je de behuizing in de richting van de scharnieren. Als de klemmen in elkaar grijpen, zou het schuiven moeten stoppen.

    • Als de schuivende klemmen volledig in elkaar hebben gegrepen en de behuizing op z'n plek lijkt te zitten, druk je stevig op de onderste behuizing om de vier verborgen klemmen ook vast te klikken. Als het goed is, hoor en voel je ze in elkaar klikken.

  9. x2fRPEBeEHJWCWeL
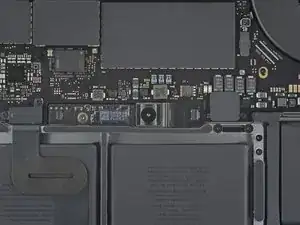
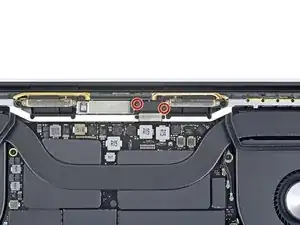
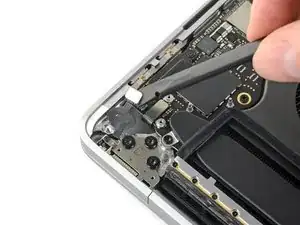
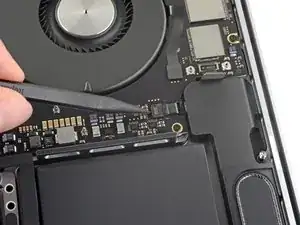
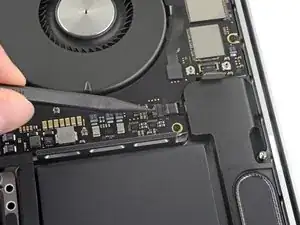
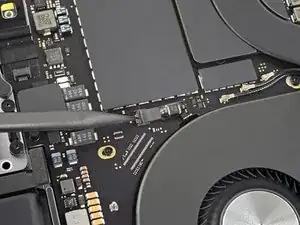
    • Peuter de isolerende sticker, die aan de kant van het logic board het dichtst bij de batterij over het batterijbord zit, los en verwijder deze.

    • Als de cover er niet makkelijk af komt, kun je wat milde warmte toedienen met een iOpener, een föhn of een warmtepistool om de lijm eronder te verzachten en het vervolgens nog eens te proberen.

  10. ZtDBt1uZPxsYUyAo
    ZtDBt1uZPxsYUyAo
    G31EQmCRMRXmiynP
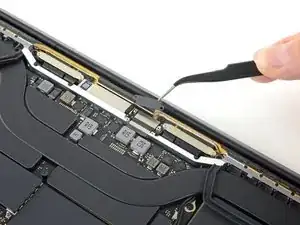
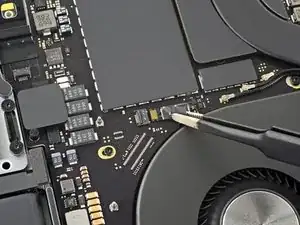
    • Peuter de tape die over de datakabelaansluiting van het batterijbord is geplakt los.

  11. 1QZWbqVH4XaRgAVp
    1QZWbqVH4XaRgAVp
    ChRIKZVhRIAHSRdS
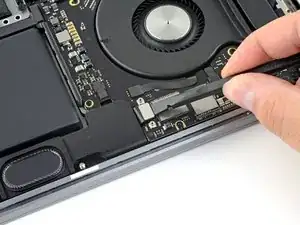
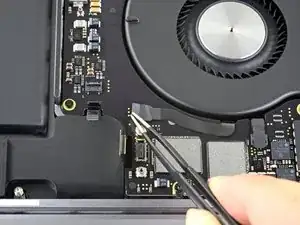
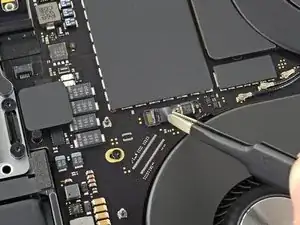
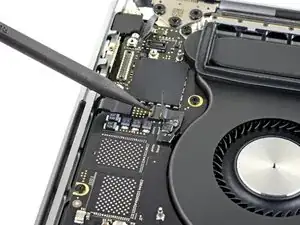
    • Gebruik een spudger om de bevestigingsklem van de ZIF-aansluiting van de datakabel van het batterijbord omhoog te duwen.

  12. KMxPVKt5dvAZ5cSH
    KMxPVKt5dvAZ5cSH
    5aKqYnsDYWSbgtWv
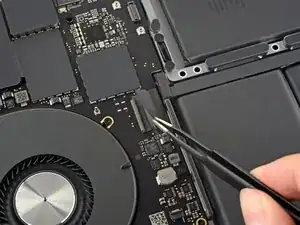
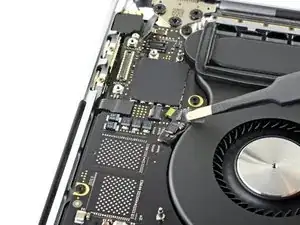
    • Koppel de datakabel van het batterijbord los door deze uit het contact op het logic board te schuiven.

    • Schuif parallel aan het logic board en zorg dat je niet naar boven trekt.

    들어올려서 떨어지면 어떻게 해야하나요…ㅠㅠ

    obbamanse87 -

    Anyone know where i can get a replacement connector mine looks like it was damaged. one side of the contacts is not fully gold

    Konstantinos Kalogeras -

  13. 3DHBYaOWHJoBY6mX
    3DHBYaOWHJoBY6mX
    NbTBNGPUQjh4UXDm
    • Peuter de tape die over de datakabelaansluiting van het batterijbord is geplakt los.

    • Duw de bevestigingsklem op de aansluiting aan de andere kant van de datakabel van het batterijbord omhoog en koppel de aansluiting los.

    Be very careful - the locking flap is very easy to break.

    Vaughan -

    I’ve seen versions of this battery board that the cable goes around and to the back of the board, so this step is not always necesary.

    Carlos Morales -

  14. cpNEOdKfhXfSWUUh
    cpNEOdKfhXfSWUUh
    GP4w6V4fwTpS34PN
    • Schuif de datakabel van het batterijbord uit het contact op het batterijbord en verwijder deze in z'n geheel.

    • Zorg dat je deze kabel niet achterstevoren of ondersteboven weer bevestigt.

    I’ve seen versions of this battery board that the cable goes around and to the back of the board, so this step is not always necesary.

    Carlos Morales -

    Putting a mark on the cable will be helpful when reinstalling so you don't put it backwards or upside down.

    maccentric -

    This isn't necessary for many repairs, such as the Screen Replacement. I just lift the cable out of the way enough to do the next few steps and leave it attached.

    maccentric -

  15. WSos1JUkTlKSlLXs
    WSos1JUkTlKSlLXs
    V5bQXtiKAC3TEpLj
    • Gebruik een T5 Torx-schroevendraaier om de 3.7 mm lange pannenkoekschroef die de stroomaansluiting van de batterij bevestigt te verwijderen.

  16. qIsYGE3Raqovrbel
    qIsYGE3Raqovrbel
    gF1UjxrpgkmjdPop
    • Gebruik een spudger om de stroomaansluiting van de batterij omhoog te duwen en de batterij los te koppelen.

    • Til de aansluiting hoog genoeg om deze weg te houden van het contact terwijl je aan het werk bent. Als het per ongeluk contact maakt, kan het je MacBook Pro beschadigen.

  17. BwbXUj2J2MvPMaVo
    BwbXUj2J2MvPMaVo
    2CyESFBgMT1nGK6q
    • Gebruik een T3 Torx-schroevendraaier om de twee 1.8 mm lange schroeven die de beschermbeugel van de kabelaansluitingen van het toetsenbord en het trackpad bevestigen te verwijderen.

    • Verwijder de beugel.

  18. VeGspPwWBagaX2Gc
    VeGspPwWBagaX2Gc
    dfJtE1xBVXXsQ3A1
    • Gebruik een spudger om de trackpadkabel los te koppelen door de aansluiting in een rechte beweging van het logic board omhoog te duwen.

  19. OjwDhDDfQOYGHau1
    • Gebruik een beetje warmte op de lintkabel van het trackpad om de lijm eronder, die het aan de batterij bevestigt, te verzachten.

    • Je kunt hiervoor een iOpener, een föhn of een warmtepistool gebruiken, maar wees hierbij voorzichtig dat je de batterij niet oververhit. De kabel mag warm worden, maar niet te warm om aan te raken.

  20. LqwiIe4yU6aXjmd1
    LqwiIe4yU6aXjmd1
    UpEsvFLanyqLUHHl
    GDwb1XTCMheoth3H
    • Peuter de trackpadkabel voorzichtig los van de batterij en duw deze uit de weg.

    • Vouw de kabel niet dubbel en wees ook voorzichtig dat deze niet scheurt. Als je moeite hebt met deze stap, forceer het dan niet—gebruik in plaats daarvan meer warmte en probeer het nog eens.

  21. 2OZona3EvVOL6gIk
    2OZona3EvVOL6gIk
    5g2sflTxwlOkfWpS
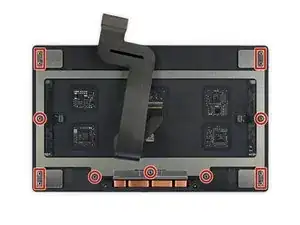
    • Gebruik een T5 Torx-schroevendraaier om de 13 schroeven die de trackpadmodule bevestigen los te schroeven:

    • Negen 5.8 mm lange schroeven

    • Vier 4.9 mm lange schroeven

    • De schroeven lijken allemaal een beetje op elkaar—wees echter wel voorzichtig dat je ze niet verwisselt.

    • Het kan handig zijn om, tijdens het weer in elkaar zetten van je toestel, de schroefdraden te voorzien van een schroefdraadborging om zo te voorkomen dat deze lostrillen over de tijd heen.

    • Installeer alle schroeven eerst losjes en check vervolgens de positie en pasvorm van het trackpad voordat je de schroeven definitief vast schroeft.

  22. RYTDAHBcLbuBQDMF
    RYTDAHBcLbuBQDMF
    cGAHDPKboTZwC3LA
    5ZIunFNXcPP22S6p
    • Klap het scherm een klein beetje open, maar houd de MacBook op z'n kop. De trackpadmodule zou los moeten komen en plat op het scherm moeten liggen.

    • Begeleid de lintkabel van het trackpad voorzichtig door het gat in het chassis.

  23. xqnWOOxH11doAZlJ
    xqnWOOxH11doAZlJ
    qWx6BEPAPWZHoQmv
    2xEK6DENUZ6TCrBm
    • Wees bij het verwijderen van de trackpadmodule voorzichtig dat je de negen kleine, metalen schroefringetjes niet verliest. (Deze zullen er namelijk afvliegen en verloren raken als ze ook maar enigszins worden geprovoceerd.)

    • Verwijder de trackpadmodule.

  24. DdWMHrfA5MpcNbFy
    DdWMHrfA5MpcNbFy
    LVfWt6mIaRDInOZG
    • Gebruik een T3 Torx-schroevendraaier om de twee 3.5 mm lange schroeven die de cover op de flexkabel van het schermbord bevestigen te verwijderen.

    • Verwijder de cover van de flexkabel van het schermbord.

    If you're familiar with repairing, you do not need to do a complete tear down, you can skip from here to step 63 and just loosen (or you can remove) the Three 3.3 mm T3 Torx screws (red) and the T5 screw (Yellow)below the left fan and slightly lift the logic board enough to slide out the battery board cable from under the logic board.

    Gregg Stanley -

  25. IBDpdAk6jcIPie4l
    IBDpdAk6jcIPie4l
    I1LUofPgsT2ubDmb
    • Verwijder vervolgens, met behulp van een T3 Torx-schroevendraaier, de twee 1.6 mm lange schroeven die de beugel over de kabelaansluiting van het schermbord bevestigen.

    • Verwijder de beugel over de kabelaansluiting van het schermbord.

  26. 124BCQ56jnbtAbjs
    124BCQ56jnbtAbjs
    tSU5alYuyUxeO3ew
    • Duw de flexkabel van het schermbord in een rechte beweging uit het contact op het schermbord om deze los te koppelen.

  27. GvBFWQcEPMqIBmNg
    GvBFWQcEPMqIBmNg
    cNS4XmC15bMOsq5R
    • Verwijder, met behulp van een T3 Torx-schroevendraaier, de vier 2.0 mm lange schroeven uit de covers op de scharnieren (twee aan iedere zijde).

    Ces vis là sont des Torx T3

    Amaury -

    Bonjour @amaury29177 Merci de remarque. Vous avez l'œil ! J'ai corrigé l'erreur. iFixit étant un wiki, je vous invite à faire la correction de votre côté s'il vous arrive de trouver une autre erreur :) Excellente journée et merci encore !

    Claire Miesch -

    Bonjour @claire17, merci de la correction et du conseil, je ferais ça la prochaine fois :) Excellente journée également

    Amaury -

  28. M4gOtHcpP1HooKZH
    M4gOtHcpP1HooKZH
    WsMBopcWMXEP1dOh
    sWX1INp2KXDZ4fZT
    • Verwijder de twee covers van de scharnieren.

  29. HsaKReAvCrSv26lP
    HsaKReAvCrSv26lP
    mkRxXOmLVoMcAeyA
    • Verwijder, met behulp van een T3 Torx-schroevendraaier, de twee 2.4 mm lange schroeven die de beschermbeugel over de Touch ID- en de hoofdtelefoonjackaansluitingen bevestigen.

    • Verwijder de beugel.

    There are threads in this T8 for the subsequent T3 screw

    Kerby Rankin -

  30. 1Wwamduwl2xxNCpL
    1Wwamduwl2xxNCpL
    a3VBxZ3XsWCfHKtU
    • Koppel de flexaansluiting van de hoofdtelefoonjack los door deze in een rechte beweging van het logic board omhoog te duwen.

  31. YCMHXkFbjxPnPRtr
    YCMHXkFbjxPnPRtr
    cx5kHXEhmUvHwKC2
    • Koppel de aan-/uitknop en de Touch ID-sensor los door de aansluiting in een rechte beweging van het logic board omhoog te duwen.

    • Deze twee kleine aansluitingen willen nog wel eens onder het logic board vast komen te zitten tijdens het weer in elkaar zetten van je toestel. Dubbel-check daarom dat ze correct zijn gepositioneerd voordat je het logic board herbevestigt.

  32. 1CIUAlC1ixSNGnCY
    • Verwijder, met behulp van een T3 Torx-schroevendraaier, de twee 1.5 mm lange schroeven die de beschermbeugel op de aansluitingen van de Touch Bar-digitizer en de schermhoeksensor bevestigen.

    Deze foto is 180 graden gedraaid. Het is bij het rechter scharnier.

    Frans -

  33. spN1OnklJ6ituThQ
    spN1OnklJ6ituThQ
    PG462OOC21SMfROf
    dA4WD3FcCEPrA4Ky
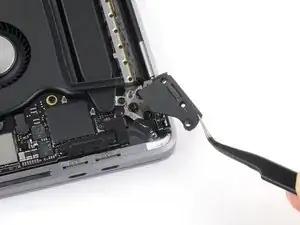
    • Schuif de beugel, met behulp van een pincet, richting de zijkant van de MacBook Pro totdat deze loskomt uit de bevestigingsklem op het logic board.

    • Verwijder de beugel.

    Would have really preferred you knot change the orientation of the MacBook in this and the following step from the previously established orientation.

    krwright -

  34. HRllg5OEWHZtWabU
    HRllg5OEWHZtWabU
    o2PUWLcsaHhvClMk
    cjWtYesknpC2LHeG
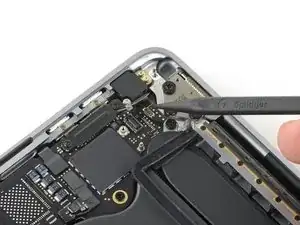
    • Koppel de kabel van de schermhoeksensor los door deze in een rechte beweging van het logic board omhoog te duwen.

    • Koppel de kabel van de Touch Bar-digitizer los door deze in een rechte beweging van het logic board omhoog te duwen.

  35. aGUkHtbvyOqh6yqa
    aGUkHtbvyOqh6yqa
    tAfZGjHB2Gjo2hmS
    • Verwijder, met behulp van een T3 Torx-schroevendraaier, de twee 1.9 mm lange schroeven die de beugel op de kabelaansluiting van het Touch Bar-scherm bevestigen.

    • Verwijder de beugel.

  36. 66w3HLAlxAPCOdDB
    66w3HLAlxAPCOdDB
    bIuDS2ihGkeqxTKL
    • Koppel de kabel van het Touch Bar-scherm los door de aansluiting in een rechte beweging van het logic board omhoog te duwen.

  37. DZNBfBlJUgWQShS4
    DZNBfBlJUgWQShS4
    OPEVJMJpf2luu12e
    • Verwijder, met behulp van een T3 Torx-schroevendraaier:

    • De twee 1.3 mm lange schroeven die de cover van de Thunderbolt-flexkabel aan de linkerkant bevestigen.

    • Nog twee 1.3 mm lange schroeven van de Thunderboltkabelcover aan de rechterkant.

  38. mBE3BGVEJFrXOqRs
    mBE3BGVEJFrXOqRs
    KEfO6HlNZeDafVCN
    • Verwijder de beschermbeugels van beide Thunderboltcontacten.

  39. cIdeSmgpikpVPStL
    cIdeSmgpikpVPStL
    fejmrroFBgeFTRQ4
    uOXyxtCFELxmiPcn
    • Gebruik een spudger om de linker Thunderbolt-flexkabel los te koppelen door deze in een rechte beweging van het logic board omhoog te duwen.

    • Wrik de aansluiting omhoog vanaf de binnenkant, het dichtst bij de ventilator.

    • Duw de flexkabelaansluiting voorzichtig naar de zijkant zodat het niet in de weg zit tijdens het verwijderen van het logic board.

  40. OICSp34Xpu6naNh4
    OICSp34Xpu6naNh4
    CGQVl5MyORkONJiT
    • Herhaal deze stap om de Thunderbolt-aansluiting aan de andere kant ook los te koppelen.

    • Duw de flexkabelaansluiting voorzichtig naar de zijkant zodat de weg vrij is voor het logic board om te worden verwijderd zonder problemen.

  41. UaHsuUS4bWsGtNkV
    UaHsuUS4bWsGtNkV
    DY5gF3lHyNAGSxwf
    ywUggaONQyrrU2gY
    • Peuter de tape die over de toetsenbordkabelaansluiting zit los.

  42. 6CGhnDrbNbrYRwGa
    6CGhnDrbNbrYRwGa
    kTIZEDHd5hvlbkrZ
    • Gebruik een spudger om de lange sluitklem op de ZIF-aansluiting van de toetsenbordkabel omhoog te duwen.

    • Omdat deze ZIF-aansluiting zo lang is, is de sluitklem ook kwetsbaar. Wees dus voorzichtig en werk langzaam. Duw bovendien in het midden zodat de klem niet breekt.

  43. fDqnoMQC2WaI6FUr
    fDqnoMQC2WaI6FUr
    NhpYqPG1b2bB1Anx
    • Koppel de toetsenbordkabel los door deze uit het contact op het logic board te schuiven.

    • Trek in dezelfde richting als de kabel.

    • Indien mogelijk trek je aan de tape die aan de kabel vast zit in plaats van aan de kabel zelf. Hiermee verminder je het risico op het veroorzaken van schade.

  44. MveWWWiMuYRbY6Zf
    MveWWWiMuYRbY6Zf
    NPEQrmYrMsaQaJdD
    • Peuter de tape die over de kabelaansluiting van de linkerspeaker zit los.

  45. EYNXHcG6hvE1M2Fv
    EYNXHcG6hvE1M2Fv
    DYRKSlrqfPBG4BZp
    • Open de sluitklem om de ZIF-aansluiting van de linkerspeakerkabel door deze in een rechte beweging van het logic board omhoog te duwen.

  46. Smh5KkuJv6OQAZgn
    Smh5KkuJv6OQAZgn
    CoetPZSUSWBRajRT
    • Koppel de linkerspeaker los door de kabel weg te trekken van het logic board totdat deze los komt uit het contact.

    • Indien mogelijk trek je ook hier aan de tape in plaats van aan de kabel zelf. Zo verminder je het risico op het veroorzaken van schade.

  47. ATKs4theFReI6Etj
    ATKs4theFReI6Etj
    vdbLZFiwSQ5Fi25F
    • Peuter alle tape die over de kabelaansluiting van de rechterspeaker zit los.

  48. RdDIBKImd1PaGJHi
    RdDIBKImd1PaGJHi
    YTHsQaflYyXhOjKf
    • Open de sluitklem op de ZIF-aansluiting van de rechterspeakerkabel door deze in een rechte beweging van het logic board omhoog te duwen.

  49. JVUOPnEnGkOgdKZQ
    JVUOPnEnGkOgdKZQ
    PWeokOGYfQZ5Swtw
    • Koppel de rechterspeaker los door de kabel weg te trekken van het logic board totdat deze zich losmaakt uit het contact.

    • Indien mogelijk trek je weer aan de tape in plaats van aan de kabel zelf om het risico op schade te minimaliseren.

  50. ZkaJY2aKZdbiuJZb
    ZkaJY2aKZdbiuJZb
    L6xwuTVS2MWyg1Qp
    • Peuter alle tape die over de eerste kabelaansluiting van de backlight zit los.

    my model doesnt have this.

    Anton Mostovoy -

  51. ph2vyVPnuYCLMAmg
    ph2vyVPnuYCLMAmg
    RV5aPPBQnyQn2jCp
    • Open de sluitklem van de ZIF-aansluiting van de backlight van het toetsenbord door deze in een rechte beweging van het logic board omhoog te duwen.

    Use a toothpick to roll under ribbon to release from logic board.

    Kerby Rankin -

  52. wox2Y4yEjJo2Z1hH
    wox2Y4yEjJo2Z1hH
    ySJlgfLKHZG6EJbZ
    rRm4oMsO1O1L6BMN
    • Koppel de backlight van het toetsenbord los door de kabel van het logic board weg te trekken totdat deze los komt uit het contact.

    • Indien mogelijk trek je aan de tape in plaats van aan de kabel zelf. Zo verminder je het risico op onnodige schade.

    • Duw de kabel uit de weg van de aansluiting zodat je genoeg ruimte maakt voor het logic board om te worden verwijderd.

  53. kQdfeSjyUAvr46qH
    kQdfeSjyUAvr46qH
    YoAgUIvepGpqXTLD
    • Peuter alle tape die over de rechter ventilatoraansluiting heen zit los.

  54. lMaAMrMTnVZDsw6w
    lMaAMrMTnVZDsw6w
    kvOYqRsW4MFJVH6i
    lr4j6JgFxUhGaaI3
    • Open de sluitklem van de ZIF-aansluiting van de rechter ventilator door deze in een rechte beweging van het logic board omhoog te duwen.

    • Koppel de rechter ventilator los door de kabel uit het contact op het logic board te trekken totdat deze volledig los komt.

    • Indien mogelijk trek je aan de tape in plaats van aan de kabel zelf, om zo te voorkomen dat je onnodige schade veroorzaakt.

  55. jZWPG56iTLObk2PP
    jZWPG56iTLObk2PP
    NnjO4bTJcnnlXymV
    • Peuter alle tape die over de linker ventilatoraansluiting zit los.

  56. ogYH2URtBuCnCfCg
    ogYH2URtBuCnCfCg
    rFSPG6GksUvK1TOt
    fTRNVuQHPDdch6SD
    • Open de sluitklem van de ZIF-aansluiting van de linker ventilator door deze in een rechte beweging van het logic board omhoog te duwen.

    • Koppel de linker ventilator los door de kabel weg te trekken van het logic board totdat deze volledig los komt.

    • Indien mogelijk trek je aan de tape in plaats van aan de kabel zelf. Zo voorkom je beschadigingen.

    my model doesnt have this

    Anton Mostovoy -

  57. V6bjQAcs1uIM663M
    V6bjQAcs1uIM663M
    xIPOfHdQVWUwgk14
    • Trek alle tape die over de backlightaansluiting van het toetsenbord heen zit los.

  58. EABKPJEqhNbl5GQh
    EABKPJEqhNbl5GQh
    ESaPKT6mXRZBb4jE
    KoMW3DKACtoUiB4T
    • Open de sluitklem op de ZIF-aansluiting van de backlight van het toetsenbord door deze in een rechte beweging van het logic board omhoog te duwen.

    • Koppel de backlight van het toetsenbord los door de kabel weg te trekken van het logic board totdat deze los komt uit het contact.

    • Indien mogelijk trek je aan de tape die aan de kabel zit in plaats van aan de kabel zelf. Zo voorkom je dat je de kabels beschadigt.

  59. SFExEweDAZXImSrJ
    SFExEweDAZXImSrJ
    X2JmNr3kIXiDEJEc
    • Trek alle tape over de aansluiting van de microfoonopstelling los.

  60. T4go5mpsgoskdDwv
    T4go5mpsgoskdDwv
    k5aER5oypgPQDucZ
    n5bYskvtDljqBJvv
    • Open de sluitklem op de ZIF-aansluiting van de microfoonopstelling door deze in een rechte beweging van het logic board omhoog te duwen.

    • Koppel de microfoonopstelling los door de kabel weg te trekken van het logic board totdat deze los komt uit het contact.

    • Indien mogelijk trek je aan de tape die aan de kabel zit in plaats van aan de kabel zelf. Voor minimaliseer je het risico op schade.

  61. bvjrGBs662NHX1sl
    bvjrGBs662NHX1sl
    WXSfXnFSLJCMhYYl
    • Gebruik een T5 Torx-schroevendraaier om de enkele 2.9 mm lange schroef die de antennekabelbundel bevestigt los te schroeven.

  62. X3gowjKpOOdLnKxm
    X3gowjKpOOdLnKxm
    U2JfRbHKKaDGciLn
    • Koppel alle drie de antennekabels los door deze een voor een uit hun contact omhoog te duwen.

    • Schuif je pincet of het platte deel van je spudger onder iedere kabel totdat deze dicht bij het contact zelf is, en kantel je tool vervolgens of duw deze omhoog om de aansluiting los te koppelen.

    • Om iedere kabel weer opnieuw aan te sluiten, positioneer je de aansluiting direct over het contact en duw je deze vervolgens naar beneden totdat je voelt dat deze in het contact klikt.

    One tip to make logic board removal and replacement easier, is to carefully tape all the flexes back out of the way. This makes it a lot easier, trust me. Paul Daniels of FlexBV fame taught me this https://pldaniels.com/flexbv/ See photo of taped back flexes here https://i.imgur.com/eriX0KV.jpg

    Peter Newman -

  63. 3JKVRnlmgci6L2W6
    3JKVRnlmgci6L2W6
    kVCAUDZ1XLtWeps3
    • Verwijder alle elf schroef die de logic board module bevestigen:

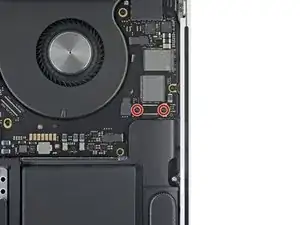
    • Drie 3.3 mm lange T3 Torx-schroeven

    • Twee 3.6 mm lange T5 Torx-schroeven

    • Vier 2.9 mm lange T5 Torx-schroeven

    • Eén 4.0 mm lange T8 Torx-schroef

    • Eén 4.0 mm lange T8 Torx-schroef (met grote kop).

    • Zorg dat je, tijdens het weer in elkaar zetten van je toestel, eerst alle schroeven losjes op en in hun positie draait. Vervolgens kun je de positie van het logic board nog wat aanpassen totdat alles op z'n plek zit. Tot slot kun je alle schroeven strak aandraaien.

    The 2.9mm T5 screws have blue loctite; the 3.6mm T5 screws have white loctite.

    Nazar Androshchuk -

  64. 2HgPlWWDKwoIg1NO
    2HgPlWWDKwoIg1NO
    YZEkTsYvyTPMSEGA
    RjTVZWXFfXrVZNNi
    • Trek (maar verwijder het nog niet) de rubberen trildemper weg van de kleefstrip die het op de ventilator bevestigt.

    • Dien, indien nodig, wat warmte toe met een iOpener, een föhn of een warmtepistool om de lijm eronder de verzachten en de dempers makkelijker los te krijgen.

    • Herhaal dit bij de andere kleefstrip op de ventilator aan de andere kant.

  65. EZ5ktSWdbiblDkZU
    EZ5ktSWdbiblDkZU
    cwAjVVAgRbEworuL
    • De logic boardmodule past vrijwel precies, maar je kunt het jezelf makkelijker maken om te verwijderen door eer spudger onder de linkerzijde van het logic board te steken en het logic board vanaf hier lichtjes omhoog te duwen.

    • Je zou bij het verwijderen van het logic board geen weerstand moeten voelen. Check eerst rustig alle kabels en houd deze uit de weg zodat je deze niet meetrekt en beschadigt.

  66. CgwAVZNo64LWKlQN
    • Verwijder het logic board door deze op te tillen vanaf de linkerzijde.

    This is a good opportunity to change thermal paste on the logic board. Should take less than 15 minutes.

    Nazar Androshchuk -

  67. vt3XIuXque1JYYLC
    vt3XIuXque1JYYLC
    GwwEIVycqMjCCwrf
    • Bij het reïnstalleren van de logic boardmodule:

    • Begeleid je de antennekabelbundel door de opening tussen het logic board en het koellichaam en zorg je dat deze goed gepositioneerd is voordat je het logic board naar beneden doet en herbevestigt.

    • Zorg je ervoor dat er geen kabels onder het logic board komen te zitten bij het weer installeren ervan. Check alle vijftien gemarkeerde locaties rustig totdat je hier zeker van bent.

    One tip to make logic board removal and replacement easier, is to carefully tape all the flexes back out of the way. This makes it a lot easier, trust me. Paul Daniels of FlexBV fame taught me this https://pldaniels.com/flexbv/ See photo of taped back flexes here https://i.imgur.com/eriX0KV.jpg

    Peter Newman -

    So easy to refit the logic board with all the flexes taped back out of the way. The only way to go IMO https://i.imgur.com/1fiRGhe.jpg

    Peter Newman -

  68. JNxhMFbxrydsdNKG
    • Gebruik een T5 Torx-schroevendraaier om de 5.1 mm lange schroef die het batterijbord bevestigt los te schroeven.

  69. RTk4g2OaPUvBt56H
    RTk4g2OaPUvBt56H
    VL4CZbMnjoo1SN1Q
    XhwcTQcUoJlwlSos
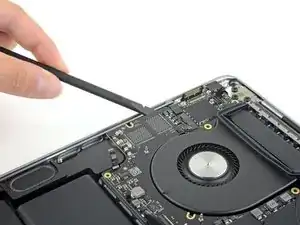
    • De vloeibare lijmverwijderaar die in je kit wordt geleverd kan de antireflectieve laag op het scherm van je MacBook Pro alsook de plastic toetsen van het toetsenbord aantasten.

    • Om je scherm te beschermen, plaats je een laagje aluminiumfolie tussen het scherm en het toetsenbord en laat je deze zitten terwijl je werkt.

    • Daarbij zou je ook nog schilderstape kunnen gebruiken om het gebied onder het trackpad zo goed mogelijk af te schermen. Je kunt er ook nog voor kiezen om een keukenpapier direct onder het trackpad te leggen om te zorgen dat deze alle excessieve vloeistof opzuigt.

  70. A5NQVhgIAv5JAUHv
    A5NQVhgIAv5JAUHv
    yjLI2w3WseqflErK
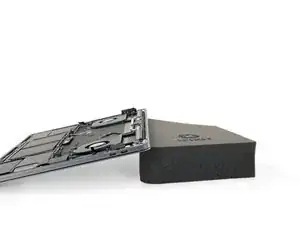
    • Om de stroom aan vloeistof te kunnen controleren, til je de achterkant (waar de scharnieren zich bevinden) van je MacBook Pro omhoog en laat je deze op een boek of een blok schuim rusten.

  71. UCT4gT2tbVaHiMBV
    UCT4gT2tbVaHiMBV
    2VdRkV2wvBC5Y5lg
    • Nu dat je MacBook Pro volledig klaar is gemaakt, is het tijd om jezelf klaar te maken.

    • iFixit lijmverwijderaar bevat aceton, een middel dat milde huid- en oogirritaties kan veroorzaken.

    • Draag oogbescherming bij het gebruiken en toedienen van de lijmverwijderaar. (Oogbescherming is ook in de kit inbegrepen).

    • Draag geen contactlenzen zonder oogbescherming.

    • Handschoenen zitten ook bij de kit inbegrepen. Als je bang bent voor mogelijke huidirritaties, is dit het moment om je handschoenen aan te trekken.

  72. ySsjbBj5AWfHuktb
    ySsjbBj5AWfHuktb
    qoaKkdC1FQdyYWLW
    Sd2idyenMPELFbiK
    • Trek de zwarte, rubberen sluiting van de fles met lijmverwijderaar.

    • Draai aan de dop om deze te verwijderen, voordat je punt van het flesje openknipt.

    • Dit zorgt ervoor dat de fles wordt geopend, zodat de druk zich gelijk kan verdelen voordat je de fles knipt. Als je deze stap overslaat, kan de lijmverwijderaar er onverwachts uit spuiten bij het knippen van het topje.

    • Gebruik een schaar om de verzegelde punt van het flesje te knippen.

    • Hoe dichter bij de top je het flesje openknipt, des te meer controle zul je hebben bij het toedienen. Hierdoor zal het makkelijker zijn kleine hoeveelheden toe te dienen.

    • Draai de dop er weer op en zorg ervoor dat het flesje goed gesloten is, voordat je weer verder gaat.

    Black plastic applicator tip does not need to be cut. Gently squeeze to see if solvent comes out before you bother to cut

    cscarlson47shop -

  73. KJmu5QEFlE2TMBfu
    KJmu5QEFlE2TMBfu
    cPhKpIOpUCiUo4HF
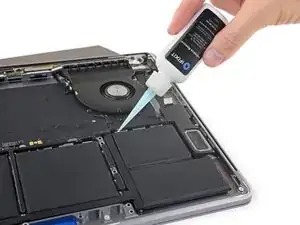
    • Dien een aantal druppels aan lijmverwijderaar toe onder de twee batterijcellen aan de rechterkant, langs de kant die zich het dichtst bij de ventilator bevindt.

    • Je hebt niet veel lijmverwijderaar nodig. De kleine fles bevat meer dan twee keer de hoeveelheid aan vloeistof die je nodig hebt om alle batterijcellen te verwijderen.

  74. eNCRqiGQQJETZ1GR
    eNCRqiGQQJETZ1GR
    WAPxZOqDRRrnYYbo
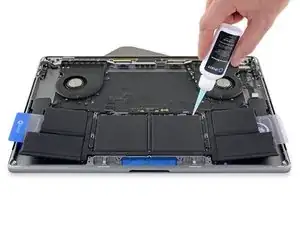
    • Dien nog een aantal druppels lijmverwijderaar toe tussen de twee batterijcellen aan de rechterkant, zodat het ook onder de onderste batterijcel stroomt.

    • Wacht gedurende twee minuten om de vloeistof in te laten trekken en de lijm te verzachten voordat je verder gaat met de volgende stap.

  75. cEEScTNYXV3nRkS2
    cEEScTNYXV3nRkS2
    FsEKrxbGHpPBWgFZ
    26VFlBwo2WuyiVUP
    • Na een aantal minuten steek je een hoek van een plastic kaart onder de batterij, beginnend bij de onderkant van de onderste, meest rechtse batterijcel.

    • Dit zou niet veel kracht moeten vereisen—de lijmverwijderaar doet namelijk het meeste werk voor je. Als je niet in staat bent om de kaart onder de batterijcel te schuiven, moet je wat meer lijmverwijderaar toedienen en wederom 2-3 minuten wachten voordat je verdergaat.

    • Probeer de batterij niet te vervormen. Een beschadigde of doorboorde batterij kan gevaarlijke chemicaliën lekken en/of in brand vliegen.

    • Wiebel de kaart heen en weer en schuif deze volledig onder beide batterijcellen.

    • Til de cellen op om deze in hun geheel van de lijm eronder te scheiden, maar verwijder deze nog niet volledig uit de laptop.

    • Laat je plastic kaart tijdelijk onder de cellen zitten om te voorkomen dat de lijm zich opnieuw aan de cellen gaat hechten.

  76. p6Pve3BsnQrUg4EU
    p6Pve3BsnQrUg4EU
    mfUDXEuuIueIYbET
    JSI32msr3xPLKKGq
    • Verplaats je werk naar de linkerkant van je MacBook Pro en herhaal de vorige stap om de twee linkse batterijcellen van de behuizing te scheiden.

    • Laat ook je tweede plastic kaart tijdelijk zitten.

  77. Oa2ktVRqeobOqO2C
    Oa2ktVRqeobOqO2C
    5ybytQHyflcRYieD
    tpOq3CX6olAnsN2q
    • Dien een aantal druppels lijmverwijderaar toe langs de bovenkant van de twee middelste batterijcellen.

    • Er bevinden zich kleine openingen in het chassis van de laptop, onder deze twee batterijcellen. Het kan dus zijn dat de lijmverwijderaar door deze gaten uit de laptop loopt en dus niet in z'n geheel onder de batterij komt.

    • Wees je bewust van deze lekken en dien, indien nodig, meer lijmverwijderaar toe langs de zijkanten.

  78. XNaDICjdpvewJwZN
    XNaDICjdpvewJwZN
    BMh41EAGdPMJJVYW
    GwCTymERmxZ5Ha5F
    • Pak de eerste plastic kaart, na een aantal minuten, vast en steek een van de hoeken onder de bovenkant van een van de batterijcellen.

    • Wiebel het op en neer en schuif het onder de batterijcel totdat alle lijm los is gemaakt.

    • Gebruik, als je hier moeite mee hebt, geen excessieve kracht en vervorm de batterij ook niet. Dien meer lijmverwijderaar toe en probeer het opnieuw, of sla twee stappen over voor een alternatieve methode.

  79. RmvOwLJD1rxgVdPo
    RmvOwLJD1rxgVdPo
    gnpB2Xmy1xwl32cP
    1esEr3FXURmkYvGt
    • Pak ook de tweede plastic kaart terug en herhaal de vorige stap om de overgebleven middelste batterijcel van de lijm en de behuizing te scheiden.

  80. bKThxSOXUKyoP1ou
    • Als je moeite hebt om de kaart onder een van de batterijcellen te schuiven, kun je ook proberen een stuk flosdraad in een zagende beweging onder de batterijcel te krijgen om deze op deze wijze van de lijm te scheiden.

    • Draag dikke handschoenen of wikkel het flosdraad om een paar schroevendraaierhandvatten om je vingers te beschermen.

    I must say you must go slow, take your time. Prepare 10 times and work one time. This is the part of the process which when done follwing this guide will go flowlessly. And thank you Carsten and the other contributors for this guide.

    Bash -

  81. hudj2CQLgMbNNNoF
    hudj2CQLgMbNNNoF
    mTogBxMo2JEBjoL2
    • Til de batterij omhoog en verwijder deze.

    • Verwijder alle lijmresten uit de behuizing van de MacBook Pro voordat je je nieuwe batterij installeert.

    • Je kunt grote delen lijm verwijderen met behulp van een pincet of je vingers. Zorg wel dat je, indien je je vingers gebruikt, ook handschoenen draagt.

    • Schraap overgebleven delen lijm weg met een plastic tool en maak de onderliggende gebieden schoon met lijmverwijderaar of isopropyl alcohol. Zorg dat je in een en dezelfde richting veegt (niet heen en weer) totdat het chassis schoon en klaar is voor je nieuwe batterij.

    • Dit kan wat moeite kosten, dus wees geduldig en werk rustig.

  82. YOGYtu4nHUWvC3E1
    YOGYtu4nHUWvC3E1
    xjblLlhkuNZkdUw4
    FGKPHdhuUHvuGSI4
    • Dubbel-check of je batterij op de juiste manier past voordat je deze probeert vast te maken.

    • Als je batterij is geleverd met een vooraf op maat gesneden kleefstrip aan de onderkant, draai deze dan nu om en peuter het stuk beschermfolie weg om de lijm klaar te maken. Als je batterij zonder kleefstrip is geleverd, kun je een stuk dubbelzijdige tape gebruiken, zoals [http://Probeer de batterijcel nog niet volledig te verwijderen—deze zit namelijk nog steeds vast aan de rest van de batterijcellen.|Tesa 61395], om je batterij op z'n plek te houden.

    • Positioneer de batterij op de juiste plek en druk het op z'n plek.

    • Zet druk op de batterij en houd deze stevig neergedrukt gedurende 5-10 seconden, zodat je zeker weet dat het kleefmiddel zich goed hecht.

Conclusie

Om je toestel weer in elkaar te zetten, volg je deze instructies in omgekeerde volgorde.

Breng je e-afval naar een door R2 of e-Stewards gecertificeerde recycler.

Ging je reparatie niet zoals gepland? Check dan ons Antwoordenforum voor hulp bij het oplossen van je probleem.

Carsten Frauenheim

Lid sinds: 10/03/20

145350 Reputatie

48 commentaren

Holy cow that is a lot of steps

T J -

Amazing. This is truly thorough, and as soon as this battery starts to fail, will come back here. Nice work documenting a whole assembly line.

antoniogonzalo -

If I want to replace my fans, it looks like I can follow this guide to step 66 and then just figure it out from there? Is there a guide somewhere on this? Thanks!

Matt -

You can do as you wrote for replacing only the fan. Ther’s nothing more to know about it.

Daniele Carminati -

I see that the MacBook Pro 13 logic board remains in place in iFixit battery replacement guide. Is there any reason why in the MacBook Pro 16 the logic board cannot remain in place while removing and reinstalling the battery?

andremengatti -

Yes, there are two battery cables running under the logic board, clearly visible at step 68. No way to put the battery back with the logic board in place.

I recently did the 15” 2017 Macbook Pro battery replacement and that seemed more difficult than this one due to the speaker connectors. In my opinion, this 16” replacement can be marked as Moderate.

Cristian Caprar -

Because the battery connector is underneath the logic board here.

Peter H -

it’s not just iFixit guide,different types of MacBooks have different ways of fixing them.

azam -

No, the battery is not trapped under the logic board. Moreover, that connector is under the logic board, but not blocked from sliding out by screws. The only reason would be to prevent the logic board from getting dissolved by the adhesive remover. Also, if you nudge the connector up with your finger, you can slide the entire battery out. If you only pry at the battery and don't intend to use any alcohol or adhesive remover, you don't need to remove the board.

Matthew Yang -

Great guide! Wow! Definitely not for the faint of heart! Thanks Carsten!

timberwilde -

This is definitely a difficulty repair. I caused some damage to the speaker, likely while trying to get the battery out. (Luckily, that will be a very simple repair)

I definitely recommend double checking that you have all right screwdrivers, scrapers/spudgers, adhesive dissolvers, screw locker and a tray with lots of compartments to keep everything organized. I have done multiple complex repairs of mac laptops in the past including screen replacements, logic board replaceements and other battery replacements and this was the most difficult. I am very glad future generations included pull tabs for the adhesive.

owenbrewer4 -

Indeed, the speakers have strong magnets, and require t be very careful with any metal parts getting close to them.

A note should be added in this tutotial, very easy to get in trouble.

Adrien Haage -

Thanks for the guide!

FWIW I skipped about half the steps, and used spudgers to angle the motherboard up, in order to remove the battery. I'll list the steps I followed below:

1-21

27-29

35-36

41-49

53-54

61

63

68

I use 99% isopropyl alcohol, and an ifixit plastic card to cut through the battery adhesive. TBH that was the most time-consuming part, because I like to let the alcohol melt the adhesive a bit before cutting, in order to minimize the amount of pressure I have to apply.

The reason I skipped a lot of steps is to minimize risk, and also to save time. Thankfully the battery ribbons were easy to slide underneath the board, once the board was angled up a bit.

Menelik Seth -

What a nightmare... There's no way this wasn't done in purpose.

2 years in and the battery's already dead. That's insane.

James Bissick -

This took longer than expected due to the logic board removal, but wasn’t too difficult and everything went to plan.

Note that you need to be REALLY careful with the ZIF connector latches like on the battery board and logic board, they are very fragile and I had to re-attach the latch for one of them.

Leo Best -

OMG!! I did not know that the process to change out the battery on the 2019 MBP was so intense. My old 2009 MBP was "cake walk" compared to this. Thanks for the HOW TO

Michael Lucas -

For Step 16:

What does "damage" mean in this case? I have one of these that I was attempting to clean, so I lifted the battery power connector up, but I can't swear it didn't make contact. When I was trying to lay it down flat I thought it would stay flat until I put the screw in, but it popped back up a short way. I then held it down & put the screw it - now my MBP isn't powering on. Did this damage the logic board?

AppleGamingSE -

Nevermind my prior; took it to a local shop & they said it has liquid damage on logic board. Sending back to seller.

AppleGamingSE -

Does this battery replacement guide also apply for the 2020 model or is it the guide for the 2021 model one needs to follow?

Sven -

Woo hoo! Just finished. I don’t know who could do this battery repair on the quicker side of that range—mine took over 5 hours. Granted, I also redid the thermal paste on my CPU and my GPU. In addition, the old battery was really stuck in there, so that took extra time. Nonetheless, now I have more experience and, no need to buy a new computer ! Thanks, iFixIt !

Peter -

Carsten did an excellent job in providing the correct information to do the job. But let us ALL NOT FORGET, this convoluted way of replacing a battery (something that would be considered a common and ordinary everyday routine need) is Apple's good faith attempt at preventing the everyday consumer from replacing their own battery in their own device. Take for example myself when it takes 80+ steps to change a battery, and provided I were wealthy, I'd have someone replace the battery for me. Not everyone is wealthy or similarly situated. Make sure you don't forget to encourage your elected officials in the U.S. Congress to vote to allow us Americans our right to repair our devices ourselves without long, drawn out, encumbering, and convoluted ways of doing it. Can you imagine how blinded in the night we would be if we had to go through all this just to change the batteries in our flashlights? We're no longer in the dark ages. I for one, am not prepared to go back even if Apple likes it or not.

Martin Dixon -

Is there a way to replace the battery without removing everything? I can just slide the big battery out of my Dell Latitude E6500 and pop another one in. However, can I replace the battery in my 2019 MBP 16" without having to remove everything?

Matthew Yang -

Unfortunately no. That's how it needs to be done.

Comparing a 2008 Dell Latitude to a 2019 macbook pro and expecting the repair process to be about the same difficulty, is actually outrageous.

The Dell Latitude E6500 is a brick. It doesn't require all the components to be compact and organised in such a complex way. It's no surprise that with thinner and more modern architecture the hardware is more difficult to repair.

Andrew -

The repair guide is awesome. Unfortunately, replacing the battery didn't bring the machine back to life. Sadness!

But the repair guide was great. I felt very confident throughout.
Ken C. -

Same with me. Did you figure out what was wrong with your machine? Replacing the battery was my best guess at what was wrong with my machine and now I'm stuck. Hopefully you had some luck diagnosing your issue?

Josef A -

Excellent guide
If I replace the battery, why coconut tool said that the manufacture date is 2013-03-18, is that normal?

Jaime Larios -

It's crazy how this version of the 16 inch Macbook Pro requires this many steps. Thank you for the time and patience collate this in-depth guide!

Zhen -

So I just completed the whole sequence and everything went fine, really really well done Carsten! Only thing that went wrong is minor but still annoying: it seems I broke the left keyboard backlight cable. What to do in such a case?

Yann Coppier -

Little extra onfo: I can't seem to find that part anywhere, and I can see the ribbon is slightly ripped in its angle, which must have happened when I put the logic board back in place. I can live without it, but it is strange having a keyboard lit only on one side... so any hint will be appreciated.

Yann Coppier -

Yann,

Thank you for the kind words! Unfortunately, the keyboard, keyboard backlight, and their cables are integral to the laptop's upper case.

Carsten Frauenheim -

So thankful for this guide. Was able to resurrect an old unit that was collecting dust. Knew issue had to be the battery. Yes, a lot of steps; though, followed closely, you will succeed!!

rwsims77008 -

3hours, with precaution and coffee time. All step are not so complicate. The unique attention is for the batterie removal. And cleaning step. So thanks for this tutorial.

Christophe PAYET -

Really thank you Carsten for this majestic guide, but shame on Apple for doing this job. I spent like 8 hours for doing everything (I know, I'm quite slow) and I even punctured the old battery while using the plastic card. I was a nightmare.

Hopefully, we will have easy-to-replace batteries by 2027 thanks to the European Union.

Special thanks to the Italian translators too, Grazie!

Gianluca Iuliano -

Do you seriously have to disconnect everything from power before removing the battery or can you just disconnect the battery and replace it with a new one? That just seems excessive.

But if their is a reason, I’d love to know

William Williams -

Is there any way to test if I'm having a battery issue? Can I boot the computer if I disconnect the battery? Currently the computer is completely dead and gives no sign of life what ever I do.

Isak Dunér -

As everyone else commented - excellent guide. I got through everything, powered it up, and everything seemed great. At this point it was late and I went to bed. The next morning, after logging in, the screen went black - never to power up again. The battery data cable showed some signs of overheating. Everything looked aligned, oriented correctly, etc. I must have had the cable slightly rotated in the socket or something. Not sure it is worth retrying with another battery data cable. Anyone else have a similar issue?

Scott Adams -

Tedious tedious tedious. The screws are smaller than a strand of hair, so take extra care.

This guide also didn't exactly match my mac, it might've been a different model year, since I was missing various cables and screws to remove. Still very helpful nonetheless, and yeah it takes a long time.

Battery ribbon cable = extremely fragile

Mason Methot -

My battery replacement went well, works great but now it can be heard clunking around on the inside.

Drew Thompson -

does the part include the adhesive remover or do I have to purchase it separately?

Johann Easton -

Adhesive remover is included, but you might prefer lighter fuel. This is working equally well and may be not as poisonous as the included toluene

– besides, in reminds me of the time when I had a Zippo (c:

Klaus Finke -

Explication très concise et facile. Suivre. Très beau travail. Merci au contributeur.

Didielus -

Thanks for the guide.

Reynaldo Santos -

There are 7 or 8 different sizes of T3 screws. Aside from the larger few the others are completely interchangeable, which I found out after accidentally knocking over my carefully laid out grid. Ridiculously over-engineered. The Juicero of laptops.

PSQuerty -

Just finished. Two days. One day out, one day back in. The macbook booted up and is back in business.

I had to use the trick mentioned in the comments to tape the flexies back to get the logic board back in.

I'll count this battery replacement as an example of peak Apple user hostility.

David Johnston -

How long to charge the new battery before it can boot up?

I’m not getting any signs of life.

some jerk -

New batteries come's with a factory charge. It should boot up the moment you press power. HTH.

Reynaldo Santos -

A link to how to reset the SMC and what the “battery calibration procedure” is would be helpful. I figured out SMC, but am baffled by what the battery calibration procedure means.

cscarlson47shop -

I tried all these steps and now the MacBook Pro doesn't even turn on when connected to power. The trackpad clicks, that's about the only thing that seems to work. No fans spinning, no capslock light, no display activity.

Riley Hagen -