Inleiding
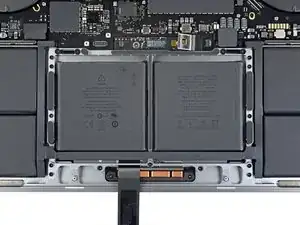
Gebruik deze handleiding om een kapot trackpad te vervangen of om het trackpad te verwijderen ten behoeve van een reparatie aan de batterij.
Ontlaad de batterij van je MacBook Pro, voor je eigen veiligheid, tot onder de 25% voordat je met deze procedure begint. Een geladen lithium-ion batterij kan in brand vliegen als deze per ongeluk wordt doorboord.
Gereedschap
Onderdelen
-
-
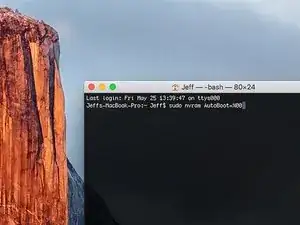
Zet je Mac aan en open Terminal.
-
Kopieer en plak de volgende command (of type het precies na) in Terminal:
-
sudo nvram AutoBoot=%00
-
Druk op [enter]. Wanneer de command is ingevoerd, voer je je adminwachtwoord in en druk je weer op [enter]. Note: je entertoets kan ook als "return" of ⏎ worden weergegeven.
-
sudo nvram AutoBoot=%03
-
-
-
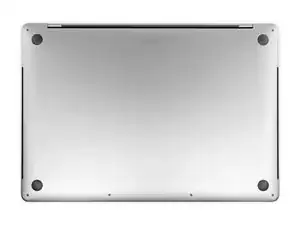
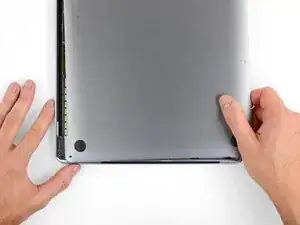
Gebruik een P5 Pentalobe-schroevendraaier om de zes schroeven die de onderste behuizing bevestigen te verwijderen. Deze hebben de volgende lengtes:
-
Vier 3.7 mm lange schroeven
-
Twee 7.3 mm lange schroeven
-
-
-
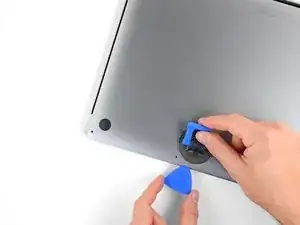
Druk een zuignap in de buurt van de voorkant van de onderste behuizing, tussen de twee schroefgaten.
-
Trek de zuignap voldoende omhoog om slechts een kleine opening te creëren tussen de onderste behuizing en de laptop.
-
-
-
Schuif een hoek van een openingsplectrum in de opening die je zojuist met de onderste behuizing hebt gecreëerd.
-
Schuif je openingsplectrum langs de meest dichtbijzijnde hoek en vervolgens tot halverwege de zijkant van de MacBook Pro omhoog.
-
-
-
Herhaal de vorige stap aan de andere kant met behulp van een andere openingsplectrum en zorg dat je de tweede klem losklikt.
-
-
-
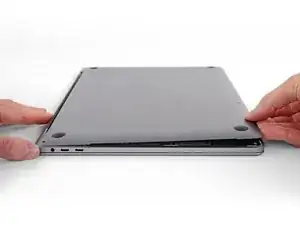
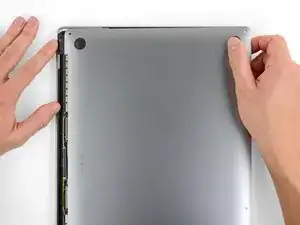
Til de voorkant van de onderste behuizing (de kant tegenovergesteld aan de kant van de scharnieren) voldoende op om je vingertoppen eronder te plaatsen voor een goede grip.
-
-
-
Trek met een stevige kracht om de onderste behuizing richting de voorkant van de MacBook te schuiven (weg van de scharnieren) om zo de laatste klemmen die de onderste behuizing bevestigen los te maken.
-
Trek eerst aan de ene hoek, dan aan de andere.
-
-
-
Verwijder de onderste behuizing.
-
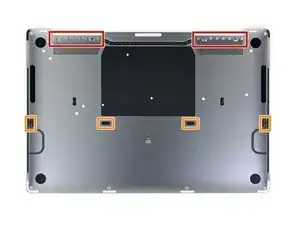
Breng je het op de juiste plek aan en zorg je ervoor dat de schuivende klemmen op de juiste positie naast de scharnieren van het scherm zitten. Vervolgens druk je alles naar beneden en schuif je de behuizing in de richting van de scharnieren. Als de klemmen in elkaar grijpen, zou het schuiven moeten stoppen.
-
Als de schuivende klemmen volledig in elkaar hebben gegrepen en de behuizing op z'n plek lijkt te zitten, druk je stevig op de onderste behuizing om de vier verborgen klemmen ook vast te klikken. Als het goed is, hoor en voel je ze in elkaar klikken.
-
-
-
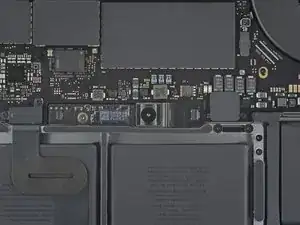
Peuter de isolerende sticker, die aan de kant van het logic board het dichtst bij de batterij over het batterijbord zit, los en verwijder deze.
-
Als de cover er niet makkelijk af komt, kun je wat milde warmte toedienen met een iOpener, een föhn of een warmtepistool om de lijm eronder te verzachten en het vervolgens nog eens te proberen.
-
-
-
Gebruik een spudger om de bevestigingsklem van de ZIF-aansluiting van de datakabel van het batterijbord omhoog te duwen.
-
-
-
Koppel de datakabel van het batterijbord los door deze uit het contact op het logic board te schuiven.
-
-
-
Peuter de tape die over de datakabelaansluiting van het batterijbord is geplakt los.
-
Duw de bevestigingsklem op de aansluiting aan de andere kant van de datakabel van het batterijbord omhoog en koppel de aansluiting los.
-
-
-
Schuif de datakabel van het batterijbord uit het contact op het batterijbord en verwijder deze in z'n geheel.
-
-
-
Gebruik een T5 Torx-schroevendraaier om de 3.7 mm lange pannenkoekschroef die de stroomaansluiting van de batterij bevestigt te verwijderen.
-
-
-
Gebruik een spudger om de stroomaansluiting van de batterij omhoog te duwen en de batterij los te koppelen.
-
-
-
Gebruik een T3 Torx-schroevendraaier om de twee 1.8 mm lange schroeven die de beschermbeugel van de kabelaansluitingen van het toetsenbord en het trackpad bevestigen te verwijderen.
-
Verwijder de beugel.
-
-
-
Gebruik een spudger om de trackpadkabel los te koppelen door de aansluiting in een rechte beweging van het logic board omhoog te duwen.
-
-
-
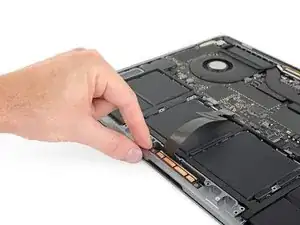
Gebruik een beetje warmte op de lintkabel van het trackpad om de lijm eronder, die het aan de batterij bevestigt, te verzachten.
-
-
-
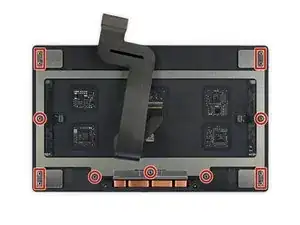
Gebruik een T5 Torx-schroevendraaier om de 13 schroeven die de trackpadmodule bevestigen los te schroeven:
-
Negen 5.8 mm lange schroeven
-
Vier 4.9 mm lange schroeven
-
-
-
Klap het scherm een klein beetje open, maar houd de MacBook op z'n kop. De trackpadmodule zou los moeten komen en plat op het scherm moeten liggen.
-
Begeleid de lintkabel van het trackpad voorzichtig door het gat in het chassis.
-
-
-
Wees bij het verwijderen van de trackpadmodule voorzichtig dat je de negen kleine, metalen schroefringetjes niet verliest. (Deze zullen er namelijk afvliegen en verloren raken als ze ook maar enigszins worden geprovoceerd.)
-
Verwijder de trackpadmodule.
-
Vergelijk je vervangende onderdeel met het originele onderdeel — het kan zijn dat je meerdere onderdelen mee over moet zetten of beschermlagen voor de lijm moet verwijderen voordat je het nieuwe onderdeel kunt installeren.
Om je toestel weer in elkaar te zetten, volg je deze instructies in omgekeerde volgorde.
Breng je e-afval naar een door R2 of e-Stewards gecertificeerde recycler.
Ging je reparatie niet zoals gepland? Check dan ons [Antwoordenforum voor hulp om je probleem op te lossen.
Een commentaar
I have a macbook pro 16" from 2019, it did not give me a haptic response, the Force Touch is sensitive to touch and pressure but there was no sensation of "click" or vibration, I disassembled the mac and the trackpad out of pure curiosity, and when closing and turn on the mac, the trackpad was completely unusable as well as the keyboard and the fans at full, I already tried to restore PRAM and SMC with an external keyboard and nothing worked, I already started in safe mode and neither. I reopen it to verify all the grants but there is nothing visibly wrong. Please Help...


















Is this step necessary? I can’t perform this step as I am attempting to repair water damage and need to remove logic board & most likely replace the battery.
Macrepair SF -
@mac_medic You definitely don’t want the power coming on while the board is wet. In your case, I think powering on the machine to disable Auto Boot would do more damage than it prevents. I agree, skip this step and be prepared to disconnect the battery quickly if the laptop automatically powers on. Good luck!
Jeff Suovanen -
Thats right! You don't want power running while working on your logic board.
Dan -
This did not work when running High Sierra.
Kyle B -
Tried this on a 2018 MBP 13” Touchbar (there’s no iFixit guide for this model yet). Need to replace a broken screen.
Luckily I managed to connect to an external screen (Cmd-Down Brightness to switch displays) and enter above command. Seems to work, but there’s another problem with this model - it powers up as soon as any key is pressed……. ffs <gnashes teeth>
Cool_Breeze -
I unscrew the battery first and wrap electrical tape over the logic board battery connector before attempting any repairs to the board. Haven’t had any problems yet and I’ve worked on about 10 of these models already. Also when you open the bottom case use a suction cup at the bottom and pull up then run a plastic spudger along the edges to disconnect the clips. Also only use a plastic spudger on the board. Saw a youtube video from a repair shop and he did not disconnect the power and used all metal tools during the entire process of removing the board. His last step was to disconnect the battery terminal.
Brian -
Is this step necessary if my mac can turn on? Battery fully dead(
Nursat b -
BEFORE YOU START: The included torx head stripped off before I was done (and you might need an additional T4) so stop now and go buy a good one. Also they fail to warn you above to get some blue threadlocker ahead of time.
Jason Sherron -
This command did not work for me and I read that sometime in later 2020 Apple stopped this command from working…any ideas on a work around?
Patrick Machacek -
Not able to do that with damaged screen
richardjgreen -
If you have a damaged screen you can still use a converter from thunderbolt (USB 3) to HDMI and plug your Macbook Pro to your TV as monitor display. Just make sure to chose the right Source (HDMI IN) in your TV. I did it and to make it work I unplug and plug again in my Macbook and so I could disable the Auto boot
Roberto Sanchez Bustos -
Hi. This does not work on 2018 13” MacBook Pro with Touch Bar. I did exactly this to disable auto boot. But when I check by using nvram -p it says: auto-boot true. Am I doing something incorrectly? I did everything step by step. Copied and pasted the sudo command, pressed enter and then entered my password. I have Big Sur 11.1 installed. Is there any other way since I need to replace the screen. Thank you. Adrian
Adrian Vizik -
Hi everyone. This is also a little pointless if you can’t see anything on the screen, and you don’t have a display adapter to USB C to display it. I agree with Brian about removing the back and disconnecting the battery cable before you even think about opening the lid of the MacBook. Applying the insulation tape is also a handy little tip that just makes sure there is no way to discharge from either the board or battery.
Roberto Enrieu -
running `nvram -p | grep 'AutoBoot'` in terminal verifies that it was accepted
result: `AutoBoot %00`
Marek Polák -
Running Big Sur 11.6.7 on a 2019 16" MBP, it's "auto-boot". So it's:
nvram -p | grep 'auto-boot'to display the current state, the default istrue- and then to change it,sudo nvram auto-boot=falsewhich turns it off.Ed Mechem -
This step is completely unnecessary if you follow the guide to disconnect the battery properly. Just put some tape between the battery and logic board connection to prevent it from accidentally touching and therefore powering on the laptop.
Grant Ormsby -
It took me a few tries to make this command work, as I was able to copy and paste the command into Terminal, but could not type in my laptop’s password. I finally typed my password into a text document, copied it (command C), and then pasted it into Terminal and it worked.
tommy404 -
I didn’t do this. Mine never auto-booted before I replaced the battery. Now it does.
hatuxka -
BEFORE YOU DO ANYTHING - CHECK THE BATTERY!
I-fixit sent me a bad battery, which I didn’t realize until it was already install. They sent me a new one, but I wasted hours uninstalling and reinstalled.
Get a volt meter and measure the voltage on the output of the battery pack. If it reads 0 V, SEND IT BACK. It should read over 2 V.
bcardanha -
I've just received my replacement battery and it reads 0,042V between the two main connectors. Do you think it's dead?
peter sussex -
When I did this from Terminal.app within Recovery Mode, the “sudo” was not recognized but I could invoke it without the sudo part. It seems to have been accepted when looking at “nvram -p”
johann beda -
When in Recovery Mode, you already have superuser powers. So you don't need to prefix commands with the sudo command to invoke them with root privileges; you already have them. Do a
pwd(print working directory) after opening Terminal in Recovery Mode, and you'll see that you're in the root user's directory.Ed Mechem -
I received the battery kit for my 2018 MacBook Pro and as per the above comment from bcardanha - Oct 12, 2021, I checked the voltage on the pads marked + and - . It was zero volts so I panicked a bit.
I sent a message on the iFixiT Facebook page and I got no reply. I finally found the customer service email for Ifixit Europe and sent them an email voicing my concern as I was not keen to work for couple of hours just to discover that the battery is faulty. I had an almost instant reply on the email (kudos to them) and they adviced me to go ahead and install the new battery as the voltage measured when battery is not connected is not relevant.
I took a leap of faith and after two hours… the new battery showed 50% charge and everything seems to be working just fine. I am happy it worked.
Mircea Comanici -
After removing the old battery and installing the new battery I powered up the MBP before screwing the bottom on. I discovered the my keyboard would not function. It took a few hours of investigation and frustration that I discovered the track pad power ribbon had become partially dislodged from the trackpad. I was able to see that this through the little machined slot where the battery sat. I had to remove the trackpad to reinsert the power ribbon back into the connector in the trackpad. after reassembling and reinstalling the battery etc the keyboard worked. Just food for thought if your run into the keyboard issue.
Ed Mease -
This should be the default. IMO I tell you to power on - not the lid.
G Sena -
Est ce que cela fonctionne sur un macbook pro 2017 sans touchbar ?
maël muzelet -
Bonjour Maël, oui, ce tutoriel concerne "les MacBook Pro 2016 (et plus récents) et les MacBook Retina 12" 2017 (et plus récents)"
Claire Miesch -
Excellent instructions. I was able to follow and install the new screen. I recommend that you get a good set of tools before you begin. I started with an inexpensive repair kit bought online. The Penta and torx bits failed. I bought an IFIXIT kit with quality bits and I was able to do everything I needed.
Tom Markham -
If you're not running an admin account the sudo command won't work (which honestly, you should not be running admin). Rather than logging in to your admin amount via the OS, in the terminal type "login [admin username]," then the password and you'll be able to do the sudo command as described above. Once you're complete, type "logout [admin username]" and you'll be good to go. Obviously replace [admin username] with whatever the account name for your admin user is.
arichard2401 -
For those unable to complete this step because the screen is too damaged I recommend leaving your macbook on until the battery dies.
Nicholas R Licato -
Just replaced my 2018 15" MBP battery. Running Sonoma.
I found no way to disable AutoBoot (The status can be checked in the Power section of system report).
Anyway, i left my battery completely drain before opening the MBP, and had no issues during the process.
Cédric Bontems -
After sending this command in terminal when I checked what happens if I now open the lid, instead the screen lit slightly up (still black) then a battery symbol showing the charging state showed up.
Now, after replacement of the battery, this is all I get to see.
No reset of NVRAM nor PRAM helped.
Currently the new battery charges (58% atm) and it feels like it‘s mocking me.
webrockers -
I suspected the keyboard or TouchID sensor wouldn’t work, so I went on and checked every connector.
I missed connecting the left TouchID sensor from step 31.
webrockers -
Read the comments section at the bottom of the article before proceeding with the repair. It is unnecessary to remove the logic board. I actually removed the 45mm plastic bar to enable the cables to slip out then in. It is only there to frustrate repairers!
Jack -