Inleiding

Gebruik deze handleiding om het scherm van je MacBook Pro 16" 2021 te vervangen.

Ontlaad de batterij van je toestel, voor je eigen veiligheid, tot onder de 25% voordat je begint met het demonteren van je MacBook. Dit verkleint het risico op een thermisch ongeluk bij het tijdens de reparatie per ongeluk beschadigen van je batterij. Neem, als je batterij gezwollen is, de juiste voorzorgsmaatregelen.

  1. sAvCLYXqUkq3CpsT
    sAvCLYXqUkq3CpsT
    dYQhaLBJXSRTTctb
    • Schakel je MacBook Pro volledig uit en koppel alle aangesloten kabels los voordat je met deze procedure begint. Klap het scherm dicht en draai de laptop om zodat deze met het scherm op je werkoppervlak ligt.

    • Gebruik een P5 Pentalobe-schroevendraaier of -bitje om de acht schroeven, waarmee de onderste behuizing bevestigd is, te verwijderen:

    • Vier 9.1 mm lange schroeven

    • Vier 5 mm lange schroeven

    • Zorg dat je, tijdens deze reparatie, goed bijhoudt welke schroeven waar vandaan komen zodat je zeker weet dat je de juiste schroeven op de juiste plek terugplaatst. Zo voorkom je schade aan je toestel.

  2. XaNohnCmRnh2nZpJ
    XaNohnCmRnh2nZpJ
    vL2whH15EFx1twZH
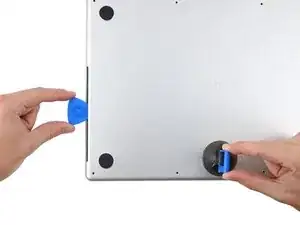
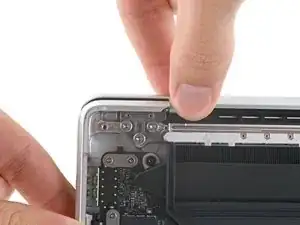
    • Druk een zuignap op de onderste behuizing, aan de voorkant van de laptop, tussen de twee middelste schroefgaten in.

    • Trek de zuignap omhoog om een kleine opening tussen de onderste behuizing en de rest van de laptop te creëren.

  3. gKFYYs2sw4AKQjyZ
    gKFYYs2sw4AKQjyZ
    H4KsmKKCORb6oQgS
    XipK6OFYbtmB2HXx
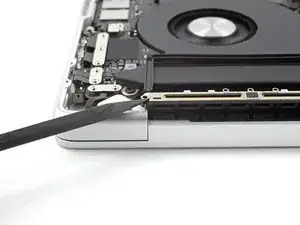
    • Steek een openingsplectrum in de opening die je zojuist hebt gecreëerd.

    • Schuif je plectrum om de dichtstbijzijnde hoek heen en vervolgens omhoog tot halverwege de zijkant van de MacBook Pro.

    • Dit zorgt ervoor dat de eerste klemmen die de onderste behuizing op z'n plek houden loskomen. Als het goed is, voel je en hoor je dat de klemmen loskomen.

  4. D6bdEaUShxT3UVIG
    D6bdEaUShxT3UVIG
    MUSM2IsQWQnMyLTY
    PVitYNF6oBIbr23x
    • Herhaal de vorige step aan de andere kant van de laptop: gebruik een openingsplectrum om de klemmen aan de linkerzijde van de laptop los te maken.

    Terrifying, don't be afraid, give it a good pull, the description above is exactly right.

    Scott -

  5. jhQl23lkLmdIajyL
    jhQl23lkLmdIajyL
    5Biq1bJPZBQJR6co
    SosOCOgOT4DGPusW
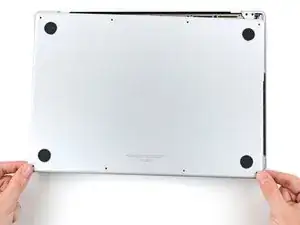
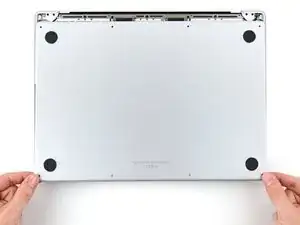
    • Trek de onderste behuizing met wat kracht richting de voorkant van de MacBook (dus van de scharnieren weg) om de behuizing los te maken uit de laatste klemmen die de behuizing vasthouden.

    • Trek eerst de ene hoek en vervolgens de andere hoek richting de voorkant.

    • Trek naar de zijkant—niet omhoog.

    • Dit kan aardig wat kracht vereisen.

  6. Opome2xEF244Sbik
    Opome2xEF244Sbik
    Zhm2CbuWmJyMyRHI
    NZBNkwTekFWxsHvu
    • Verwijder de onderste behuizing.

    • Om de onderste behuizing weer terug te plaatsen:

    • Breng je deze in de juiste positie aan en zorg je dat de klemmen in de buurt van de scharnieren op een lijn komen te zitten. Druk de behuizing vervolgens omlaag en schuif deze richting de scharnieren. De behuizing zou moeten stoppen met schuiven zodra deze vastgeklemd wordt.

    • Als de klemmen eenmaal goed vastzitten en de behuizing lijkt op de juiste plek te zitten, druk je deze stevig omlaag om de laatste vier klemmen vast te klikken. Als het goed is, hoor en voel je de klemmen vastklikken.

  7. FgGgf4GhVSJkB6Hd
    FgGgf4GhVSJkB6Hd
    ySvkRMDrNuH1dhiQ
    gReZjWbNlkRwQT4Z
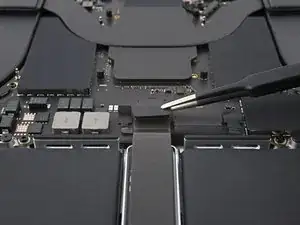
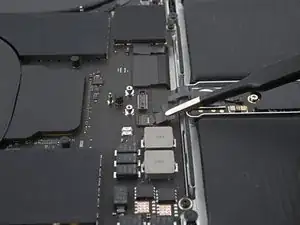
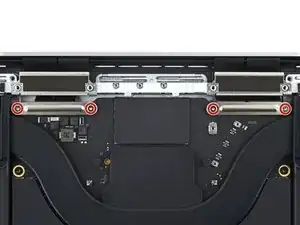
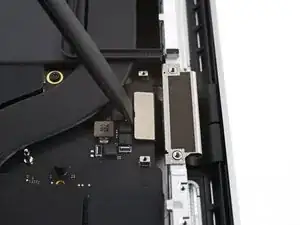
    • Gebruik een T3 Torx-schroevendraaier om de twee 2.1 mm lange schroeven, waarmee de beugel van de trackpadkabel op het logic board is bevestigd, te verwijderen.

    This photograph does not match my 2021 Macbook Pro. Fortunately the differences do not impact the removal operation.⏎
    There is a different arrangement and number and type of chips to the left of the image.

    One square grey thing nad five rectangular black things ...
    Mine does not have the rows of test points above the track pad cable.

    Simon Anthony -

  8. QtRqh2PcLwJEyMl2
    • Gebruik een pincet of je vingers om de beugel van de trackpadkabel te verwijderen.

    This photograph does not match my 2021 Macbook Pro. Fortunately the differences do not impact the removal operation.⏎
    There is a different arrangement and number and type of chips to the left of the image.

    One square grey thing nad five rectangular black things ...
    Mine does not have the rows of test points above the track pad cable.

    Simon Anthony -

  9. WaQjuOAf5MZEwxHg
    WaQjuOAf5MZEwxHg
    xPSIP1AxNtUONlKO
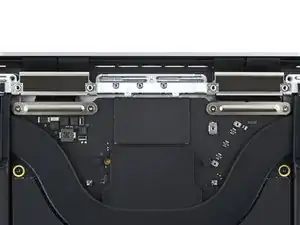
    • Gebruik het platte deel van je spudger om de drukaansluiting van de trackpadkabel uit het contact op het logic board omhoog te wrikken en zo los te koppelen.

    • Om drukaansluitingen zoals deze weer te bevestigen, breng je ze op de juiste positie boven het contact aan en druk je eerst de ene en dan de andere kant naar beneden tot de aansluiting zich vastklikt. Druk niet op het midden, want als de aansluiting niet goed geplaatst is, kun je hiermee de pinnen verbuigen en je toestel permanent beschadigen.

    This photograph does not match my 2021 Macbook Pro. Fortunately the differences do not impact the removal operation.⏎
    There is a different arrangement and number and type of chips to the top/left of the red circle.

    One square grey thing nad five rectangular black things ...
    Mine does not have the rows of test points to the left of the track pad cable.

    Simon Anthony -

  10. VPel3ETKSKoJBrqN
    VPel3ETKSKoJBrqN
    lYVqFT3cGXZnpqfc
    • De trackpadkabel is lichtjes op het frame bevestigd met wat lijm.

    • Trek de trackpadkabel los en van het toestel weg om de kabel van de lijm te scheiden.

    This photograph does not match my 2021 Macbook Pro. Fortunately the differences do not impact the removal operation.⏎
    There is a different arrangement and number and type of chips to the top/left of the red circle.

    One square grey thing nad five rectangular black things ...
    Mine does not have the rows of test points to the left of the track pad cable.

    Simon Anthony -

  11. cgQyOS4NtRvIy3Ai
    cgQyOS4NtRvIy3Ai
    G4sovFjM5QySl1sx
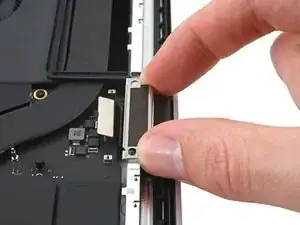
    • Verwijder de tape die over de aansluiting van de datakabel van het batterijbord heen is geplaatst.

    Das sind T4 Schrauben bei mir

    Ralf Schäfer -

    This photograph does not match my 2021 Macbook Pro. Fortunately the differences do not impact the removal operation.⏎
    There is a different arrangement and number and type of chips to the left of the image.

    One square grey thing nad five rectangular black things ...
    Mine does not have the rows of test points above the track pad cable.

    Simon Anthony -

  12. pCALggmovIyZDFi4
    pCALggmovIyZDFi4
    hXAscdRj32qCEUd1
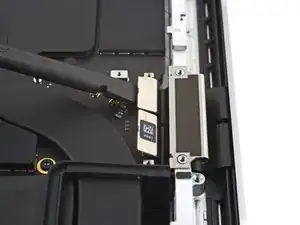
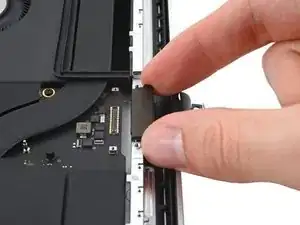
    • Gebruik een spudger om de vergrendeling op de ZIF-aansluiting van de datakabel van het batterijbord omhoog te klappen.

    This photograph does not match my 2021 Macbook Pro. Fortunately the differences do not impact the removal operation.⏎
    There is a different arrangement and number and type of chips to the left of the image.

    One square grey thing nad five rectangular black things ...
    Mine does not have the rows of test points above the track pad cable.

    Simon Anthony -

  13. kOyvt5RDHC3UERUP
    kOyvt5RDHC3UERUP
    4oP3UYNM35Wn1OEi
    GxE4rspckMvMdJ4h
    • De datakabel van het batterijbord is lichtjes op het logic board bevestigd.

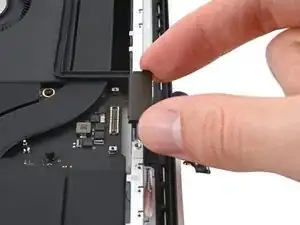
    • Steek een pincet met botte uiteinden tussen de datakabel en het logic board.

    • Schuif je pincet onder de kabel om deze van de lijm eronder te scheiden.

    • Koppel de datakabel los door deze uit het contact op het logic board weg te schuiven.

  14. OVL4qQbalnGIRUlA
    OVL4qQbalnGIRUlA
    i2UpmCcbNGOTGFZH
    • Gebruik een pincet of je vingers om de datakabel van het batterijbord van het toestel weg te trekken.

  15. sRXeCfdINDYogUZM
    sRXeCfdINDYogUZM
    OUulhyR2wrFGLiCj
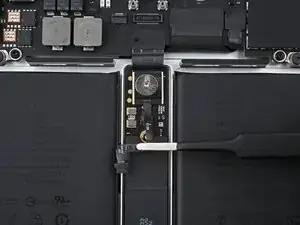
    • Gebruik een T5 Torx-schroevendraaier om de 3.9 mm lange pannenkoekschroef, waarmee de batterijaansluiting bevestigd is, te verwijderen.

    This photograph does not match my 2021 Macbook Pro. Fortunately the differences do not impact the removal operation.
    There is a different arrangement and number and type of chips to the top/left of the red circle.

    One square grey thing nad five rectangular black things ...

    Simon Anthony -

  16. hvVm3YJcO2MRuHkK
    hvVm3YJcO2MRuHkK
    rFVOELLuBj2ZHQDt
    • Gebruik een spudger om de batterijaansluiting omhoog te duwen en de batterij los te koppelen.

    • Til de aansluiting hoog genoeg weg zodat deze tijdens de reparatie geen contact maakt met het contact. Als het per ongeluk contact zou maken, kan dit je MacBook Pro permanent beschadigen.

    is it possible to buy/replace this battery power connector? I broke mine on the logic board side and they are impossible to find. Ofc apple want $900 because the laptop is "modified" after replacing the keyboard :|

    Thenon -

    The previous image did not match my Macbook Pro, this one does.
    Two square grey things, three rectangular smaller black things. :-)

    Simon Anthony -

  17. qHXHOPIA3Nm5Z4Mx
    qHXHOPIA3Nm5Z4Mx
    RX1B6llNG3REKEGx
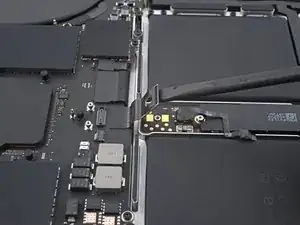
    • Gebruik een T3 Torx-schroevendraaier om de drie 2.1 mm lange schroeven, die de beugels op het antennebord en op de coax-kabels bevestigen, te verwijderen.

  18. NISpyifFwBadkYRn
    NISpyifFwBadkYRn
    wAKrsORhDY21Sbuf
    • Gebruik een pincet of je vingers om het beschermplaatje bovenop de coaxiale kabels van de antennebalk te verwijderen.

  19. QsvVGWDNUgWL2tAm
    QsvVGWDNUgWL2tAm
    kc1Tm3DP5RFVIoGJ
    • Gebruik de punt van je spudger om de aansluiting van de coaxiale kabel van de antennebalk omhoog te wrikken en los te koppelen.

    • Herhaal deze stap ook voor de twee andere kabels.

    • Deze kabels kunnen bij het weer in elkaar zetten van je toestel lastig aan te sluiten zijn. Zorg dat je de aansluitingen één voor één boven het contact plaatst om deze vervolgens met het platte deel van je spudger omlaag te drukken. Als het goed is, hoor je de aansluiting vastklikken.

  20. QG5nkErfOYmMPwfP
    QG5nkErfOYmMPwfP
    FYJGYThTWbXy3HOF
    • Gebruik een T5 Torx-schroevendraaier om de zes schroeven, waarmee de antennebalk aan het frame is bevestigd, te verwijderen:

    • Twee 7.5 mm lange schroeven

    • Vier 3 mm lange schroeven

    • Gebruik een P2 Pentaloba-schroevendraaier om de negen 1.5 mm lange schroeven, waarmee de antennebalk aan het frame bevestigd is, te verwijderen.

    • Deze schroeven draaien makkelijk door; zorg dus dat je een constante neerwaartse druk uitoefent en langzaam te werk gaat bij het verwijderen van deze schroeven.

    You should update all your guides that include these instructions. At least in my 2021 16" MBP, the screws described here as P2 Pentalobe ARE NOT P2 Pentalobe. P2 tools strip out the heads on these. Per the Apple manual, the actual drive type is 1 IPR. Wera makes one.

    felix4567 -

    On my 2021 16" the P2 worked great for these screws. No stripping. I'm sorry that happened to yours, Felix! Seems there might be some variants in the screws used.

    Quantum Mechanic -

    I had also P2 and T5.

    Klares -

  21. 4KXaRPXBXyemFIae
    4KXaRPXBXyemFIae
    QlWUGmx6FDGauRxp
    • Steek de punt van je spugder tussen de antennebalk en het frame.

    • Wrik de antennebalk met behulp van je spudger omhoog om deze van het frame te scheiden.

  22. ewF6AEhufwb53IHS
    ewF6AEhufwb53IHS
    6QKNeMlitQ3K54vC
    • Trek de antennebalk in een rechte beweging uit het frame omhoog om deze te verwijderen.

  23. HmnoNBvWLm6tZEqB
    HmnoNBvWLm6tZEqB
    DTUULHJ3jgM2KHKx
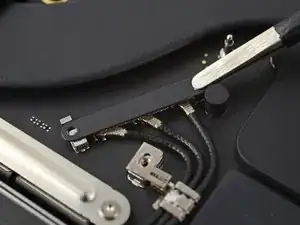
    • Gebruik een T5 Torx-schroevendraaier om d vier 2.1 mm lange schroeven, waarmee de beschermplaatjes op de schermkabel zijn bevestigd, te verwijderen.

    Hi there, the display cover screws use a T3 Torx not a T5

    Brandon McCulloch -

    Right you are Brandon! Thank you for the comment, and I have changed the guide accordingly.

    Alex Diaz-Kokaisl -

  24. AlZTNpXrnKCED5cP
    AlZTNpXrnKCED5cP
    rEaeYwEYMRDd3KUS
    • Gebruik een pincet of je vingers om de twee beschermplaatjes van de schermkabel van het logic board te verwijderen.

  25. iGLZDr6x3fcOoSdA
    iGLZDr6x3fcOoSdA
    QoKvLDMrNMfIrIjR
    WRVYbhNYbW4N1jEx
    • Gebruik het platte einde van je spudger om de drukaansluiting van de meest rechtse schermkabel los te koppelen: wrik de aansluiting in een rechte beweging van het contact op het logic board omhoog.

  26. nd1ANiturmExTbJ6
    nd1ANiturmExTbJ6
    awfFUOcBChlpEAOu
    • Herhaal de vorige stap voor het loskoppelen van de meest linkse drukaansluiting.

    This is not the same Mac as the pic above this one...???

    macmanaspen -

    When replacing, these are hard to connect while the cable brackets are attached, because the ribbons were too stiff. I skipped Step 30, did Step 29-26, then replaced the brackets.

    HeatherG -

  27. 2JGRJb6FneQSFHud
    2JGRJb6FneQSFHud
    jMWdk4YGXDWhnDp2
    6aOry1sKEFLy4DTS
    • Trek de achterkant van de beugel van de schermkabel omhoog om de klemmen van de beugel uit het frame los te maken.

    • Verwijder de beugel.

    • Herhaal deze stappen ook voor de andere beugel op de schermkabel.

    Replacement screen might not come with these brackets, so be sure to save them from the original.

    HeatherG -

  28. KULnxFpPK6DEIgVB
    KULnxFpPK6DEIgVB
    CfYwnYmB6nnGr3vp
    • Als de twee buffers met de beugels mee zijn verwijderd, kun je deze stap overslaan.

    • Trek de twee beugelbuffers in een rechte beweging omhoog en uit het frame om deze te verwijderen.

  29. nU4vyumR2oRPuaCS
    nU4vyumR2oRPuaCS
    OTeZrglWMhtG3yqe
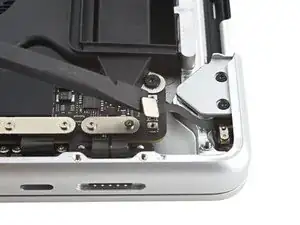
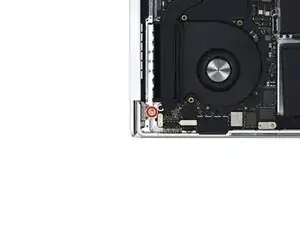
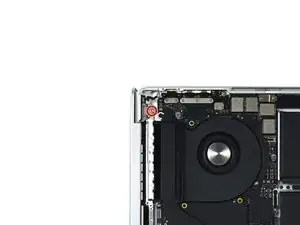
    • Gebruik een T3 Torx-schroevendraaier om de twee 2.1 mm lange schroeven, waarmee het beschermplaatje op de schermhoeksensor (bij het rechterscharnier) is bevestigd, te verwijderen.

  30. ySdYkAvPTeNpnfUy
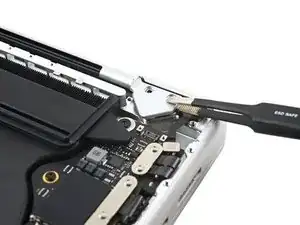
    • Gebruik een pincet of je vingers om het beschermplaatje van de schermhoeksensor te verwijderen.

  31. 3KVZiV1tnfFGagno
    3KVZiV1tnfFGagno
    YmxKBWWb6rwTKWQD
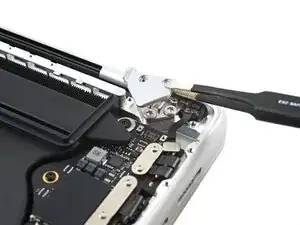
    • Gebruik het platte einde van je spudger om de drukaansluiting van de schermhoeksensor omhoog te wrikken en los te koppelen.

  32. OO3WXlt5bvYI5LRs
    OO3WXlt5bvYI5LRs
    VjwDUR4V23D2ROXd
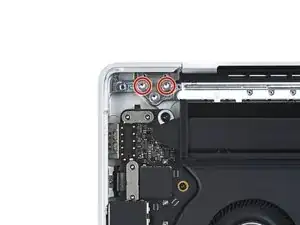
    • Gebruik een T5 Torx-schroevendraaier om de vier 2.5 mm lange schroeven, waarmee de covers op de schermscharnieren zijn bevestigd (twee aan iedere kant), te verwijderen.

    What is the part number for these four screws?

    maxwelljconnelly -

  33. RYfHBwuYeqCM2Aj4
    RYfHBwuYeqCM2Aj4
    CTPX1AQVV1gyMGpW
    KanI5vuSACUnAJNa
    • Gebruik een pincet om de covers van de scharnieren horizontaal van het scharnier weg te trekken en zo van het frame te scheiden.

    • Verwijder de covers.

  34. bKaPYeeyPjlAWn5J
    bKaPYeeyPjlAWn5J
    1u3ZBfElVSVxdEMX
    • Gebruik een T8 Torx-schroevendraaier om de twee bovenste 6.4 mm lange schroeven uit elk van de scharnieren te verwijderen (vier schroeven in totaal).

    • Elk scharnier bevat een derde schroef, welke je voor nu laat zitten.

    Both this guide and Apple's official repair manual state that these are T8 Torx screws... I found the T8 to bee too small for this, and instead used a T9, which fit perfectly.

    Nuka Kola -

    These screws were in very tight. The dinky driver that came with the replacement screen was insufficient. I had to use a more substantial bit driver. T8 worked fine for getting them loose. Then used the T9 that came with the replacement to get them all the way out.

    HeatherG -

    Mine was also T9 and you should also lose a little bit the 3rd screw on every side.

    Klares -

    I used the “TR9” in the iFixit kit

    kevin -

  35. dAHYNPOxARHeWpRs
    dAHYNPOxARHeWpRs
    KA556FCTuJc5Vrn3
    • Als je van plan bent je scherm weer te gebruiken, klap je het scherm nu open en plak je een laag tape net boven de scharnieren op het scherm. Dit helpt bij het beschermen van het schermglas.

    • Open je scherm nu volledig en zet je MacBook op een zijkant.

    This should be step 1. A whole lot easier to put the tape on before taking the back off and undoing all the screws.

    HeatherG -

  36. WV6SC2Is3ihfYAjI
    WV6SC2Is3ihfYAjI
    jkdL6IpciW4K3UJW
    wdeMKDnFV6lABHjG
    • Gebruik een T8 Torx-schroevendraaier om de twee resterende 6.4 mm lange schroeven (een in ieder scharnier) te verwijderen.

    • Verwijder de bovenste schroef als laatste, en gebruik bij het verwijderen je andere hand om de helften van de MacBook te stabiliseren. Zo voorkom je dat een van de helften plots loskomt en mogelijk valt.

    Both this guide and Apple's official repair manual state that these are T8 Torx screws... I found the T8 to bee too small for this, and instead used a T9, which fit perfectly.

    Nuka Kola -

    Also, loosen both screws (but not remove) before opening the lid, since they are installed tightly.

    kevin -

  37. IMM3limP1GumvBZL
    IMM3limP1GumvBZL
    BQdVBNrR4fkQScab
    IJo2ODH3HDDxHkxP
    • Houd zowel het scherm als de rest van de laptop stevig vast. Beide helften kunnen in deze stap omvallen en beschadigd raken.

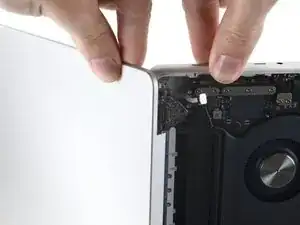
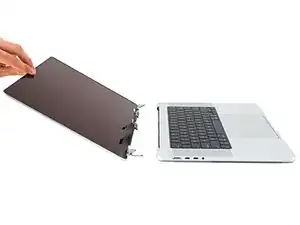
    • Duw beide helften van de MacBook Pro samen zodat de scharnieren uit hun inkepingen in het chassis getild kunnen worden.

    • Duw de main body van de MacBook Pro van je weg terwijl je het scherm naar je toe trekt. Zo scheid je beide helften van elkaar.

    Ich fand es deutlich leichter, das Gerät mit der Tastatur auf den Tisch zu legen, das Display an der Tischkante herunterragen zu lassen und die Display Oberkante mit den Oberschenkeln zu stabilisieren.

    Klares -

  38. FNnhxexVSBfitTmr
    • Verwijder het scherm.

  39. FEbGVqhmIuaBH3ZW
    FEbGVqhmIuaBH3ZW
    U4PtkM5gVmCSPkYb
    • Bij het weer in elkaar zetten van je toestel bevestig je de schroeven eerst losjes in de schermscharnieren. Vervolgens pas je de positie van het scherm aan tot deze volledig op de juiste plaats zit. Dan pas draai je de schroeven in de scharnieren strak aan.

    • Als je scherm bij het openen ervan klikt of een ander onheilspellend geluid maakt, kun je de scharnieren weer losdraaien en de positie van het scherm aanpassen. Zorg dat het scherm niet te ver naar voren is geplaatst en dat het scherm niets langs de body van de laptop schuurt bij het openen en sluiten.

    • Je kunt ervoor kiezen om wat blauw schroefdraadborgmiddel op het schroefdraar van de schroeven te smeren. Zo voorkom je dat de schroeven op den duur losraken.

    The track pad cable bracket screws take a T4 not a T3, and the 6 main hinge screws take a T9 not a T8.

    Will Patterson -

    Beim Zusammenbau daran denken, die Display Kabel zuerst auf die Innenseite zu führen

    Klares -

Conclusie

Volg bovenstaande instructies in omgekeerde volgorde om je toestel weer in elkaar te zetten.

Vergelijk je nieuwe onderdeel met het origineel om te zien of je nog meer onderdelen mee over moet zetten. Dubbel-check ook of je beschermfolie moet verwijderen alvorens je je nieuwe onderdeel kunt plaatsen.

Ging je reparatie niet helemaal volgens plan? Bezoek dan onze algemene probleemoplossingspagina of stel je vraag op ons MacBook Pro 16" 2021-antwoordenforum voor hulp bij het oplossen van je probleem.

Alex Diaz-Kokaisl

Lid sinds: 16/01/22

169220 Reputatie

11 commentaren

Will I lose True Tone functionality even though I use an original Apple screen that has True Tone for the repair?

drgenius2003 -

If you don't break the entire lcd, but only some part of it, the True Tone will still there. I have mine fixed because of the liquid damage. I only replace the LCD, not the fullset with the case. I have some locals to help me fixed it for me. So I don't know the details how they repair my macbook.

They gave me 2 options,

first told me that I will lose true tone feature if I replace it with the fullset lcd,

the 2nd option, If I replace the LCD only, the true tone still there because they can move the "ic" to the lcd replacement. But the disadvantage for the 2nd option that I will got some defect on my screen not much and not really visible if I don't really look at it. Please note that this options is possible because I didn't break the entire lcd.

I chose the 2nd option and it's work. The defect caused by my liquid damage is not really visible

ghiffari -

I had purchased my part from Apple directly, so when I was doing the system configuration at the end, they asked for my order number and my serial number, which I assume were used on their end to mark parts as genuine and restore TrueTone. If you purchased your part from apple and have the order number, then restoring TrueTone should not be a problem. If you got a part from elsewhere, then I don't how the service people on Apple's end would identify it to be able to mark it as genuine in their system, and to associate it with your machine. Perhaps you can contact them and ask..

Nuka Kola -

I hope this has a video demonstration too

wedzmer.munjilul -

In case you are not aware: you can get a genuine replacement screen directly from Apple. This machine is one of the first to be a part of their new repair program. If you get the screen from them, you will not lose the TrueTone functionality! After completing the repair, you will have to contact heir online support, who will guide you through system configuration steps to mark installed parts as genuine, thereby restoring TrueTone. You will also be able to send in your old screen to get some money back. Cheers!

Nuka Kola -

I successfully did the repair with a used Screen unit that was pulled from another MacBook. I don’t see any issues with True Tone or the blurred behavior of the screen. Still I am facing an ALS001 error which relates to the ambient light sensor. This causes the fan to run on high speed. But the sensor seems to work… at least it is adjusting brightness of screen and keyboard backlight. Any ideas how to fix this?

Andreas -

The new display screen cables have no brackets. How to remove them from the old display cables? It seems glued on the cables firmly and hard to pull off.

Yale Craig -

Buongiorno, ho letto che un chip T1 riconosce il monitor di concorrenza ed impedisce l avvio. E' Possibile?

matteo barsacchi -

I got a used lid assembly from laptopscreen because iFixit was out of stock, but I used this guide and it was spot on.

Just for awareness though: the screen I received had a different lid position sensor on it than the original screen for this computer. The connector on both sensors was the same, but the bends in the flat cable didn't allow it to line up to the main board connector properly. It wasn't difficult to swap the position sensor from the original screen. There's one P2x1.5mm screw attaching it to the side of the hinge and it comes off. So, if you're thinking of doing this replacement, don't be too eager to dispose of that old screen.

Laptopscreen listed the lid assembly as fitting both A2485 and A2780 models, and I installed it on an A2485.

info890 -

I just replaced my cracked screen with a pre owned one, on the new screen there was no screen angle sensor, I moved it from the old screen to new, will this work or does it still need calibration from Apple.

I have now had the laptop on charge for about 30 min and it does not startup, the screen seems to work now as it displays a battery symbol showing low battery (red) and a lightning symbol suggesting it is taking charge but it does not start; could it be I did not get the battery datat cable connected properly

Peter Falk -

An update, I had not connected the battery data cable properly redid and now it works

Peter Falk -