Inleiding

Vooraf vereiste handleiding om een iPhone X te openen en zo toegang te krijgen tot de binnenste onderdelen voor reparatie of vervanging.

  1. Whblnhy2uvYmFjIL
    Whblnhy2uvYmFjIL
    4URQtwUtqSQUKdHH
    NgjPkqJtEMhTXkd3
    • Als het scherm van je iPhone gebarsten is, kun je wat tape over de barsten plakken om te voorkomen dat het scherm verder beschadigd raakt tijdens dit proces. Zo verklein je ook het risico op fysieke schade.

    • Plak een aantal lagen tape op het scherm van de iPhone tot het gehele scherm bedekt is.

    • We raden je ten sterkste aan om tijdens deze stap een veiligheidsbril te dragen zodat je je ogen beschermt tegen eventueel loskomende glasscherven.

    • Als het je in de volgende stappen niet lukt om de zuignap op het scherm te bevestigen, kun je ervoor kiezen om een stuk duct tape in een handvatvorm op het scherm te plakken. Hiermee kun je dan het scherm omhoog tillen om een opening te creëren.

    • Als alternatief kun je er ook voor kiezen om de zuignap met secondelijm op het scherm vast te plakken.

  2. aaO4KYlBJShASHjk
    aaO4KYlBJShASHjk
    1r6VLlUjodppndSN
    BMhMJ35CLUOmyNqB
    • De volgende twee stappen introduceren de Anti-Klem, een handige tool die we aanraden aan iedereen die regelmatig reparaties uitvoert. Als je de Anti-Klem niet gebruikt, sla dan de volgende drie stappen over voor een alternatieve methode.

    • Voor uitgebreider instructies voor het gebruik van de Anti-Klem, lees je deze handleiding door.

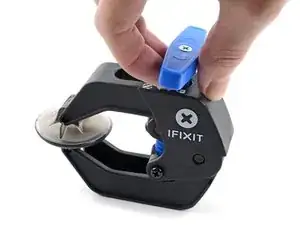
    • Trek de blauwe hendel naar achteren zodat de anti-klem vrij kan bewegen. (Op deze manier deactiveer je de openingsstand van de anti-klem.)

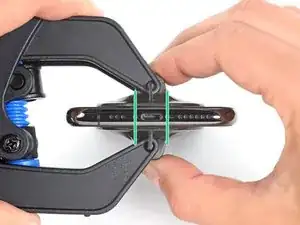
    • Schuif de armen over de linker- of rechterzijde van je iPhone.

    • Plaats de zuignappen dichtbij de onderkant van de telefoon—één op de voorkant en één aan de achterkant.

    • Druk beide zuignappen aan, om zuigkracht uit te oefenen op de gewenste plek.

    • Als het oppervlak waarop de zuignappen zich moeten vastzuigen te glad is, kun je wat tape gebruiken voor meer grip.

  3. fm1Txb6ZWoZVRccg
    fm1Txb6ZWoZVRccg
    ASYBeEfJh2IqKXlL
    qYIoimNJqUrEuJAT
    • Trek het blauwe handvat naar voren om de armen van de anti-klem te vergrendelen.

    • Draai het handvat 360 graden met de klok mee of tot de zuignappen uit beginnen te rekken.

    • Zorg dat de zuignappen op één lijn met elkaar zitten voordat je begint met het openen van het toestel. Als je ziet dat de zuignappen niet meer op één lijn zitten, maak je ze los en breng je ze weer op de juiste positie aan.

  4. fqtITHlwZLOFLmTY
    fqtITHlwZLOFLmTY
    321YFxdKNFRFVwk3
    YctteqQxMcE3kxyP
    • Verwarm een iOpener en plaats deze tussen de armen van de anti-klem op je telefoon.

    • Je kunt ook een föhn, heteluchtpistool, of een kookplaat gebruiken, maar wees bij het gebruik hiervan extra voorzichtig. Te veel warmte kan tot warmteschade leiden. Vooral het scherm en de batterij zijn hier erg vatbaar voor.

    • Vouw de iOpener zodat deze op de onderkant van de iPhone komt te liggen.

    • Geef de lijm een minuutje de tijd om los te komen zodat de anti-klem een opening kan creëren.

    • Steek een plectrum in de opening onder het scherm en de plastic rand, en niet onder het scherm zelf.

    • Als de anti-klem er niet in slaagt een opening te creëren die groot genoeg is voor je plectrum gebruik je meer warmte en draai je het blauwe handvat een kwartslag met de klok mee.

    • Draai het handvat nooit verder dan een kwartslag per keer en wacht een minuut voordat je de anti-klem weer besluit aan te draaien. Laat de anti-klem het werk voor je doen.

    • Sla de volgende drie stappen over.

    DO NOT separate the glass from the plastic bumper or rim around it. These instructions don't clarify that the pick has to be inserted between the plastic rim and the metal body. It is likely that the glass will lift slightly off the plastic surround before the plastic will lift out of the metal body. I had success sliding a card or pick back and forth along the bottom edge of the plastic rim while pulling on the suction cup. Eventually there was a space large enough for the pick to go under the plastic rim.

    Anessa -

    Thanks for pointing this out! I'll revise this step to clarify this point.

    Arthur Shi -

  5. JYhTvDYuGLQw3jiI
    • Het verwarmen van de onderkant van de iPhone helpt de lijm, die het scherm op z'n plek houdt, te verzachten, wat het makkelijker maakt om de telefoon te openen.

    • Gebruik een föhn of een warmtepistool, of prepareer een iOpener en leg deze op de onderkant van de iPhone gedurende ongeveer een minuut om zo de lijm die eronder zit te verzachten.

    General tip regarding heating necessary to remove adhesive:

    consider using a heated tip of a small screwdriver or metal spudger (not the one made of plastic, provided in kit), rather than to heat the device itself.

    Uri -

    You then need to be careful about the temp of the tool which if hot enough can melt plastic components or harm them. Keeping the heat source (heat gun) far enough away from the object that you’ll eventually melt the glue but would be much harder to melt components. I try to keep 4” or 5” gap between the source & object

    Sandman619 -

    Thanks for the info. Could a air convector do the job

    dominique.br -

    When opening a device that has previously been worked on, and on which the adhesive might not have been replaced, be extremely carful when opening the phone. It will open much more easily than expected. If you’re not careful you might rip a cable.

    jonpol -

    Is this tool required or can I just use the Anti-Clamp by itself.

    Mikail -

    If you have a 3d printer, heat the bed to 80c and put the phone screen side down on it for 30 secs

    philip.joseph123 -

    thaks for this advise, I was looking for this as I dont have a heat gun haha, nice hack

    Andres Chaparro -

  6. qXGGZ2MpZIYeQjKI
    qXGGZ2MpZIYeQjKI
    tGDwxj5neYkh3MDh
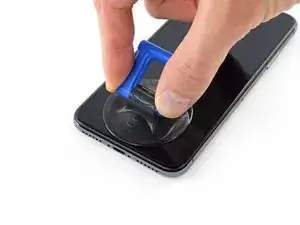
    • Als je een enkele zuignap met handvat gebruikt, druk deze dan vast aan de onderkant van de telefoon, maar vermijd het bolle deel van het glas.

    If you were using some form of screen protector, it may come off first as soon as you pull on the suction cup. Do not be alarmed. That is normal behavior.

    Alain-Daniel Wa-Baguma -

    3m VSB double stick tape will stick to the screen when the suction cups fail (see my comment on step 1)

    Tawan Khamapirad -

  7. uTXCGQFa5j4E5T3Y
    uTXCGQFa5j4E5T3Y
    DWfsuj4RCooAtKRa
    Zw4PcEZSTKHaLcqq
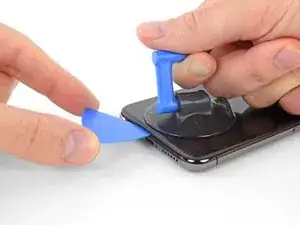
    • Trek de zuignap omhoog met een stevige, constante kracht om zo een kleine opening tussen het voorste paneel en de achterste behuizing te creëren.

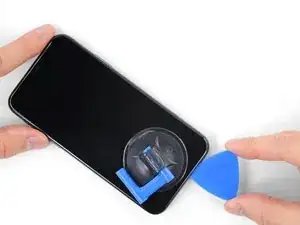
    • Steek een openingsplectrum in de opening onder de plastic rand van het scherm, niet onder het scherm.

    • De waterdichte lijm die het scherm op z'n plek houdt is erg sterk; het creëren van de opening kan dus heel wat kracht vereisen. Als je moeite hebt met het openen van de telefoon, dien dan meer warmte toe en wiebel het scherm op en neer om de lijm te verzachten totdat de opening groot genoeg is voor je tool.

    In addition to safety goggles, I would recommend you also wear good gloves to avoid getting cut with the glass as you try to pry it open.

    Alain-Daniel Wa-Baguma -

    The top about applying more heat and gently rocking the screen up and down to weaken the adhesive did the trick for me. Thank you!

    Monil Shah -

    There needs to be more clarity on where to shove the opening pick into. There is actually two openings that the pry tool can be forced into: one below the black plastic bezel, and one above the black plastic bezel. When I heated my screen with a warming pad and pulled up the suction cup, it actually pried apart above the black plastic bezel which removed the touch screen from the display panel. With this being the first newer iPhone I'd opened since the 3GS, I didn't realize that I was opening the wrong opening as the directions only mentioned one opening and did not warn of this. I was pretty disappointed in the lack of mentioning this, as I was taking my time and following it to the tee. As a result, it destroyed my original iPhone screen.

    Caleb Davison -

    DO NOT separate the glass from the plastic bumper or rim around it. As someone else noted, these instructions don't clarify that the pick has to be inserted between the plastic rim and the metal body of the phone. When pulling upwards with the suction cup, it is likely that the glass will lift slightly off the plastic surround before the plastic will lift out of the metal body. I had success sliding a card or pick back and forth along the bottom edge of the plastic rim while pulling on the suction cup. Eventually there was a space large enough for the pick to go under the plastic rim.

    Anessa -

    Thank you for pointing this out! I've updated the step to reflect this.

    Arthur Shi -

    The suction cup doesn't work at all... The minimum force I apply to lift it up, it comes off completely. This is very frustrating!!!

    Mario Silva -

  8. QE4lOUoglbyWQUwm
    QE4lOUoglbyWQUwm
    cHHBBJPBr4bVv24U
    agDTTsHWFYyI2WBC
    • Schuif je openingsplectrum langs de linker onderhoek en via de linkerzijde van de iPhone naar boven. Snijd daarbij alle lijm door die het scherm aan het frame bevestigt.

    • Steek je plectrum niet dieper dan 3 mm in de opening. Zo voorkom je schade aan de onderdelen in de iPhone.

  9. mkLvBfvMoYsfQbGS
    • Er loopt een aantal makkelijk te beschadigen kabels langs de rechterkant van de iPhone. Steek je plectrum daar niet in de opening om te voorkomen dat je je toestel beschadigt.

    Wouldn’t it be better to put this part BEFORE the step where you have to pry open the phone?

    Jan D. Höllwarth -

  10. OEUEsoSAmOAWxAMR
    OEUEsoSAmOAWxAMR
    YOhTValkxrevLipu
    aSZ2MAdtw4ZImiCD
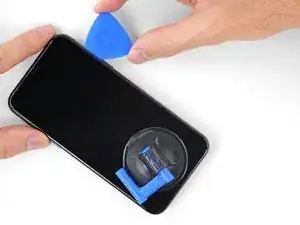
    • Steek je openingsplectrum opnieuw in de onderkant van de telefoon en schuif deze nu langs de rechter onderhoek en via de rechterzijkant omhoog om de lijm daar door te snijden.

    • Steek je plectrum ook hier niet dieper dan 3 mm in de opening om te voorkomen dat je de schermkabels beschadigt.

    If you have flat feeler gauges (for adjusting engine valve tappet clearance, ignition points … old school) the .003” thick gauge goes right in. Work your way up in thickness until you can get the pic or supplied pry tool in. Don’t insert metal feeler gauge in too far, just enough to hold crack open. I didn’t need to use the suction cup. I used a hot/cold gel pack heated in microwave to heat edges to soften glue a bit. Made sure it wasn’t so hot I couldn’t stand it on my skin.

    William Olstad -

  11. WfcjjEBfMZqEySEf
    WfcjjEBfMZqEySEf
    PCXKpWMWg6GWEViY
    McqYslJ4vV1SOOnm
    • De bovenkant van het scherm is bevestigd met zowel lijm als klemmen.

    • Schuif je openingsplectrum langs de bovenste hoek van het scherm, terwijl je het scherm voorzichtig naar beneden loopt of trekt, in de richting van de Lightning-poort.

    • Als je te veel kracht gebruikt, zullen de klemmen breken. Wees voorzichtig en heb geduld.

    • Steek je plectrum ook hier niet dieper dan 3 mm in de opening om te voorkomen dat je de voorste sensormodule beschadigt.

    • Schuif je plectrum naar de tegenoverliggende bovenste hoek en snijd alle lijm daartussen door.

    These are the best instructions I’ve ever read for anything.! Thank you!

    Peter Andrew -

  12. GnieimxVeXdJJobM
    • Trek aan het kleine uiteinde van de zuignap om deze van het scherm te verwijderen.

  13. XFu5RLJA6ncMAhxo
    XFu5RLJA6ncMAhxo
    nCGOAuVQLFmYsrOd
    XjQSuyqDe1k51mua
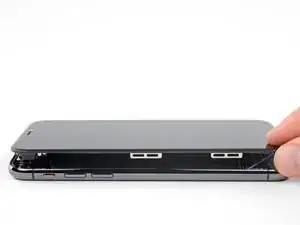
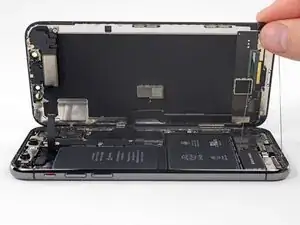
    • Open de iPhone door het scherm van links naar rechts open te klappen, alsof je de achterkant van een boek opent.

    • Probeer het scherm nog niet volledig los te krijgen, aangezien deze nog steeds aan het logic board van de iPhone verbonden is met een aantal kwetsbare lintkabels.

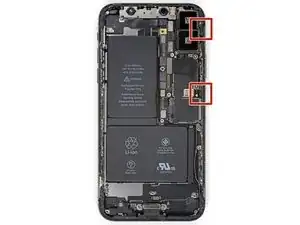
    • Zorg dat je, zoals je op de foto kunt zien, het frame inclusief het scherm uit het toestel haalt en voorkom dat het frame in de telefoon blijft hangen.

    • Laat het scherm op een object leunen, zodat je niet te veel spanning op de kabels zet en je nog steeds aan de telefoon kunt werken.

    • Tijdens de hermontage breng je het scherm in positie, op één lijn met de klemmen aan de bovenkant, en druk je de bovenkant van het scherm voorzichtig in de klemmen voordat je de rest van het scherm vastklikt. Als het scherm niet goed vastklikt, controleer je de klemmen om zeker te weten dat ze niet gebogen zijn.

    My phone came apart in a different way and looks not right the little box at the top of the display as actually bolted to the top of the frame body I think something went really wrong when I opened it.

    Mike Kostersitz -

    It opens like a book but be careful not to open it all the way — only as far as shown in the photo. Otherwise it will strain the thin cable that connects the sensor module and then no more FaceID for you (or, as it turns out me). This could have been made more explicit in the instructions.

    Richard Tucker -

    It opens like a book but be careful not to open it all the way  … the small stainless steel tabs that hold the screen around the metal frame, that are on the bend place (right side of the phone)… are tend to bend, you can straighten them back to 90 deg. but the plastic base that they are on? very fragile- watch out not to break the plastic bezel … it may come apart of the glass.

    dabur872 -

    Advice for re-assembly: Before closing up the phone with the seal, check if phone is powering up again and speaker, mic and sensors are still working. If done this check even before installing the board connector bracket in Step 13.

    Alexander Nowak -

Conclusie

Om je toestel weer in elkaar te zetten, volg je deze instructies in omgekeerde volgorde.

Jeff Suovanen

Lid sinds: 06/08/13

442718 Reputatie

0 commentaren