Inleiding

  1. uPo3AEtVjGUOXlda
    uPo3AEtVjGUOXlda
    mwuqER61PwOt1uE6
    2mwhXcw14Cve5xpk
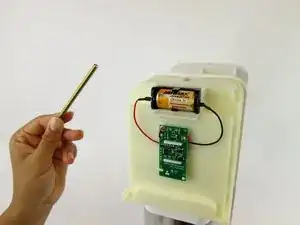
    • Duw de goudkleurige staaf, die zich aan de bovenkant van het apparaat bevindt, uit de koolzuur houder.

    • U kunt het uiteinde van uw schroevendraaier gebruiken om dit stuk eruit te duwen.

    We could,remove this covee, without sliding the assembly out ofbthe case. There was NO gold bar in the system…

    Robert Coles -

    ….. no gold bar either in my device…. ??????

    hbergeron -

  2. GphQUg1qNkEDRTcT
    GphQUg1qNkEDRTcT
    3NxQEZirCDyytuUo
    qf5UgdCjM4uZKNKH
    • Schuif de gele batterij behuizing omhoog en weg om het van het apparaat te verwijderen.

    Careful! I had springs and retainers go flying on this step

    Felicia Renaud -

    Yep…same here. Took me a good minute to figure out where they came from!?

    Rodney Davis -

    Fun fact: The lights on the SodaStream are simply a timer. They are in no way linked to a pressure gauge. If you want more bubbles it doesn't mean you have to press on the activation mechanism harder. you can press gently and just wait longer. This way the water will not spill out over the top and leak all over the table. Ignore the lights and just wait for the safety release valve to activate as you are filling the bottle. that's how you know you have reached the limit.

    Ken Ostrovsky -

    I don't have see springs but led don't work? How work led? The battery is charge. Thank you

    Letizia -

  3. MyqGNupIls4esFYK
    MyqGNupIls4esFYK
    SoBGKXxOyqRVkDdg
    • Haak het onderste stuk van de plastic arm aan weerszijden van het apparaat los.

  4. hKsCCevvmGpuqCOj
    hKsCCevvmGpuqCOj
    IeXvoBOnR1oDwP1a
    • Til de bovenkant van de plastic arm op met de spudger en verwijder deze aan beide kanten.

    Slot screwdriver works just fine for these next two steps

    Scott -

  5. WplpmtfCWF3Yhvag
    WplpmtfCWF3Yhvag
    6oJEPbASQJCQ35YI
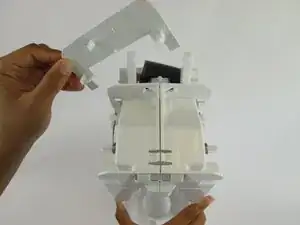
    • Verwijder het plastic stuk, dat zich aan de voorkant van de koolzuur houder bevindt, van beide kanten van het apparaat met behulp van een plastic openingstool of nylon spudger.

    Be careful…they will fly off across the room!

    Rodney Davis -

  6. DaRJ6MhBiBihfSJt
    DaRJ6MhBiBihfSJt
    RZygY4bEgNJsDSvK
    • Verwijder het plastic ovaal met de veer erin.

    Do not have this piece on mine?

    ronkellington -

    nor do I. They must have made some changes.

    Scott -

    This piece exists on my 2013 metal chassis version, but not on my 2016/17 plastic chassis.

    Darryl Marko -

  7. XHqPTJfYlsRZRWpD
    XHqPTJfYlsRZRWpD
    Y1nZCpBr1gbrMw62
    • Trek het klepje van het laderlipje naar beneden en weg van de rest van de koolzuur houder.

  8. QZYhTiECMNFJ4yun
    • Verwijder de drie schroeven van 17,9 mm aan de rechterkant.

    • Deze schroeven kunnen moeilijk bereikbaar zijn.

    Should this be four screws? I followed all directions (I think) and had one extra screw to remove, just above the bottle mount, before I could split the two halves apart

    Phil Wilkes -

    Yes I had a 4th screw at this step too. Going backwards the missing fourth screw in the instruction messed me up and I had to redo it!

    Daniel Sylvester -

    Yes the 4th screw still isn't mentioned - and just below it is the rare-earth magnet that can fall out when the halves are separated. This magnet activates the LEDs when the carbonating block is pushed down - no magnet, no lights.

    Malcolm Noble -

  9. tRskmIiswd2dIWWT
    tRskmIiswd2dIWWT
    YVheV5LUOmF2vEIU
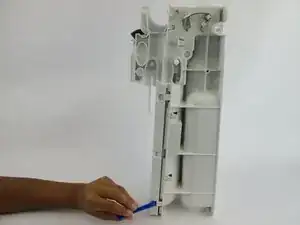
    • Haak de vier clips aan de bovenkant van de koolzuur houder los en verwijder de plastic afdekking.

  10. Kpo2GkMvnSPDLHlJ
    Kpo2GkMvnSPDLHlJ
    cN32IXyu2cZUQYPk
    1OsWloFwisA2OA2E
    • Til de clips aan beide zijden op met de plastic spudger. Schuif de voorklep eraf.

  11. jEnRGH6ULh4rYv6F
    jEnRGH6ULh4rYv6F
    vtIDqL1hraJfUYUa
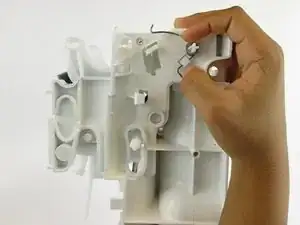
    • Haak de zilverkleurige veerarmen aan beide zijden van het apparaat los door deze naar beneden te duwen.

  12. HNUK2PBMpGYJJPgP
    • Pak de rechter- en linkerkant van het apparaat vast en trek het in twee identieke helften.

    • Zodra deze twee delen uit elkaar zijn, vallen alle resterende interne componenten uit het apparaat.

    what happens to the middle white piece?

    Noah Langer -

    Yeah there's a step missing here…between 17 & 18

    Daniel Sylvester -

    Is it better to lay it on its side?

    Gareth White -

    I hope someone will document the missing step of what it looks like if you separate the halves without having all the parts fall out.

    What does it look like and where do they go? Kinda' important for reassembly.

    Joe -

    I've added a photo to this step showing just this, fingers crossed it gets approved

    lizzbeeton -

    Liz - would you post a link to your pic here so we can see it even though it's not approved yet?

    Joe -

    Re: "missing step"

    On the newer models, (at least 2016/17) the valve is attached to the left side and it's two Phillips head screws must be removed.

    These instructions are correct for earlier models where the valve is in the middle, so there is no missing step.

    Darryl Marko -

    Se voce deitar o aparelho com cuidado, nada cairá e as peças ficarão no lugar

    J.Poppa -

    Thanks to this guide, I’ve taken a part my SodaStream Source a few times now. Like others have mentioned, during reassembly, this step tripped me up every time. It’s definitely missing details about the part orientation. I took some additional photos in efforts to help others. Please find the album here.

    Mitch -

    Thanks Mitch!! That's exactly what I needed! been pulling my hair out trying to figure out how that white piece went back in.

    KayLynn Mathews -

    You’re very welcome! I’m so glad it helped you out!

    Mitch -

  13. JWdRZrQqWysjWsVd
    JWdRZrQqWysjWsVd
    DXtYONVnU6D22mK2
    keuLcodMFNVLKBR1
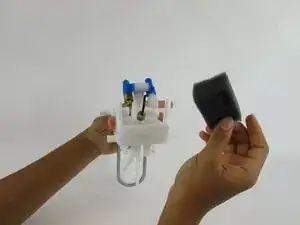
    • Trek het schuimrubberen kussentje omhoog en verwijder het van de voorkant van de koolzuur component.

    Any source for spare parts known? Ebay and Amazon does not help here!

    lutz Ziffer -

    no foam pad on mine either

    Scott -

    What is the name of the part that is in blue? Mine is broken and I would like to replace it

    Tony R -

    The part on mine that was broken is the plastic cap/nut that connects the black hose to the canister holder.

    Going to try and superglue it. Wonder if there's a source for this nut?

    Joe -

    I wish it was that simple. The hose has a brass ferrule crimped on it, and the nut cannot be replaced without being able to remove and crimp a new ferrule to the (new?) hose. I have found a listing (eBay Europe?) for a split brass nut that allows replacement, but...

    https://www.google.com/url?sa=t&source=w...

    https://picclick.co.uk/Messing-Mutter-f%...

    Darryl Marko -

    No foam too

    Loic Popiel -

  14. FVBvef2ilBWlEBsU
    • Verwijder de zes schroeven van 17,7 mm aan de onderkant van het lipje van de lader.

  15. WA4F2d2O2T61TZDG
    WA4F2d2O2T61TZDG
    K5COTeJWIAfAPx4F
    lE4HAFSWo3RD1OWx
    • Trek het laderlipje uit het mondstuk.

    Dove posso acquistare il tubo dell'aria del gasatore?

    zorzi.corrado2 -

Conclusie

Volg deze instructies in omgekeerde volgorde om uw apparaat weer in elkaar te zetten.

Angela Mossgrove

Lid sinds: 20/02/17

1123 Reputatie

2 commentaren

Bonjour j'ai une pièce à l'intérieur dont je ne retrouve pas du tout la position au remontage.

Pouvez vous m'aider ?

Delphine Renard -

De quelle partie s'agit-il, peux-tu prendre une photo ?

Toon Konings -