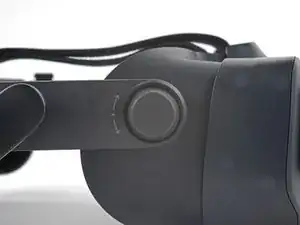
Inleiding

Gebruik deze handleiding om een of beide kijkers van de Valve Index VR Headset te vervangen.

Schakel je toestel uit en koppel alle aangesloten kabels los voordat je met deze reparatie begint.

Let op: dit is een lastige reparatie met veel kleine, losse onderdelen die los kunnen komen tijdens het proces. Ga langzaam te werk, en zorg dat je goed kijkt of er onderdelen uit het toestel komen.

  1. HS44Zki51H2VDFW2
    • Draai de verstelknop met de klok mee om het oogdeel maximaal te verstellen.

  2. tOH1gFNEuMpQDJKT
    tOH1gFNEuMpQDJKT
    VByiidwDNcbUPiNY
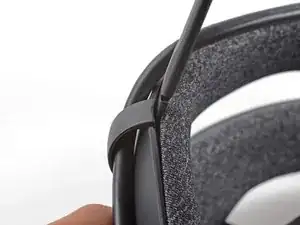
    • Gebruik je hand om het gezichtskussen op rustige wijze in een rechte beweging van de headset af te trekken.

    • Het gezichtskussen wordt met vier magneten, die aan de schroeven in het frame bevestigd worden, op z'n plek gehouden.

    • Zorg dat de vier schroeven, voordat je het gezichtskussen weer terugplaatst, weer bevestigd zijn. Als je dat niet doet, zal het gezichtskussen niet op z'n plek blijven zitten.

  3. 1v6MrVGCDlfnwSvr
    1v6MrVGCDlfnwSvr
    MXEwSPXLipDlNVW3
    JJT5GCa1x3DyNCGT
    • Steek het platte einde van je spudger tussen de onderkant van de hoofdbandklem en het kussen van de hoofdband.

    • Wrik de klem omhoog tot deze van de hoofdband los is gekomen.

    • Om deze weer te bevestigen, zoek je eerst de inkepingen op de hoofdband waar de klem in geplaatst wordt. Vervolgens breng je de klem op een lijn met de inkepingen, verifieer je dat de verbindingskabel door de klem loopt en druk je de klem terug op z'n plek.

    Do you sell replacement clips?

    TomCatT -

    I didn't really see the need to unclip this or do the next step so I skipped it. It seems easy enough to unplug the cable while it's still attached to these, so unless you're really concerned about the cable bending a little more than it already does it seems unnecessary.

    Stephen Smith -

    (above comment is meant for the eye tube replacement guide, since the steps appear to be shared between guides)

    Stephen Smith -

  4. 3aROd5KcPVsfPHKy
    3aROd5KcPVsfPHKy
    Cf2N1rWE4wenPNiQ
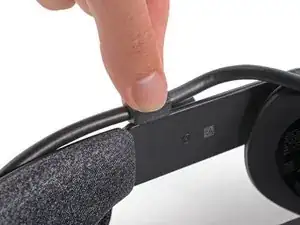
    • Gebruik je vingers om de verbindingskabel in een rechte beweging van de kabelgoot van de hoofdband te verwijderen.

  5. JJTEad1WoMc4RpTY
    JJTEad1WoMc4RpTY
    DdAuAjCk1RrBQRIH
    • Trek de verbindingskabel in een rechte beweging uit de headset.

  6. Q6vnPQLACExUJPAm
    • Gebruik een T5 Torx-schroevendraaier om de vier 6.0 mm lange schroeven, waarmee het frame aan de headset bevestigd is, te verwijderen.

  7. iwWfpKIFsvfVkEtO
    iwWfpKIFsvfVkEtO
    bVgrOVqS1rQCfvuh
    • Probeer het frame er niet af te wrikken, aangezien je hiermee de headset kunt beschadigen.

    • Pak de linkerzijde van het frame met je hand vast en schuif deze van de headset af.

    • Check of de klemmen van het frame op een lijn zitten met de headset voordat je het frame weer terug op z'n plaats schuift.

    This was a little tricky. There's a latching mechanism inside the bezel that requires squeezing the sides a bit to unlatch. In exactly the same hand position as the photo, you need to squeeze. Absolutely don't pry it off or it will snap.

    Scyntrian -

  8. sEjc5DiZuDrNKQvm
    sEjc5DiZuDrNKQvm
    ge3npSLPOFEHemeC
    AJyBuvsEFM4GKU44
    • Herhaal de vorige stap voor de rechterzijde van het frame.

    • Verwijder het frame van het gezichtskussen.

  9. NMNT3GayeVRqcRux
    NMNT3GayeVRqcRux
    54KSAbUUKKPPHXLZ
    PPcM5oL3OWn4IqAN
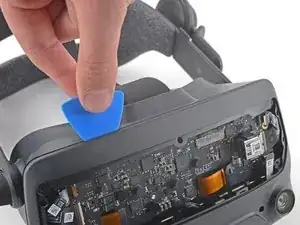
    • Gebruik een pincet om de linkerzijde van de pakking van de headset te scheiden.

    • Herhaal deze stap voor de rechterzijde van de pakking.

    • Zorg dat de gaten in de pakking, bij het weer terugplaatsen van de pakking, over de pinnen op de headset heen vallen.

  10. kTVsVRUUI63foZYS
    kTVsVRUUI63foZYS
    oOlEQODliClA4Tuf
    BJiyQgNTgoFPWJAw
    • Trek de pakking op rustige wijze uit de headset.

    • De pakking is lichtjes aan de buitenkant van de lenzen vastgemaakt. Toch zou het er relatief gemakkelijk van los moeten komen.

    my headset has an additional piece of plastic that yours doesnt have, and its not letting me remove the lenses in later steps

    Lemon Jumps -

    There is a plastic piece behind the gasket that will prevent the eye tubes from coming out which isn't listed in this guide. It has 3 clasps and pries out horizontally.

    Cer 12 -

    I was pleased to discover that the adhesive on the rubber gasket stays sticky enough to stay in place after reassembly (at least so far) so you may not need to worry about reapplying new glue.

    Stephen Smith -

  11. 1VdRVHbgDKg16Aqu
    1VdRVHbgDKg16Aqu
    qILHYgyRBRdTLyRr
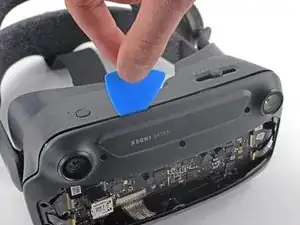
    • Gebruik je hand om de voorste behuizing in een rechte beweging van de headset weg te trekken.

    • De voorste behuizing wordt op z'n plek gehouden door vier magneten die door middel van schroeven aan de voorste behuizing vastzitten.

    • Zorg dat je de vier schroeven die het moederbord in de headset bevestigen hebt bevestigd voordat je de voorste behuizing installeert. Als je dit niet doet, zal de voorste behuizing niet op z'n plek blijven zitten.

    Whoever wrote this is a moron.

    Sam Omiotek -

    My god. Thank you. This was an extremely helpful guide. I just couldn't get it off!

    Theu -

  12. rLSklgCaPuv64Y33
    • Gebruik een T5 Torx-schroevendraaier om de vier 5.4 mm lange schroeven, waarmee de cover van het moederbord aan het headset bevestigd is, te verwijderen.

  13. Q4QcJ1kjGYlt1WQO
    Q4QcJ1kjGYlt1WQO
    FeHLfkPY3IgFXAei
    • Verwijder de cover.

  14. yfabmjgyKaEecBt1
    • Gebruik een T5 Torx-schroevendraaier om de volgende acht schroeven uit het voorste frame te verwijderen:

    • Vier 6.3 mm lange schroeven met fijne schroefdraad

    • Vier 6.0 mm lange schroeven met grof schroefdraad

    This is your last chance at catching the ipd adjustment groove on the right eye tube and catch the little knob on the back of the motherboard with it. (Just forgot about it myself and thankfully you can do it from this step the latest

    Blecha100 -

  15. 6WcehUioswbZLFC4
    6WcehUioswbZLFC4
    di4NQCposKBIYavu
    yoBJpHU1h3iXSth3
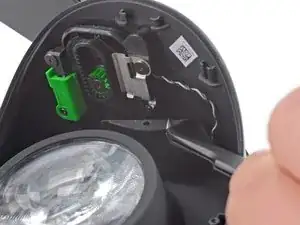
    • Gebruik een spudger om de vergrendeling op de ZIF-aansluiting in de linker bovenhoek van het moederbord omhoog te klappen.

    • Koppel de FPC-lintkabel los van het moederbord.

  16. 5sstq4o1VF3DSeqJ
    5sstq4o1VF3DSeqJ
    Qnuk1vnMMrFpbfPI
    bmVQZngjLshAgrD6
    • Gebruik een spudger om de vergrendeling op de ZIF-aansluiting in de rechter bovenhoek van het moederbord omhoog te klappen.

    • Koppel de FPC-lintkabel los.

  17. jH2IyWUVmoEJpOjC
    jH2IyWUVmoEJpOjC
    sLdoecCJxDYjQotq
    • Gebruik het platte einde van je spudger om de drukaansluiting in de linker benedenhoek van het moederbord los te koppelen.

    • Om drukaansluitingen als deze weer aan te sluiten, breng je deze op de juiste plek aan en druk je vervolgens eerst de ene kant en vervolgens de andere kant vast. Druk niet op het midden van de aansluiting. Als de aansluiting namelijk niet goed geplaatst is, kan dit tot permanente schade leiden.

  18. YXiLknBH4VCDnUI1
    YXiLknBH4VCDnUI1
    A6ZPpANoYgpBi3tX
    • Gebruik het platte einde van een spudger om de drukaansluiting in de rechter benedenhoek van het moederbord los te koppelen.

  19. IXGlNvAICcAtJnMy
    IXGlNvAICcAtJnMy
    lPHsHEnOMGa4s52I
    • Steek een openingsplectrum tussen het voorste frame en de rest van de headset.

    • Schuif je plectrum rustig door de opening heen om het voorste frame van de rest van de headset te scheiden.

    there are adhesive strips at the 11:30, 01:30, 05:30, and 06:30 positions. Slow, gentle prying removes the front fascia. There are no clips holding it in place.

    JimMcBubbles -

  20. gqEBWUsY5XnKekDl
    gqEBWUsY5XnKekDl
    ZkMvGoWnZAqNDvqI
    • Schuif je plectrum door de opening heen totdat alle kanten van het frame van de rest van de headset los zijn gekomen.

    Frontblende ist sowohl oben als auch unten an zwei Stellen leicht eingeklebt.

    Falls die Frontblende bei Schritt 21 nicht abgeht, könnte der Klebstoff dafür verantwortlich sein.

    In dem Fall kann man ihn mit dem Plektrum von der Blende lösen.

    Grober Feinmotoriker -

  21. RZCi6PnZwrs1RKPu
    RZCi6PnZwrs1RKPu
    OAqHwP1vehpgWEq6
    • Verwijder het voorste frame.

  22. TCjHR5NYNmCxlC1E
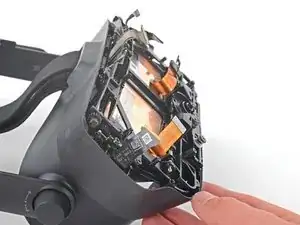
    • Bekijk eerst de zeven verschillende kabels die losgekopeld moeten worden alvorens het moederbord verwijderd kan worden.

    note that the wheel that adjusts the distance between the eyes goes over the boar. So you will tuck the board under it.

    Michael Hehe -

  23. HQQpZp5QANDclP5I
    HQQpZp5QANDclP5I
    4yCQFuJAjZofGrOo
    LYbGQwjIyjODqh5p
    • Gebruik het platte einde van je spudger om de brede ZIF-aansluiting aan de linkerzijde van het moederbord te openen.

    • Koppel de FPC-lintkabel van het moederbord los.

  24. W4S4IqHrXOYwCFBa
    W4S4IqHrXOYwCFBa
    qHsPNGQiifR5DpSJ
    • Gebruik het platte einde van je spudger om de drukaansluiting in de linker benedenhoek van het moederbord los te koppelen.

    • Zorg dat deze kabel, bij het weer in elkaar zetten van je toestel, niet onder het moederbord vast komt te zitten.

  25. gNkeRbLXFjHFZyie
    gNkeRbLXFjHFZyie
    1B3xtjGE3wLrXQ3E
    jJE6TtTAmmNCVpyB
    • Gebruik een van je vingers of een openingstool om de schermkabelaansluiting aan de bovenkant van het moederbord te openen.

    • Koppel de aansluiting van de schermkabel op voorzichtige wijze los van het contact.

    this one is pretty difficult, and could use some more explanation (esp since the teardown video of the index skips it completely). you need to lift up on the corner of the cover, and then use the pointy end of the spudger to slowly wiggle the cable UP and out of the connector, a little at a time on each side.

    Owen Smith -

    Good tip, this is not a press connector. Once the cover is swung open it slides out upwards not away from the board

    Stephen Smith -

  26. 4UXYQfOJC3IVUOBE
    4UXYQfOJC3IVUOBE
    FIWi3Tdys6UErNqJ
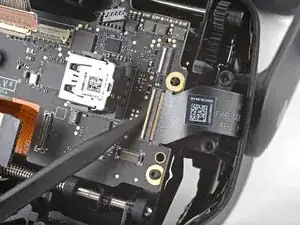
    • Gebruik de punt van je spudger om de gebundelde kabelaansluiting in de rechter bovenhoek van het moederbord op voorzichtige wijze los te koppelen.

    don't push up on the indented plastic

    Jose Zamora -

    This pops out towards you, do not try to push up.

    Storm DPD -

    thank you to the comments about not pushing up!

    Aeon Faye -

    Simlarily: when reassembling, line the cable up above the insert, and push slightly toward the MB. You'll hear a tiny click when it slots in.

    Joj -

  27. QL2UqWW1CYCdtIIp
    QL2UqWW1CYCdtIIp
    QcTyN5YwO3SeKWQU
    Gaa4RjVFZNGiUoOo
    • Gebruik de punt van je spudger om de vergrendeling op de ZIF-aansluiting, naast de USB-poort op het moederbord, omhoog te klappen.

    • Koppel de FPC-kabel van het moederbord los.

    • Zorg dat deze kabel, bij het weer in elkaar zetten van je toestel, niet verstrikt raakt onder het moederbord.

    Not sure if this is on every headset, but mine had adhesive holding this cable to the motherboard and to the press connector cable. Be very careful peeling these apart, the adhesive is a little strong. Using the guitar-pick looking thing from the fix kit managed to separate them for me, but it might have been sheer luck lol.

    Owen Smith -

  28. oXd3I5plhXSKkDfJ
    oXd3I5plhXSKkDfJ
    oICKoYOMEmqVOXRT
    • Gebruik het platte einde van je spudger om de drukaansluiting onder de USB-poort op het moederbord los te koppelen.

    • Zorg dat deze kabel, tijdens het weer in elkaar zetten van je toestel, niet onder het moederbord vast komt te zitten.

  29. WGpqUYMeUubjUo11
    WGpqUYMeUubjUo11
    HywiclnUqKGIJ6wk
    aTjmMd4WXnSGAZ5o
    • Gebruik een spudgerom de brede ZIF-aansluiting aan de rechterzijde van het moederbord te openen.

    • Koppel de FPC-lintkabel van het moederbord los.

  30. QmpYEpvEZLR2iOHP
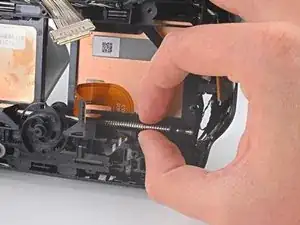
    • Gebruik een T5 Torx-schroevendraaier om de vijf 6.0 mm lange schroeven, waarmee het moederbord in de headset bevestigd is, te verwijderen.

    These are a set of 5 coarse threaded screws.

    Patrick Hartge -

  31. 1VowAHqkQjSodGRG
    1VowAHqkQjSodGRG
    ouJidliMDFMjJHbk
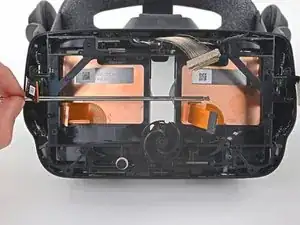
    • Pak het moederbord vast bij de USB-poort en verwijder deze op voorzichtige wijze uit de headset.

    • Wees bij het weer in elkaar zetten van je toestel erg voorzichtig en voorkom dat je de hiervoor losgekoppelde kabels onder het moederbord klemt.

    During reassembly be sure to align the ipd slider with the gap on the back of the right eye tube. The ipd adjustment slider is located on the top left of the motherboard and is very easy to miss.

    Failing to align that the motherboard and the eyetube will result in resistance while adjusting the ipd, as well as an incorrect ipd being used in steamVR (which doesn't feel too great).

    Aux -

  32. 3oC4VOQmIMRXGsDk
    3oC4VOQmIMRXGsDk
    BKG1GKQLTnIK4BNw
    • Til het moederbordschild van de twee kruisvormige pinnen af.

  33. bfOSY6CEebF3AY3B
    bfOSY6CEebF3AY3B
    vGHv4yGYliVSDKrb
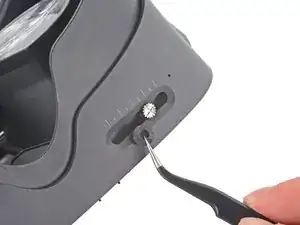
    • Gebruik een pincet om de rubberen dop die over de IPD-verstelschroef heen is geplaatst te verwijderen.

    On reassembly, the best method for getting this back on is to get one end on and pulling until it's about half on. Then begin pulling with tweezers and spinning at the same time.

    Patrick Hartge -

    if you're struggling to get this back on, I'd recommend prying at the underside (specifically at the part with the little dent on it) with your flathead screwdriver bit until it splits, then pulling it on and over, using your screwdriver to fold the two halves of the rubber over the screw.

    Owen Smith -

    The way I managed to get this back on was to slide the adjuster all the way to one side (eg all the way right) and then put it on starting on the left, then I was able to use the pointy end of a spudger coming in from the front or back of the headset to slide in between the screw head and the rubber piece, into the pocket of the rubber piece (where it folds over) and stretch that part over the sides. The final side I was able to slowly get on just by rubbing the top of the rubber piece in that direction with my fingernail until it went on fully. It definitely took some time.

    Stephen Smith -

  34. egUbvymn2kkSkRdM
    • Gebruik een 2.5 mm (3/32 inch) platkopschroevendraaier om de 6.5 mm lang IPD-schroef uit de headset te verwijderen.

  35. XRxoeDbgYXxJOEEF
    • Gebruik een T5 Torx-schroevendraaier om de vijf 4.5 mm lange schroeven, waarmee het midframe bevestigd is, te verwijderen.

    These are fine threaded screws, in case you get your screws mixed up. They are also defined by the only set of 5 with blue locktite on them.

    Patrick Hartge -

  36. IVCdWZNvKoHtDHb6
    IVCdWZNvKoHtDHb6
    qusNLrdWFxMpFpda
    • Nu het midframe los is, schuif je de behuizing richting de achterkant van de headset om de rail van de kijker bloot te leggen.

  37. NtnfH4aq3AtoWrxl
    • Gebruik een T5 Torx-schroevendraaier om de 4.4 mm lange schroef, waarmee het linker tandwiel op de rail van de kijker is bevestigd, te verwijderen.

    • Als je niet bij de schroef kan, draai je de verstelknop van de kijker zodanig dat het tandwiel naar buiten wijst.

  38. Rb1fEEOsFPr5mbEI
    • Verwijder het linker tandwiel van de rail.

    Be careful, there are retainers and plastic bushings on the outer sides of the rail, just inside of the midframe. I removed these with tweezers as I slid out the rail. To reinstall, I had to feed the retainer through the little hole in the front of the midframe and work it into place with the tweezers. I got the final positioning with the pointy end of a spudger. You can see one of the retainers in this picture, just to the right of the inside of the midframe where the rail is sticking through. The hole to feed it through is just below it, where the last bend of the retainer is sticking out.

    Ulric Dettweiler -

    This guide says "Remove the left end" but I suggest deciding based on the side you want to actually change.
    I left the both top and bottom bars in place and just pulled them out as much as needed to free the eyetube on the side I wanted to change. it makes your life way easier!

    Pouya -

  39. L21THYK61Zi4MQ4x
    L21THYK61Zi4MQ4x
    lJeV2U4QFa6RuSiR
    YVxrsOG6m2MqWnHa
    • Pak het tandwiel aan de andere kant en schuif de rail van de kijker uit de headset.

    I had two small black pieces that look like they belong on the eye rail pop off on this step. https://imgur.com/a/tZ1mxPf Anyone have any idea where they go back on during re-assembly?

    Tyler MacInnis -

    I had this problem too. If you look at the below disassembly picture you can see that these are bushings on the inner side of the gear axel. This is extremely easy to miss. They face opposite sides and are on either side of the axel, there is also a spring on the inside of these that is completely neglected in this guide.

    These bushings are used to ensure that the FOV adjustment axel gears remain flush.

    https://imgur.com/a/uP7mVGt

    Xayrga -

    Wish i had read the comments here. Both the little metal bar and plastic piece went flying on both sides when I removed the rod. Took me a good hour to find one that fell. Honestly the hardest part of reassembling this for me was getting that little piece back how it's supposed to be on both sides.

    Gray Corgi -

    Did you have just one metal bar or two? Could have sworn two popped out but now I can only find one. Did you happen to snag a picture?

    Astrid Wood -

    Reassembling in this step is one of the most difficult things I've ever had to do. I've been at it for days and haven't been able to fit in back in place.

    I lost one of the two springs/wires when removing the rod - I'm warning anyone to BE READY with the magnet screwdriver or when you start pulling it out- the springs are very thin and will slip in to the tiniest gaps in the headset. When trying to reassemble, I keep dropping it into little gaps and struggle to get itback.
    I think the first one I lost might be within the old eye tube - going to try cracking it open to get it back.


    There really needs to be some more direction in this guide here other than 'align the springs.' this has been an ordeal, kudos to anyone with the dexterity to pull this off.

    Joj -

    I'm convinced everything in this guide is ambigious and the person who wrote it never even touched a headset.

    maxima_crashed -

    To answer my own question. Yes there is a set of bushing and spring on each side. The spring here is a bent piece of metal, with some bends in it. The side with the larger bend goes into a small hole at the bottom and is used for retention. If you thread the top through the hole and kinda get it in there straight you will see how it lines up. This is a pretty big step for iFixit to miss. It is a pain to get in so if you are reading this beforehand use some tape or tac to stick the side coming through the hole in the plastic frame down. Much easier to get it all in that way.

    Astrid Wood -

    Any easy way of getting those springs back in cuz &&^& me I can't get em

    Death Venom -

    Ok, I figured out a workaround if you're having trouble getting those stupid little wires clipped through the hole and onto the bushing.
    I figured this was like trying to shove a ship into a bottle rather than building a ship in a bottle. So I ditched the wires, got a spool of wire of similar width, then just fed it through the hole and bent it around the axle, bent it into place back in the hole, and clipped it for length. Still very difficult, but doable.

    Got the headset together, and haven't had a problem adjusting the knob, so I think I did well here.

    Joj -

    Found a way to do it, step by step:

    0. Make sure the plastic bushing is oriented the right way, as in the picture.⏎⏎
    1. Fit the rod into the headset from the right side.⏎⏎
    2. Use the tweezers to put the bushing on. Push the rod only as to fit and mount the bushing.⏎⏎
    3. Fit the spring the bent side-first into the hole. Beware, it might fall into the inside of the headset. Orienting the headset diagonally helps. ⏎
    4. Guide the spring with tweezers to mount it on the rod.

    5. !!! Guide the rod through the holes in the eye tubes. !!!

    6. Stretch the spring and the bushing diagonally. Push the bushing slightly to the center of the headset while you lift the spring slightly with the tweezers. The spring has to fit inside the bushing.
    7. Align the parts as in the picture/
    DO NOT PUSH the parts completely to the side, the spring WILL fall out and you will contemplate your life choices.

    For the left side, reverse steps 2 and 3: The spring needs to come in first.

    I'll try to add this to the repair guide.

    maxima_crashed -

    Make sure the FOV distance is same on both sides of the headset when reassembly the cogwheel. I missed this and needed to backtrack to this step and resync the sides. You just need to remove the cogwheel on one side so the sides can move independly of eachother, now make sure the sides sync and reistall the cogwheel.

    Karin Westerlund -

    So the way I approached the rails and the bushing with the spring was to use the thinnest spudger I had (basically just a metal rod) to follow the rail as I pull it out so that the bushing and spring slide onto the new rod. I was able to avoid having to re-insert either spring since that sounds very difficult. I also ended up doing 1 side at a time, pulling the rods halfway out to one side so that I only have to worry about keeping 1 spudger in place at a time. I figured if I tried to do both with 2 metal rods holding both springs in place I would surely knock one out and lose the spring. I also followed the first spudger with a second spudger going back the other direction (from center through the hole towards the outside) so that I could only capture the spring and not the bushing. It seemed more stable that way and less likely the spring will slip. You could also temporarily tape the spudger to the frame to keep it secure holding back the spring while you work.

    Stephen Smith -

  40. IbgjEZTWZ3FVaxZU
    IbgjEZTWZ3FVaxZU
    ePQYwABQuPetWhDk
    eBnt3Cr6Bv4PvBKn
    • Gebruik een spudger of je vingers om drie van de vier klemmen van de onderste rail van de kijker te verwijderen.

    • Houd de klemmen met een vinger vast om te voorkomen dat ze bij het loskomen wegvliegen.

    • Om deze klemmen weer te bevestigen, plaats je het open einde op de groef in de rail en druk je vervolgens vast.

    • Twee van de klemmen vereisen dat je de veer eronder plaatst voordat je de klemmen kunt plaatsen.

  41. gxqQiyViXkrQ2pPB
    gxqQiyViXkrQ2pPB
    EUfI5SFBRqE1rA3T
    • Houd elke veer met een hand vast om te voorkomen dat ze eruit springen bij het wegschuiven van de onderste rail.

    • Schuif de veren bij het weer in elkaar zetten van de headset weer terug op de rail en "loop" ze rustig met je vingers terug tot ze zich volledig op de rail bevinden.

    I ran into a problem with reassembly somewhere at this point--two very small black parts seem to have fallen out and now the headset's eyepieces won't return to the middle, only stay where they are if moved with the IPD slider.

    Foxhound -

  42. LZMwNJypWtPDRTGa
    LZMwNJypWtPDRTGa
    GUFiKXPEaglKgmEb
    EeJ5a1PGOjQPVHDS
    • Verwijder de onderste rail van de kijker.

    • De kijkers zijn nu los en kunnen eruit vallen.

    If you're like me and had the swirly gear piece thing in the middle fall out, make sure you put it back in correctly or your IPD adjustment will be wrong. You can use the picture in the guide as reference for the position of that piece vs the position of the IPD slider. Move the slider at the bottom left screw with white washer thing to the same position as in the guide, and drop the swirly gear in the exact position as shown in this guide.

    Alternatively, you can push the IPD mechanism into the lowest IPD (closest together) setting and set the swirly gear thing in the position where both of the little half circle "notches" in it are perfectly horizontal / at the same level on each side.

    Gray Corgi -

    Mine popped off. How do you know it's in the correct position? My adjuster can reach both ends and steamvr reports 58 and 70mm is that good enough verification?

    Anders Malmgren -

  43. Ik1qXwkHfUTLSxQu
    Ik1qXwkHfUTLSxQu
    YrTWJKAQnrVHWEV2
    • Verwijder de kijker(s).

    • De kijkers passen net en kunnen daarom lastig te verwijderen en herinstalleren zijn. Probeer verschillende posities als je ze erin probeert te zetten of eruit probeert te halen, maar gebruik geen botte kracht.

    The reconstruction steps should be included as well...

    Phillip Hochman -

    Installation is opposite of removal

    Jayce Feldmann -

    Wasn't exactly opposite, those springs did not want to go back in!

    Fizz -

    I can't seem to lift the eye tube out, there is this plastic part in the front that blocks it (they are loose but there is no position in which they can be removed):

    https://files.catbox.moe/it930u.jpg

    https://files.catbox.moe/lqq7lk.jpg

    Owen Smith -

    I also have that plastic part. it is glued to the inner plastic frame. So I left it alone just folded it out of the way so that eyetube could be pulled out ( bottom side first)

    Pouya -

    I have that part too. I was able to get the eyepieces out by tilting them back, and then flexing the top of the index to let them slide underneath it. Make sure that your eye relief adjustment is as far out and thus as loose as you can make it.

    Aric TenEyck -

    Can't remove the lenses either, the plastic frame is not giving enough space to pull them out. There is no way you can remove or bend the plastic frame holding the eyetubes together without breaking it, either.
    There should have been extra steps provided to remove that thing.

    maxima_crashed -

    Apparently you're supposed to bend the upper frame slightly so as to give the screw holes on the eye tubes some space to exit.
    Contrary to what the author says, no, it won't break. It's a firm plastic.
    There has been a snap sound but this is the step that does require some force to complete.

    maxima_crashed -

    Yep, also had this nosepiece-shaped piece of plastic making removing it impossible. The thing isn't present in the teardown video, so might be a different version?
    I ended up slightly flexing the piece to free the eye tube, but I heard something snap, and then I was able to wiggle it around a little more, making installing new tube easy. . Haven't completed the operation, hopefully I didn't screw myself here.

    Joj -

    The hard plastic nose piece in between the lenses can be removed with light to light medium pressure there are three clips similar to the clips holding the inner facia piece on.

    once removed, the tubes come out with ease.

    JimMcBubbles -

Conclusie

Vergelijk je nieuwe onderdeel met het origineel om te zien of je nog meer onderdelen mee over moet zetten. Dubbel-check ook of je beschermfolie moet verwijderen alvorens je je nieuwe onderdeel kunt plaatsen.

Volg bovenstaande instructies in omgekeerde volgorde om je toestel weer in elkaar te zetten.

Breng je e-afval naar een door R2 of e-Stewards gecertificeerd recycle-station.

Ging je reparatie niet zoals gepland? Bezoek dan onze algemene probleemoplossingspagina of stel je vraag op ons Valve Index-antwoordenforum voor hulp bij het oplossen van je probleem.

Sam Omiotek

Lid sinds: 25/02/19

87671 Reputatie

20 commentaren

I gained two extra small pieces not mentioned, I think when removing the top rail, they just dropped out into the housing. Looks like they go next to the eye tubes and are not included with the replacement so make sure you don't lose them!

https://imgur.com/a/AW4dHOW

Fizz -

I believe those are suppose to add tension to the top rail. I lost mine but it should be for a small metal spring tensioner (I think).

Gabe -

Great guide. Thanks so much!

David S -

Hey, you guys forgot to mention anything about 2small pieces of bent metal no thicker then a staple that looks pretty important. Might want to include every piece that may be affected when assembling/disassembling the headset, Especially in the later stages.

Jesse the Dragon (Dragon) -

wtf are these??? I also had them fall out and don't know what they are!

Patrick Hartge -

I know this is a little bit late, but I'm just going to post this here for anyone doing this in the future: They mention this in step 39. They are EXTREMELY hard to get back in. I recommend putting the headset on it's head and then using your fingers, not tweezers, dropping them in the small upper hole (lower from the index's view). I took a photo of it here.

The metal clip holds the plastic tube in place that the upper rail goes through.

Schweinsfuss Nasenbeutler -

If for some reason you broke the audio connector on step 26, the part number you are looking for is Molex 781710005 and the plug is 781720005.

[deleted] -

My IPD adjustment is way out of whack now after a left lens replacement. It's reading much higher numbers than actual and the lowest possible setting reads at 63 or so. Anyone else have their IPD adjustment go off? Any ideas on how to fix it?

Jeremy P -

For reference I figured this out with help from a comment at the motherboard stage. There is a tiny slider at the top left of the motherboard that fits into a slot on the rear of the RIGHT eye tube (the left eye tube when looking from the motherboard side). When that slide is properly in its slot the digital IPD lines up with the physical IPD correctly. I had missed it when doing a left eye tube replacement because I hadn't focused on the other side.

Jeremy P -

I added a comment on step 21 that shows a picture of this, in case anyone is having the same problem.

Schweinsfuss Nasenbeutler -

For anyone looking, the picture schweinsfuss posted is on slide 21. it's hard to see but the non-rubber component needs to be between the two rubber pieces for it to be correct.

Alexander Sparks -

After replacement my windows cannot recognize the headset. In device manager it says "unknown usb device (device descriptor request failed)"

Anyone know how to fix this? I have tried a lot of methods found online, tried replugging, reinstalling...

lance2499 -

Is there a way to test which of the eye tubes is faulty?

Mike -

wear it. see what eye tube is faulty. play a game.

Paul Treagan -

Did it and thanks to this guide the Index is working again.

For everyone searching the web: My symptoms were vertical white lines in my left eye. Got the new eye tube from iFixit and everything is working now!

The Guide needs two updates though.

Step 39 needs to show the black pieces and springs for reassembly as this was very hard. (I think one of the parts is missing in thge pictures of the guide ;-) )

And There seems do be a newer version of the headset that has a plastic plate over the bottom parts of the tubes that prevent them from being extracted. This part is missing in this guide.

BIG THX @samomio for the guide and iFixit for having the part!

Robert -

I had the same experience with the plastic part. Just bend it down. It just seems to be some kind of dirt-guard. It is quite bendy and doesn't snap or anything. I went pretty rough on it to get the tubes out.

Schweinsfuss Nasenbeutler -

I sold my Index on eBay and somehow during shipment black bits of old foam or something fell out and were visible in the screen so I had to give him a refund. I took the lenses out from the front. I heated them up carefully with a heat gun and used a suction puller and a steel spudger but I slipped and scratched one lens They came out (just one side) seperated. I cleaned all the gunk out and reassembled it. Two years ago - still using it every day. the scratch which is quite clearly visible is not really visible close up strangely enough so it doesnt interrupt my gaming. Now that I have removed a lens I am comfortable that I could easily remove an Index lens. (ratcat17@hotmail.com)

Ratcat Nugile -

Extremly good guide, took me 2 hours in total. My tip is to print out all the pages, lay them out as you go and put cups or something as containers for the parts on the specific step. There are a huge number of tiny parts in this thing. Makes it way easier to reassemble. Also read step 39 carefully! During reassembly make sure that the upper rail actually goes through the small plastic tube on the eye-tubes, otherwise you won't be able to adjust IPD.

Schweinsfuss Nasenbeutler -

Awesome guide.

Should be mentioned that when turning the headset upside down to remove the eye tubes themself that the gear thing in the middle will fall out, and is a little tedious to get into the right orientation when reassembling.

Also the paperclip-type "springs" are extremely difficult to get back in, would be nice to have more thorough installation instructions on that.
I ended up threading it back through the hole at the bottom, and using tweezers to pull it back up and over the plastic bushings.

Dalrae -

Reinstalling the tiny little springs was a nightmare, but I got it done. I found it easiest to turn the headset upside down so that gravity would hold the spring in the right orientation. The rest was patience, dexterity, and a lot of luck...

Torrent Amador -