Inleiding

Om het scherm te kunnen verwijderen zul je de kleefstrip rondom het scherm door moeten snijden. Nadat de strip is doorgesneden, kun je deze niet meer hergebruiken om het scherm terug te plaatsen, en dus heb je nieuwe kleefstrips nodig.

  1. 31RLGQDPIQTZnaoB
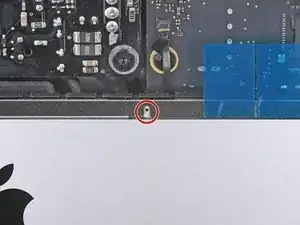
    • Als het scharnier los wordt gemaakt, is de iMac uit balans en niet makkelijk te hanteren voor een reparatie. Plaats daarom een iMac-ondersteuningswig in de houder om de iMac te stabiliseren.

    • Als je de kartonnen iFixit-ondersteuningswig gebruikt, volg dan deze instructies om 'm in elkaar te zetten.

    • Als je geen iMac-ondersteuningswig hebt, zorg je dat je extra voorzichtig werkt—het scherm kan makkelijk vallen en zelfs breken als de iMac onverwachts uit balans raakt.

    I made one out of a square cardboard box, and working well so far

    Will Moindrot -

  2. fArVwAExDBjnrGQT
    fArVwAExDBjnrGQT
    xstksgp25KuNq2AM
    • Zorg dat je, voordat je de nieuwe kleefstrips plaatst, alle oude lijmresten rondom de achterste behuizing eerst verwijdert.

    • Als je je oude scherm nog hergebruikt, zul je ook de lijmresten aan de achterkant van je scherm moeten verwijderen.

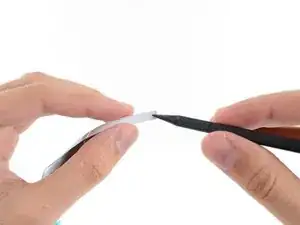
    • Trek de oude kleefstrips uit het toestel met behulp van een pincet of je vingers. Begin aan de onderkant en peuter alles weg naar boven, richting de bovenkant van het toestel.

    • Maak de voorheen gelijmde gebieden, nadat je alle oude lijmresten hebt verwijderd, schoon met wat hooggeconcentreerde isopropyl alcohol (>90%) en een stuk stofvrij doek. Veeg alles weg in dezelfde richting en niet heen en weer.

    • Sla deze stap niet over. Anders kan het voorkomen dat je nieuwe kleefstrips zich niet goed aan de oppervlakte hechten en dat je scherm uiteindelijk uit je iMac valt.

    The aluminum frame have a plastic zone. Could the isopropyl alcohol damage the plastic surface?

    Fer Triva -

    Hello! Isopropyl alcohol should not damage the plastic surface.

    Arthur Shi -

    It’s not clear if you’re supposed to remove the black strips under the adhesives from the screen. Sometimes they come off when removing the main adhesives, but they seem to be two separate layers.

    online -

    Only the adhesive should be removed—the black strips underneath them should stay in place.

    Arthur Shi -

    “Only the adhesive should be removed—the black strips underneath them should stay in place.”

    By fault I’ve removed the black strips, now there is a gap between the glass and the aluminum frame in the bottom.

    the display is perfectly pasted, it’s only a matter of appearance…

    If I open the computer again, what kind of adhesive tape (caption tape?) could I use to eliminate the gap between the glass and the frame?

    Or it’s better to let it go…

    Thanks for your support

    Massimiliano Nannetti -

    Hi Massimiliano ,

    You should be fine. The bottom edge doesn’t have black strips. It should be bare metal. However, there shouldn’t be any gaps between the glass and the frame. Make sure that the adhesive is fully adhered on the bottom edge.

    Arthur Shi -

    Hi Arthur,

    my English is not perfect…

    I would mean that I removed all the black strips under the adhesives on the screen; so I believe that the glass has become too thin compared to the bottom aluminium frame.

    I thought to open the Mac again and put some black strips to increase the thickness of the glass screen but I don’t know what kind of tape I should use (Kapton or other?).

    And then I will put a new set of ifixit adhesives strips.

    Maybe it’s a waste of time… it’ s only an aesthetic matter

    Thanks again

    Massimiliano Nannetti -

    Thanks for the clarification. Since there is always a chance to crack the screen glass when cutting the adhesive, I’d suggest not to open up the iMac again. However, if you do open it, I suggest using Tesa tape.

    Arthur Shi -

    Thanks Arthur,

    I will follow your suggestion… I will not open again my computer…

    Now it works very well and fast.

    Massimiliano Nannetti -

    So, the bit about the adhesive strips really needs to be clarified. Nowhere in the instructions is there talk about multiple layers of adhesive, one that should be removed and one that should remain. And looking at the pictures further on, clearly the wider sections where the adhesive go are completely clean of any black strips. However, on the screen side, I’ve noted that indeed there are two layers, at least on the top. And removing both layers leads to the adhesive *not* really taking hold and the screens falling out. Really wish this had been clearer. I’ve helped dozens of people upgrade their iMac but after the first time that I had to replace a screen due to it falling and breaking, I’ve been using clear strong adhesive tape externally on the corners to ensure that the screen stays in place. Ugly, but better than the risk.

    David -

    Are you sure there are 2 layers of tape? My replacement tape comes with the sections that sticks over the 2x antenna sections on the right side of the screen (looking at the screen). The old tape has antenna section left over because only the thinner edge part was cut so that section separated.

    Furthermore, the replacement tape on the antenna section is only sticky on 1 side (facing the chassis) and no sticky surface to the screen (other than the thin 5-6mm width edge like the rest of the none antenna section.

    As for falling off, I'm guessing there are 1. cheap tapes that looks the part but don't stick as well 2. surfaces not cleaned and primed 3) 2 top corner breathing channel (hot air rise and go out there) got sealed off as Step 6 below + pulling and stretching the tape sealed off that channel. Happened to me the first time, had to cut back to expose the air channel. On subsequent efforts, didn't pull to stretch the tape. Went gradually a couple of inches at a time so the tape don't stretch.

    Howard -

    I’m putting in an SSD, don’t have any strips. Would super glue work?

    natfrey -

    no! don't do that. if for any reason in the future you need to open it up again, you will only destroy your screen. you can get strips really cheap on Amazon.

    David -

    I too started removing the second layer of adhesive strips before reading these comments. PLEASE update the article to reflect that the other black strips should stay!

    Mark Sandell -

    A few key notes

    2 top corners have air gaps to let the hot air out. When applying the new tapes, its easy to stretch the tape and seal this hole using the method outlined below. Best to go slowly small section at a time to avoid stretching the tape. 2 people is helpful.

    Before peeling the tape facing the LCD, its good to mount the LCD with masking tape (avoid covering mic holes) to test everything. I like to use Photo Booth and record a video to ensure camera and mics are all working properly.

    2 people also helpful on the final reseal. I like to stand the iMac up vertically so can power on and do final check after LCD connection before reseal. The screen is pivots on the bottom edge and iMac chassis is wobbly on its stand so 2 people is helpful. For final check, I like to make sure screen powers on and display shows before final reseal.

    Howard -

  3. It3sDfBwS4KdJi1b
    It3sDfBwS4KdJi1b
    tIhDrpLo2ifXsBpf
    • De kleefstrip met het label 4R zou een uitsnede moeten bevatten voor de microfoon.

    • Als je 4R-strip deze uitsnede niet bevat, kun je beter deze handleiding volgen.

    As far as I can tell, this model still had the mic at the top near the webcam, not at the bottom, so this notch is not needed for this model (2014 21.5” iMac A1418)

    Neddy -

  4. b2WiucfpUPIyH4sf
    b2WiucfpUPIyH4sf
    l3c26NEcnGuJsITW
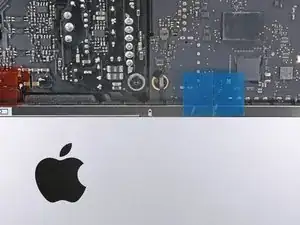
    • Leg al je kleefstrips op hun eigen plek voor je, zodat je overzicht voor jezelf creëert en ervoor zorgt dat je geen kleefstrips op de verkeerde plek plaatst:

    • Strip 01 aan de linker bovenkant

    • Strip 02 aan de rechter bovenkant

    • Strip 03 aan de rechter zijkant

    • Strip 4R aan de rechter onderkant met de donkere kant naar boven toe gericht

    • Strip 4L aan de linker onderkant met de donkere kant naar boven toe gericht

    • Strip 05 aan de linker zijkant

  5. SgrnjqXCIOlRCgO1
    SgrnjqXCIOlRCgO1
    2yG3EcqdmMGBkWds
    hcBLG4NkNad2lQSm
    • Begin met strip 03, welke aan de rechter zijkant van de achterste behuizing wordt geplaatst.

    • Plaats je kleefstrip, voordat je de folie er vanaf trekt, alvast langs het frame in de iMac zodat je een idee krijgt van waar je deze moet plaatsen.

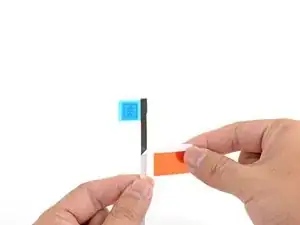
    • Pak het blauwe lipje vast en trek het korte stukje folie van de achterkant van je kleefstrip af om de kleefkant van de kleefstrip bloot te leggen, zodat je deze in de behuizing kunt plakken.

  6. SeQEUUUxVZKZtOVY
    SeQEUUUxVZKZtOVY
    oHo1gJJFmdfRBLLb
    • Steek de punt van een spudger in het gat aan het einde van de strip, waar je zojuist de folie hebt verwijderd. Steek de spudger in het gat vanaf de kant met de witte laag op de kleefstrip.

  7. sSMGlBNS6pLBnMhp
    sSMGlBNS6pLBnMhp
    2TirHkyJpSJgiV5Z
    VXdPLIKBA1uhdkRB
    • Met je spudger door het gat in de kleefstrip heen stekend, duw je je spudger in het bijbehorende gat in het frame van de iMac.

    • Breng de kleefstrip, met behulp van het gat en je spudger, aan op de juiste positie aan de rechterkant. Trek je spudger weg van de kleefstrip, zodat deze op spanning komt te staan en druk deze vervolgens stevig vast in het frame.

  8. vCOJlbIel1V34mJn
    vCOJlbIel1V34mJn
    L15SaWYDvIixc4jw
    • Als je het onderste deel van de kleefstrip eenmaal op de juiste positie hebt gebracht, trek je het langere stuk folie achter de kleefstrip los.

    • Als de onderste helft niet correct is aangebracht, kun je deze alsnog voorzichtig lostrekken en proberen om 'm opnieuw en ditmaal correct te positioneren voordat je de onderste folie lostrekt. Zorg dat je je spudger gebruikt om de bovenkant vast te houden.

  9. GPK1ivEbnnSKD1pT
    GPK1ivEbnnSKD1pT
    yQhJa2deriyhhpfM
    • Breng de bovenste helft van je kleefstrip op een lijn met de rechterzijde van de achterste behuizing en druk deze vast.

  10. UiWXg2hLd3stxZ2a
    UiWXg2hLd3stxZ2a
    hh1kHQPomRjuIbBQ
    • Gebruik je vinger om de kleefstrip plat te strijken. Zorg dat deze op een nagenoeg perfecte lijn zit met de rechterzijde van het frame en dat er geen rimpels in zitten.

    • Trek de voorste folie nog niet van de kleefstrip af.

  11. SAvWwElBYxSJt53F
    • Werk tegen de klok in langs de buitekant van de iMac en breng hierbij drie kleefstrip op eenzelfde wijze aan:

    • Strip 02 aan de rechter bovenkant

    • Strip 01 aan de linker bovenkant

    • Strip 05 aan de linker zijkant.

  12. KVlOshbVBknbCYjX
    KVlOshbVBknbCYjX
    3rheY2QEJqEgUERd
    b2AptGhwBkFjDjMy
    • De volgende stappen zullen je laten zien hoe je de kleefstrip aan de rechter onderkant bevestigt (strip 4R), welke een inkeping bevat die over de microfoon heen moet vallen.

    • Lees eerst deze en de volgende vier stappen door voordat je met dit deel van de procedure begint.

    • Pak de rode treklip op strip 4R vast en trek hieraan om ongeveer 5 cm (2 inches) aan witte folie van de strip af te trekken.

    These steps instruct you to install the lower strips to the iMac frame first, as that is what Apple instructs their techs to do. If you have an iMac without a microphone hole, you can choose to install the lower strips onto the display first. Peel the blue tab instead of the red to expose the adhesive. Carefully place the adhesive along the bottom edge of the display. The L-bend on the adhesive should match the display contours.

    Arthur Shi -

    i have no microphone hole - which is good . . . because the 4R and 4L stips must be labelled incorrectly as the L’s are on the wrong side. Also the strips don’t completely cover the bottom. And there are no holes in these strips making placement less secure. Someone certainly goofed. (Reckon I’ll use snipped off L’s to cover the open space.

    George Guess -

    Ah, the L strips don’t overlap - so they’re long enuf, but they are still reversed.

    George Guess -

    Die Löcher in den Klebestreifen passen nicht (mehr) zu den Löchern im Rahmen. Ich habe mich an den breiten Stellen orientiert und die Klebestreifen daran ausgerichtet. Das ging besser.

    The holes in the adhesive strips no longer match the holes in the frame. I oriented myself towards the wide areas and aligned the adhesive strips with them. That worked better.

    Stefan -

  13. b26SQ2cOObdeI6lB
    b26SQ2cOObdeI6lB
    EtiYK2dWVupC21Vl
    XLrYJxQG3Vka1it6
    • Vouw het losse gedeelte van de witte folie om en druk de vouwlijn aan.

    • Dit legt 5 cm aan kleefstrip bloot terwijl je tegelijkertijd de rode treklip uit de weg vouwt.

  14. llfiVyZqG1iFC56k
    llfiVyZqG1iFC56k
    MBLllrKPWoboKl3k
    DNHW5STaLdYS5HHa
    • De microfoon bevindt zich in het middelste gat en wordt omgeven door twee grotere gaten.

    • Breng de kleefstrip aan op een lijn met de onderkant door de inkeping voor de microfoon over het microfoongat heen te leggen.

    • Als je iMac geen microfoongat bevat, breng je de rechterkant van de kleefstrip zo aan dat de L-vormige hoek precies naar de kleefstrip aan de rechter zijkant komt te zitten. De L-vormige hoek behoort niet te overlappen met de kleefstrip aan de rechter zijkant.

    • De kleefstrips scheuren vrij gemakkelijk. Wees dus voorzichtig en zorg dat je niet te hard aan de strips trekt.

    • Als je de strip eenmaal op z'n plek hebt gebracht, druk je ook de inmiddels blootgelegde linkerkant van de strip op de iMac.

    The strips that I received from OWC do not have a notch cut out for the microphone. The instructions advise you, for 2017 and later 21.5” iMacs, to cut about 2 inches off from the left side of the strip so you do not cover the microphone hole.

    Peter Hillman -

    As far as the remaining 2 inches I cut off, I snipped off a little more on the right side to leave a small gap for the microphone and placed that small remaining part in the center where it should have been if there was no microphone, just to complete the adhesive.

    Peter Hillman -

    I have done quite a few of these now. It is easier to apply the bottom strips to the Display, rather than the housing. With the Red tabs folded at 90 degrees to the adhesive. You can then remove these tabs with the display kind in place, secured by painters tape on the out side before closing it up.

    Charlie Nancarrow -

    Don't make the mistake i just did - if you want to cut a notch, cut the BOTTOM 2/3rds section of the strip, not the top! :P

    Also, here's a some pics of the mic location in the 2017 retina version from iFIXit: Muffled Microphone - iMac 21.5" (mid 2017) - Following Adhesive Strips.

    Philip Sedlmair -

  15. Klii133D35ScCxaI
    Klii133D35ScCxaI
    SBbYWeMPupHA5aew
    rynmTTSJOZA1II6a
    • Trek het resterende deel van de witte folie weg om de rest van de kleefstrip ook bloot te leggen.

  16. h3CyNvaTcdFHbewP
    h3CyNvaTcdFHbewP
    Ja62kHPcpAaRT53q
    hZMpNSbTJaYxdGNE
    • Schuif je vinger, van links naar rechts, over de kleefstrip om zeker te weten dat er zich geen rimpels in de strip bevinden. Druk de strip, terwijl je je vinger over de strip heen beweegt, stevig naar beneden.

  17. tFvTSGi1GLICaarT
    tFvTSGi1GLICaarT
    vvWAPgHBGTD53iwA
    EMs6fYpepKgqkj56
  18. SdsL4QecnIAVqxLG
    SdsL4QecnIAVqxLG
    g6QqGnvROVaoPedA
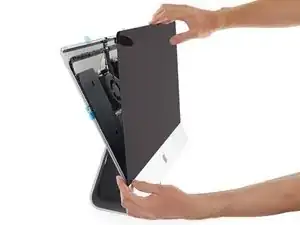
    • Breng het scherm voorzichtig op z'n plek en zorg dat deze op de juiste positie komt te zitten.

    In my experience, it is easier to lay the Mac flat on its back, especially if you do not have a wedge, because the display will tilt up and down and you do not want that happening. With the Mac on its back, I removed all the front adhesive strips and then angled the display (not a big angle) against the chin making sure it was even on both sides. Then reconnect the video cables and gently bring the display down into the proper position. Step 23 below seems too much of a hassle to try and get the bottom adhesive strips out while the display is resting on them, and taping the bottom of the display in Step 19 also seems to be a hassle.

    Peter Hillman -

  19. kEUGji5BKisTALtW
    kEUGji5BKisTALtW
    lH1yUBNnjU1fwlOa
    • Gebruik schilderstape om de onderkant van het scherm tijdelijk aan de behuizing van de iMac te bevestigen.

    • De tape zorgt enkel dat de positionering van het scherm even behouden blijft en maakt het dus mogelijk om de bovenkant van het scherm open te klappen zodat je bij de schermkabels kunt.

    • Wikkel de tape niet om de zij- en achterkant van de iMac heen, aangezien je in dat geval riskeert het scherm te breken bij het aansluiten van de kabels.

    Noooo!! I followed this step and promptly cracked my screen!!!! You need to be extremely careful NOT to wrap the tape around the back of the computer. These images make it look like it's wrapped around, but if you do that, you won't be able to lift the screen at all to attach the display cables. Why?!!!!!

    Mark Sandell -

    Oh no! I'm so sorry to hear this! Thank you for sharing your experience—I'm going to add a warning into the step.

    Arthur Shi -

  20. ULVCmrKsljVRCwoH
    ULVCmrKsljVRCwoH
    5gSqYsnFqMFJopZY
    • Op dit moment is het een goed idee om je reparatie te testen, zodat je zeker weet dat je iMac goed functioneert voordat je deze definitief sluit. Volg de volgende drie stappen om de schermkabels tijdelijk weer aan te sluiten en je iMac in te schakelen voordat je de folie van de kleefstrips af trekt en je je scherm bevestigt.

    • Als je reeds hebt gecheckt of je iMac correct werkt, kun je deze en de volgende stap overslaan en je iMac sluiten.

    • Steek de stroomkabel van het scherm in het contact op het logic board.

    I am powering the unit back up to test all is working. Screen is black but fan is running loud. I’ve decoupled the power and confirmed both the display cables are connected. Note - I replaced both the HDD with a SSD as well as upgraded the RAM from 8GB to 16GB.

    Neil Harfert -

  21. kMhUMSXgmNHKcwZu
    kMhUMSXgmNHKcwZu
    fvEmMbGJSVLfLsfe
    wxrUnIxaMMvKIcIT
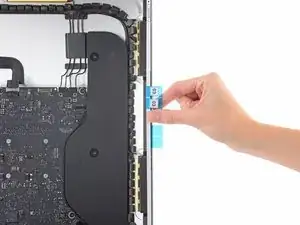
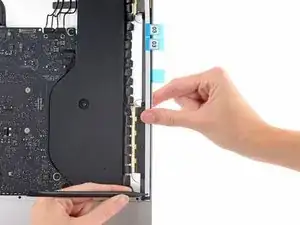
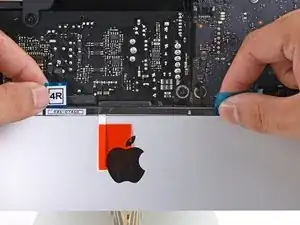
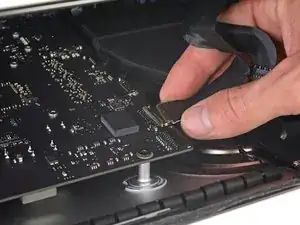
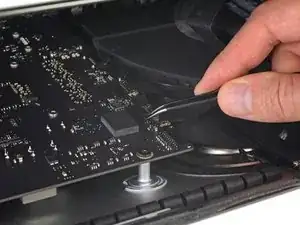
    • Gebruik een pincet of je andere hand om de schermdatakabel aan te sluiten op het contact op het logic board.

    • Zorg dat je deze aansluiting volledig recht en helemaal in het contact duwt.

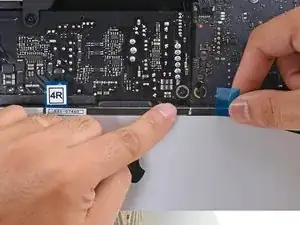
    • Bevestig de metalen bevestigingsbeugel op de schermdatakabel door deze naar beneden, in de richting van het logic board, te drukken.

    While the previous step refers to “cables,” plural, this step suggests that only the display cable needs to be reinstalled in order to test working order. In my experience (iMac 21-1/2" Retina 4K Display, late 2015), I found that I had to also reconnect the camera/microphone cable in order for the screen to work. [6/7/21]

    Gary Heurich -

  22. HryradaXyXLjNBFI
    HryradaXyXLjNBFI
    yKlYNtqMT2CmqAn6
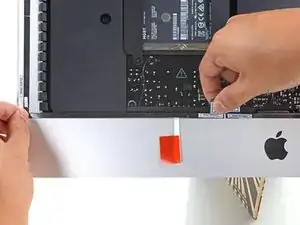
    • Zet het scherm terug op de achterste behuizing van de iMac.

    • Steek de stekker van je iMac nu in het stopcontact, schakel je iMac in en test je reparatie voordat je verder gaat met het sluiten van je computer. Zorg dat je alle functies checkt van alle onderdelen die je mogelijk hebt verwijderd of losgekoppeld hebt.

    • Als je deze stap hebt voltooid, schakel je je iMac weer uit en haal je de stekker weer uit het stopcontact voordat je verder gaat met deze reparatie.

    At this point I tested everything to make sure it worked, including the microphone. It was a bit muffled so I poked it with a pin to try and clear it. This was incredibly stupid because (a) the muffling was due to the backing which I was about to remove from the strip (b) poking with a pin broke the microphone.

    I’m not going to buy a new microphone (£72 apparently) and a new set of strips, so I’ll get an external USB microphone instead.

    But to anyone else, if the microphone sound is muffled, don’t worry!

    rjbusenet -

  23. HaVIVnq2Vxod2aY2
    HaVIVnq2Vxod2aY2
    66wTTTQDlPcAIG4M
    ocQGuql3TnTJHXJ2
    • Zorg dat je dubbel checkt of je iMac is uitgeschakeld en dat de stekker uit het stopcontact is voordat je verder gaat.

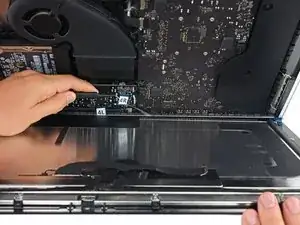
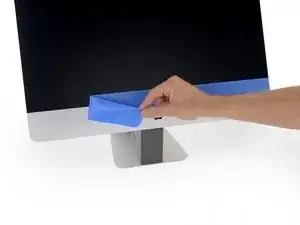
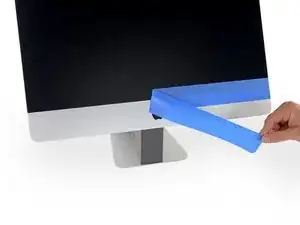
    • Nadat je hebt bevestigd dat je iMac prima functioneert, koppel je de schermkabels weer los en laat je het scherm voorzichtig naar voren leunen.

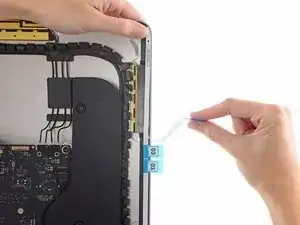
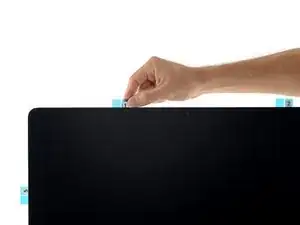
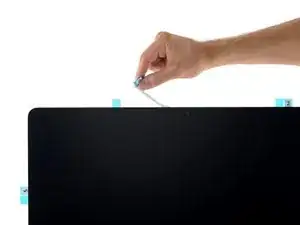
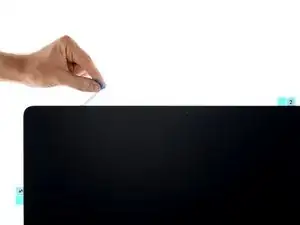
    • Verwijder de folie van de twee onderste kleefstrips door de blauwe folie vanaf boven met een pincet vast te pakken en deze in een rechte beweging van de onderkant van het scherm naar boven te trekken.

  24. XR3JugtFF6OgkKD5
    XR3JugtFF6OgkKD5
    XPyUV3YXJTQsEJfe
    QDOiJ3HUSegPbtkL
    • Sluit de stroom- en datakabels van het scherm voor de laatste keer aan.

    • Zorg dat je de metalen bevestigingsbeugel op de schermdatakabel goed bevestigt en sluit.

  25. Re3YY3EJG5hPTQud
    Re3YY3EJG5hPTQud
    JCYpQjtj6JlMLW16
    4oaYI6bFC6NYxaR3
    • Check het glas direct voor de webcam op stof en andere mogelijke bevuilingen. Indien nodig kun je dit glas even schoonmaken met een microvezeldoekje voordat je je scherm sluit.

    • Houd het scherm stevig vast en in balans met een hand terwijl je in de volgende stappen de folie van de kleefstrips af zult halen met je andere hand. Je kunt er ook voor kiezen om het scherm tegen de iMac-behuizing aan te laten leunen.

  26. Y2rYniXZCwPjHiIB
    Y2rYniXZCwPjHiIB
    VYMyp3nTOpEG3QKC
    yb6jJ5ZyDJrZmNBw
    • Verwijder de folie van strip 01 door deze aan de treklip omhoog te trekken.

  27. X1LABhMtSFFOmPrd
    X1LABhMtSFFOmPrd
    DGfT3UTqd35NwSea
    • Verwijder de andere kant van de folie van strip 01.

  28. WJrmK6UfMepgIQWI
    • Herhaal de vorige stappen om de folie van alle overige kleefstrips af te trekken.

  29. WWLIGTZ4KLNXTLIW
    WWLIGTZ4KLNXTLIW
    OIDcHJv2FMYbXpRR
    nYhvwbfSBjx1LstD
    • Om ervoor te zorgen dat de kleefstrips zich goed aan het scherm hechten, leg je de iMac voorzichtig op z'n rug (zodat het scherm naar boven wijst) en druk je alle kanten van het scherm stevig aan.

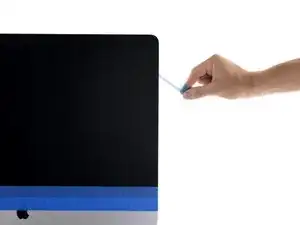
    • Verwijder de tape waarmee je het scherm tijdelijk aan de achterste behuizing hebt bevestigd.

    • Check het scherm na 24 uur om te bevestigen dat het niet losjes in de iMac-behuizing zit.

    Yo lo pongo sobre una manta con la pantalla apoyada sobre la manta.Pongo trapos o papel de cocina doblado alrededor de la pantalla y lo sujeto con pinzas de tender ropa.Lo dejo así 24 horas y queda perfecto. Saludos y gracias por el tutorial.

    JAIME GARCIA MARTINEZ -

Walter Galan

703036 Reputatie

0 commentaren