Inleiding

Dit is een vooraf vereiste handleiding! Deze handleiding is onderdeel van een andere procedure en is niet bedoeld om los daarvan te worden gebruikt.

  1. otaRXAqJBHRfjpZL
    • Het scherm wordt door sterke lijm op z'n plek gehouden. Om het scherm dus van de lijm te scheiden, zul je de lijm eerst met behulp van een iOpener, föhn of warmtepistool moeten verwarmen.

    • Het kan nodig zijn dat je je toestel meerdere keren moet verwarmen om de lijm zacht genoeg te maken en te voorkomen dat deze weer hard wordt tijdens de reparatie.

    • Verwarm een iOpener en leg deze gedurende ongeveer twee minuten op de onderkant van je iPad-scherm.

  2. dXwytgcbeMBtyPIK
    • Bescherm, als het scherm van je iPad gebarsten is, je ogen en je huid. Bedek het scherm met een laag tape om de glasscherven bij elkaar te houden en om ervoor te zorgen dat de zuignap zich vast kan zuigen. Als alternatief kun je een stuk sterke tape als handvat gebruiken.

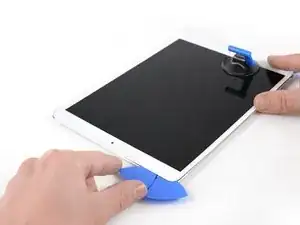
    • Druk een zuignap naast de thuisknop van de iPad en druk deze naar beneden om een vacuüm te creëren.

    • Om zo veel mogelijk hefkracht te krijgen, plaats je de zuignap zo dicht mogelijk bij de rand van de iPad (zonder over de rand te gaan).

    • Trek de zuignap stevig omhoog om een kleine opening tussen het voorste paneel en de achterste behuizing te creëren.

    • Trek niet te hard aan de zuignap, aangezien je daarmee riskeert het glas (verder) te breken. Gebruik, indien nodig, meer warmte om de lijm te verzwakken.

    • Als je eenmaal een opening hebt gecreëerd die groot genoeg is, steek je een openingsplectrum in de opening.

    i used a proper suction tile puller (small one from DIY store used to hold bathroom tiles) to lift the screen off after heating around the edge using a heat gun. Be careful - It didn't damage anything. The tiny suction things that come with those iPhone kits are not strong enough for this. The one in picture might be good, but looks similar to the kits ones that have key ring.

    Robert Lord -

    The suction cup that comes with the iPad battery replacement is plenty large enough and strong enough.

    CAUTION, do not push the picks in more than a the width of the replacement screen adhesive strips. You will damage the $200 screen, maybe break the glass. The screen is multiple layers and the picks can get in-between the layers if you push too far in. I got into trouble at the lower left corner. After getting the screen loose, I found that I only need a 2-3 millimeters on the sides and bottom, and four or five millimeters in the corners.

    Gene Torrey -

    These comments need to be highlighted and added to the guide. The pictures showing the pick placement are very misleading. The thickness of the adhesive is only 2mm as you had mentioned! Waiting now for my replacement screen. Apples products look amazing but now I realize I would have been way better off just living with a one hour battery and or buying a new ipad.

    William Best -

  3. HRYjnydwI5uHt12k
    HRYjnydwI5uHt12k
    2nxd5mrkce3UfC1r
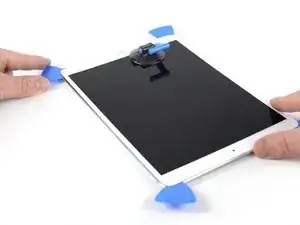
    • Snijd de lijm onder het scherm door door je plectrum langs de onderkant van het scherm richting de linker onderhoek te schuiven.

    • Laat je plectrum op z'n plek zitten om te voorkomen dat de lijm zich opnieuw gaat hechten.

    Be super carful at the sides! If you insert your pick more than ~2mm, you will separate your display and front glass.

    voidfish -

  4. IDX6WsfJwQGPK1hD
    IDX6WsfJwQGPK1hD
    woVkXQtjng5taXfv
    CX5pQLbDVpljSlel
    • Verwarm de linkerzijde van de iPad gedurende twee minuten, of totdat het toestel te warm is om comfortabel vast te houden.

    • Indien nodig, herverwarm je je iOpener voor een aantal seconden of tot deze ook te warm is om comfortabel aan te raken. Wees voorzichtig en voorkom dat je je iOpener oververhit. Bij oververhitting loop je het risico dat je iOpener openklapt.

    • Steek een tweede openingsplectrum in de linker onderhoek van de iPad.

    • Schuif je tweede openingsplectrum langs de linkerzijde van het scherm omhoog om de lijm onder het scherm door te snijden.

    • Laat je openingsplectrum in de linker bovenhoek zitten om te voorkomen dat de lijm zich opnieuw gaat hechten.

  5. Xsv3FIGGDpg2cySF
    • Leg je iOpener gedurende twee minuten op de bovenkant van je iPad, of tot deze net te warm is om comfortabel aan te raken.

  6. iaIrQdhTPk3NQkBo
    iaIrQdhTPk3NQkBo
    5MDrFiJpRxgYtktW
    rZvTbO5Akf3ef1fF
    • Steek een derde openingsplectrum in de linker bovenhoek van de iPad.

    • Gebruik je openingsplectrum om de lijm onder de bovenkant van het scherm los te maken door je plectrum naar de rechter bovenhoek van de iPad te schuiven.

    • De naar voren gerichte camera bevindt zich in het midden van de bovenkant van de iPad en kan beschadigd raken als je de plectrum te diep in het toestel steekt bij het schuiven. Zorg dus dat je bij het snijden in de buurt van de camera enkel de punt van je openingsplectrum in het toestel steekt.

  7. NcHeiicA1BxMtSMG
    NcHeiicA1BxMtSMG
    2nq2lKnxklD4SEqb
    FyR4ypp5WTIbhUo3
    • Leg je iOpener tot slot gedurende twee minuten op de rechterzijde van de iPad of tot deze te warm is om comfortabel aan te raken.

    • Breng een vierde openingsplectrum aan, in de rechter bovenhoek van de iPad.

    • Schuif je plectrum langs de rechterzijde naar de rechter onderhoek van de iPad om de lijm onderweg door te snijden.

    • Schuif je plectrum langs de rechter onderhoek—verwarm je toestel opnieuw indien nodig—en snijd de resterende lijm aan de onderkant door. Stop echter voordat je bij de thuisknop bent.

    We must be very careful when we are prying left and right size bezel to peel off the screen as there very little gap between edges and LCD. Slightly inside push can crack LCD. We need to pay full care and raising edges very very slowly.

    iRepairMan -

    if you manage to get hold of the adhesiv strip, then pull it out slow and careful, that help a Lot !

    HP SIE -

  8. yNLpdqy3o1k2mXRL
    yNLpdqy3o1k2mXRL
    IGBVYHPJbbyL5okD
    • Steek een vijfde openingsplectrum in de opening aan de bovenkant van de iPad in de buurt van (maar niet direct op) de naar voren gerichte camera.

    • Kantel je plectrum op voorzichtige wijze om de schermmodule van de iPad-body te scheiden.

    • Probeer het scherm nog niet volledig te verwijderen, aangezien deze nog steeds met het moederbord van de iPad verbonden is.

    • Gebruik, indien nodig, meer warmte en/of snijd de lijmresten door die voorkomen dat het scherm los komt.

    Be very gentle when twisting. My screen broke in this step. I would not twist it but try to remove glue further as there is a aluminium support of the screen in the wide area beneath the light sensors and there is glue on that also preventing in easy lifting the screen. Just be careful not to damage the light sensors and camera.

    agrior -

  9. ocbIAZjbSbxccEWF
    ocbIAZjbSbxccEWF
    ZXh6TyUUb4CQX1wM
    ExGEFNSRgrxMVNIy
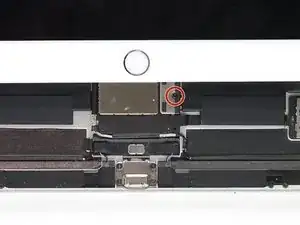
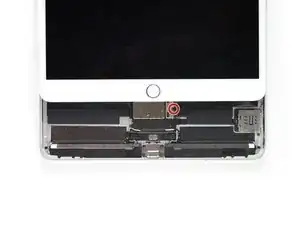
    • Til de schermmodule vanaf de bovenkant op en schuif het scherm vervolgens naar boven (door het naar je toe te trekken) richting de jack-aansluiting en de naar voren gerichte camera tot de schroef diede batterij-aansluiting bevestigt zichtbaar is.

    • Til het scherm niet verder dan 70° omhoog, aangezien je anders riskeert de lintkabels te beschadigen.

    How do you go about getting to this battery connector as it is covered by a large metal shield above the logic board, if you do not disconnect the battery you risk frying the back light.

    Ayden McCormack -

    The metal shield is not relevant for this. You can leave it in place or remove it if it comes of. Once the screw of the plate is removed you will be able to lift the print a little bit and put someting between the battery connector and the board connector. The connector is beneath the print. Look further on to see a deck card is used for this.

    agrior -

  10. 4rXEwLDSrwuJsswL
    4rXEwLDSrwuJsswL
    neY1rxtpUctU1N3T
    • Verwijder de 1.9 mm lange Phillips-schroef die de batterij-aansluiting bevestigt.

    • Zorg dat je, tijdens deze reparatie, goed bijhoudt welke schroef waar vandaan komt zodat je zeker weet dat je de goede schroef op de juiste plek terug plaatst en zo schade aan je toestel voorkomt.

    What size Phillips bit?

    Josh Heilik -

    In this whole guide I used 00 and 000.

    agrior -

  11. 4ouBh4GC2IOhyKNR
    4ouBh4GC2IOhyKNR
    5VpvOTBpSOqCXNgw
    PsWasEsoNUIanBMK
    • Deze afbeeldingen laten zien hoe de batterij-aansluiting onder het logic board eruit ziet. Gebruik deze afbeeldingen als referentie bij het veilig loskoppelen van de batterij.

    • Let erop dat er bij de batterij-aansluiting vanaf het logic board uitstekende veren zitten die tegen de contactkussens van de batterij aandrukken. Aangezien zowel de batterij als het logic board vastgelijmd zijn zul je een dun en flexibel object tussen de contactpunten moeten schuiven om de batterij los te koppelen.

    This picture looks nothing like my A2152 battery connector. I can’t really tell what is happening here.

    todd sorel -

    This is an iPad Pro not an iPad Air which is different.

    Dan -

  12. 2e3jiUVhPCTeK3V2
    • Wees voorzichtig bij het isoleren van de batterij met behulp van een batterijblokker. De batterijcontacten zijn makkelijk te verbuigen, wat tot permanente schade kan leiden.

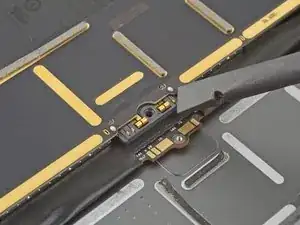
    • Om de batterij los te koppelen, schuif je de vork van de batterijblokker of de punt van een openingsplectrum onder de batterij-aansluiting om zeker te weten dat het circuit is onderbroken.

    • Duw de batterijblokker niet met brute kracht onder de aansluiting. Als je moeite hebt met het onder het logic board plaatsen van de batterijblokker, kun je proberen de batterij los te koppelen met behulp van een speelkaart.

    • De batterijblokker of speelkaart zou idealiter zonder blokkades onder het logic board moeten schuiven.

    • Laat de batterijblokker op z'n plek zitten terwijl je werkt.

    I found it very hard to fit something under the battery power connector. I did not have a battery blocker, so I tried a playing card. I was not able to slide it between the springs. The section of the battery power connector, above the cantilever springs, did not seem to want to give at all, like in the picture above. If other people had success, I would love to hear how.

    hdh607 -

    I didn’t have success either, but i kept myself grounded, and avoided battery contact as much as possible.

    Amber Wooldridge -

    I used a playing card cut to shape. I had to make a couple, to try a few times.. It does go in eventually. Not deep, but enough to break connection. You can test by trying to switch on iPad.

    Robert Lord -

    It took some time but I was able to get it under the back part and slide it forward.

    Barbara Nelson -

    You must disconnect the battery before plugging the new screen. I think i didn't break the circuit in first attempt and shorted the screen, the result was half of the screen didn't work. I used a playing card. Second attempt was successful with new screen.

    Robert Lord -

    I believe I have a good solution to this problem. I was dissatisfied with the thickness of the battery blocker, or even a thin guitar pick, for that matter; both required force and I feared bending the springs or leaving the connection intact.

    What worked for me was cutting a small strip of non-conductive, static-proof film (the kind that RAM and other sensitive components come in). There was every reason to trust in its non-conductivity but just to be sure, I used a VOM to test; its resistance was out of the VOMs range, meaning that its conductivity was nil. I used a spudger to gently lift the logic board off of the battery contacts and slid the non-conductive strip in between; went without a hitch.

    When reassembling, I laid the strip on the battery contacts, laid the logic board on top, installed it, connected the display panel and gently drew the slip out and installed the battery screw. Worked like a charm.

    Valdaquende -

    These are some extremely misleading set of instructions and picture. Much better if you have the battery discharged, so don't need to worry about blocking the connector. But DO NOT force anything in the through the socket and certainly do not try to bend up the soldered cover, as it appears to be happening in the picture. You will break the connector, most likely resulting in ipad shutting down every 3 minutes from the notorious "thermal sensor missing" panic system crash.

    Kostas “Kosprey” -

    I like the method used in this video to block the battery. Seems superior to the instructions here.

    Calion -

    I skipped this part entirely and now its not turning on after i screw on the screw, did I break the connector?

    Albert Einstein -

  13. vuHXR5SLK1ppwfYQ
    vuHXR5SLK1ppwfYQ
    rohBSEFOJRJTRUcZ
    lPR1DjbIaXn1OdBK
    • Til het scherm langzaam van de bovenkant weg en wees hierbij voorzichtig dat je de lintkabels niet beschadigt.

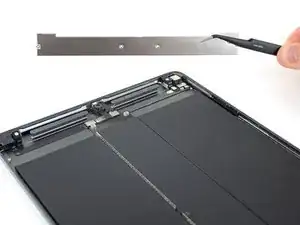
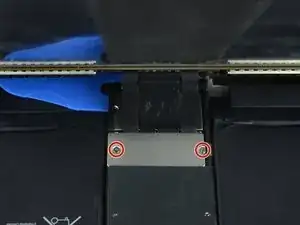
    • Verwijder de twee 1.3 mm lange Phillips-schroeven die de beschermende beugel op de schermaansluiting bevestigen.

    • Het kan handig zijn om de schroevendraaier iets naar de zijkant te houden om te voorkomen dat je de lintkabels beschadigt.

    • Verwijder de beugel op de schermaansluiting.

    Here it is very precocious steps to do. Flx cables to connectors are small in size and we cannot lift the display vertically. Therefore, we may struggle to unscrew the metal shield. We need to use smaller size of philip screw driver or place vertically the display to create enough gap between philip screw driver and the cover bracket. Similarly, when we are replacing new display we need to be carefully connect four flex cable with connectors with logic board.

    iRepairMan -

    agree, with re-assembly very tiny screws and awkward positioning, the back two cables pop off if not careful.

    Tom McGrath -

    I did this step using just the tip of the PH000 screwdriver, it made it much easier to get my hands into the small space, the replacement screen from ifixit had tighter cables that I was not comfortable stretching out to go to a 90* angle to screw back on. Make sure your tip is magnetized for best results :)!

    Amber Wooldridge -

    Meaning no disrespect for this excellent guide, I found this photo to be a bit misleading; at least in my case. It clearly shows about 90˚ between the case and the display. I tested the limits with the one I was repairing and could find no way to raise the display far enough to clear a screwdriver without jeopardizing the cables. I resorted to the same solution that Amber Wooldridge discovered; using a PH000 bit and hand-tightening. I had a tiny needle-nosed plier that I used to tighten them a bit (but very gently).

    Valdaquende -

  14. eFMfF6wqyCeBKRSU
    eFMfF6wqyCeBKRSU
    AQUlSPXnIfQFunMv
    quIQSO3BZ4g5PHqS
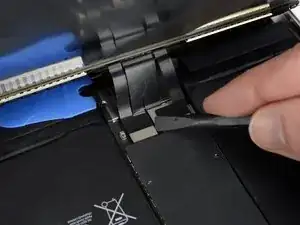
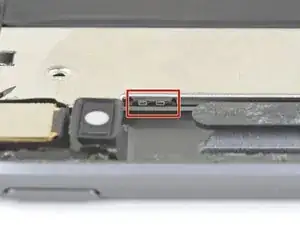
    • Gebruik een spudger om de twee zichtbare flexaansluitingen van het scherm los te koppelen door deze recht uit de contacten omhoog te duwen.

    • Om drukaansluitingen als deze weer terug aan te sluiten, breng je ze op de juiste positie boven het contact aan en druk je eerst een zijde en dan de andere zijde naar beneden. Druk niet op het midden, omdat je hiermee riskeert de aansluiting te beschadigen. Als de aansluiting niet goed zit, riskeer je namelijk de pinnen te verbuigen.

  15. rLEFxLicwMOpGHhK
    rLEFxLicwMOpGHhK
    TAwItumI5lUCWasR
    FBQrmOyUp3ST3UwV
    • Daaronder zul je nog twee extra schermkabelaansluitingen vinden.

    • Gebruik je spudger om deze aansluitingen voorzichtig omhoog te duwen en los te koppelen.

    I went to replace the LCD assembly on an ipad Air 3, and one of the flex cables on the new LCD assembly broke in half. The flex cables on the old assembly work well and are intact. Is it possible to transfer the old flex cable(s) to the new assembly, or can I solder the broken pieces of the new flex cable together? I have also contacted the part supplier about this and am awaiting a response.

    Krella -

  16. kYoe4hwvKgs3PFDe
    • Verwijder de schermmodule.

    • Verwijder, voordat je je nieuwe scherm installeert, alle oude lijmresten uit je iPad en maak de voorheen gelijmde gebieden schoon met wat isopropyl alcohol (>90%) en een stuk stofvrij doek. Dit prepareert de iPad voor nieuwe kleefstrips en zorg voor een goede hechting.

    • Als je van plan bent om je oude scherm weer te installeren, verwijder dan alle oude lijmresten van de achterkant van het scherm en maak de gebieden waar het scherm in was gelijmd schoon met isopropyl alcohol.

    • Test de functies van je iPad en installeer vooraf op maat gesneden kleefstrips op de achterkant van het scherm met behulp van onze handleiding voor het aanbrengen van kleefstrips rondom het scherm. Sluit je toestel daarna.

    Definitely test your iPad’s functions before sealing it up. I needed to reopen the display to reconnect the display connectors in order to have the display functioning properly. As a result, the adhesive strips did not work as well and I needed to tape some of the edges closed with a small section of strong clear packing tape.

    hdh607 -

    I stuck the adhesive to the chassis first. That was messy because the plastic that covers the adhesive seems to be for screen side first. So you end up exposing both sides and those collect dust. I now realise you're supposed to put the adhesive on screen first. Not sure if it would have made much difference in the outcome (mine screen is not stuck in some places).

    Robert Lord -

    I found this out too. I had two sealing kits and they were both meant to be fixed on the screen first. I did not managed to get the screen to stick with the body as well. Now used some B6000 glue in addition.

    agrior -

    When cleaning, apply alcohol to the cloth, not the edges of the screen, because it might get inside the screen.

    Calion -

  17. 61FSTJYwKBNeoiIs
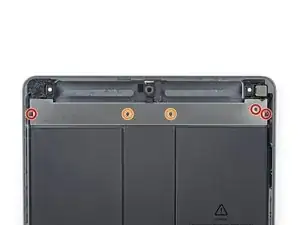
    • Gebruik een Phillips-schroevendraaier om de vijf schroeven die de beugel bevestigen te verwijderen:

    • Drie 1.4 mm lange schroeven

    • Twee 2.4 mm lange schroeven

    On the LTE version, there are four more additional screws at top edge to the left and right of the front facing camera, right below the antenna assemblies.

    Gregg Stanley -

  18. H1LqAwdT61uSGC5Z
    H1LqAwdT61uSGC5Z
    TxPgFPs4Ib2JRkQv
    sumOlypQKDFOCT43
    • Gebruik een spudger om de beugel richting de bovenkant te duwen en los te maken uit de klemmen die in de buurt van de achterste camera zitten.

  19. 36iJuRRuHNeAhTyF
    36iJuRRuHNeAhTyF
    NSD5aPKQofpAXrLr
    • Verwijder de beugel die over de bovenste onderdelen heen is geplaatst.

    • Zorg dat de beugel bij het weer in elkaar zetten van je toestel onder de klemmen nabij de camera schuift.

Conclusie

Volg bovenstaande instructies in omgekeerde volgorde om je toestel weer in elkaar te zetten.

Robert Boyd

Lid sinds: 01/02/21

30286 Reputatie

0 commentaren