Inleiding

Als het scherm van je iPhone 12 gebarsten is, niet meer reageert op je input, of geen beeld toont terwijl je telefoon wel aanstaat, kun je deze handleiding gebruiken om je iPhone te herstellen en weer nieuwe leven in te blazen met een nieuw scherm, a.k.a. schermmodule.

De gecombineerde oorstukspeaker + sensormodule die aan de achterkant van het scherm is bevestigd, is in de fabriek op unieke wijze gekoppeld aan jouw individuele iPhone. Je zult deze onderdelen dus mee over moeten zetten naar je nieuwe scherm bij elke schermvervanging die je uitvoert. Dit onderdeel bevat onder andere de infraroodlichtschijnwerper, welke een onderdeel is van de biometrische Face ID-beveiligingsfunctie. Als deze beschadigd is of vervangen wordt, zal de Face ID-functie niet langer werken. Wees daarom extra voorzichtig en probeer te voorkomen dat je geen van deze onderdelen tijdens deze procedure beschadigt. Als je deze wel beschadigt, kan enkel Apple of een door Apple geautoriseerde reparateur de Face ID-functies herstellen.

Let op: De True Tone-functies zullen niet langer werken als je het scherm vervangt, zelfs als je een origineel Apple-scherm gebruikt.

  1. oBBxtkV2gJcIPKkK
    • Ontlaad de batterij van je iPhone, voordat je met deze handleiding begint, tot onder de 25%. Een geladen lithium-ion batterij kan in brand vliegen en/of exploderen als deze per ongeluk wordt doorboord.

    • Schakel je iPhone uit voordat je begint met het demonteren van je toestel.

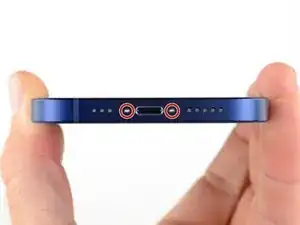
    • Verwijder de twee 6.75 mm lange P2 pentalobe-schroeven aan de onderkant van je iPhone.

    • Het openen van het iPhone-scherm zal de waterdichte pakkingen aantasten. Zorg dat je vervangende pakkingen klaar hebt liggen voordat je verder gaat, of zorg dat je je toestel niet aan water blootstelt als je je iPhone zonder pakkingen weer in elkaar zet.

    Do you sell the waterproof seals separately or are they included in the kit?

    Heather Furnas -

    Do you sell the waterproof seals separately or are they included in the kit? (I would like to know this as well.)

    CaliforniaGunner -

    I just got my Fix Kit and it includes the seals. Not sure if a "part only" version would, though.

    Neal Sofge -

  2. 6UPwoloGBO4tmVoS
    6UPwoloGBO4tmVoS
    BmSYPJmOy6dbHipF
    3EOdQPAGOmiuhoKU
    • Je kunt de onderdelen in je telefoon gemakkelijk beschadigen met het te diep inbrengen van je openingsplectrum. Volg deze stap om je plectrum te markeren en schade aan je toestel te voorkomen.

    • Plaats op 3 mm van de punt van je plectrum een markering met een stift.

    • Je kunt op iedere punt voor een andere markering kiezen.

    • Als alternatief kun je ook een munt als markering gebruiken in plaats van een stift. Plak hierbij de munt op de plectrum zodat de munt tegen je telefoon aandrukt zodra deze een bepaalde diepte bereikt.

    Got to step 2 and realized the fix kit doesn't include an opening pick! Looks like a guitar pick, and I have those lying around. Is that expected? Looks like the pick is used in many steps below. There's a little blue crowbar that isn't mentioned in the instructions. Perhaps that replaces the opening pick?

    Sloan Looney -

    Hi! I can't see which guide you were using when writing this comment. Can you reply here with which guide and fix kit you used?

    Clay Eickemeyer -

    I see you posted this in Meta. I hope it's resolved soon! In the meantime, a guitar pick may work well enough for your repair.

    Clay Eickemeyer -

    what fix kit?

    Meow Purr -

    My fix kit didn't include an opening pick either

    WILLIAM HARRIS -

    Make sure you check inside the black boxes after emptying them. My pick was stuck inside one of the boxes.

    AndyF -

    My AliExpress refurbished screen came with a pick that has a coin-like circle that pops out, so no modification was necessary

    Gijs Leegwater -

    the picture shows 3 cm but the description says 3 mm's. Which one is it?

    John Pena -

    That is a misunderstanding. It is a ruler with a scale for cm, it shows 0.3 cm, i.e. 3 mm.

    VauWeh -

    Oh, come ON!

    Big Ed -

    It will ALWAYS be millimeters on a phone, but this step is ridiculous, skip it!

    Leif DeWolf -

    @leifdewolf I wouldn't skip it for a first repair.

    Gabriel-Science -

    It's not an Ifixit KIT if it doesn't include everything. You'll need to order the opening pic separately. Or head to Walmart like myself and look for guitar pics. Hopefully, this will work just as well.

    Jaleeljb97@icloud.com -

    No pick in mine as well. It’s really not clear that you have to order this separately when ordering an IPhone SE 202/2022 screen repair kit. Is this the case?

    Jackson Castiglione -

    Frustrated, I ordered a compact package where everything was encapsulated. Useless suction tools could not separate the screen. If it is unable to decouple the screen, then why sucking suction tools you have provided.

    Shourob Datta -

    For my kit the triangle pick was stuck inside the box with the screen not with the other tools maybe it's also there for you

    Henry Scheibehenne -

    Y’all are getting far, FAR too detailed with some of this stuff…. Measuring and marking the pick that you won’t actually use to open the device?!? lol that’s kinda funny. Just heat it up, grab a spudger, and the back just pops right off! The iFixit tech need to stick to the KISS method more often, you know KEEP IT SIMPLE STUPID!!! Like l, for reals, I’ve been doing this stuff for YEARS and using iFixit guides regularly and this is just ridiculous at this point!

    Leif DeWolf -

    Will the phone still work if the sensor assembly on the back of the screen is damaged?

    Mutshidzi Rambau -

    I don't have a pick, but how much better are these picks than an old credit card for opening an iPhone 13 mini?

    mike eng -

    The pick in my iFixIt kit was packed with the battery, not with the rest of the toolkit.

    Tony Houlihan -

  3. U6uMaQ2w3xOXGqZt
    U6uMaQ2w3xOXGqZt
    CPoII2uYnsjeyboh
    UYpZQjIJZTscr1dr
    • Als je iPhone een gebarsten scherm heeft, kun je wat tape over de barsten plakken om te voorkomen dat het scherm verder beschadigd raakt tijdens dit proces. Zo verklein je ook het risico op fysieke schade.

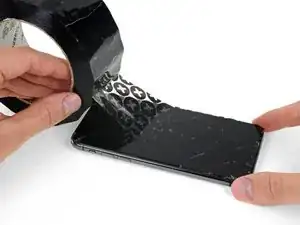
    • Plak een aantal lagen tape op het scherm van de iPhone tot het gehele scherm bedekt is.

    • We raden je ten sterkste aan om tijdens deze stap een veiligheidsbril te dragen zodat je je ogen beschermt tegen eventueel loskomende glasscherven.

    • Als het je in de volgende stappen niet lukt om de zuignap op het scherm te bevestigen, kun je ervoor kiezen om een stuk duct tape in een handvatvorm op het scherm te plakken. Hiermee kun je dan het scherm omhoog tillen om een opening te creëren.

    • Als alternatief kun je er ook voor kiezen om de zuignap met secondelijm op het scherm vast te plakken.

  4. B3jjMp2cvD5Rjabx
    B3jjMp2cvD5Rjabx
    QXAiF3sdtAYXQTQt
    FMOPQmVFrA1qxL1R
    • In de volgende drie stappen leggen we uit hoe je de anti-klem het best kunt gebruiken. De anti-klem is een tool die we gemaakt hebben om de openingsprocedure te vergemakkelijken. Als je geen gebruik maakt van de anti-klem, kun je de volgende drie stappen overslaan en de alternatieve methode gebruiken!

    • Voor meer gedetailleerde instructies over het gebruik van de anti-klem verwijzen we je door naar deze handleiding.

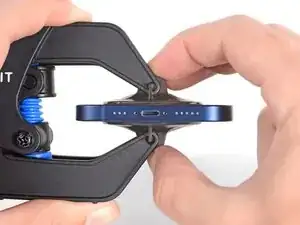
    • Trek het blauwe handvat naar achteren om de armen van de anti-klem te ontgrendelen.

    • Schuif de armen over de linker- of rechterzijde van je iPhone.

    • Plaats de zuignappen aan de onderkant van de glazen achterkant—één aan de voorkant en één aan de achterkant.

    • Druk de zuignappen aan zodat je zeker weet dat ze zich goed vastzuigen.

    • Als het oppervlak te glad of onregelmatig is en de zuignappen zich niet goed vast willen zuigen, kun je wat tape gebruiken om te zorgen dat de zuignappen meer grip hebben.

  5. oVcZhyKbh6AqAYBD
    oVcZhyKbh6AqAYBD
    bPLD3rBQF23DDmGa
    mpAqXAZbRjfBNAkL
    • Trek het blauwe handvat naar voren om de armen van de anti-klem te vergrendelen.

    • Draai het handvat 360 graden met de klok mee of tot de zuignappen uit beginnen te rekken.

    • Zorg dat de zuignappen op één lijn met elkaar zitten voordat je begint met het openen van het toestel. Als je ziet dat de zuignappen niet meer op één lijn zitten, maak je ze los en breng je ze weer op de juiste positie aan.

  6. u1p2GSBABb4i1qXl
    u1p2GSBABb4i1qXl
    TEVkJ3VWQ5bWEZ2G
    LMDHoJDdVkP56a4a
    • Zorg dat je iPhone op een stevig object rust voordat je het toestel probeert te openen. Leg je iPhone bijvoorbeeld op een boek met harde kaft zodat je telefoon parallel aan je werkoppervlak ligt. Dit maakt de volgende stappen wat gemakkelijker.

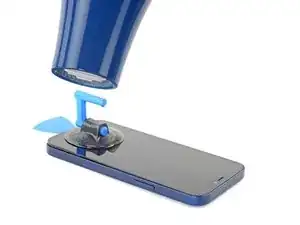
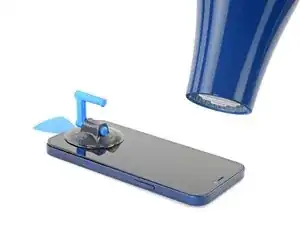
    • Gebruik een föhn om de onderkant van de iPhone te verwarmen en de lijm die het scherm vasthoudt te verzwakken. Het glas zou iets te warm moeten zijn om comfortabel aan te raken.

    • Voor meer gedetailleerde instructies over het gebruik van een föhn om de lijm in een toestel te verzwakken, verwijzen we je door naar deze handleiding.

    • Geef de lijm ongeveer een minuutje de tijd om los te komen en trek het toestel vervolgens rustig uit elkaar tot je een opening hebt gecreëerd.

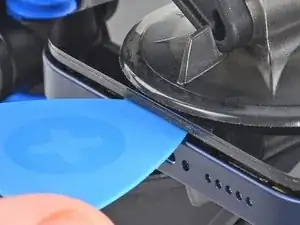
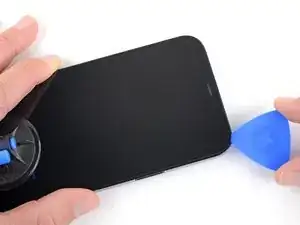
    • Steek een openingsplectrum in de opening onder de rand van het scherm.

    • Als het niet lukt een opening te creëren die groot genoeg is om een openingsplectrum in te steken, raden we je aan meer warmte te gebruiken en het handvat van de anti-klem een kwartslag aan te draaien.

    • Draai het handvat nooit verder dan een kwartslag per keer en wacht een minuut voordat je de anti-klem weer besluit aan te draaien. Laat de anti-klem het werk voor je doen.

    • Sla de volgende twee stappen over.

  7. OXZKWsxxXqG3arZh
    • Gebruik een föhn of een heteluchtpistool om de onderkant van de iPhone gedurende 90 seconden te verwarmen. Verwarm het scherm tot deze net te warm is om aan te raken.

    • Gebruik je föhn of heteluchtpistool nooit te lang op één plek. Het is namelijk mogelijk dat het té warm wordt en dat er onderdelen beschadigd raken.

    Also: 3D Printer's heated bed set to 70-80 degrees Celcius for a few minutes does the job, as it basically works the same way heating mats used in professional repair shops do.

    3D Printing Enthusiast -

  8. ASLAa2AJO4E5GYT1
    ASLAa2AJO4E5GYT1
    EMmHxm3YOfOoLkEG
    • Als je een enkele zuignap gebruikt, druk je deze op de onderkant van je telefoon, waarbij je de rand van het glas probeert te vermijden.

  9. QdfiItrQQ6MhHWbj
    QdfiItrQQ6MhHWbj
    4nKuwPf1B6TyCssL
    eU1UEGuDjKnyIdUg
    • Trek de zuignap met een stevige, constante kracht omhoog om zo een kleine opening te creëren tussen het voorste schermpaneel en het frame van de telefoon.

    • Steek een openingsplectrum in de opening onder de plastic rand van het scherm.

    • De waterdichte kleefstrip die het scherm vasthoudt, is erg sterk: het creëren van de opening kan daarom heel wat kracht kosten. Als je moeite hebt met het creëren van de opening, zul je meer warmte moeten gebruiken om het scherm daarna heen en weer en op en neer te wiebelen, zodat er genoeg ruimte ontstaat voor het inbrengen van je plectrum.

    This seems impossible. I've been trying for an hour with heat and rocking, and the screen doesn't budge. :(

    Aubi Abramowitz -

    this is impossible, will take years

    Evan Z -

    Don’t give up! Use more heat and a tad more force. I know you may fear breaking it more, but as long as you don’t stick the prying tool too far or tug too hard, you can do it! I have faith that you can do it!

    Rachel Kelley -

    I'm in the same boat, this isn't coming off. I've tried the hair dryer as well as the heating pad from ifixit. Any other ideas?

    The suction cup comes off before the screen will

    Brian Melcher -

    Is there a better tool for this? Just saw a video on YouTube where a kid pryed it open with no heating/etc. in 5 seconds.

    Brian Melcher -

    I've changed the batteries in probably a half dozen iphones of different models. But 25 minutes of heating and pulling had no effect on iPhone 12

    Ryan Thornburg -

    Welp. I finally ended up breaking the screen attempting this. DO NOT ATTEMPT THIS REPAIR! Not worth the broken screen and losing the cost of shipping both ways when you return the battery.

    Ryan Thornburg -

    thx, I ll go to an apple repair center

    Ronald Geerligs -

    Back (and bad...) experience ! Even if you heat a lot, the screen is hardly sticked. Take care, before sliding the mediator under the screen, this one should be moved up, at least 2 mm. On my side i have slided around 1 mm and .... inserted the mediator between the glass screen and the screen structure ring.... result : glass break and screen to change (my initial exercise was the battery removal !). I feel that next time i will visit a repair center...

    Gilbert -

    Pro tip for anyone having trouble with this. You have to use multiple rounds of heat and pulling. Use a hair dryer and not the iOpener that comes with the fix kit and get it just too hot to touch then quickly start pulling and wiggling it up and down. Once it cools down grab the hair dryer again and repeat it a couple times until you start to get a big enough gap.

    I just did this yesterday and it took around 5 rounds of heating and pulling to get it to seperate enough from the body.

    Oliver Pressello -

    It's important to insert the pick under the bezel. I just delaminated my screen. The screen was probably fine, but it was glitching, so I wanted to check for a bad connection. Anyway, now I get a new screen.

    Under the bezel, eh.

    Chris Green -

    After reading this almost a year later to the day I last commented on it, I now know that the best way I have found to remove a screen, from pretty much any phone, not just this one, is heat (I use a heating pad on 80 degrees celsius) and before putting the phone on the heating pad, I use 91% isopropyl alcohol around the edges that you will be sliding your pry tools in, and I leave it on for 10 min. I then take it off, add more alcohol, and then put it back on the pad for another 5 min. Also, while I am sliding my tools around the screen, I continuously add more alcohol, and if it takes a really long time, then more heat as well. Heat, alcohol, and patience, lots of patience, and you should be good. Hope this helps, good luck!

    Rachel Kelley -

    Can confirm, this does indeed work. Just keep warming it up, lifting up and down, and repeat when phone goes cold. After around 10 rounds it would move enough to where I could see inside the phone when lifted. You can then insert pick

    Tip: You can also try to apply heat and lift the other corner, just enough to make it move slightly. This will ease pressure needed to separate the glue on the other side as-well.

    Thomas -

    No worries guys! it’s completely doable! You just need to be patient and keep trying multiple times

    Giordano Urettini -

    I don't doubt that you folks eventually got this open, but how on earth do you not lose your mind with the suction cup popping off every 5 seconds? Agree with Ryan above, have replaced batteries on several other iPhone generations with nowhere near this much effort. Still working on it going on 1 hr, about 10 rounds of hair dryer heat. Did Apple use a stronger adhesive for the 12?

    davidum -

    Success. iOpener doesn't get the phone nearly hot enough. Multiple rounds of hair dryer + isopropyl alcohol dribbled in b/w case and screen while pulling up on suction cup. For me, the bottom left hand corner (volume rocker side) seemed to lift up first, so I moved the suction cup to that corner while doing the heat + alcohol.

    davidum -

    When I changed the battery on a 7+ instead of the suction cup/heat method I used an Cacto blade inserted horizontally along the bottom edge to break the seal. Would this work on the 12?

    mikefunkpa_c -

    I struggled with this step, but eventually got it. Use LOTS of isopropyl alcohol, and soak the entire perimeter. Let it sit for 30 seconds after application, then heat it up, then pull with the clamp and rock back and forth. Reapply the alcohol and repeat until it works. Took me about 30 mins, but I eventually got it up just enough for the first pick. The iOpener is completely useless, I just used a shrink wrap gun and made sure to hold it 8-12 inches from the phone on the lowest heat setting.

    Wesley Kelly -

    iOpener along the bottom edge, the Anti-Clamp, and three tries about 5 minutes each worked for me. Never popped off, just needed lots of patience and 1.5 screw turns on the clamp. Bottom left corner was first, like another commenter.

    Neal Sofge -

    This is extremely bad way to describe how to open the screen. I ended up detaching screen without reaching to bevel. Now I have a broken display. Super disappointed

    Daud E -

    I was unable to remove the screen, even with my heat gun. I’ve repaired at least a dozen iPhone 6 and may five or six iPhone 7, but the 12 defeated me. I worked for about an hour varying heat from the gun and using my old IFixit iSclach custom suction cup device to no avail (even permanently broke the clamp). After an hour I was so worried I was going to either crack the screen or delaminate it, I gave up. IFixit makes this look MUCH easier than it is. :-(

    John Lipscomb -

  10. TLFrov6MrYfe6MLs
    TLFrov6MrYfe6MLs
    DDIYLM3VDKPF1sdb
    • Gebruik een föhn of een iOpener om de rechterzijde van de iPhone (de zijde waar de aan-uitknop zit) gedurende 90 seconden te verwarmen. Het scherm zou iets te warm moeten zijn om comfortabel aan te kunnen raken.

  11. rGMaUZMOwp6jDZup
    rGMaUZMOwp6jDZup
    sBgqGmTWBfaWInJQ
    rxBEr5BO3bFbLaRG
    • Schuif je plectrum langs de rechter benedenhoek van de iPhone om de lijm in die hoek door te snijden.

    • Schuif je plectrum verder langs de rechterzijde van het scherm omhoog tot je bij de rechter bovenhoek bent.

    • Steek je plectrum niet verder dan 3 mm in de opening om te voorkomen dat je de onderdelen in de iPhone beschadigt.

    • Laat je plectrum in de rechter bovenhoek zitten voordat je verder gaat.

    There is a spot on this side where a slight ridge in the iPhone frame makes the pick stick. Eventually I used two, one twisting a bit to open a path for the other. But if you're not expecting it you feel like you're going to break something.

    Neal Sofge -

    If you do not heat the phone enough, you may separate the digitizer from the lcd screen when the suction cups begin to pull, instead of lifting the whole lcd plus digitizer assembly. If so, you may just have destroyed your lcd. No big deal if you were going to replace the screen, but very bad news if you just wanted to change the battery.

    Robert Hoffman -

  12. EEAWPuNCXwOopd5j
    • Gebruik een föhn of een iOpener om de bovenkant van de iPhone gedurende 90 seconden te verwarmen. Het scherm zou iets te warm moeten zijn om comfortabel aan te kunnen raken.

  13. jjDP5cRJDxygaS4e
    jjDP5cRJDxygaS4e
    wfpdoWB6GTpFmSWF
    hRbFaNyEBNemtUjd
    • Schuif je plectrum om de rechter bovenhoek heen om de lijm daar door te snijden.

    • Steek je plectrum hier niet verder dan 3 mm in de opening om te voorkomen dat je de voorste sensormodule beschadigt.

    • Laat je plectrum in de linker bovenhoek zitten.

    Note Step 17 about being careful about the cables on the left edge!

    Neal Sofge -

  14. 1iVQp4WpwoHLdBEJ
    1iVQp4WpwoHLdBEJ
    oTaCH2yFmSQBq4A5
    • Gebruik een föhn, een iOpener of een warmtepistool om de linkerzijde van de iPhone gedurende 90 seconden te verwarmen. Het scherm zou iets te warm moeten zijn om comfortabel aan te kunnen raken.

    Also: 3D Printer's heated bed set to 70-80 degrees Celcius does the job - it basically works the same way professional heated mats that are used in phone repair shops.

    3D Printing Enthusiast -

  15. 1EkaRCPsl1hLCcO5
    • De kabels aan de linkerzijde van de iPhone zijn makkelijk te beschadigen met je plectrum. Steek je plectrum hier dus niet in de opening om schade aan de kabels te voorkomen.

    I kinda forgot about this step when I opened my first iPhone 12.
    For the next one, I'm going to mark that edge of the phone with blue tape roughly where each cable is to help me remember.

    Also FWIW, I got the 70 cent adhesive cutting tool from Apple with my genuine battery and used that for all my display prying needs after getting the first opening propped with a guitar pick.

    It worked great and did not damage anything so no need to sweat inserting something too far and causing damage.

    Daniel Cassel -

    Could you PLEASE move this to step 13?? I tore the front sensor cable. 😭

    Renee Riley -

  16. U32XuDLs5g4YdpJX
    U32XuDLs5g4YdpJX
    P1QKu5D5XkUVQHhB
    • Steek een tweede openingsplectrum in de linker benedenhoek van de iPhone.

    • Draai beide plectrums tegelijkertijd naar de zijkant om het scherm los te maken uit de klemmen aan de linkerzijde van de telefoon.

    • Zet langzaam maar zeker meer kracht bij het draaien van de plectrums.

    • Als je moeite hebt met het losmaken van de lijm verwarm je de linkerzijde nog een keer.

  17. IWXGOEkVZMt431sG
    IWXGOEkVZMt431sG
    Qxj6lbMWEEfMw45M
    NoVbSlrJHyCMaaFN
    • Draai je iPhone zodat de rechterzijde van je telefoon naar je toe wijst.

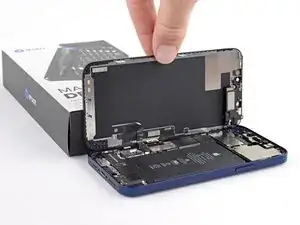
    • Open de iPhone door het scherm vanaf de rechterkant open te klappen, zoals je bij een boek zou doen.

    • Probeer het scherm nog niet volledig te verwijderen, aangezien deze, door middel van een aantal kwetsbare lintkabels, nog steeds is verbonden met het logic board van de iPhone.

    • Laat het opengeklapte scherm tegen een object leunen, zodat je op veilige wijze aan de telefoon kunt werken.

    • Zorg dat je het scherm, bij het weer in elkaar zetten van je toestel, op de juiste positie legt, zodat de klemmen op een lijn komen met het frame en druk de bovenkant van het scherm vervolgens als eerste vast. Als je het scherm niet vast voelt of hoort klikken, zul je de staat van de klemmen moeten checken om te zien of ze niet gebogen zijn.

    i did this and the shroud with the earpiece speaker still stuck with the phone so its just wedged in there i cant get it out

    lil teslas -

    Must have slid a pick in too far as the front sensor ribbon in step 27 was broken…<sigh>. Any chance that sensor is easy to replace?

    Jon -

  18. fVLd1ujMC23kPMBM
    • Verwijder de twee 1.1 mm lange Y000-schroeven die de covers van de batterij- en schermaansluitingen bevestigen.

    • Zorg dat je, tijdens deze reparatie, goed bijhoudt welke schroeven waarvandaan komen, zodat je zeker weet dat deze op de juiste plek terug worden geplaatst. Zo voorkom je dat je je iPhone beschadigt.

    • Dit is, tijdens het weer in elkaar zetten van je toestel, een goed moment om je iPhone aan te zetten en alle functies te checken, voordat je je iPhone weer definitief sluit. Zorg dat je je iPhone weer uitschakelt als je verder gaat met de reparatie.

    Ouch, I see a broken flat here…

    Alessandro Sordelli -

    Can I use a y 0.6 if I don’t have y000

    kellciou cr -

    Yep! The measurements for Y000 are 0.6 mm.

    Alex Diaz-Kokaisl -

  19. nCqmqLuRyNhUsecI
    • Verwijder de cover.

    Hi

    On my original display on an iPhone 12, there is no metal hinge as shown here and therefore no place for it when closing the phone. Have double-checked model and the original display - and it is just not there. Is there another model based on serial number?

    Hinge marked: https://www.dropbox.com/scl/fi/asztgi60g...

    Best regards,

    Carsten

    Carsten Feltman -

  20. q1GE6ij6DBGAtVUa
    q1GE6ij6DBGAtVUa
    UFeAbkthIglN1PdG
    • Gebruik je spudger of een nagel om de batterijaansluiting uit het contact op het logic board omhoog te duwen.

    • Probeer te voorkomen dat je de zwarte, siliconen zegels rondom deze en andere bordaansluitingen beschadigt. Deze pakkingen bieden extra bescherming tegen water- en stofindringing.

    • Buig de aansluiting lichtjes weg van het logic board om te voorkomen dat deze per ongeluk contact maakt met het contact op het logic board en zo de telefoon inschakelt tijdens de reparatie.

  21. JWGf11bubrJIQJqt
    JWGf11bubrJIQJqt
    JnsnSmZNtLSbSfID
    • Gebruik een spudger of een nagel om de schermkabelaansluiting los te koppelen.

    • Om drukaansluitingen als deze weer aan te sluiten, breng je deze op de juiste positie boven het contact aan en druk je eerst de ene kant en dan pas de andere kant vast. Druk de aansluiting niet via het midden vast, want als de aansluiting niet goed zit, zul je op deze wijze de pinnen buigen en deze mogelijk permanent beschadigen.

  22. FtXJDFkUoD1lyBai
    FtXJDFkUoD1lyBai
    lnDDQGdsvpfnyRjt
    • Gebruik een spudger of een nagel om de kabelaansluiting van de digitizer los te koppelen.

    • Als een van de functies van het scherm niet goed werkt na deze reparatie, kun je de batterij loskoppelen en de batterijaansluiting opnieuw aansluiten: zorg dat je deze goed hoort of voelt vastklikken en dat er niets tussen de aansluiting en het contact zit.

  23. vanQfZqXPQGekhh1
    • Gebruik een Y000-schroevendraaier om de vier schroeven, die de cover van de voorste sensoraansluiting bevestigen, los te schroeven.

    • Drie 1.1 mm lange schroeven.

    • Eén 1.4 mm lange schroef.

  24. KJnJAuPTwlxnICBD
    KJnJAuPTwlxnICBD
    MHdESpgJCsSSZaMy
    1qodeTMyy56DyGRv
    • Klap de cover vanaf de linkerkant open totdat de kleine klem aan de rechterkant loskomt.

    • Verwijder de cover.

    • Steek, bij het weer in elkaar zetten van je toestel, eerst de klem aan de rechterkant in de opening. Vervolgens kun je de rest van de cover bevestigen.

  25. LC4oSHWw4nEIZ3H5
    LC4oSHWw4nEIZ3H5
    5PkRCF6AJnj1hYTc
    • Gebruik een spudger of een nagel om de kabelaansluiting van de voorste sensormodule los te koppelen.

  26. XrIRhPcqOHJyMV1q
  27. FNoMExEdtM2bCQRG
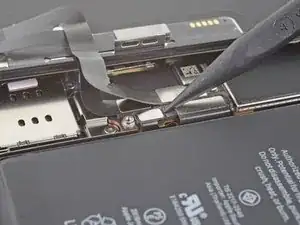
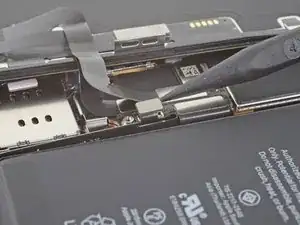
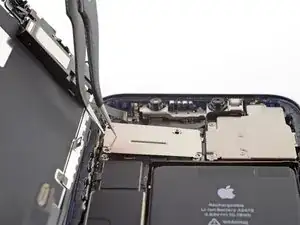
    • Verwijder de vier schroeven, die de speaker/sensormodule aan de achterkant van het scherm bevestigen:

    • Twee 1.4 mm lange Phillips-schroeven.

    • Eén 1.7 mm lange geschouderde Y000-schroef.

    • Eén 1.2 mm lange Y000-schroef.

    The 2 left screws on my iphone 12 wont budge I dont know what to do?

    Jack aouff -

  28. DfRmLtFThgt3RCJF
    DfRmLtFThgt3RCJF
    JFRDHIoLXoAcQd3j
    • De oorstukspeaker is lichtjes in de telefoon vastgemaakt.

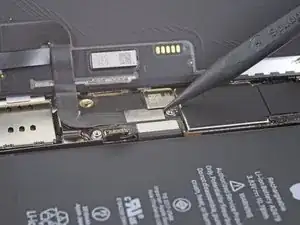
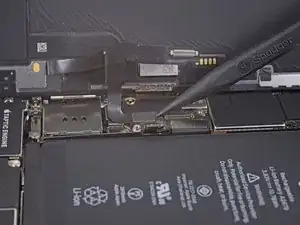
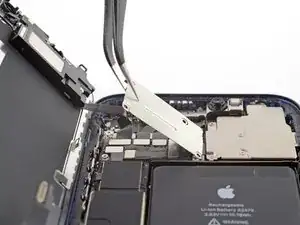
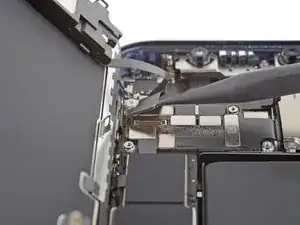
    • Gebruik de punt van je spudger om de bovenkant van de speaker op voorzichtige wijze omhoog te wrikken.

    • Klap de speakermodule naar beneden en weg van de bovenkant van het scherm.

    • De speaker blijft met een zeer dunne lintkabel verbonden zitten. Wees voorzichtig en zorg dat je de kabel niet beschadigt of onnodig op spanning brengt.

  29. RdXToegN2BGGYdyN
    • Gebruik een föhn, warmtepistool of verwarm een iOpener en leg deze gedurende 1-2 minuten op de voorste bovenkant van het scherm om de lijm onder de sensoren te verzwakken.

  30. BVjAbVWW2crHEFdI
    BVjAbVWW2crHEFdI
    YXlZGYoSRLPmpVEO
    2sEdYZwZK5YtBN5o
    • Gebruik de punt van je spudger om de omgevingslichtsensor uit de inkeping in het voorste paneel omhoog te tillen en te verwijderen.

    • Zorg dat je de lintkabels van de lichtsensor niet beschadigt bij het omhoogwrikken van de sensor.

    • Blijf je spudger onder de omgevingslichtsensor en de bijbehorende kabel door schuiven om deze van de lijm te scheiden die het in de telefoon bevestigt.

  31. gJMTCKnBTFbYMGir
    gJMTCKnBTFbYMGir
    FW3JR4BeQlirVqEl
    HBEGxfStEHZDjFgw
    • Gebruik de punt van je spudger om de microfoon uit de inkeping in het voorste paneel omhoog te tillen en te verwijderen.

  32. skZ4Y3qHkQJvCHId
    skZ4Y3qHkQJvCHId
    ZqJ3P6fCmcwlKyCw
    • Gebruik de punt van je spudger om de nabijheidssensor en de infraroodschijnwerper uit de inkeping in het voorste paneel te tillen.

  33. MgCiuB1KVM4cVrui
    MgCiuB1KVM4cVrui
    lP1ybDY4QKcSBQsp
    cJ3liVwEWJmas4Zq
    • Verwijder de oorstukspeaker en de voorste sensormodule.

    • Check, bij het weer in elkaar zetten van je toestel, de positie van de zwarte, plastic module die de volgende onderdelen bevat:

    • Nabijheidssensor

    • Infraroodschijnwerper

    • De module moet zodanig zijn gepositioneerd dat deze onderdelen niet in de weg worden gezeten door enige vorm van lijm.

    Beim Testen des neuen Displays ist zu beachten, dass der Hell- Dunkelregler nicht funktioniert, solange der Lichtsensor nicht auf das neue Display montiert wurde.

    Mike Schriewer -

Conclusie

Vergelijk je vervangende onderdeel met het originele onderdeel — het kan zijn dat je meerdere onderdelen mee over moet zetten of beschermlagen voor de lijm moet verwijderen voordat je het nieuwe onderdeel kunt installeren.

Om je toestel weer in elkaar te zetten, volg je deze instructies in omgekeerde volgorde.

Breng je e-afval naar een door R2 of e-Stewards gecertificeerde recycler.

Ging je reparatie niet zoals gepland? Bezoek dan onze pagina over probleemoplossing of stel je vraag op ons iPhone 12-antwoordenforum voor hulp bij het oplossen van je probleem.

Adam O'Camb

Lid sinds: 11/04/15

212588 Reputatie

9 commentaren

i am trying to source a replacement screen for my iPhone 12 that needs a new digitizer and battery. My main concern is since I cannot purchase an original part from apple and have to resort to eBay they have several option;

Lcd / Oled soft / Oled hard / Incell lcd??

I asssumed the 12 came with the oled screen and I’m worried that if I put a non original type screen it could damage phone after awhile?

what digitizer should I get?

Adam Anderson -

Hi, I would recommend looking at places like Fixez.com rather than Ebay. Their prices are lower and they have a LCD buyback program which is very helpful. They have a wide ranging variety of LCD's. On a scale of best to worst LCD's its ranges: OLED Soft,OLED Hard, Incell LCD, LCD. I hope this helps

Tecc World -

Hi there,

I have read that by installing an aftermarket screen, I would get a non-genuine display message. Has Apple addressed this issue?

Than

Alex Hsu -

Genuine components have chips that allow the phone to identify them - third party ones frequently do not. The phone is doing what it is designed to do so there isn’t really anything for Apple to address. Much as anything it’s to stop companies refurbishing iPhone’s ‘in-house’ and selling them as having genuine parts. The non genuine part message is t inherently a bad thing, it’s an advisory rather than an error.

Core Confusion -

Hi, I lent my grandson my iphone 12 and I got it back with a broken screen and a broken back glass. I have another iphone 12 for parts. I was going to swap out the screen and the back glass. My question is do I have to remove all these parts as described above or c an I just plug the new screen in ? Second question my iphone has a Qlink wireless SIM card in it and it works perfect. The same SIM card will not work in my other iphone that being said would it be easier to somehow take my other iphone and use the parts from my broken one so the SIM card would work in it? I don't know what it would entail to do such a thing but if you would possibly know what I would have to do to make this happen please let me know... Otherwise I will take the screen and back glass and continue to install them on my own phone. also which procedure would be easier to do?? Kudos to you on this article I followed it to the letter and everything worked perfect I removed the screen without any problems. GREAT ARTICLE! Thanks Jeffrey

Jeffrey Miller -

Great guide.... I was able to successfully replace the screen. However, the step to apply the glue sheet is missing. I had to undo what I spent 40 mins doing correctly just to get the adhesive sheet applied and redo it.

CV Sayani (cvs) -

Bonjour suite au changement d'écran sur mon iPhone 12 j'ai acheté un écran d'origine ( service pack) depuis j'ai un message suite a un changement d'écran pièce inconnu impossible de vérifier l'authenticité etc..... d'où peut venir le soucis ?

Aurélien -

Friday March 8,2024 United States Iphone12

Old one had white lines on the left > Put the new one>turned it on and my finger prints would not allow it to open it and did two soft reset up,down and hold power button on until apple logo appears and no success. So next was removing the film that comes attached to it on the back side of new screen , plugged it back in and no success. So then i plugged the old one but only connected two connectors pretty much was lazy to take it all apart lol. Last was put that tiny screen protector that came with the 3rd party screen and sure enough it WORKED!! I also was studying about the motherboard but it did not seem to go that deep in it. Oh and the facetime works as well . I am going to update and let it scan my face for facetime . Don't give up it . You got this.

Kevin Ventura -

Ich möchte bei einem iPhone 12 das Display wechseln aber ohne Einschränkungen und Fehlermeldungen, kann mir da jemand helfen?

Lias -