Inleiding

De trilmotor zorgt voor de trillingen en haptische feedbackfuncties van je iPhone. Volg deze handleiding om de trilmotor in een iPhone 7 Plus te verwijderen en/of vervangen.

Deze handleiding toont je hoe je de schermmodule volledig verwijdert; dit heeft als doel te voorkomen dat je de schermkabels per ongeluk vastklemt of beschadigt tijdens het werken. Als je denkt dat je de trilmotor kunt verwijderen zonder de schermkabels in gevaar te brengen, kun je de stappen die je tonen hoe je de schermkabels loskoppelt, overslaan.

  1. lmhcoVgsVMmGK1sw
    • Ontlaad je iPhone, voordat je begint, tot onder de 25%. Een geladen lithium-ion batterij kan in brand vliegen en/of exploderen als deze per ongeluk wordt doorboord.

    • Schakel je iPhone uit voordat je met de demontage begint.

    • Verwijder de twee 3.4 mm pentalobe schroeven aan de onderkant van de iPhone.

    • Het openen van het scherm van de iPhone zal de waterdichte sluiting van de telefoon aantasten. Zorg dat je vervangende sluitingen klaar hebt liggen voordat je verdergaat of zorg ervoor dat je telefoon niet wordt blootgesteld aan water als je ervoor kiest de sluitingen niet te vervangen.

    The recommendation of discharging the battery is completely unnecessary. Even a 25% charged battery can explode. Completely ridiculous suggestion.

    pargoff -

    The risk of thermal runaway on these batteries decreases with the battery's SOC (state of charge). Below 50% charge the risk is fairly low, and at 25% charge the risk of a thermal event is near zero. If I recall correctly, the same suggestion appears in Apple's official (non-public) service manuals for the iPhone.

    Jeff Suovanen -

    @jeffsu Yes, that is correct. Apple does require all certified staff to discharge the battery below 25%. This is an industry standard for all LiION batteries. If you don’t want to do this, just make sure to not puncture the battery and disconnect it first thing.

    iHelpU.Tech -

    Hang on a second here, doesn’t the Ifixit part I ordered come with the seals? The display assembly? It doesn’t. Now I have to wait another week?!

    Vanessa Pinter -

    How do you turn off if the screen isn’t responding to touch?

    adam -

    The replacement battery came with the seal—but how do you put it on???

    lkollar -

    Instructions for replacing the seal are here: Vervanging van de kleefstrips van een iPhone-scherm

    bester -

    I just found the instructions on how to install the seals AFTER I was completed and had to figure it out. Maybe, just maybe you should link this somewhere on the guild instead of buried in a comment. Just a thought.

    Charles Meitin -

    Step 1 is: Read through all the steps and comments or the method prior to starting on this Step 1. There's a lot of much needed information and experience that you can learn from which will reduce the chance of struggling, wasting time or even breaking your device.

    My favourites are:

    Use a hot water bottle.

    Label all screws you remove with their size and location on a piece of paper with double sided sticky tape.

    Test the lightning assembly at step 13

    There is a Standoff driver bit in the box, don't use a screwdriver.

    etc...

    Neil Eriksen -

    A tip for looking out for all those little screws. I used an ice block tray, for all the little screws etc. I numbered each with the step number, as in the instructions, but not all steps have bits to look out for. Where two different size screws are used I had a tray for each size and marked step a and step b. For this I coloured each tray sticker with the colour of the screw as shown in the instructions. All this worked a treat with no confusion or using the wrong part.

    Herb

    Herb Adler -

    The screw size for those with a screw set is P2.

    Gareth Flandro -

  2. XUktKLOCPaciWbL2
    • Het verwarmen van de onderkant van de iPhone helpt de lijm, die het scherm op z'n plek houdt, te verzachten, wat het makkelijker maakt om de telefoon te openen.

    • Gebruik een föhn of een warmtepistool, of prepareer een iOpener en leg deze op de onderkant van de iPhone gedurende ongeveer een minuut om zo de lijm die eronder zit te verzachten.

    How long should I use a hairdryer for?

    Warren Binder -

    I used it until it was hot to the touch but not too hot where you burn yourself.

    gczarny -

    Hey, I just took apart my first iPhone 7 plus today, and it was easier for me to use guitar picks and a magic glass tool. I did tear the home flex on the screen—now I know to be more careful of that on disassembly—-~Katrina of iPad Rehab Microsoldering

    jessabethany -

    First I tried to remove the screen with the hot iOpener, but it doesn’t worked, the day after I putted the Iphone in the sun for a while and then used the hot iOpener, then the screen was easy to remove :-)

    Marc Boon -

    Get a T-shirt add heat to a lil corner of it, with either a hair straighter or an Iron , touch the T-shirt if it’s seems hot but doesn’t burn u hold that lil hot piece of T-shirt against the edge ur trying to pry open , if it’s still not opening add a I’ll more heat,

    www.tertlegerl -

    I don’t think the iOpener was effective at softening the adhesive. Using a suction cup and the spudger is good enough.

    Mac -

    I took a hot water bottle and layed it on the display of the iPhone for a minute, because I did not have an iOpener. That worked for me perfect.

    Michael Maier -

    How can I get all this tools

    Ajibol emmanuel -

    Pour ouvrir mon iPhone 7+ j’ai utilisé un séchoir à cheveux avec modération. Cela a été beaucoup plus facile

    Serge -

  3. QkQCsE1Zo1LMstsE
    QkQCsE1Zo1LMstsE
    bAxOw2QF2CDIYIpB
    • Druk een zuignap op de onderste helft van het voorste paneel, net boven de thuisknop.

    • Zorg dat de zuignap niet overlapt met de thuisknop, aangezien dit ervoor zal zorgen dat de zuignap zich niet vast kan zuigen aan het scherm.

    • Als je scherm gebarsten is, kun je het beplakken met een laag doorzichtige tape zodat de zuignap zich wél vast kan zuigen. Als alternatief kun je de tape ook gebruiken in plaats van de zuignap. Als het alsnog niet lukt, kun je de zuignap aan het scherm vastlijmen met behulp van secondelijm.

    Hi! My suction cup doesn’t work. It won’t strongly suck on my screen. Does anyone have any advice?

    kaiminliu119 -

    Heat it up just a little with a hair dryer make sure it’s flat , let it coo a bit now try it??

    robertread -

    The suction cup you provide sucks. In that it doesn’t hold. Luckily I had a set of heavy duty suction cups from when I worked on my iMac.

    Charles Meitin -

    Moi j’ai utilisé un séchoir à cheveux cela a été beaucoup plus facile pour l’ouvrir , mais avec modération

    Serge -

  4. B42ufcARi3bVAURY
    B42ufcARi3bVAURY
    kPSe6jXIJFcBE5rk
    qJeHEUiARuDmJKHH
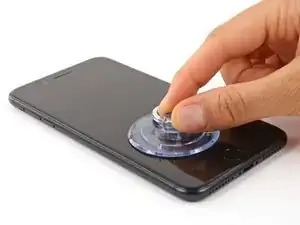
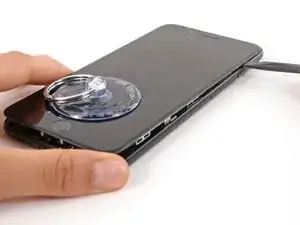
    • Trek de zuignap omhoog met een stevige, constante kracht om zo een kleine opening tussen het voorste paneel en de achterste behuizing te creëren.

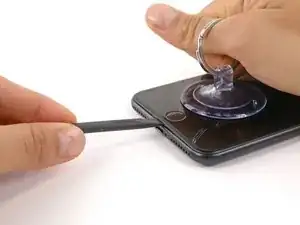
    • Steek het platte einde van een spudger in de opening.

    • De waterdichte lijm die het scherm op z'n plek houdt is erg sterk; het creëren van de opening kan dus heel wat kracht vereisen. Als je moeite hebt met het openen van de telefoon, dien dan meer warmte toe en wiebel het scherm op en neer om de lijm te verzachten totdat de opening groot genoeg is voor je tool.

    • Draai je spudger lichtjes omhoog terwijl je aan de zuignap trekt, om de opening tussen het scherm en de achterste behuizing iets te vergroten.

    Be very careful not to pull up with too much force. My screen just shattered while I was pulling up with my suction cup. (There were no previous cracks or chips or anything).

    Benjamin Pounds -

    I’m stuck on this part. I’ve heated the bottom up and attached the suction cup right above the home button, but I can’t pull it apart. I feel like I’m going to break the glass display. Tips?

    whtafrcn420 -

    Someone mentioned above, using strong tape helps .

    MajorCouillon -

    You won’t be able to put the spudger into the gap unless the phone is in a vertical position (speaker side up) in your hands.

    Mac -

    read steps 4-9 before attempting. I cracked my glass because I didn’t

    David Lei -

    My first 7 Plus opening. I pulled up the screen just enough to insert a thin guitar pick at the bottom of the phone to break the adhesive. I didn’t even create a gap as such. I then ran the pick along the sides to continue to detach the adhesive, just like iFixIt show in Step 10 for the top of the phone.

    My screen already had a crack at the bottom, near the home button, so I was nervous about pulling too hard on the screen. It had a screen protector fitted so maybe that helped keep it all together.

    iFixIt’s use of a spudger at the bottom of the phone looked hazardous to me, especially with my damaged screen.

    Big Ed -

    This must be a joke. I’ve been trying for days to pull open the iphone like this. Doesn’t work. I bent the ring on the suction cup trying to pull it off, but nothing happens, no gap, not remote possibility of a pick or spudger getting in there.

    James Osborne -

    Ended up using a blowdryer and a razor blade. Bottom got scratched up, but there was no way that fat plastic spudger was going to fit. I got the razor under the corner, from there worked to middle and twisted with repeatedly adding heat. Lots of heat.

    James Osborne -

    Be aware that there is a small connector, under the home button.

    Herb Adler -

    I found that the edge of the spudger was too thick, so I sanded it down to almost a knife edge. This made it much easier to insert into the gap.

    Herb Adler -

    Use the Opener and a razor blade to cut through the adhesive. It takes about 45 seconds to heat up the Opener in a 1000 watt microwave. Be careful not to damage the thin display ribbon cables on the right side iphone. After you use the razor blade to cut the adhesive on the two sides and bottom you should be able to use the spudger to remove the display screen.

    larrywert -

  5. kuaYdrJrBKqV2oiI
    kuaYdrJrBKqV2oiI
    DppWOQQUFWhiIQmK
    hviLJx3oefn6IJk3
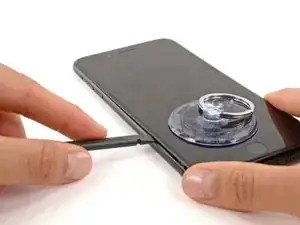
    • Steek het platte einde van de spudger aan de onderkant van de iPhone tussen het voorste paneel en de achterste behuizing .

    • Schuif je spudger langs de linkerkant van de telefoon omhoog, beginnend bij de onderkant en in de richting van de volumeknoppen en de stilteknop, en snijd onderweg alle lijm door die het scherm op z'n plek houdt.

    • Probeer de bovenkant van het scherm niet los te krijgen van de achterste behuizing, aangezien deze met elkaar verbonden zijn door middel van plastic klemmen die mogelijk kunnen breken als je dit probeert.

  6. ebTEdalPStEFwprn
    ebTEdalPStEFwprn
    TcvF6HREfbLQd12j
    • Verwijder de spudger uit de linkerkant van de telefoon en steek het platte eind in de rechter onderhoek.

    • Schuif de spudger langs de rechterkant van de telefoon omhoog naar de rechter bovenhoek en snijd alle lijm die het scherm vasthoudt door.

  7. KRSf5aPqMubL3siA
    KRSf5aPqMubL3siA
    rP5ESkqIt3tEq2Th
    • Trek aan de zuignap om het scherm omhoog te tillen en de iPhone te openen.

    • Til het scherm niet verder dan 10º omhoog om te voorkomen dat je de kwetsbare lintkabels die langs de rechterkant van de telefoon liggen en het scherm aan het logic board verbinden scheurt of kapot maakt.

    The ribbon cable part should be said earlier instead of halfway through

    I just broke one because of it

    BrenX1 -

  8. UqjoOlLyth4N5RTX
    UqjoOlLyth4N5RTX
    YB3djkmK3OBKgwAR
    • Trek aan het lipje op de zuignap om deze van het voorste paneel te verwijderen.

  9. gQLjVmwVCr5rcqCo
    gQLjVmwVCr5rcqCo
    KBRYMMwmcXRcyNMd
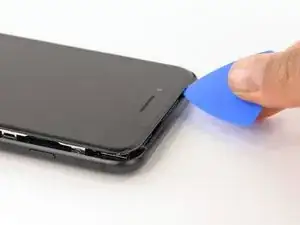
    • Schuif een openingsplectrum onder het scherm en langs de bovenkant van de telefoon om de laatste lijm door te snijden.

    I couldn't find the pick in the tool set, so made my own. Then I found the original in the battery box. %#*@.

    Herb Adler -

    Same thing for me

    Jason Skelton -

  10. c3SYZXxuPyoxPGU2
    c3SYZXxuPyoxPGU2
    A1WVvvZb1eBsEBvg
    Kb3jum1WnDlDRHJF
    • Trek de schermmodule lichtjes weg van de bovenkant van de telefoon om deze los te krijgen uit de plastic klemmen die de module aan de achterste behuizing bevestigen.

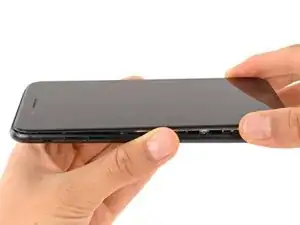
    • Open de iPhone door het scherm open te slaan vanaf de linkerkant, net zoals je de achterkant van een boek zou openslaan.

    • Probeer het scherm niet volledig los te maken van de telefoon, aangezien het het scherm nog steeds verbonden is met het logic board van de iPhone door middel van een aantal kwetsbare lintkabels.

    So if I broke the cable that connects the display to the logic board. What replacement part would I need to order now?

    Robert Danson -

    Probably the screen

    Christian Sirolli -

  11. UHPAQ4xaQQRZEEc2
    • Verwijder de volgende vier tri-point Y000 schroeven die het plaatje op de onderste schermkabel aan het logic board bevestigen:

    • Drie 1.2 mm schroeven

    • Eén 2.6 mm schroef

    Is it really safe to lay the device fully open like a book? The cable leading to the LCD gets stretched across the sharp edge of the aluminum edge of the back cover.

    u204863 -

    Generally I'd say no, it's not safe. In reality I've seen a bit of variance in the cable length, and sometimes it'll be fine—but mostly I'd be prepared to prop the display up or hold it in place at a slight angle so it doesn't put too much stress on the cables. On prior iPhones it was easy to rubberband the display to a box or a can of soda, and something like that would probably work well here too. Use your own judgment.

    Jeff Suovanen -

    You could stick the suction cup back on, near the right side of the phone, with the blue hook oriented in such a way that it becomes a stand for the screen. That way it won’t open much more than 90 degrees, and leaves both your hands free.

    Mark -

    The tri wing screws are so hard to remove. What's the trick?

    shannon caldwell -

    At first I think I was being too careful and was getting no where. I got better results by pressing down on the screwdriver with more pressure while turning and those little screws came right out.

    LadyTech -

    I cannot remove one of the corner screws in this step and i have used the tweezers and the y000 tri tip and i am afraid that it is stripping it. is there a work around for this step?

    Katherine Monday -

    @katmonday1 No workaround unfortunately. Make sure the driver tip is in good condition and fits the screw correctly. Seat it in the screw, hold the driver perfectly vertical, press down hard (and maintain it), and turn. It’ll come out. If it’s really stripped you’ll have to get more aggressive—try one or more of the techniques in this guide or get some help. Good luck!

    Jeff Suovanen -

    my screwdriver will only remove the 2.6mm screw and not the others, what shall i do?

    AubreyG1 -

    A tip to remember which screw is which as the differences are pretty tiny: I used different colored sharpie fine-points and made a mark on the top of the screws before removing. I thought about having strips of tape that I stuck similar sizes to, but the coloring seemed to work more easily. I only did this for step 11 and it saved me down the road when trying to differentiate the 1.2 and the 1.3mm screws!

    Trey Smith -

    STOP! Before you remove Any screws, be sure to create several bins to hold the various sizes in… or mark them like Trey suggested. I failed to pay attention because I thought they were all the same… they are not. It is very hard to figure out the sizes if you remove them all and store them in a single location.

    John Grant -

    i had a piece of paper with the steps numbered that involved screws. I had double sided tape on the paper and the number of screws and thier position marked. This was so helpful in removing and then finding and installing the tiniest screws on earth. And i have TINY hands. I can’t imagine someone with large paws being able to accomplish any of this.

    Tina Matthews -

    there is one screw thats 1.2 mm but its bigger than the others and will fit in no hole of the entire phone. i got it out bot now i have no idea where it has to go i tried every hole. can somebody help me?

    Lars Göbel -

    what do i do if one of the screws dont want to come off

    Neylley Reynoso -

    I was having a hard time removing one of the screws before I discovered the tip of the screw driver that comes with my replacement battery had already deformed. However after I switched to a better screw driver the screw came off easily. Make sure the tip is in good condition, and avoid those cheap drivers if possible.

    aquila_zyy -

  12. k34xU4RKWbs1uk5K
    k34xU4RKWbs1uk5K
    GKWmAgKZl1p5xwIU
    • Verwijder het plaatje op de onderste schermkabel.

    I am confused, please help. LOL the bracket, the very first one being removed. I see it has three screws the same size and one a different size? I've been trying to fix my daughter's phone and ordered a 0.6 mm Tri Wing screwdriver for iPhone 7 plus /Apple watch. It seems to fit the screws and it seems to be turning them although I can't see that well but they're not coming out. However when I used it on a smaller bracket with two screws they came right out so I'm thinking I don't have the right screwdriver I am at my Wit's End!! I have been working on this phone or attempting to for a while now. I cannot find a list anywhere of the exact size screwdrivers needed to Take apart an iPhone 7 plus. Any help would be greatly appreciated.

    chris west -

    If your tri-wing screwdriver worked for other tri-point screws in the phone, then it should work for the screws you are struggling with! If it feels like the screws are spinning but not coming out, try to use tweezers to pull them out. I often struggle with tri-point screws, and need to apply some downward pressure to remove them. This can be risky though, as you do not want to strip the screw or damage components underneath the bracket. If you continue to struggle, you can give this driver and this bit a try.

    Scott Havard -

    Also be aware that the battery connector might stick to the bottom of the steel bracket. This part had me a bit puzzled at first. lol

    Just gently pry the connector off the steel bracket to release it and be sure the connector isn’t allowed to accidentally reconnect to the board.

    jeffrey griffith -

    I had to use a fingernail to dislodge the bracket. As Jeffrey said, it was apparently stuck to the connector.

    lkollar -

  13. VS1FiZyZHebFIuQo
    VS1FiZyZHebFIuQo
    ZZUGd2VCcGplGEZm
    uSeYoeEvmaI6TPuB
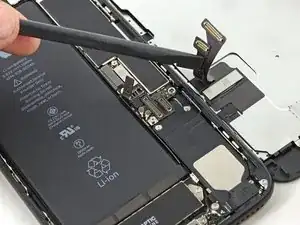
    • Gebruik de punt van een spudger om de batterijaansluiting uit het contact op het logic board omhoog te duwen.

    • Buig de schermkabel lichtjes weg om te voorkomen dat deze tijdens de reparaties contact maakt met het contact en de iPhone per ongeluk inschakelt.

    You could cover the battery socket with a small piece of tape to make sure that it doesn’t accidentally re-connect. It’s not likely to, but I liked the peace of mind.

    Mark -

    on reassembly, make sure that the connector cable is back in place, along side the battery, and not up, or on top in any way.

    Sarr Sheffer -

    I slipped a small piece of paper under the flap.

    MajorCouillon -

    After this step it is worth jumping to step 36 and disconnecting the lighting connector assembly (indicated with the orange rectangle) and connecting the new cable to test it out. After attaching the new lightning connector assembly, reattach the battery, and try plugging it in to see if the new assembly works correctly. If it does, then power down the phone, disconnect the battery, and disconnect the new lightning connector assembly. Then continue. If it doesn’t work, this check will save you a couple of hours of work.

    Evan O -

  14. EjPXnLkfPYtKriYF
    EjPXnLkfPYtKriYF
    ohPCtWpSggN3HkmE
    Fpc2oOAExSPUJGn2
    • Zorg dat de batterij is losgekoppeled voordat je de kabels in deze stap los- of vastkoppelt.

    • Gebruik het platte einde van een spudger of je nagel om de twee onderste schermaansluitingen los te koppelen door deze in een rechte beweging uit het contact op het logic board omhoog te duwen.

    • Om drukaansluitingen zoals deze weer aan te sluiten, positioneer je deze totdat op z'n plek lijkt te zitten en duw je één kant van de aansluiting omlaag tot deze vastklikt, om vervolgens hetzelfde te doen aan de andere kant. Druk niet op het midden, want als de aansluiting verkeerd zit, zul je de pinnen buigen en zo schade veroorzaken.

    • Als je witte lijnen op het scherm of een volledig wit scherm ziet, of de touchscreen-functie werkt gedeeltelijk of helemaal niet na het in elkaar zetten van je telefoon, kun je proberen deze kabels weer los te koppelen en opnieuw aan te sluiten. Zorg ervoor dat ze goed en stevig aangesloten zijn.

    The note about the danger of pressing on the connector incorrectly is very legitimate. Though I find it more practical to use a wide (1.5 cm) case opener tool to press it down all at once. Minimizes risk of bending the connector.

    Talon -

    What can happen if the battery is not disconnected before the two lower display connectors?

    Alextay -

    Hello, by my expierence and what i have learned iphone repair videos you can ‘blow up’ capacitors which one in logic board, screen is sensetive with voltages and etc….

    Darius Varanavičius -

    what are my options if the display connector broke? can it be replaced or do I need to get a whole new screen?

    matomach -

    When I removed the lower display cable bracket in step 12, the top connector stuck to the bracket and became disconnected.

    Grant Crawford -

    My replacement screen wouldn't sit in the display connector properly, (wouldn't clip in both sides at same time) so I made sure it sat on one and it was lined up and got a thin piece of dense sponge and placed that over the connector, then proceeded to install the connector shield and screen works perfectly fine without a hitch. Very good tutorial just earnt me £25 lol

    Joshua Driscoll -

    have the same issue, sometimes it doesn’t sit on the left side, other time not on the other, the difference is iphone not starting at all or looping with apple logo reboot…

    ibisiki -

    Bent the pins on the connector out of place, worked them very carefully back with fine nose tweezers. This was by far the crux of the repair for me.

    nicO -

  15. eOV4A2QhwOEwbiHK
    eOV4A2QhwOEwbiHK
    PHEMGNluvvEJ1qga
    AiXmxFQOUDwwQlS2
    • Verwijder de drie tri-point Y000 schroeven die het plaatje bovenop de aansluiting van de sensormodule in het voorste paneel bevestigen:

    • Eén 1.3 mm schroef

    • Twee 1.0 mm schroeven

    • Verwijder het plaatje.

    Posted a comment above on the first step. The screwdriver that I ordered Works taking out these two screens shown in the picture. However it does not work on the first bracket that needs to be removed. It seems that all screw sizes are somewhat different but I'm not finding a list showing different screwdriver sizes needed. Does this make sense? Could anybody please give me some advice on this thank you much.

    chris west -

    I know your comment was posted a long time ago but just in case someone else has the same problem, the only difference in the screws are the lengths. The ends are the same.

    mcr4u2 -

    What happens if you break “tear in half” the black tape stuff?

    assweeetasyou -

    Unfortunately if you tear the black cable you will need to replace it !!!

    Wayne Lyell -

    Chris West the screwdriver that probably came with the kit was pentalobe to get the first two screws out to open the case. you need a .6mm Y tip driver for internal. its deceptively Phillips looking but is not it only has three blades in a Y, not 4 in a +

    Jeremiah Kjensmo -

    I called the y tip a triangle tip until I read these comments. Thanks for the correction

    Kayla Tobin -

    Hello is it if I put wrong screw can damage the board?

    alicenine84 -

    Care should be taken while removing the last 1.0mm screw, on the far right in the picture. This screw is screwed into another screw (or standoff) beneath the bracket. This standoff may come unscrewed and upon removing the bracket you may find the screw and standoff are still attached to the bracket. Do not lose this part if you decide to separate them , the standoff is not a normal phillips, and may require a special driver to reinstall. I used the phillips to start it back in, and relied on the screw to tighten it upon reassembly.

    Benji -

    I know this is late bit a trick I use to put the standoffs in (had to do 2 cause someone lost the screws I was replacing) is to take the screw that goes in it srew them together loosely to give it a fake phillips head then gently screw both into the spot the standoff goes in. you can then take the phillips out (may need to put a spudger between the screw and standoff to keep the standoff down then use a tiny flathead to gently tighten the standoff down. its a few steps but makes life easier if you need to replace it quickly.

    Stephen Patterson -

    I was able to remove the first 1.0 mm three tri-point Y000 screw from the bracket but I cannot for the life of me get the other 1.0 mm screw undone or the one 1.3 mm screw undone. Any tips?

    I tried pressing down a bit harder and I even put the first screw back in to see if it helped me loosen the other two but it did not work.

    My screwdriver was doing the job up until this point, and I’m worried I’ll strip the screw if I keep trying.

    Would appreciate any advice!

    jrosegoep -

    Dear IFixit: First, I want You to know I love your repair guides. I consider You to be the absolute best repair manuals available. But, hopefully as your friend I am going to point out once the bracked is removed a 2.0 mm Standoff screw should appear. It’s 1 of 2 screws holding the Antena Flex Cable in place. Rob

    Robert Schmidt -

  16. HP3GYMeDTQfroDSM
    HP3GYMeDTQfroDSM
    rYVXLQtY5ZhLE5pe
    • Koppel de aansluiting van de sensormodule in het voorste paneel los van het contact op het logic board.

    • Zorg dat je, bij het opnieuw aansluiten van deze drukaansluiting, één kant per keer vastklikt om het risico te vermijden dat je de aansluiting verbuigt.

    Make sure that the orientation of the cable when you attach is correct! See the picture for the correct orientation. If it gets installed 180 degrees out(i.e., the ribbon goes up instead of down, then the earphone, front camera, and Home button will be inoperative. Ask me how I know!?! Worked great when installed correctly!

    Kevin Reilly -

    Thanks Kevin. I would be stuck if I hadn't read your comment!?! Great input.

    Lukas Watts -

    That's save my life!thanks god!

    neg -

    I also made this mistake! Thank goodness it didn’t break anything.

    That Guy -

  17. 6sXLpmxMPOVXtwBd

    When removing the old adhesive from the edges, duct tape can be useful. Simply use small strips of duct tape and your spudger to press the tape’s adhesive side carefully into the edges of the phone’s display and slowly peel the duct tape away from the display. The duct tape should pick up the remaining adhesive and carry it away from the edges. use the tip of the spudger to gently scrape away any remaining dirt or film from the crease around the edge and repeat the action with a new strip of tape to pick up any dirt, adhesive or grime from the surface. This should save considerable time.

    Benji -

    Thank you for including a link to the iPhone Display Adhesive Replacement guide, this was very helpful!

    Robert O'Brien -

    is it really necessary to remove the display? the screen connectors are delicate and I fear re-assembly errors. I changed the battery and did not remove any screen connectors. no problems.

    jacobra -

    Due to the fact that THIS is the repair guide for replacing the DISPLAY it IS necessary to remove the display connectors. There is another guide for changing the battery -- you might want to follow that one.

    Hannes -

    I did not remove the display and ended up ripping one of the lower display cable ribbons when I turned the phone to remove one of the connectors. Be careful. I had to get a new display and move the Touch ID button.

    Shawn Hime -

    I think that moving the replacement of the seal lower in the chain of events would be more beneficial. I'm replacing the battery, and stretching the adhesive tabs that held the battery in at a low angle kept sticking themselves to the newly-installed adhesive seal.

    In the end, I wound up having to just remove the section of the seal along the bottom of the case :-/

    If I'd been looking at the bigger picture, I'd have wanted to put the seal on right before reattaching the screen cables.

    Rob Russell -

    This guide does not show you the removal process for the top camera assembly. My screen looks like the one pictured but my replacement doesn't have the top connector or any of the front facing camera components and since the ribbon for the connectors looks like its coming out from underneath the display I can't see how to swap it over to the new display.

    Jezagee -

  18. lHOvsFvFYwiIMMSk
    • Verwijder de volgende twee Phillips schroeven die de barometrische ventilatieopening aan de achterste behuizing bevestigen:

    • Eén 2.9 mm lange schroef

    • Eén 2.1 mm lange schroef

    I skipped this step and go straight to step 25. I skipped it because I couldn’t get the screws to come off. But skipping those step did not prevent me or has any detrimental effects on performing step 25.

    Jamie Liao -

    I agree, I don’t see any reason to remove the Taptic engine to remove the battery…It seems like more of a chance of screwing something else up…keep it simple…

    William Karis -

    If you’re replacing the battery, removing the Taptic Engine gives you a much better chance of removing the battery adhesive strips successfully. To keep them from snagging and breaking, you want to pull them from as low an angle as possible. With the Taptic Engine in the way, you have to pull them at almost 90 degrees, or risk snagging them on the Taptic Engine.

    Jeff Suovanen -

    i can’t get the 2.1 screw 2 come out pls help anyone

    John Bryce -

    I agree with Jamie Liao above. Skips steps 18-24 as described. Before proceeding with step 25, I heated a microwavable hot/cold compress (used to treat muscle strains). I set the iPhone back casing on the heated compress before pulling out the adhesive strips.

    Again, there is no need to do steps 18 through 24.

    Thomas Young -

    i didn’t remove this and had major issues pulling the adhesive strips out. I literally couldn’t grasp them and then when i did, they broke! UGH! I was able to complete the installation but i must have done something wrong because my phone still isnt working. It just ‘flashes’ the apple logo. Won’t do anything else. Should have just taken it in for repair. Now i have to buy a new phone anyway.

    Tina Matthews -

  19. EBvQf1QUlPsSZU6e
    EBvQf1QUlPsSZU6e
    oKfGa4eTuPMASdef
    • Duw de barometrische ventilatieopening voorzichtig in de richting van de trilmotor om de lijm die het aan de onderkant van de iPhone bevestigt, los te krijgen.

    Adhesive may require a tiny amount of tugging of the barometric vent to free it…

    Sarr Sheffer -

  20. 6CqaBIqrf6xoOkBH
    • Verwijder de barometrische ventilatieopening.

  21. Xhp4TTPbA3JhDNaA
    Xhp4TTPbA3JhDNaA
    FGXYOjOlBjoHwiKw
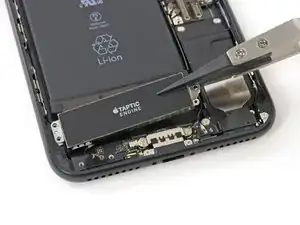
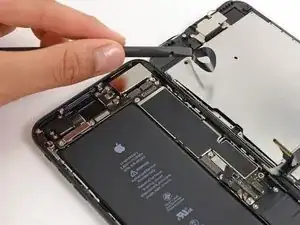
    • Gebruik het platte einde van een spudger om de trilmotoraansluiting los te koppelen van het contact op het logic board.

  22. QuVtJpInD2T3wvXK
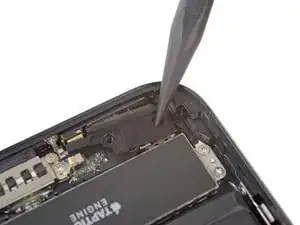
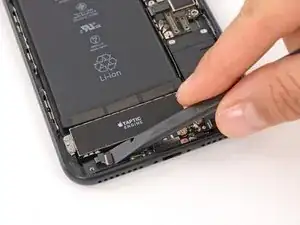
    • Verwijder de drie 1.5 mm Phillips schroeven die de trilmotor aan de achterste behuizing bevestigen.

    what do you do if the top left screw is not coming out?

    Karrington Dowe -

    There is a little guide pin for the Taptic Engine proper seating

    Landis -

  23. uQn5Y4IG5CsxDvZA
    uQn5Y4IG5CsxDvZA
    NnfXa3NaCaypGVQ3
    • Verwijder de trilmotor.

Conclusie

Vergelijk je nieuwe onderdeel met het originele onderdeel om te zien of je nog meer onderdelen van je oude naar je nieuwe onderdeel over moet zetten of om te zien of je beschermfolie moet verwijderen voordat je je nieuwe onderdeel kunt bevestigen.

Om je toestel weer in elkaar te zetten, volg je deze instructies in omgekeerde volgorde.

Breng je e-afval naar een R2 of e-Stewards gecertificeerde recycler.

Ging je reparatie niet zoals gepland? Check dan onze pagina over probleemoplossing of stel je vraag op ons antwoordenforum voor hulp bij het oplossen van je probleem.

Scott Havard

Lid sinds: 28/06/16

50572 Reputatie

3 commentaren

is there a replacement taptic engine available to purchase?

Jody Tamplen -

Did you end up finding one anywhere?

Matthew Lafond -

you can purchase a taptic engine on the ifixit store :-)

I Malloy -