Inleiding

Vooraf vereiste handleiding voor het verwijder van de speaker of de wi-fi diversiteitsantenne.

  1. ENyvBuKbFVTcwRoM
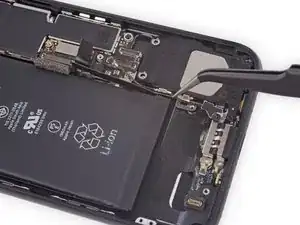
    • Verwijder de Phillips-schroef die de Wi-Fi diversiteitsantenne aan de achterste behuizing bevestigt:

    • Eén 3.2 mm schroef

  2. GVXFYj26Eytc6ggM
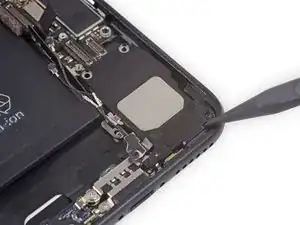
    • Verwijder de volgende drie Phillips-schroeven die de speaker aan de achterste behuizing bevestigen:

    • Twee 1.3 mm schroeven

    • Eén 2.0 mm schroef

  3. NZ2FYCkUirNEmCqA
    NZ2FYCkUirNEmCqA
    XM63CBMNUGEANVGp
    R2A2hlIaZYxtKNMv
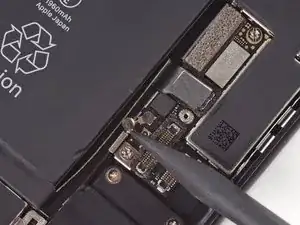
    • Gebruik de punt van een spudger om de twee antennekabelaansluitingen uit hun contacten op het logic board omhoog te duwen.

    Hey may i ask…what is the use of both of the antenna cables?i just opened my iphone 7 plus and i found both of the cables are broken.if both of the cables are broken,what does it effect on my iphone?

    Mohd Wazirul -

    Speaker and antenna?

    Keah Smith -

    I'm missing the black thing from my antenna and I have no signal, could this be the reason why? Is the black thing insulation?

    Keah Smith -

    These doodads are a pain to route and reconnect. I probably spent 15 minutes just on this part of reassembly. One of them is connected to the new part. It won’t have the soft grommet on top.

    Ray Bieze -

    One of these came away from its base. The one nearest the battery.

    When I reassemble it I’m thinking just a bit of glue at the side once re attached to base, so lomg as it touches the base contacts?

    Any comments?

    ANDREW -

    I am having the worst time imaginable trying to reconnect the antenna cable coming from the lightening connector assembly to the logic board. It’s barely long enough and will not snap into place. There’s a minature gold pin sticking up from a circular gold ring on the logic board and I must have spent an hour on this one step. The antenna end has the female end. Everything else went well. The antenna connector from the old lightening assembly will connect relatively quickly. I’m beginning to think the new antenna connector female end might be defective. I’m ready to cut the black antenna wire and try to solder in a longer piece using the old connector assembly. Any ideas? HELP !!!

    David Sandrof -

    These can be tricky to reconnect. I found the best way is to hold the connector with tweezers and use the point of a spudger on top of the connector in the other hand. Slowly moving the connector with the tweezers while applying gentle pressure with the spudger, you will eventually feel the connector and its seat line up and you can snap into place. Don’t force it, when it is lined up it is easy so you have to patiently work on aligning it.

    David Ege -

    please say which antenna is which, impossible to know now

    Mitchell Thompson -

    Tip that helped me: remove the standoff screw next to the clip before derouting (or, upon reassembly, rerouting) the cables. This gives you a lot more space to work with! (Note: I only did this on reassembly, so I don’t know if there are any gotchas on disassembly.)

    T Murrills -

    Please pay close attention to witch one goes where or take a picture bad mistake made.

    michael -

  4. 6yiSroPqDJRjSbBk
    6yiSroPqDJRjSbBk
    ILHmbOMFhFB5OHK1
    • Gebruik een pincet om de antennekabels los te klikken uit de contacten op het logic board.

  5. dU3ZJGmCPZ1bALlI
    dU3ZJGmCPZ1bALlI
    QimsyIes2rMjcYCS
    • Gebruik een pincet om de antennekabels uit de klem op de speaker te verwijderen.

    • Zorg dat je de kabel zo dicht mogelijk bij de aansluiting vastpakt, om schaden aan de kabel te voorkomen.

    They pull off to the side.

    Ark -

    This was an oddly challenging step, lifting the speaker slightly from the top end allowed me to slide the tips of one side of the tweezers in between the cable and the speaker, prying it out rather than grabbing and pulling which feels dangerous.

    Jesse de Vries -

    They break very easily

    Josh Brito -

    difficile a retirer. Les 2 tables sont clipsés sur le haut parleur. Il m’a bien fallu 10 - 15 minutes pour arriver a les retirer. Aucune astuce a vous donner, a part de la persévérance.

    Guigui -

    One cable seems to stay attached to the speaker. Don’t try to pry it off the speaker! This is shown in the video but not in these photos.

    Cynthia Lamb -

  6. q3631AQDapQoBYN6
    q3631AQDapQoBYN6
    lfZXAnVnBnXDooYM
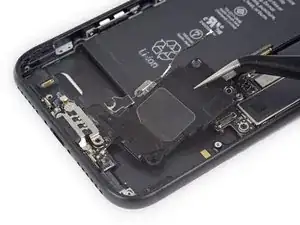
    • Gebruik de punt van een spudger om de speakermodule in de richting van het logic board en van de achterste behuizing weg te schuiven.

  7. kdWfREmZYIO1G4cp
    • Verwijder de speaker.

    Reassembly tip: after aligning the speaker with the bottom edge, instead of lowering the speaker into place, keep the speaker raised slightly and push the cables back into the clip (which were removed in step 28) with the flat end of a spudger. In doing so, though, make sure that the cable from the lightning connector piece remains above the flat metal piece protruding out the left side of the speaker.

    T Murrills -

Conclusie

Om je toestel weer in elkaar te zetten, volg je deze instructies in omgekeerde volgorde.

Scott Havard

Lid sinds: 28/06/16

50572 Reputatie

0 commentaren