Inleiding

Vooraf vereiste handleiding om een iPhone 8 te openen en zo toegang te krijgen tot de binnenste onderdelen voor reparatie of vervanging.

  1. kH33mVcxVN2MyNsd
    • Ontlaad je iPhone, voordat je begint, tot onder de 25%. Een geladen lithium-ion batterij kan in brand vliegen en/of exploderen als deze per ongeluk wordt doorboord.

    • Schakel je iPhone uit voordat je begint deze uit elkaar te halen.

    • Verwijder de twee 3.5 mm lange pentalobe-schroeven aan de onderkant van de iPhone.

    • Het openen van het scherm van de iPhone zal de waterdichte sluiting van de telefoon aantasten. Zorg dat je vervangende sluitingen klaar hebt liggen voordat je verdergaat of zorg ervoor dat je telefoon niet wordt blootgesteld aan water als je ervoor kiest de sluitingen niet te vervangen.

    just how long are those screws- i turn and turn and turn and the lift off is soooo slight, seemingly insignificant…

    An. Jahnke -

    I would recommend, from the very beginning, dumping all tools out of the kit (if you got it) and using that white paper tool box as a tray to organize the screws and braces in. It’s nice to work over because it catches screws well and makes it easy to see them if you drop any.

    Johnny Emrica -

    That’s a great idea thank you

    Mohamed Dekkiche -

    Screw to the left of the charging port will not come out. Screw on the right came out no problem. Any ideas?

    Bill Maher -

    Maybe the screw is stripped…

    Gabriel-Science -

    I already replaced my iPhone 8 battery with one from iFixit and honestly I wasn't impressed. It worked well for a few months, but then I started noticing the peak performance capability dropping significantly thereafter. I followed the initial charging instructions to a tee and only let it drop below 20% once a month. Normal everyday use for me... no intense apps like games, etc. I considered having Apple do it this time around, but for these older models they don't keep the batteries in-stock and you have to give them your phone for up to a week. So in the end, I opted to try another battery from iFixit instead. Hopefully this one will last longer.

    tripmusic -

    Does it lasted longer ?

    Gabriel-Science -

    How with the gigantic kit do I not have a 3 1/2 pentalobe driver the very first screwdriver I reach for and that I need is not in any of these kits. What’s up with that?

    Michael Stephens -

    Same problem. The kit comes with a screw driver, but not for this pentalobe screw. This is a problem.

    Yuji Ishitsuka -

    I had to search what screwdriver bit I had to use from the ifixit toolkit; it's the P2 bit. (Maybe it's more obvious if you bought the battery kit, because it only has one type of pentalobe screwdriver.)

    Nathaniel Zielstra -

  2. uSKuDUqkPXShJGIe
    uSKuDUqkPXShJGIe
    VcewaYwFWPodicdm
    UuEMr1v4SuV4fLE3
    • De volgende twee stappen introduceren de Anti-Klem, een handige tool die we aanraden aan iedereen die regelmatig reparaties uitvoert. Als je de Anti-Klem niet gebruikt, sla dan de volgende drie stappen over voor een alternatieve methode.

    • Voor uitgebreider instructies voor het gebruik van de Anti-Klem, lees je deze handleiding door.

    • Trek de blauwe hendel naar achteren zodat de anti-klem vrij kan bewegen. (Op deze manier deactiveer je de openingsstand van de anti-klem.)

    • Schuif de armen over de linker- of rechterzijde van je iPhone.

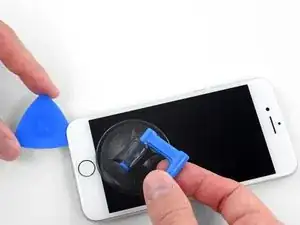
    • Plaats de zuignappen dichtbij de onderkant van de telefoon—één op de voorkant en één aan de achterkant.

    • Druk beide zuignappen aan, om zuigkracht uit te oefenen op de gewenste plek.

    • Als het oppervlak waarop de zuignappen zich moeten vastzuigen te glad is, kun je wat tape gebruiken voor meer grip.

  3. TWCRek6KAd4BXPEo
    TWCRek6KAd4BXPEo
    5bA1wXPF4DYK1xqZ
    WBMxwmobsDvHpXqL
    • Trek het blauwe handvat naar voren om de armen van de anti-klem te vergrendelen.

    • Draai het handvat 360 graden met de klok mee of tot de zuignappen uit beginnen te rekken.

    • Zorg dat de zuignappen op één lijn met elkaar zitten voordat je begint met het openen van het toestel. Als je ziet dat de zuignappen niet meer op één lijn zitten, maak je ze los en breng je ze weer op de juiste positie aan.

  4. 1UMWDAgvEgkQkwPM
    1UMWDAgvEgkQkwPM
    5SG2UIItrZgdZEa4
    • Verwarm een iOpener en plaats deze tussen de armen van de anti-klem op je telefoon.

    • Je kunt ook een föhn, heteluchtpistool, of een kookplaat gebruiken, maar wees bij het gebruik hiervan extra voorzichtig. Te veel warmte kan tot warmteschade leiden. Vooral het scherm en de batterij zijn hier erg vatbaar voor.

    • Vouw de iOpener zodat deze op de onderkant van de iPhone komt te liggen.

    • Geef de lijm een minuutje de tijd om los te komen zodat de anti-klem een opening kan creëren.

    • Steek een plectrum in de opening onder het scherm.

    • Als de anti-klem er niet in slaagt een opening te creëren die groot genoeg is voor je plectrum gebruik je meer warmte en draai je het blauwe handvat een kwartslag met de klok mee.

    • Draai het handvat nooit verder dan een kwartslag per keer en wacht een minuut voordat je de anti-klem weer besluit aan te draaien. Laat de anti-klem het werk voor je doen.

    • Sla de volgende drie stappen over.

    it looks like a....

    Gergely Soki -

  5. HWFBtehBMjCQcFAc
    • De volgende drie stappen laten je zien hoe je het scherm opent met behulp van een enkele zuignap.

    • Het verwarmen van de onderkant van de iPhone helpt de lijm, die het scherm op z'n plek houdt, te verzachten, wat het makkelijker maakt om de telefoon te openen.

    • Gebruik een föhn of een warmtepistool, of prepareer een iOpener en leg deze op de onderkant van de iPhone gedurende ongeveer 90 seconden om zo de lijm die eronder zit te verzachten.

    No hair dryer so GENTLY heated over stove burner

    John Toth -

    Hello,

    What temperature is suitable for removing the front display ? I bought i-Fixit ProTech which is not include the heating "roller" . Thanks for help

    Jiří Sítko -

    I was about to ask the same Question...

    Enno Winch -

    Ich habe eine heiße Wärmflasche verwendet. Das hat gut funktioniert :-)

    Moritz Hartges -

    I laid my phone face-down on my 3D printer’s heated bed, and set the temperature to 60 C. After a few minutes, it was ready to loosen.

    Nate B -

    Hey, that's smart !

    Gabriel-Science -

    If you don’t have an “iOpener” or heat gun, try using an electric heating pad. I have a small $11 pad I got at CVS for my knee. On medium heat it worked fine for removal and with the “pennies” for setting the new seal.

    Pete P -

    I used a heated tea kettle and a tea towel, it worked!

    Adam Yavner -

    I put on the furnace vent for 10 minutes to get it warm to the touch but not hot.

    terrelldoc -

    I attached it to the after burner of my rocket ship and that worked.

    Matt Brown -

    I'm holding mine just above an erupting volcano but I'm still waiting to see if it has worked. How long does it need?

    Paul Aron -

    It won't work if you don't throw it in the lava.

    Gabriel-Science -

    I used a water-filled ziploc bag, heated it in microwave. fast, cheap, worked.

    John Barker -

    Hairdryer works fine for this step. No issues.

    tripmusic -

    Agree! Just did it for 2 times to make sure I didn't overheat the phone.

    André Lopes -

    The most effective way to heat up the glue is to leave the phone in full sun - if it's available. In fact I would always wait for a sunny day to repair any glued together Apple device. The heat will be very even and the phone was probably designed to survive anything the sun can throw at it - although it can get very warm. (I'm in the UK) If you leave the phone turned on it will give a warning if it goes near the temperature limit.

    John -

    I'm sorry but I tried both the hair dryer (for 3 minutes!) and the eye opener (also 3 minutes) and no luck. Not even a hint of loosening the adhesive holding down the display!! Do I send this kit back for a refund or what??!!

    John Noble -

    No luck, guys. 3 minutes of hair drying and 3 minutes heating up the iopener. What next?

    John Noble -

    Okay, a half hour later i finally got the screen loose, but not after super heating it for at leat 10 minutes with a hair drying and burning my hand trying to pry it open. Also, watch out for the power button because it inadvertently keeps switching the phone back on while you wrestle with it. More later . . .

    John Noble -

    . . . and now I need to buy a new phone!!! the cable broke as I was trying to unscrew one of the top screws, so thanks! I FIXed IT but Good!!!!

    John Noble -

    Nate B's advice was key. I couldn't get the temperature of the display hot enough to break the seal with a hair dryer. A heat gun set to low speed and 550F (287C) got the display up to just over 130F, close to the 60C Nate mentioned.

    Matt C -

    This part was actually much easier than I thought. I used a hair dryer on max for 2 minutes on each side of the phone, less than half an inch away from the phone, just on the bottom half. It was hot! Screen came right out!

    Nuno Lopes -

    I used a tube sock full of about 1 cup of white rice. Tied a knot in the top of the sock. Put the sock of rice in the microwave on 60% power for 1 minute. Kept doing this until the temp felt right. Put the sock of rice down, put bottom edge on sock, then covered w/ other half of the sock/rice. Put a piece of paper towel between phone and sock/rice to absorb any moisture. When lifting up on front panel, I rested the phone on the sock/rice. Worked nicely once I got the temp of the rice high enough.
    (threw the rice away later :-) )

    Burning Sensation -

    “Threw the rice away later” has to be the best advice here. I wrapped my phone in a small heating pad and turned it up to 6 of 8. Worked great in 5 min or less! No need for water bottles, microwaves, heat guns, volcanoes, …. I kept the heating pad later ; )

    dantegd -

    I popped my iPhone under a desk lamp with a 60w filament light bulb in it, switched it on, (See this photo) then read the iFixIt instructions and comments. By the time I’d done that, the glue had softened enough to start work. I managed to do the whole process, slowly and methodically, without incident. The iPhone even worked after I’d put it all back together. So we’ll done iFixIt. Another satisfied customer!

    Tony Houlihan -

  6. VRy3fVrOovwUCabE
    VRy3fVrOovwUCabE
    A5IlSaM3n1xvayKW
    • Druk een zuignap op de onderste helft van het voorste paneel, net boven de thuisknop.

    • Zorg dat de zuignap niet overlapt met de thuisknop, aangezien dit ervoor zal zorgen dat de zuignap zich niet vast kan zuigen aan het scherm.

    Even with using high heat from a blow dryer, I had to put the suction cup over the home button or the bottom edge wouldn’t lift at all. That waterproof adhesive is incredibly strong.

    Aaron Soderholm -

    As others have said, this part really stinks, but it’ll work if you keep trying. Agree with multiple rounds of hair dryer on high (did about 60-90s each time), and with having to out the suction cup over the home button. You don’t need a big gap to pry it open - it’ll be slight …

    Johnny Emrica -

    Patience is the key here. Expletives and patience. Like previous comments say, putting the suction cup over the home button (I used packing tape to maintain the seal) will allow you to apply force to the proper location to separate the screen. Good luck!

    J Rawlinson -

    Get a suction cup pliers. It’ll make this part fun

    Bradley Steiner -

    iSclack EVO opened the iPhone easily even without heating with no fear of accidentally over-opening it like with a simple suction cup.

    Matti Haveri -

    If you don't have the anti-clamp device, to prevent the screen from tearing open when suctioning it, I suggest some layers of tape around it and the back of the phone (the tape has to be stretchy enough to just minimise the momentum when separating the screen), or some big rubberbands

    Raziocinjo -

    This was the time consuming part. I’d recommend having a thin bladed knife or similar to get things going. I used the small blade on my Swiss Army knife, but be careful. When it goes, it can be unexpectedly sudden. I also used a strong rubber band to stop any excessive opening of the screen.

    Tony Houlihan -

  7. PnYJMHrBqA2Jh22u
    PnYJMHrBqA2Jh22u
    5BxGfRPfmCqCLMOc
    xYlJ5IgLFMxCDZ2B
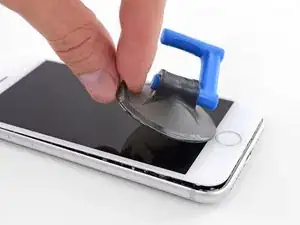
    • Trek de zuignap omhoog met een stevige, constante kracht om zo een kleine opening tussen het voorste paneel en het frame van de telefoon te creëren.

    • Steek een openingsplectrum in de opening.

    • De waterdichte lijm die het scherm op z'n plek houdt is erg sterk; het creëren van de opening kan dus heel wat kracht vereisen. Als je moeite hebt met het openen van de telefoon, dien dan meer warmte toe en wiebel het scherm op en neer om de lijm te verzachten totdat de opening groot genoeg is voor je tool.

    The screen on my phone was so broken, a suction cup did not work, so I softened the adhesive with a blow dryer and used a Jimmy to carefully pry open the phone from the bottom just enough to slip a pick in.

    charguy -

    Just completed a smashed screen replacement, this is probably the most time consuming part. Used packing tape to cover the screen to help create a suction surface (had to replace it a couple times because it pulls away after a purple good pulls ) Used consistent heat for about 5 minutes, then stuck a pick in the tiniest opening… and pry pry pry!

    Brian Gill -

    I failed at this step. No amount of heating, pulling, and rocking opened up enough of a gap to slip in even a knife let alone the blue plastic tool. That's with a phone that has an undamaged screen - just trying to replace the battery. Apple won this round :(

    Michael Sherman -

    Be really careful here. I placed a sucker to the front and rear to help lever off the screen. However, the whole thing came away much easier than I anticipated and I ripped the front part completely away from the rear, tearing all three connector cables. New iPhone required.

    Chris Wood -

    Note that the opening pick they show here does not appear to come with the kit, which is a bummer! The plunger, the mini blue crowbar thing, these are too thick. I ended up using a really thin guitar pick.

    Johnny Emrica -

    Following careful methods can mostly preserve the seal and reusable. Won’t be as water tight but probably still pretty good.

    Bottom edge is pull up with suction + separating tool. Use small precision scissor to cut any tape that gets overly stretched upon initial opening.

    - For the 2 long edges, use an exacto knife to separate the seal from the screen. This keeps the tape on the chassis. Go slow along the long sides. Becareful to avoid scratching the paint on underside of the screen’s edge.

    - Top corners have a thick sealed tape. Best to just use separating tool to twist it open.

    In summary, top and bottom edge use separating tool. Side long edges can use exacto knife to gradually gently separate the seal from underside of the screen’s edge.

    Howard -

    4 picks and an exacto knife, plus 45 minutes later, I finally got it to open! Thanks tor the tip!

    Cat -

    Intact screen, check. Tool kit, check. Hair dryer hot enough to make the phone too hot to touch, check. Following all instructions, check. Screen still in place and refusing to come off, check.

    I heated, reheated, pulled and pulled. I simply could not get it off. Worked at it for an hour and a half, and I’m not a small guy. Yes it is hard to hold, but could get a grip. Just could not get it to budge. Off to the iPhone repair shop tomorrow. Anybody want to buy a repair kit and replacement battery?

    Jim Meyers -

    After struggling for 30m, I looked up some alternate methods and found this helpful:

    https://www.youtube.com/watch?v=25zAK5mG...

    - I used a utility knife and pried up right under the home button

    - the angle matters! I was trying to go too far down before going in. The top surface of the phone is rather thin, so you go in after barely getting under the chassis lip

    - tilt utility knife left to right once you’ve got it under to work it in

    - leave the utility knife in, and now add that pick

    Jared Wilk -

    Pro-tip: don't be an idiot like me. Instead, remove the screen protector you have on the phone before applying the suction cups. Derp.

    hunter.geofizz -

    I struggled with a hair dryer at first and a singular suction cup. However, I tried putting packing tape on the spot where I put the suction job (even though my screen isn't cracked) and I was able to do it first try with ease. Definitely recommend packing tape.

    Alessio Toniolo -

    Suction cup pliers. Dead easy

    Bradley Steiner -

    After successful screen replacement, returning to give my thanks here. Excellent tips from you all - if you’re using force, you’re doing it wrong. Heat, very very gentle exact-o knife barely down then fully under the screen below the home button … perfect. Slow and patient around the upper corners, and don’t forget to heat there as well! Thank you all!

    dantegd -

    The problems with this step are (1) not having three hands and (2) managing to hold the phone in a way that doesn't put reverse pressure somewhere else on the screen. Exacto knife was the best tip. It's a little dangerous. On a misstep you may scratch the screen or jab yourself, but it's what got me in.

    thewrytstf -

    sorry, could not lift off the display any nano-meter even after applying enough force I think and heating it up. need to visit a store.

    Andi Tony -

    I used a razor blade and plenty of heat, and it somehow worked like a charm at the cost of me cutting myself. Definitely be careful when doing this, I used the razor blade on the left side of the iphone then wedged in a small screwdriver and then used the pick to cut the rest of the material away.

    Sharaf Kazi -

  8. 2QPL6xQ1bKKTHEE2
    2QPL6xQ1bKKTHEE2
    Scr2EQgs2BWhSj3N
    KyO5DVLoiSXnDh2Z
    • Schuif je openingsplectrum langs de linkerkant van de telefoon omhoog, beginnend bij de onderkant en in de richting van de volumeknoppen en de stilteknop, en snijd onderweg alle lijm door die het scherm op z'n plek houdt.

    • Stop in de buurt van de linker bovenhoek van het scherm.

    • Probeer de bovenkant van het scherm niet los te wrikken van de achterste behuizing, aangezien deze wordt vastgehouden door middel van plastic klemmen die kunnen breken.

    My Plektrum worked ok, but the edges broke off a bit towards the end

    griffin.weber -

  9. g1bJoLynAKeivqUm
    • Er loopt een aantal makkelijk te beschadigen kabels langs de rechterkant van de iPhone. Steek je plectrum daar niet in de opening om te voorkomen dat je je toestel beschadigt.

    I was trying to replace my battery, and accidentally cut one of the cords on my screen. I marked my pick, so i don't know how it happened.

    Gib Jeffries -

  10. bYHHQWBLX2SbZ4ZM
    bYHHQWBLX2SbZ4ZM
    oWPIhKQUMFLQKwJF
    VbhlSMqUKVaR3i4t
    • Steek je openingsplectrum opnieuw in de rechter onderhoek van de iPhone en schuif deze nu langs de rechterzijkant omhoog. Snijd ook hier alle lijm door die je onderweg tegenkomt.

    • Steek je plectrum ook hier niet dieper dan 3 mm in de opening om te voorkomen dat je de schermkabels beschadigt.

    No pick in the kit you sent me.

    Ted Cooper -

  11. JsELGeLj2sULj4Rl
    JsELGeLj2sULj4Rl
    1Q5TB6TXChTQrCSO
    • Trek met beleid aan de zuignap om zo de onderkant van het scherm op te tillen.

    • Til het scherm niet meer dan 15º omhoog of je riskeert het afklemmen of afscheuren van de lintkabels die het scherm verbinden.

    • Trek aan het kleine lipje op de zuignap om deze van het voorste paneel te kunnen verwijderen.

  12. 1wx6fuMwGlVmTVwg
    1wx6fuMwGlVmTVwg
    L5DvjVj5xMJAlXg4
    y6nMrARZIGjH4KZO
    • Steek een openingsplectrum onder het scherm en schuif deze langs de linker onderhoek en linkerzijde omhoog om de laatste lijm door te snijden.

    I did end up using just a smidge of IFIXIT adhesive remover along the edge before opening and that seemed to really help

    Karen Flowers -

    I have been using the pointed tweezers to pull the adhesive strands apart and out as the display comes off.

    Adam Yavner -

    This bit was awkward as to get a good grip I kept inadvertently switching the %#*@ phone on!

    wendyhoward -

  13. pmOBsioPu6PHdocL
    pmOBsioPu6PHdocL
    wCWsnncFGO1Jy1KT
    • Schuif de schermmodule een beetje omlaag (weg van de bovenkant van de telefoon) om deze los te krijgen uit de klemmen die het scherm aan de achterste behuizing bevestigen.

    I had trouble sliding down the display and found I hadn't separated the stop enough.

    Jeffrey Anderson -

    When you are pulling the display downward, be very careful! I pulled a little too hard and the display cables tore from the downward (toward home button) motion. Now I have to replace the display! 😭

    So Munch Love -

  14. XaJPKiESSbHGIDqx
    XaJPKiESSbHGIDqx
    TKsLuMfvlLBnsdMa
    uyGD4MIvBrhLyuiO
    • Open de iPhone door het scherm van de linkerkant naar rechts te kantelen, alsof je de achterste kaft van een boek opent.

    • Probeer het scherm nog niet volledig los te koppelen, aangezien deze nog steeds aan het logic board van de iPhone verbonden is met een aantal kwetsbare lintkabels.

    • Om het scherm open te houden en aan de telefoon te kunnen werken, kun je het scherm tegen een object laten leunen.

    Nach RECHTS klappen - nicht nach links!

    Manfred Wachtel -

    Als ich das Flachbandkabel auf der rechten Seite sah, hab ich mich auch gefragt, ob die das mit nach Links klappen ernst meinen, und das „Buch“ lieber auf japanische Art nach rechts aufgeklappt. Das sollte dringend in der Anleitung korrigiert werden!

    Sebastian Plickert -

    “Up from the left” means lift up the left side.

    Which is the same as folding to the right.

    “Like the back cover of a book” explains it even more clearly.

    Maybe it gets lost in translation?

    Nick Shtangey -

    Fold to THE RIGHT - not to the left!

    Jim Glenys -

    When I saw the ribbon cable on the right side, I also wondered if they were serious about folding it to the left, and the "book" would rather be opened to the right in the Japanese way.This should be corrected urgently in the manual!

    Jim Glenys -

    Hi Jim, the display opens from the left side, toward the right side. It should look like the back cover of a book. Hope this helps. Good luck with the repair!

    Adam O'Camb -

    DO NOT LAY THE TWO HALVES FLAT!!! There is a reason why the third photo shows the screen half leaning against a box! This really needs to be a warning in addition to the one about not separating the display.

    Mangled Jargon -

    If you're skipping the screen and taptic engine removal like I did, I suggest you tape the back of the phone to the table, and also tape the screen to the vertical object it lays on, so it stays still. That way you will avoid having to constantly readjust it because of the sliding of the housing of the phone when you're working on it. Be careful where you're putting the tape on the screen though, if you're doing it on the internal components.

    Raziocinjo -

Conclusie

Om je toestel weer in elkaar te zetten, volg je deze instructies in omgekeerde volgorde.

Adam O'Camb

Lid sinds: 11/04/15

212588 Reputatie

0 commentaren