Inleiding

De thuisknop van de iPhone 8 Plus is eigenlijk een solid-state sensor, welke ook de Touch ID-functie (vingerafdrukherkenning) bevat.

De meeste vervangende thuisknoppen zullen niet werken, dus check dit voorzichtig voordat je je reparatie begint. De originele thuisknop van je iPhone is in de fabriek exclusief gecombineerd met het logic board—en zonder Apple's exclusieve calibratieproces zal zelfs een originele thuisknop van een andere iPhone niet werken. Om een kapotte thuisknop te repareren, zul je een speciaal gemaakte universele thuisknop moeten installeren. Besef wel dat deze thuisknop enkel als knop zal werken; de Touch ID-functie zal niet werken.

Als je enkel een kapot scherm vervangt, kun je deze handleiding gebruiken om je werkende thuisknop te verwijderen en deze over te zetten naar een nieuw scherm, waarbij je alle functies, inclusief Touch ID, behoudt.

Om te voorkomen dat je de schermkabels per ongeluk scheurt of anderszins beschadigt, is het beter om de schermmodule eerst volledig te verwijderen, voordat je begint met de reparatie van de thuisknop/Touch ID-sensor. Maar als je je comfortabel genoeg voelt om met de thuisknop/Touch ID-sensor aan de slag te gaan zonder de schermmodule eerst te verwijderen, kun je de stappen over de schermmodule overslaan.

  1. OqdAPX1NfcxJgNbg
    • Ontlaad je iPhone, voordat je begint, tot onder de 25%. Een geladen lithium-ion batterij kan in brand vliegen en/of exploderen als deze per ongeluk wordt doorboord.

    • Schakel je iPhone uit voordat je begint deze uit elkaar te halen.

    • Verwijder de twee 3.5 mm pentalobe schroeven aan de onderkant van de iPhone.

    • Het openen van het scherm van de iPhone zal de waterdichte sluiting van de telefoon aantasten. Zorg dat je vervangende sluitingen klaar hebt liggen voordat je verdergaat of zorg ervoor dat je telefoon niet wordt blootgesteld aan water als je ervoor kiest de sluitingen niet te vervangen.

    what do I do about super stripped screws?

    Ean Palacios -

    I’m sorry, your comment slipped past my radar earlier. For future fixers that might see this and ask the same question, you can check out our stripped screw guide for some detailed advice.

    Adam O'Camb -

    Do you need a toolkit like the essential toolkit

    Adam Palmer -

    Hi Adam. Having a tool kit with all of the listed parts above is best. The screw heads are very small and each set of screws needs a very specific type of driver to remove them without stripping any of them.

    Kyle Luksa -

  2. 6UPwoloGBO4tmVoS
    6UPwoloGBO4tmVoS
    BmSYPJmOy6dbHipF
    3EOdQPAGOmiuhoKU
    • Je kunt de onderdelen in je telefoon gemakkelijk beschadigen met het te diep inbrengen van je openingsplectrum. Volg deze stap om je plectrum te markeren en schade aan je toestel te voorkomen.

    • Plaats op 3 mm van de punt van je plectrum een markering met een stift.

    • Je kunt op iedere punt voor een andere markering kiezen.

    • Als alternatief kun je ook een munt als markering gebruiken in plaats van een stift. Plak hierbij de munt op de plectrum zodat de munt tegen je telefoon aandrukt zodra deze een bepaalde diepte bereikt.

    Got to step 2 and realized the fix kit doesn't include an opening pick! Looks like a guitar pick, and I have those lying around. Is that expected? Looks like the pick is used in many steps below. There's a little blue crowbar that isn't mentioned in the instructions. Perhaps that replaces the opening pick?

    Sloan Looney -

    Hi! I can't see which guide you were using when writing this comment. Can you reply here with which guide and fix kit you used?

    Clay Eickemeyer -

    I see you posted this in Meta. I hope it's resolved soon! In the meantime, a guitar pick may work well enough for your repair.

    Clay Eickemeyer -

    what fix kit?

    Meow Purr -

    My fix kit didn't include an opening pick either

    WILLIAM HARRIS -

    Make sure you check inside the black boxes after emptying them. My pick was stuck inside one of the boxes.

    AndyF -

    My AliExpress refurbished screen came with a pick that has a coin-like circle that pops out, so no modification was necessary

    Gijs Leegwater -

    the picture shows 3 cm but the description says 3 mm's. Which one is it?

    John Pena -

    That is a misunderstanding. It is a ruler with a scale for cm, it shows 0.3 cm, i.e. 3 mm.

    VauWeh -

    Oh, come ON!

    Big Ed -

    It will ALWAYS be millimeters on a phone, but this step is ridiculous, skip it!

    Leif DeWolf -

    @leifdewolf I wouldn't skip it for a first repair.

    Gabriel-Science -

    It's not an Ifixit KIT if it doesn't include everything. You'll need to order the opening pic separately. Or head to Walmart like myself and look for guitar pics. Hopefully, this will work just as well.

    Jaleeljb97@icloud.com -

    No pick in mine as well. It’s really not clear that you have to order this separately when ordering an IPhone SE 202/2022 screen repair kit. Is this the case?

    Jackson Castiglione -

    Frustrated, I ordered a compact package where everything was encapsulated. Useless suction tools could not separate the screen. If it is unable to decouple the screen, then why sucking suction tools you have provided.

    Shourob Datta -

    For my kit the triangle pick was stuck inside the box with the screen not with the other tools maybe it's also there for you

    Henry Scheibehenne -

    Y’all are getting far, FAR too detailed with some of this stuff…. Measuring and marking the pick that you won’t actually use to open the device?!? lol that’s kinda funny. Just heat it up, grab a spudger, and the back just pops right off! The iFixit tech need to stick to the KISS method more often, you know KEEP IT SIMPLE STUPID!!! Like l, for reals, I’ve been doing this stuff for YEARS and using iFixit guides regularly and this is just ridiculous at this point!

    Leif DeWolf -

    Will the phone still work if the sensor assembly on the back of the screen is damaged?

    Mutshidzi Rambau -

    I don't have a pick, but how much better are these picks than an old credit card for opening an iPhone 13 mini?

    mike eng -

    The pick in my iFixIt kit was packed with the battery, not with the rest of the toolkit.

    Tony Houlihan -

  3. TYwCcrqNBd4ohROm
    TYwCcrqNBd4ohROm
    Ui5vOPjtLUbtNCGB
    cvSW1VHhPiNmImkf
    • Als het scherm van je iPhone gebarsten is, kun je wat tape over de barsten plakken om te voorkomen dat het scherm verder beschadigd raakt tijdens dit proces. Zo verklein je ook het risico op fysieke schade.

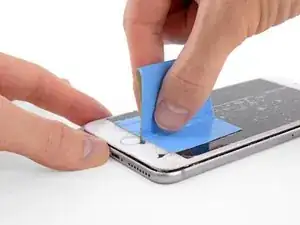
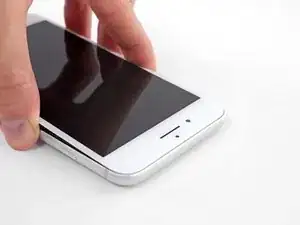
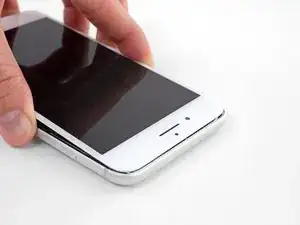
    • Plak een aantal lagen tape op het scherm van de iPhone tot het gehele scherm bedekt is.

    • We raden je ten sterkste aan om tijdens deze stap een veiligheidsbril te dragen zodat je je ogen beschermt tegen eventueel loskomende glasscherven.

    • Als het je in de volgende stappen niet lukt om de zuignap op het scherm te bevestigen, kun je ervoor kiezen om een stuk duct tape in een handvatvorm op het scherm te plakken. Hiermee kun je dan het scherm omhoog tillen om een opening te creëren.

    • Als alternatief kun je er ook voor kiezen om de zuignap met secondelijm op het scherm vast te plakken.

  4. YFbVJy32AORrrT13
    YFbVJy32AORrrT13
    5OoBJRhLaZ2HItnM
    A4T1DxOZSJ16rhJn
    • De volgende twee stappen introduceren de Anti-Klem, een handige tool die we aanraden aan iedereen die regelmatig reparaties uitvoert. Als je de Anti-Klem niet gebruikt, sla dan de volgende drie stappen over voor een alternatieve methode.

    • Voor uitgebreider instructies voor het gebruik van de Anti-Klem, lees je deze handleiding door.

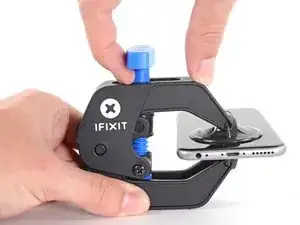
    • Trek de blauwe hendel naar achteren zodat de anti-klem vrij kan bewegen. (Op deze manier deactiveer je de openingsstand van de anti-klem.)

    • Schuif de armen over de linker- of rechterzijde van je iPhone.

    • Plaats de zuignappen dichtbij de onderkant van de telefoon—één op de voorkant en één aan de achterkant.

    • Druk beide zuignappen aan, om zuigkracht uit te oefenen op de gewenste plek.

    • Als het oppervlak waarop de zuignappen zich moeten vastzuigen te glad is, kun je wat tape gebruiken voor meer grip.

  5. jTOgVMBLsXEoHW6M
    jTOgVMBLsXEoHW6M
    GHUOCycRqrdGPloU
    XhWEEIvdRoCv4ayy
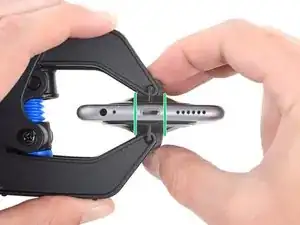
    • Trek het blauwe handvat naar voren om de armen van de anti-klem te vergrendelen.

    • Draai het handvat 360 graden met de klok mee of tot de zuignappen uit beginnen te rekken.

    • Zorg dat de zuignappen op één lijn met elkaar zitten voordat je begint met het openen van het toestel. Als je ziet dat de zuignappen niet meer op één lijn zitten, maak je ze los en breng je ze weer op de juiste positie aan.

    Bien, y a-t-il des boutiques spécialisées elle-même se charger de l’opération de changement de l’écran de l’iPhone 8 plus je suis un littéraire. Je renonce à le faire moi-même mais j’assume les frais le prix de l’écran. Merci de répondre dans un commentaire suivant Cordialement

    Acquaviva -

  6. KbWJQqLcoArLKmUO
    KbWJQqLcoArLKmUO
    RnlwghmEIU5hKxhF
    • Verwarm een iOpener en plaats deze tussen de armen van de anti-klem op je telefoon.

    • Je kunt ook een föhn, heteluchtpistool, of een kookplaat gebruiken, maar wees bij het gebruik hiervan extra voorzichtig. Te veel warmte kan tot warmteschade leiden. Vooral het scherm en de batterij zijn hier erg vatbaar voor.

    • Vouw de iOpener zodat deze op de onderkant van de iPhone komt te liggen.

    • Geef de lijm een minuutje de tijd om los te komen zodat de anti-klem een opening kan creëren.

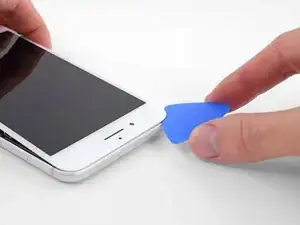
    • Steek een plectrum in de opening onder het scherm zodra de anti-klem een opening heeft gecreëerd die groot genoeg is voor je plectrum.

    • Als de anti-klem er niet in slaagt een opening te creëren die groot genoeg is voor je plectrum gebruik je meer warmte en draai je het blauwe handvat een kwartslag met de klok mee.

    • Draai het handvat nooit verder dan een kwartslag per keer en wacht een minuut voordat je de anti-klem weer besluit aan te draaien. Laat de anti-klem het werk voor je doen.

    • Sla de volgende drie stappen over.

  7. EXTwOVVOnkGXlAiy
    • De volgende drie stappen laten je zien hoe je het scherm opent met behulp van een enkele zuignap.

    • Het verwarmen van de onderkant van de iPhone helpt de lijm, die het scherm op z'n plek houdt, te verzachten, wat het makkelijker maakt om de telefoon te openen.

    • Gebruik een föhn of een warmtepistool, of prepareer een iOpener en leg deze op de onderkant van de iPhone gedurende ongeveer 90 seconden om zo de lijm die eronder zit te verzachten.

    6/14/23 I did this repair but used a heat gun on low for 60 seconds. This allowed me to open the case as the instructions say, but in the end the Home button failed. I probably over heated it. I used this "go around" for a virtual Home button. I don't care about touch ID:

    https://www.youtube.com/watch?v=LbTlUm4p...

    laryball -

  8. 1SUHNLjLanp2x1y2
    1SUHNLjLanp2x1y2
    G2AloSCafqypVhRk
    • Druk een zuignap op de onderste helft van het voorste paneel, net boven de thuisknop.

    • Zorg dat de zuignap niet overlapt met de thuisknop, aangezien dit ervoor zal zorgen dat de zuignap zich niet vast kan zuigen aan het scherm.

    Warning ! If you pull too hard (reheat the underside of the display again), you create an gap of air between the glass and the lcd display !

    When you replace the display assembly you end up with gray stains on the display.

    Result: you have to buy a new display (assembly).

    Arnoud -

    Using just the single suction cup that is included in the battery replacement kit probably wouldn’t open the device. An iOpener and an iSlack should be the recommended method. However, you can get it open with just the single suction cup and iOpener, but does take a lot of time.

    Get an iOpener and iSlack with the battery replacement kit.

    Chris -

    I used a flat x-acto (#18) blade knife tool to gently pry back the screen enough to allow me to insert the pick near the bottom corner. I then worked the pick under the screen as mentioned in steps 5 & 6 below then. This worked really well for me.

    Kyle Luksa -

    I used the suction cup without heating the phone - the adhesive came away quite easily without applying any heat. Maybe due to age of phone (nearly 4 years old). Worth trying.

    Ben Vinnerd -

    I can’t get the single suction cup to work. Hate being stuck on the simplest step!

    Donny -

    My screen was very shattered, and was quite hard to get suction, as my tape was very low quality. However, after pulling it up a little bit, I was able to insert a regular razor blade into the very small gap and used that as a lever.

    Michael Scroop -

    Oh my goodness! Don't do that again. You can definitely damage something in the phone if you use a sharp metal razor blade..

    cytur -

  9. mrEFNcgfVQWurjTW
    mrEFNcgfVQWurjTW
    rErHmkOhfvSITnGD
    TohvbXinCCnyfcK6
    • Trek de zuignap omhoog met een stevige, constante kracht om zo een kleine opening tussen het voorste paneel en de achterste behuizing te creëren.

    • Steek een openingsplectrum of een andere dunne wriktool een aantal millimeter diep in de opening.

    • De waterdichte lijm die het scherm op z'n plek houdt is erg sterk; het creëren van de opening kan dus heel wat kracht vereisen. Als je moeite hebt met het openen van de telefoon, dien dan meer warmte toe en wiebel het scherm op en neer om de lijm te verzachten totdat de opening groot genoeg is voor je tool.

    After multiple tries and using a very hot iOpener, it will not open.

    Kenneth Ewald, Sr. -

    In sheer frustration, I pulled out my trusty pocket knife and managed to lift the bottom of the screen slightly, but in the process, cracked the glass from the bottom to the home button. The case is open now.

    Kenneth Ewald, Sr. -

    this was by far the most difficult part. be diligent and follow the “firm and constant pressure” guide... the “gap” will be extremely “slight”. you will be able to slide a corner of the pry tool even if you cannot see the gap.

    Colleen V -

    This needs a TON of strength and most likely a partner. Your strong partner will pull up the screen with the suction cup and you will put the pick into the small gap that appears.

    cytur -

  10. AOHSGnMOFMrHBNmQ
    AOHSGnMOFMrHBNmQ
    pBblekYxOTaMfuJJ
    GvMBDIHTcivkDvXO
    • Schuif je openingsplectrum langs de linker onderhoek en via de linkerzijde van de iPhone naar boven richting de volumeknoppen en de stil-/geluidsschakelaar. Snijd daarbij alle lijm door die het scherm aan het frame bevestigt.

    • Stop in de buurt van de linker bovenhoek van het scherm.

    Do not go over the top otherwise you can crack the screen. Sadly happened to me :(

    The instruction should be:

    “Stop near BUT BEFORE REACHING the top left corner of the display”

    Leonardo Piga -

  11. vNlPrysxSGXqqFA4
    • Er loopt een makkelijk te beschadigen kabel langs de rechterkant van de iPhone. Steek je plectrum daar niet in de opening om te voorkomen dat je de kabel beschadigt.

  12. iiGOsaDUPLVF3bpu
    iiGOsaDUPLVF3bpu
    xIUoq1psydvfJCrU
    WRDGbKd2rpx3JRwL
    • Steek je openingsplectrum opnieuw in de rechter onderhoek van de iPhone en schuif deze nu langs de rechterzijkant omhoog. Snijd ook hier alle lijm door die je onderweg tegenkomt.

    • Steek je plectrum ook hier niet dieper dan 3 mm in de opening om te voorkomen dat je de schermkabels beschadigt.

    I had really good luck using a hairdryer on some of the more stubborn portions of adhesive.

    Jessica Kirsh -

  13. dlBIvSNLXKCnX4B6
    • Trek met beleid aan de zuignap om zo de onderkant van het scherm op te tillen.

    • Til het scherm niet meer dan 15º omhoog of je riskeert het afklemmen of afscheuren van de lintkabels die het scherm verbinden.

  14. STTnPPfiiKNEokvD
    • Trek aan het kleine lipje op de zuignap om deze van het voorste paneel te verwijderen.

  15. FWPXimHpMQKpmZZu
    FWPXimHpMQKpmZZu
    MGZUVhY6gplY6qCc
    voQbuSeunKejF3ic
    • Schuif een openingsplectrum onder het scherm langs de bovenkant van de telefoon om ook daar de laatste lijm door te snijden.

    Be very careful at this step. The glass at the top will break very easy when the display is lifted too much.

    Gerdschi D -

  16. Y3wG53ZtiZEQdGYY
    Y3wG53ZtiZEQdGYY
    FNyyLxBTwBhIDlrI
    • Schuif de schermmodule een beetje omlaag (weg van de bovenkant van de telefoon) om deze los te krijgen uit de klemmen die het scherm aan de achterste behuizing bevestigen.

  17. 4NykCXCCyRd5enLv
    4NykCXCCyRd5enLv
    mFZBjHhOBBSSbDKG
    yGLgglmNotb5obSH
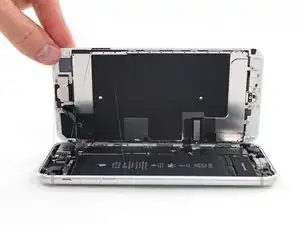
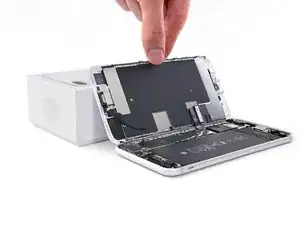
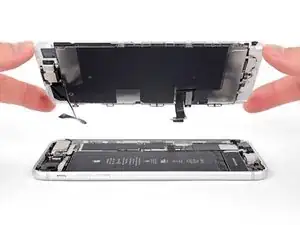
    • Open de iPhone door het scherm van de linkerkant naar rechts te kantelen, alsof je de achterste kaft van een boek opent.

    • Probeer het scherm nog niet volledig los te koppelen, aangezien deze nog steeds aan het logic board van de iPhone verbonden is met een aantal kwetsbare lintkabels.

    • Om het scherm open te houden en aan de telefoon te kunnen werken, kun je het scherm tegen een object laten leunen.

    Das “links” ist auf dem Foto rechts.

    Matze Diamond -

    Das ist falsch. Wenn man auf das iPhone sieht, ist der Home Button unten. Auf dem Photo ist deutlich sichtbar, dass die linke Seite angehoben wird.

    Hans -

  18. gdf4RAku2FO4NKSD
    gdf4RAku2FO4NKSD
    RrJOlSmc4jTe2Wsm
    • Verwijder de vier Phillips (JIS) schroeven die het paneel van de onderste schermkabel aan het logic board bevestigen, met de volgende lengtes:

    • Twee 1.3 mm schroeven

    • Eén 1.4 mm schroef

    • Eén 2.7 mm schroef

    • Zorg dat je, tijdens deze reparatie, bijhoudt welke schroef waarvandaan komt, zodat je deze op de juiste plek weer terug kan schroeven. Een schroef op de verkeerde plek kan leiden tot permanente schade.

    The Phillips screwdriver bit is the PH000. The measurement refers to the screw length.

    Jack Harry -

  19. FVmDfbaakEqqPyM5
    • Verwijder het onderste paneel van de schermkabel.

  20. xCtNERRx2CKlovLn
    xCtNERRx2CKlovLn
    6OqRktbAd2XLTrpP
    • Gebruik de punt van een spudger om de batterijaansluiting uit z'n contact op het logic board omhoog te duwen.

    • Buig de kabel lichtjes omhoog en weg van het contact om te voorkomen dat deze per ongeluk contact maakt en zo de telefoon inschakelt tijdens de reparatie.

    When I reassembled the iPhone 8 Plus, I had to plug it into a Lightning cable to wake it up (just pushing power button wasn’t sufficient).

    browniestarmite -

  21. hSevVTlWDAgGghXZ
    hSevVTlWDAgGghXZ
    xRZuRojAQGBGB3jM
    • Gebruik de punt van een spudger of een nagel om de grote, onderste schermaansluiting los te koppelen door deze in een rechte beweging uit het contact omhoog te duwen.

    • Om drukaansluitingen zoals deze weer aan te sluiten, positioneer je deze totdat op z'n plek lijkt te zitten en duw je één kant van de aansluiting omlaag tot deze vastklikt, om vervolgens hetzelfde te doen aan de andere kant. Druk niet op het midden, want als de aansluiting verkeerd zit, zul je de pinnen buigen en zo schade veroorzaken.

    I got hold of a iPhone 8 Plus with cracked screen that I am planning to fix.

    Here is my problem:

    When I tried to take out the screen from my phone, (step 15-18) I was curious about the new screen, so I tried to connect it. It was completely dead! Then I tried the old cracked one, and suddenly that was dead to! This is a phone that some fool has been inside earlier and changed battery, but I suspect he has done some more really stupid things. The Taptic Engine is living its own life and vibrating every time I slightly touch the home button. (I have a new Taptic Engine) The phone is also full of dust and small particles that does not belong there. One tri-point Y000 screw (step 18) is even missing! Now the biggest problem is that both screens are black! I know the phone is on, because I hear voice command speak when I turn on the power. The screen worked before I tried to change it? And one last thing: My new LCD screen came with new flex cables. Is it possible to switch over, so I can use the old ones?

    smikalsen -

    Hi,

    Is your problem solved?

    Daniel Leprince -

    Be careful of damaging MOSFETs by the LH side of the large lower display cable. After replacing the battery and turning the device on, the phone showed low charge and didn't have a charging symbol even after plugging into multiple cables and chargers. Turns out I had damaged the logic board attempting to disconnect the connector.

    Chris Cerrudo -

  22. aWkRBoqdn5JLDxut
    aWkRBoqdn5JLDxut
    NNsd3K6mmfCyvmLZ
    • Koppel de tweede onderste schermkabelaansluiting los, direct achter degene die je in de vorige stap los hebt gekoppeld.

    I used the other end of the spudger on this connector and it seemed to work a little better for me. I came in from underneath the top-right edge instead of the bottom right.

    Jessica Kirsh -

  23. oJa4BeNCiLydYrFd
    oJa4BeNCiLydYrFd
    GA64GXyHWNMhEGK5
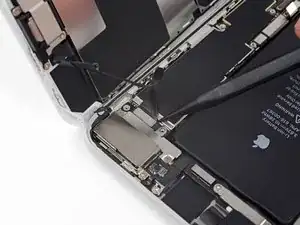
    • Verwijder de twee tri-point Y000 schroeven die het plaatje over de aansluiting van de sensormodule in het voorste paneel bevestigen:

    • Eén 1.0 mm schroef

    • Eén 1.2 mm schroef

    una vite da 1mm e due viti da 1.2 mm???

    Matteo Carachino -

    Ciao Matteo! Grazie per l’osservazione. Ho appena modificato il testo :) La traduzione è aperta a tutti. Hai quindi la possibilità di fare le tue suggestione direttamente nel testo e sei il benvenuto se vuoi usare di questa possibilità nel futuro. Grazie ancora per la vigilanza! Saluti, Claire

    Claire Miesch -

    The tool kit does include a 1.0 or1.2mm screwdriver! How am I supposed to remove those screws?

    peter frommer -

    Bought the screwdriver that supposedly fits these screws and it still doesn’t work.

    hypercarduser -

    My bracket looks different. Can’t get these screws out.

    Ray Rushing -

    kit came with wrong bit. i received 2x P02 (penta tips) and no tri point y000.

    Christopher Shane Gripp -

    There is no such thing as a trigger point y000 screwdriver. Why couldn't they use Philips like the rest of the screws.Nobody knows what these trips point y000 even look like. this is a scam to force you to buy a new phone.

    Al tb -

    y000 tri-point screw driver comes with the iFixit repair kit at minimal cost

    godo -

  24. hBRGDcEYEQNRA2A1
    • Verwijder het plaatje op de aansluiting van de sensormodule in het voorste paneel.

  25. GacqUhpZexRIIL1r
    GacqUhpZexRIIL1r
    gTmxBknJLSOFdNJx
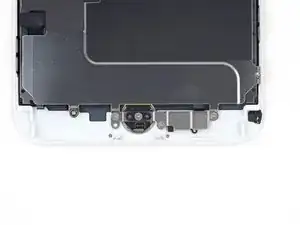
    • Gebruik de punt van een spudger of een nagel om de aansluiting van de sensormodule in het voorste paneel los te koppelen van het contact.

    What happens is this strip is torn and how does one fix it

    Mijinyawa Dauda -

  26. AVYiAe5OJSrbfHdg

    Should there be a step somewhere in here to point out when to remove the blue plastic from the new iFixit screen?

    Paul Santora -

  27. JjpPyrsaW2PrKPeW
    JjpPyrsaW2PrKPeW
    JFSTFpVaHkuTLbOn
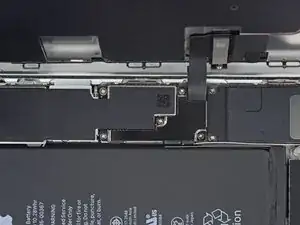
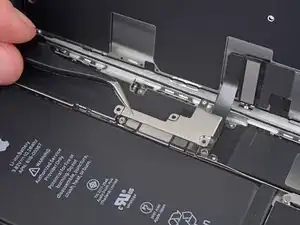
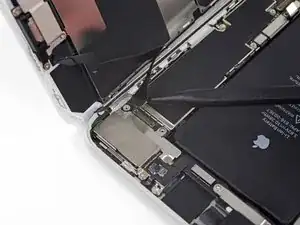
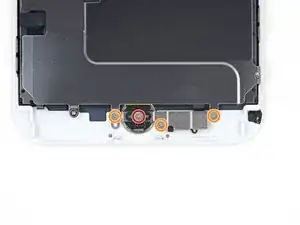
    • Verwijder de vier Y000 schroeven die het plaatje bovenop de thuisknop/Touch ID-sensor bevestigen:

    • Eén 1.2 mm schroef

    • Drie 1.3 mm schroeven

    • Wees, tijdens de hermontage, voorzichtig dat je deze schroeven niet te strak aandraait en om zo te voorkomen dat je thuisknop mogelijk niet meer werkt.

    The 1.2mm screw on the home button stripped for me. I ended up bending the bracket on each side in order to remove the home button. I then bent it back as best I could during reassembly and screwing it down.

    browniestarmite -

    The leftmost screw here (attaching the display bracket to the front panel plastic) was not present on my aftermarket screen assembly. Had to pull it from the original.

    handemail -

    same here on the one im doing now. Dont know its history.

    Harald Ellingsen -

  28. nrVbhmS6UdvyrMlS
    • Verwijder het plaatje dat de thuisknop/Touch ID-sensor bevestigt.

  29. M5RAcUTYWZUROQnW
    M5RAcUTYWZUROQnW
    QHT5NUyXQYXfHMi4
    YCREWlQsUNsbXdMn
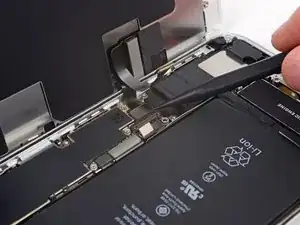
    • Wrik onder de linkerkant van de kabelaansluiting van de thuisknop om deze uit het contact los te koppelen.

    • Als de gehele aansluiting omhoog begint te komen zonder los te komen, duw dan, met de platte kant van je spudger, op de kabel aan de bovenkant van de connector, terwijl je aan de linkerkant van de aansluiting blijft wrikken. Wees wel voorzichtig dat je de kabel of aansluiting niet beschadigt, aangezien dat permanente schade aan de sensor oplevert.

    I accidentally severed the cable, now my sensor is disabled. So far this was the most delicate cable I encountered because it was so small.

    Harmonie Beckham -

  30. NUTlB2f6WdjrBhbG
    • Het verwarmen van het gebied om de thuisknop/Touch ID-sensor heen zal helpen om de lijm, die de kwetsbare kabels op hun plek houdt, te verzachten en het verwijderen ervan te vergemakkelijken.

    • Draai de schermmodule om. Gebruik een föhn of prepareer een iOpener en leg deze op de onderkant van het scherm gedurende ongeveer 90 seconden om zo de lijm eronder te verzachten.

    • Oververhit het scherm niet. Het zou zo warm moeten zijn dat het nét niet comfortabel genoeg is om aan te raken.

  31. wyDvpaBVRSP4ovWU
    wyDvpaBVRSP4ovWU
    xTYJBCRPKagBULx3
    4Tf1oXFd6M3Kd3a3
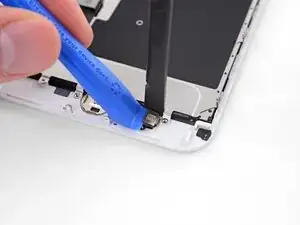
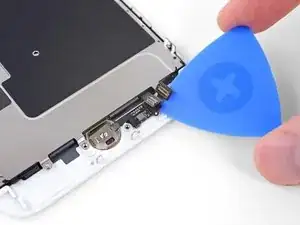
    • Gebruik een openingsplectrum om de lijm die de kabel van de thuisknop/Touch ID-sensor aan de achterkant van het schermpaneel vasthoudt, los te maken.

    This did not work for me…. ended up breaking the connector from the home button. Most likely messed up the customer’s iPhone… the adhesive would not pry up with just pick… does iFixit offer a home button replacement?

    Sidar M Caceres -

    did not work for me either, also ended up breaking the connector, just use the tweezer to separate it. do not use opening pick!!!!! it’s too thick for it!!

    Jeffrey Tang -

    Isopropanol and heat will loosen the adhesive and its possible to gently remove with plastic pick, metal tweezers risk damaging the Home button cable and disabling the Touch facility.

    Chris Smith -

    Pretty easy to follow instructions if you have patience and careful hands. If you have clumsy hands you will not succeed in fixing any small electronics. There are some small things you should use to help you succeed at fixing small electronics, like some scotch tape or other clear tape to hold some of the cables in place while you work on small electronics items, also a small heavy bottle or object to propped the iPhones cases against to hold them from falling over so that your hands can be free to perform your tasks. Great job you are doing iFixit personel and I am with you all the way with fighting for our rights to fix our electronics equipment.

    wogriffith -

    Isopropanol in conjunction with the heat really did the trick here. Heat up first, then use plenty of the alcohol to pry it up carefully using the pick.

    Maximilian Krause -

    Heat dryer on high worked for me.

    Stephen Smith -

    I followed exactly the method in Step 37. First, turn the screen over and warm up slightly around the home/Touch ID sensor , making the cable easier to come loose from the screen. I didn't use an opening pick, I used a spudger it worked fine, but be careful

    clbr -

    why is my home button attached to the lcd? there is no clip and makes it impossible to easily remove home button. help!!

    Joel -

    I also was mystified as to why I could not remove the home button after successfully removing the cable. Then I remembered that I had suggestion at step 4 and covered shattered screen with clear tape! Once tape was removed, button came out! LOL!

    bseagrave -

    I heated the tip of a thin knife with a hot air gun and slide it under the flexible cable. When I hit resistance I reheated the knife. Keeping it parallel to the board while doing this. After 4 heatings the knife moved the rest of the way and the cable lifted easily off of the iPhone back. This method left enough glue on the cable that it restuck fine when moved to the new iPhone.

    Bill Auerbach -

    Apple loves to make this the most difficult thing. I've been successful many times, and not so on other repairs. I just finished a repair and everything was in tact, but sadly it didn't work. Took a part and put back. So I turned on the assistive touch home button. They will be getting a new phone soon, so not a big issue except Pride.

    Shawn Bailey -

  32. iTSSaELEwxXa5kW3
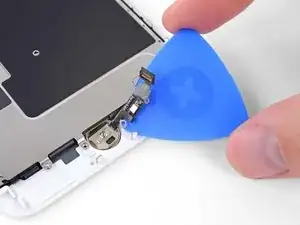
    • Verwijder de thuisknop/Touch ID-sensormodule door deze door het gat in de voorkant van het scherm te begeleiden.

    • Om deze weer te installeren, begeleid je eerst de kabel door het gat in de voorkant van het scherm, zoals op de foto getoond wordt.

    • Het kan zijn dat je vervangende onderdeel wordt geleverd met extra Y000-schroeven die al zijn bevestigd naast de thuisknop. Verwijder de overbodige schroeven zodat je het plaatje van de thuisknop weer kan installeren.

    What is a good alternative adhesive for sticking this back on the new screen?

    Jithesh -

Conclusie

Als je vervangende scherm niet is geleverd met een voorste camera en sensorkabel, volg je deze stappenom deze over te zetten naar je nieuwe scherm.

Vergelijk je nieuwe onderdeel met het originele onderdeel om te zien of je onderdelen over moet zetten om het nieuwe onderdeel compleet te maken. Controleer ook of je beschermfolie moet verwijderen voordat je het nieuwe onderdeel kunt plaatsen.

Om je toestel weer in elkaar te zetten, volg je deze instructies in omgekeerde volgorde.

Breng je e-afval naar een R2 of e-Stewards gecertificeerde recycler.

Ging je reparatie niet zoals gepland? Check dan onze Antwoordencommunity voor hulp bij het oplossen van je probleem.

Jeff Suovanen

Lid sinds: 06/08/13

442718 Reputatie

6 commentaren

aiuto mi son cadute e quindi perso

sensore home/Touch ID Una vite da 1,2 mm Tre viti da 1,3 mm

dove le trovo?

Giovanni Giuffrida -

ATTENTION: Don’t screw in that one screw over the home button too much, or the button breaks! I just found one proper explanation for it in this YouTube video (https://www.youtube.com/watch?v=rDVnp90a...). Basically, that one screw that goes over the Home button should not be tightened too much, so that the metal plate doesn't bend (which it did for me).

Manuele -

This was truely helpful.

Josh Odeh -

Anybody have the issue where the button works when the phone is in 2 pieces, but when you assemble the screen onto the phone body, the button no longer responds after a restart??

Power on phone while in 2 pieces -> home button is working

Attach screen to phone body -> home button is still working

Restart phone with phone assembled -> home button not responding

Morrious -

Hallo Zusammen

Wird bei diesen Mikroschrauben nur das Gewinde gemessen oder die gesammte Schraube inkl. Schraubenkopf? Ich frage, weil mir die Schrauben des Homebutton weggespickt sind 1.2 und 1.3mm...

Danke

LG

alex delpiero -

Hallo Alex!

We measure the entire screw for our guides.

Arthur Shi -