Inleiding

Dit is een vooraf vereiste handleiding die je toont hoe je de batterij van een iPhone 8 vervangt.

Deze handleiding toont je hoe je de volledige schermmodule verwijdert; dit is bedoeld om incidentele schade aan de schermkabels te voorkomen. Als je je comfortabel genoeg voelt om de batterij te verwijderen zonder de schermkabels daarbij te veel te belasten, kun je de stappen voor het verwijderen van de schermmodule overslaan. Daarbij raadt deze handleiding het aan, hoewel het mogelijk is om de kleefstrips direct na het openen van de telefoon te verwijderen, om eerst de trilmotor te verwijderen. Dit verkleint het risico op het breken van de onderste kleefstrips op de trilmotor of door het trekken in een te scherpe hoek.

Kalibreer, voor een optimale performance, je nieuw geplaatste batterij: laad deze op tot 100% en blijf deze opladen voor minstens twee uur langer. Gebruik je telefoon vervolgens totdat de batterij volledig leeg is en je telefoon daarom uitvalt. Laad je telefoon, tot slot, weer helemaal op naar 100%.

  1. QEiwXOLOCt5t6bkO
    • De batterij van de iPhone 8 is vastgemaakt door middel van vier kleefstrips met treklipjes—twee aan de bovenkant en twee aan de onderkant.

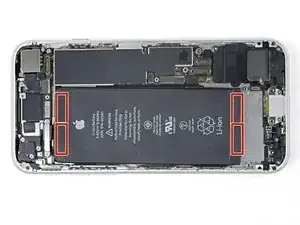
    • Iedere kleefstrip heeft een zwarte treklip aan het einde welke lichtjes vastzit aan de voorkant van de batterij.

    Be careful prying around the side button connector when trying to remove the top tabs. There is very little room to maneuverer

    Tom Millard -

    £ Tapes broke on me so I applied iISOPROPYL ALCOHOL using an Eye Dropper waited 30 seconds tHen heated up some oil in the bag rice for 2 minutes on 700W and the applied the unopened packet to the back of the iPhone for 90 seconds.

    Themn I used an out of date credit card with the raised numbers facing down to easily release the battery.

    David Howard

    David Howard -

    Great tip! Worked perfectly and easy. Thanks.

    Stephen Smith -

    It should read heated up some boil in the bag rice

    David Howard

    David Howard -

    Very difficult. be very careful on the limited space end that you don't puncture the battery!

    Carl Schultz -

    I really hope you guys not to skip steps for detaching taptick engine because it is really hard to pull out string with taptic engine. 4 of 3 strings were cutted when I treid to detach batteries with taptic engine. So, I really recommend you to get rid of taptic engine before you start this step. But if you skipped and strings are cutted, there is a way. Use hair dryer 90 secs as maximum hot behind the battries and detach the batteries. It worked to me.

    Min Su Kang -

    I tried to remove the battery without detaching the taptic engine -and succeeded-: Just took into account the fact that it is by far easier and safer to start detaching the battery on the other-than-taptic side. I did it the tough way, knowing that the battery is then discarded. I hair-dried the back of the iPhone a little bit and then inserted a strong credit card all along the side of the battery and leveraged ! Yes, even without triying to remove the stickers. It bends the battery (however dead. This is why you change it, right ?!) but it comes after a few seconds. The 2 stickers detach, than it is easy ans simple to remvore the battery from the 2 other-side stickers.

    Jean Luc -

    I skipped removing the Taptic Engine (this was my second iphone SE replacement). In both replacements, 4 tabs broke off at the top and bottom of the battery (no matter how slowly I pulled). I found the best success using 91% Isopropyl Alcohol in all 4 corners of the battery to dissolve the adhesive. I took a clear straw and put one end of it in the bottle of alcohol and covered the top end of the straw with my finger to create a vacuum to hold the liquid in the straw. I placed about 1/4 inch of alcohol in the bottom of the straw by keeping my finger on top to keep the liquid from leaking out of the straw). I placed 1/4 inch of alcohol at each corner of the battery and let it work it's magic for about 5 minutes dissolving the adhesive. I repeated this process a second time just to make sure all the adhesive was weakened sufficiently. I used the flat end of the Spudger to carefully pry out the battery. Do not pry in the top left corner as there is a cable embedded under the battery you could damage.

    Doug Dombek -

  2. vs4oMYcRlWEFb2lY
    vs4oMYcRlWEFb2lY
    jImYu1JRHGErUfnj
    okM1ORGZUueh1Xi6
    • Peuter de eerste kleefstrip, aan de rechter onderkant, los van de batterij.

    • Gebruik, als het kan, je nagels of een pincet met stompe uiteinden. Wees voorzichtig dat je de batterij niet doorboort met scherpe tools.

    Vor Schritt 30 umbedingt die Rückseite des iPhone erwärmen. Ich habe das iPhone 10 Minuten auf eine heiße Wärmflasche gelegt.

    Moritz Hartges -

    Strongly suggest you remove the display. Also the picture shows the "perfect world" it is far ore difficult to remove and get to those white adhesive pull strips. be very careful!!!

    Carl Schultz -

  3. 4eDyPbJ62yPLKLAd
    4eDyPbJ62yPLKLAd
    J3TMbulIt5RYhCcJ
    fjKZrs3OCvNRVb3I
    • Probeer de kleefstrips recht en vlak te houden tijdens deze procedure; gedraaide of gebogen strips zullen, in plaats van makkelijk loskomen, vast blijven plakken en breken.

    • Druk ook niet op de batterij tijdens het trekken aan de kleefstrips. Druk op de batterij zal ervoor zorgen dat de kleefstrips breken.

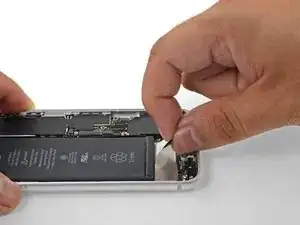
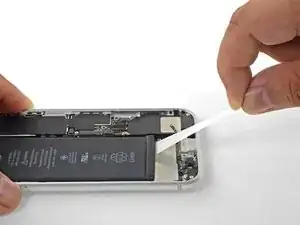
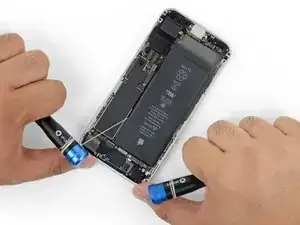
    • Trek een kleefstrip, langzaam, weg van de batterij in de richting van de onderkant van de iPhone.

    • Trek met een gelijkmatige kracht en houd constante druk op de kleefstrip totdat deze losschiet tussen de batterij en de achterste behuizing. Trek de kleefstrip, voor het beste resultaat, vanuit een zo laag mogelijke hoek zonder de kleefstrip daarbij op een ander onderdeel te scheuren of breken.

    • De kleefstrip zal een aantal keer haar eigen lengte lang worden. Blijf doortrekken en pak de strip telkens dichter bij de batterij opnieuw vast indien nodig.

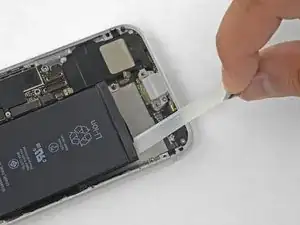
    • Als een van de kleefstrips tijdens het proces breekt, kun je je vingers op een bot pincet gebruiken om het resterende deel weer te pakken te krijgen en door te gaan met trekken.

    • Als een van de kleefstrips onder de batterij breekt en je deze niet weer te pakken krijgt, probeer dan de overige strips te verwijderen en ga verder met de instructies.

    This was the most frustrating step of the process. I found that if you pull steadily and slowly while continuing to grip the adhesive as close to the battery as you can there is a much smaller chance of breaking the adhesive strip and losing it under the battery.

    Benjamin Boldt -

    I did not have replacement adhesive tabs for my battery so I needed to re-use the old ones. First, I pulled back the black tabs from the top and sides of the battery (Steps 28 and 29). Then I laid the phone on a hot water bottle (Wärmeflasche for our German friends) while I very, very, very slowly prised the battery out of the body using the flat end of a spudger, starting at the corner closest to the volume buttons. The battery did deform somewhat during the process, but it was fully discharged and I had no combustion problems. After a few minutes of gentle pressure on the battery corner, it started to release from the adhesive. Full removal took about 5 minutes and the adhesive tabs were not damaged in any way and happily re-adhered to the new battery.

    I did all this after skipping over steps 18 to 27 and put the new battery in place after connecting it first to the circuit board to ensure correct alignment.

    jnbruin -

    All 4 strips tore after just removing a small portion… even though I took great care to pull slowly and at a small angle. Could not imagine how anyone could have managed this with my phone. Had to heat and pry out.

    griffin.weber -

    I damaged the graphite film underneath the battery while removing it from stubborn adhesive using a card from the side. Can I buy replacement graphite film? Should I remove it altogether since it's ripped or will that cause problems for heat dissipation? Thank you for any information.

    Anne Marie Hammock -

    Every time I've tried to remove these strips they just wind up breaking, regardless of the Taptic Engine being removed, or not.

    tripmusic -

  4. yAxAcOuZkVKD1xAY
    yAxAcOuZkVKD1xAY
    vMCND6xEQrEDRyJI
    woB3TYHUSBFt1Phm
    • Herhaal de bovengenoemde stappen om de overige drie kleefstrips te verwijderen.

    • Zorg dat je de batterij enigszins vasthoudt bij het verwijderen van de laatste strip. Anders kan het zijn dat je de batterij onverwachts uit de iPhone lanceert.

    • Als je met succes alle kleefstrips hebt weten te verwijderen, kun je de volgende stap overslaan.

    • Als een van je kleefstrips onder de batterij is gebroken en je deze niet meer te pakken hebt weten te krijgen, ga je verder met de volgende stap.

    If you have a thin flexible plastic shim shaped like a letter opener, you can slip it under the battery and take it off the adhesive.

    Spencer Chan -

    I damaged the graphite film underneath the battery while removing it from stubborn adhesive using a card from the side. Can I buy replacement graphite film? Should I remove it altogether since it's ripped or will that cause problems for heat dissipation? Thank you for any information.

    Anne Marie Hammock -

    Good luck with the top two…. Virtually impossible to remove. Both of mine broke almost immediately. I tried floss and a strong thread and both broke before they did much good.

    so I took a plastic card (an old credit card would work, but you’ll have to cut it thinner or work from the sides. If you got the bottom two out successfully, you should be able to get enough lift to start prying gently with the card.

    Good chance you’ll scuff up the super-thin carbon film over the charging coil if you’re too aggressive. And DO NOT use alcohol to soften the glue because it will melt right through that thin carbon layer and make a mess. Best bet is to go gradually…. Put the plastic card under the battery, pull up a bit to add tension, and then stick a pencil or popsicle or something under the card to keep keep the tension and give it 5 minutes or so for the tape to loosen. Then pull up on the card to add new tension, move the stick up, and wait again. It’ll take 20-30 minutes. Repeat until free and don’t rush.

    Bigh -

    Thank you much -- I was planning to use alcohol until you brought up this point. Slow but steady leverage like you describe (with mild-to-moderate heat underneath) does indeed sound like the best bet.

    David Reynolds -

    Anne, I had little rips in that layer, and it doesn’t seem to have affected anything.

    Bigh -

    @bigh I’m surprised nobody else mentions this problem! With the piece above the battery still in place, impossible to pull « at the smallest possible angle with horizontal » as for the 2 bands below: I suppose that’s why they make us remove the taptic engine! Why not similarly remove the things above the top of the battery?

    Jean Orloff -

    Or at least explain why removing the things above the battery is a bad idea. (Which I don't doubt.)

    I love how right after the previous step where they (rightly) put heavy emphasis on how exquisitely careful you need to be to pull at the lowest angle possible and not snag it on other components, in this step they glibly skip right past "Oh and that'll be effing impossible for the top two since you have to pull at almost 90° right next to components with narrow edges, so good luck".

    David Reynolds -

  5. DBnvH5CTIVnxfCdd
    DBnvH5CTIVnxfCdd
    Ch4yrKmbroeQvpsG
    • Als een van de kleefstrips onder de batterij is afgebroken en de batterij nog steeds in de achterste behuizing vast zit, kun je deze verwijderen met behulp van een aantal druppels isopropyl alcohol (>90%). Dien de alcohol in de buurt van de afgebroken strip(s) toe en probeer de batterij, na ongeveer een minuut, weg te tillen.

    • Probeer de batterij er niet met botte kracht uit te wrikken. Indien nodig kun je wat extra druppels alcohol toedienen om de lijm nog verder te verzwakken. Probeer echter te voorkomen dat je je batterij in deze stappen doorboort of vervormt met je wriktool.

    • Als je voor het omhoogwrikken van de batterij kiest om wriktools te gebruiken, wees dan extra voorzichtig dat je de lintkabels en de draadloze oplaadspoel direct onder de batterij niet beschadigt.

    • Als de batterij nog steeds aan de achterste behuizing blijft plakken, verwarm je een iOpener of gebruik je een föhn om de achterste behuizing, direct achter de batterij, te verwarmen zodat je de lijm nog verder verzwakt.

    • Verwarm je iPhone totdat de achterste behuizing net iets te warm is om op comfortabele wijze aan te raken. Oververhit je iPhone niet, aangezien dat kan leiden tot het in brand vliegen van de batterij.

    • Als alternatief kun je ook een sterk stuk draad (zoals flosdraad of een deel van een gitaarsnaar) onder de batterij door rijgen.

    • Trek de snaar in een zagende beweging van kant naar kant en doe dit over de gehele lengte van de batterij om de lijm zo los te snijden. Beschadig of vervorm de batterij niet.

    • Draag, om je handen en vingers te beschermen, handschoenen of wikkel de einden van de snaar om een tool (zoals de twee schroevendraaiers op de foto) heen.

    In my case the floss caught on the sharp edge of the wireless charging coil pulling up the edge of the coil, butane cutting off the floss. I think the coil had been damaged by some previous repair, but be careful. After you pull past the first two adhesive strips, peek under the battery to make sure the floss is sliding over not under the coil. The coil doesn't look like a coil – more like a paper thin pad.

    Joel -

    Soaking the floss in rubbing alcohol helped also. It took some doing, but eventually came through without issue.

    Trever Knie -

    the wireless coil accidently got a little tear just to the right middle area. I put the new battery in and everything seems fine. I wonder if I should change the coil? anyone have any suggestions of what symptoms to look for if there were to be an issue ? thank you

    cb brooks -

    I ended up heating the back of the phone for 30-60 seconds (don't do anymore than that) and used the opening tool as a fulcrum to lift the battery. As long as you're careful it should work!

    Vladimir Stanev -

    I damaged the graphite film underneath the battery while removing it from stubborn adhesive using a card from the side. Can I buy replacement graphite film? Should I remove it altogether since it's ripped or will that cause problems for heat dissipation? Thank you for any information.

    Anne Marie Hammock -

    We used my heating pad set on low, placed the case on it, about two minutes and using the opener tool, lifted the battery out. This was the only bump/snag we had, the remaining steps went well and I have my phone back.

    Pete P -

    All the adhesive strips broke, so I used the long plastic tool for brute force extraction, twisting the old battery in the process. Most of the old strips in the back remained, so reused them for the new battery.

    Boaz Ben-Zvi -

    A hairdryer and dental floss dipped in Isopropyl alcohol worked for me. You need to use the blue pick and pointy end of the spudger to get the floss down deep enough into the crevice near the taptic engine. Then I just slowly pulled both ends of the floss down the length of the battery. DO NOT use the blue triangle pick, or similar to try and pry the battery up. The last time I very nearly damaged the charging coil near the center of the battery.

    tripmusic -

    Of course skipping the screen and taptic engine disassembly, all 4 strips broke for me, so I ended up using a thin rubberband in place of the floss, and a flexible plastic card, slim enough to slip under the battery and pry it out. Took more than an hour but it worked out in the end, and I was glad I didn't have to deal with reattaching the screen and everything else to be honest. Be careful to not tear other small components with the edges of the card though, as I tore some unsuspecting black rubbery cover from a metallic case above the battery connector. Used some thin insulating tape to cover the exposed parts, just to be safe.

    Raziocinjo -

  6. 4bYRPYeqSJkQMwrH
    • Verwijder de batterij uit de iPhone.

    • Als je vervangende batterij werd geleverd in een plastic hulsel, verwijder dan eerst het hulsel voordat je de batterij installeert.

    • Als er zich nog alcoholresten in de behuizing bevinden, veeg je deze nu voorzichtig weg of laat je deze drogen voordat je je nieuwe batterij installeert.

    • Als je nieuwe batterij geen vooraf geïnstalleerde kleefstrips bevat, gebruik dan deze handleiding om de kleefstrips ook te vervangen.

    • Voer een geforceerde herstart uit na het weer in elkaar zetten van je telefoon. Dit kan een aantal problemen voorkomen en probleemoplossing vergemakkelijken.

    • Zorg dat je je nieuwe batterij, voordat je deze definitief bevestigt, eerst weer even tijdelijk op het contact op het logic board aansluit. Dit helpt bij het op de juiste positie plaatsen van de batterij.

    • Vervolgens bevestig je de batterij, koppel je deze weer los van het contact op het logic board en ga je verder met het weer in elkaar zetten van je toestel.

    Having received a replacement battery from CE Store, the phone is now OK with top battery performance. The one received earlier was just a scrap, not chargeable. Now, I’m quite satisfied.

    Miklos Barton -

    I made the mistake of powering the phone on once the new battery was connected to make sure it was working, before I put the screen back on. Now my home button doesn’t work, even after two hard resets. Anyone know how I can get it working again? Note I didn’t disconnect the screen or taptic engine or anything else. I just left the screen hinged 90°, the only connector I touched was the battery connector.

    John M -

    Same issue. Home button is dead. No cables were damaged. Everything else works. Any ideas?

    Aaron Soderholm -

    I had the same issue with the Home button, I turned on Virtual Home Button, which makes the phone usable. Shutting the power off off and restarting the phone bring you to the login screen. go to Settings, Accessibility, Touch, Assistive Touch.

    Gary Berman -

    You maybe fried it.

    Gabriel-Science -

    I recommend making sure the battery connector is lined up with the socket before setting it down on in the compartment, mine was very close, but a little too high and it made getting it connected a little more difficult than it needed to be.

    Benjamin Boldt -

    I agree Benjamin. Eager to ask anyone starting this, since it added 90 minutes onto my project, be careful, though I can testify that the metal flex connector bends. In other words, I bent it about 3 times so the proper alignment could be attained - sort of a zig zag. Amidst that phase I had practically given up, almost started removing the new battery, but alas I got the phone to work again. We'll see if its function can last.

    Steph B -

    Performing a force restart at this point makes no sense. Shouldn’t it be performed after the display is installed?

    Richard Dempsey -

    Creio que a "reinicialização forçada" deverá ser feita "após a remontagem" do aparelho como está instruído.

    Samuel Vitor Alves dos Anjos -

    He said:

    I believe that the "forced restart "should be done "after reassembling" the device as instructed.

    Roman Khalikov -

    After you connect the new battery and before laying it down, make sure the end closest to the Taptic Engine has as much of a gap as possible and don't lay it down until you are absolutely sure that you are happy with the placement of it. This time around that end of the battery wound up being pretty much flush against the Taptic Engine and there really isn't much of a gap compared to the previous battery I put in there. I suspect there may be some inconsistencies with how the metal flex connector is attached to the battery itself from the factory and possibly the connector's length. With the battery connected, laying it down and leaving as much of a gap as possible, will help for the next time you replace it, especially if you choose not to remove the Taptic Engine.

    tripmusic -

    i've done a number of electronics repairs. failed badly at this one. when i was taking the two halves of the phone apart, the front sensor assembly cable sheared in half like it was made of jello. i would have been better off simply putting a new battery in and not attempting to reseal the phone. yes, it would have lost any water resistance, but the operation would have been much simpler. now a phone that i was happy with except for its battery life is going into the trash. i'll never open up an iphone again and i don't recommend it.

    Alex Redmond -

    It's the major risk of repairing your device yourself. However, if you feel confident enough and if it's not an hard repair, I would say « Do it ! ».

    Gabriel-Science -

Conclusie

Om je toestel weer in elkaar te zetten, volg je deze instructies in omgekeerde volgorde.

Breng je e-afval naar een R2 of e-Stewards gecertificeerde recycler.

Ging je reparatie niet zoals gepland? Check dan onze iPhone 8 antwoordencommunity voor hulp bij het oplossen van je probleem.

Arthur Shi

Lid sinds: 03/01/18

297440 Reputatie

0 commentaren