Inleiding

Vooraf vereiste handleiding voor het loskoppen van de schermmodule.

  1. BO6lEF2W1kX5S1sI
    • Ontlaad je batterij, voordat je begint, tot onder de 25%. Een geladen lithium-ion batterij kan in brand vliegen en/of exploderen als deze per ongeluk wordt doorboord.

    • Schakel je iPhone uit voordat je begint met het uit elkaar halen van je telefoon.

    • Verwijder de twee 6.9 mm lange pentalobe schroeven aan de onderkant van de iPhone.

    • Als de schroeven zijn beschadigd, vervang je de schroeven.

    • Het openen van het scherm van de iPhone zal de waterdichte sluiting van de telefoon aantasten. Zorg dat je vervangende sluitingen klaar hebt liggen voordat je verdergaat of zorg ervoor dat je telefoon niet wordt blootgesteld aan water als je ervoor kiest de sluitingen niet te vervangen.

    There are 6.81mm long screws!

    Daniel -

    One of the pentalobe screws is stripped :( - suggestions for how to get it out?

    cgtyoder -

    same situation here

    kaunomarcius -

    Same issue for me too, how do I get the stripped screw out?

    patronics -

    Update: I was able to get the “stripped” screw out using another Pentalobe-2 screwdriver bit from another company. It seems it wasn’t the screw, but the screw driver that was actually stripped. Hence why the other screwdriver kit I got came with 3 of this bit, I suppose.

    patronics -

    I ended up going to a jewelry store, and they drilled down into the screw, with of course an incredibly tiny bit. That allowed me to insert the P2 driver, and I was able to unscrew it at that point. Good luck!

    cgtyoder -

    Same issue with the stripping. The tip of the iFixit P2 head in my $70 kit just ground off on the first screw and that was that. Not much you can do.

    Kyle Harris -

    yes correct the same happened to me, the screws were perfect shaped never been open and as soon as i used the P2 it stripped the screws, seems like the P2 is slightly smaller but Dremel kit with a very small drill bits and precise knife tool is the way to go.

    Dulce Vidal -

    This step in automatically followed through, without any thought. Why remove these screws? Can anybody explain? The Screen is detachable all the same, with them well screwed in…

    Uri -

    These screws attach to a plate that’s part of the screen half of the phone. If you succeed in detaching the screen without removing those, it would seem reasonable that you will have damaged that plate or its ability to keep the two halves together.

    Dan Long -

    @Dan Long is right

    Uri -

    Clean out the pentalobe screw heads first so the tool goes all the way in. A small sewing needle works well to loosen any build up and then press some putty/chewing gum into the screw head and pull away quickly for a final clean out.

    William Olstad -

    The this kit should include screws because you’re going to strip them. Can’t even get past step one. Did anybody figure this out

    justin -

    Never opened my phone ever, when I went to look at the first step.. I noticed one of my screws was stripped. I thought it was impossible, but I removed the non stripped one, then once I got to the stripped one.. I learned my assumptions were correct. I bought this one straight from the apple site years ago ahaha Any tips to remove the stripped screw?

    Clarence Williams -

    William Olstad's tip about cleaning the screws with a needle and a bit of poster putty worked well for me. There was a lot of crud in there! The opening is shallow, so it's easy to see how the screwdriver wouldn't catch with even a bit of grit in the way, No problem getting the pentalobe screws out with the ifixit screwdriver.

    punkinann -

    If all else fails, very carefully cut a slot across the head of the screw with a Dremel tool using a diamond bit that dentist will gladly give you - I ask my dentist for used bits; and chuck them in a drill bit chuck designed for Dremel. The slot allows you to use a tiny, straight blade screwdriver. You can reuse the screw or replace it with a new pentalobe screw.

    Dan Smith -

  2. Whblnhy2uvYmFjIL
    Whblnhy2uvYmFjIL
    4URQtwUtqSQUKdHH
    NgjPkqJtEMhTXkd3
    • Als het scherm van je iPhone gebarsten is, kun je wat tape over de barsten plakken om te voorkomen dat het scherm verder beschadigd raakt tijdens dit proces. Zo verklein je ook het risico op fysieke schade.

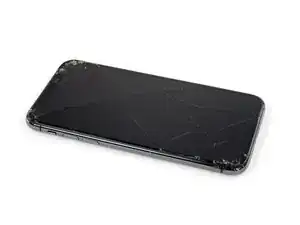
    • Plak een aantal lagen tape op het scherm van de iPhone tot het gehele scherm bedekt is.

    • We raden je ten sterkste aan om tijdens deze stap een veiligheidsbril te dragen zodat je je ogen beschermt tegen eventueel loskomende glasscherven.

    • Als het je in de volgende stappen niet lukt om de zuignap op het scherm te bevestigen, kun je ervoor kiezen om een stuk duct tape in een handvatvorm op het scherm te plakken. Hiermee kun je dan het scherm omhoog tillen om een opening te creëren.

    • Als alternatief kun je er ook voor kiezen om de zuignap met secondelijm op het scherm vast te plakken.

  3. aaO4KYlBJShASHjk
    aaO4KYlBJShASHjk
    1r6VLlUjodppndSN
    BMhMJ35CLUOmyNqB
    • De volgende twee stappen introduceren de Anti-Klem, een handige tool die we aanraden aan iedereen die regelmatig reparaties uitvoert. Als je de Anti-Klem niet gebruikt, sla dan de volgende drie stappen over voor een alternatieve methode.

    • Voor uitgebreider instructies voor het gebruik van de Anti-Klem, lees je deze handleiding door.

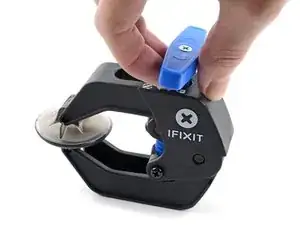
    • Trek de blauwe hendel naar achteren zodat de anti-klem vrij kan bewegen. (Op deze manier deactiveer je de openingsstand van de anti-klem.)

    • Schuif de armen over de linker- of rechterzijde van je iPhone.

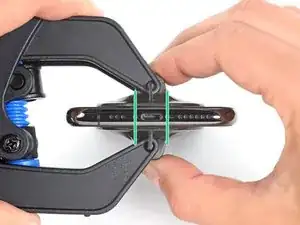
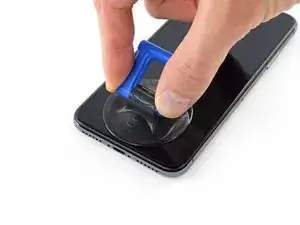
    • Plaats de zuignappen dichtbij de onderkant van de telefoon—één op de voorkant en één aan de achterkant.

    • Druk beide zuignappen aan, om zuigkracht uit te oefenen op de gewenste plek.

    • Als het oppervlak waarop de zuignappen zich moeten vastzuigen te glad is, kun je wat tape gebruiken voor meer grip.

  4. fm1Txb6ZWoZVRccg
    fm1Txb6ZWoZVRccg
    ASYBeEfJh2IqKXlL
    qYIoimNJqUrEuJAT
    • Trek het blauwe handvat naar voren om de armen van de anti-klem te vergrendelen.

    • Draai het handvat 360 graden met de klok mee of tot de zuignappen uit beginnen te rekken.

    • Zorg dat de zuignappen op één lijn met elkaar zitten voordat je begint met het openen van het toestel. Als je ziet dat de zuignappen niet meer op één lijn zitten, maak je ze los en breng je ze weer op de juiste positie aan.

  5. fqtITHlwZLOFLmTY
    fqtITHlwZLOFLmTY
    321YFxdKNFRFVwk3
    YctteqQxMcE3kxyP
    • Verwarm een iOpener en plaats deze tussen de armen van de anti-klem op je telefoon.

    • Je kunt ook een föhn, heteluchtpistool, of een kookplaat gebruiken, maar wees bij het gebruik hiervan extra voorzichtig. Te veel warmte kan tot warmteschade leiden. Vooral het scherm en de batterij zijn hier erg vatbaar voor.

    • Vouw de iOpener zodat deze op de onderkant van de iPhone komt te liggen.

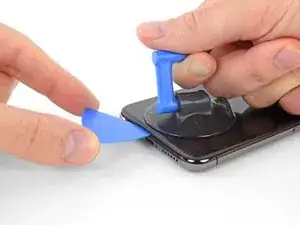
    • Geef de lijm een minuutje de tijd om los te komen zodat de anti-klem een opening kan creëren.

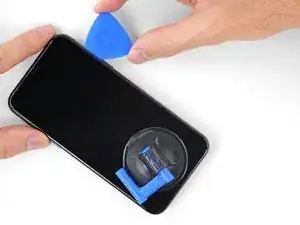
    • Steek een plectrum in de opening onder het scherm en de plastic rand, en niet onder het scherm zelf.

    • Als de anti-klem er niet in slaagt een opening te creëren die groot genoeg is voor je plectrum gebruik je meer warmte en draai je het blauwe handvat een kwartslag met de klok mee.

    • Draai het handvat nooit verder dan een kwartslag per keer en wacht een minuut voordat je de anti-klem weer besluit aan te draaien. Laat de anti-klem het werk voor je doen.

    • Sla de volgende drie stappen over.

    DO NOT separate the glass from the plastic bumper or rim around it. These instructions don't clarify that the pick has to be inserted between the plastic rim and the metal body. It is likely that the glass will lift slightly off the plastic surround before the plastic will lift out of the metal body. I had success sliding a card or pick back and forth along the bottom edge of the plastic rim while pulling on the suction cup. Eventually there was a space large enough for the pick to go under the plastic rim.

    Anessa -

    Thanks for pointing this out! I'll revise this step to clarify this point.

    Arthur Shi -

  6. JYhTvDYuGLQw3jiI
    • Het verwarmen van de onderkant van de iPhone helpt de lijm, die het scherm op z'n plek houdt, te verzachten, wat het makkelijker maakt om de telefoon te openen.

    • Gebruik een föhn of een warmtepistool, of prepareer een iOpener en leg deze op de onderkant van de iPhone gedurende ongeveer een minuut om zo de lijm die eronder zit te verzachten.

    General tip regarding heating necessary to remove adhesive:

    consider using a heated tip of a small screwdriver or metal spudger (not the one made of plastic, provided in kit), rather than to heat the device itself.

    Uri -

    You then need to be careful about the temp of the tool which if hot enough can melt plastic components or harm them. Keeping the heat source (heat gun) far enough away from the object that you’ll eventually melt the glue but would be much harder to melt components. I try to keep 4” or 5” gap between the source & object

    Sandman619 -

    Thanks for the info. Could a air convector do the job

    dominique.br -

    When opening a device that has previously been worked on, and on which the adhesive might not have been replaced, be extremely carful when opening the phone. It will open much more easily than expected. If you’re not careful you might rip a cable.

    jonpol -

    Is this tool required or can I just use the Anti-Clamp by itself.

    Mikail -

    If you have a 3d printer, heat the bed to 80c and put the phone screen side down on it for 30 secs

    philip.joseph123 -

    thaks for this advise, I was looking for this as I dont have a heat gun haha, nice hack

    Andres Chaparro -

  7. qXGGZ2MpZIYeQjKI
    qXGGZ2MpZIYeQjKI
    tGDwxj5neYkh3MDh
    • Als je een enkele zuignap met handvat gebruikt, druk deze dan vast aan de onderkant van de telefoon, maar vermijd het bolle deel van het glas.

    If you were using some form of screen protector, it may come off first as soon as you pull on the suction cup. Do not be alarmed. That is normal behavior.

    Alain-Daniel Wa-Baguma -

    3m VSB double stick tape will stick to the screen when the suction cups fail (see my comment on step 1)

    Tawan Khamapirad -

  8. uTXCGQFa5j4E5T3Y
    uTXCGQFa5j4E5T3Y
    DWfsuj4RCooAtKRa
    Zw4PcEZSTKHaLcqq
    • Trek de zuignap omhoog met een stevige, constante kracht om zo een kleine opening tussen het voorste paneel en de achterste behuizing te creëren.

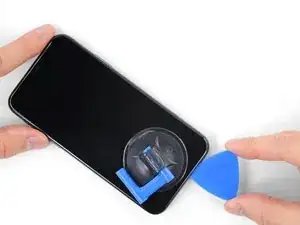
    • Steek een openingsplectrum in de opening onder de plastic rand van het scherm, niet onder het scherm.

    • De waterdichte lijm die het scherm op z'n plek houdt is erg sterk; het creëren van de opening kan dus heel wat kracht vereisen. Als je moeite hebt met het openen van de telefoon, dien dan meer warmte toe en wiebel het scherm op en neer om de lijm te verzachten totdat de opening groot genoeg is voor je tool.

    In addition to safety goggles, I would recommend you also wear good gloves to avoid getting cut with the glass as you try to pry it open.

    Alain-Daniel Wa-Baguma -

    The top about applying more heat and gently rocking the screen up and down to weaken the adhesive did the trick for me. Thank you!

    Monil Shah -

    There needs to be more clarity on where to shove the opening pick into. There is actually two openings that the pry tool can be forced into: one below the black plastic bezel, and one above the black plastic bezel. When I heated my screen with a warming pad and pulled up the suction cup, it actually pried apart above the black plastic bezel which removed the touch screen from the display panel. With this being the first newer iPhone I'd opened since the 3GS, I didn't realize that I was opening the wrong opening as the directions only mentioned one opening and did not warn of this. I was pretty disappointed in the lack of mentioning this, as I was taking my time and following it to the tee. As a result, it destroyed my original iPhone screen.

    Caleb Davison -

    DO NOT separate the glass from the plastic bumper or rim around it. As someone else noted, these instructions don't clarify that the pick has to be inserted between the plastic rim and the metal body of the phone. When pulling upwards with the suction cup, it is likely that the glass will lift slightly off the plastic surround before the plastic will lift out of the metal body. I had success sliding a card or pick back and forth along the bottom edge of the plastic rim while pulling on the suction cup. Eventually there was a space large enough for the pick to go under the plastic rim.

    Anessa -

    Thank you for pointing this out! I've updated the step to reflect this.

    Arthur Shi -

    The suction cup doesn't work at all... The minimum force I apply to lift it up, it comes off completely. This is very frustrating!!!

    Mario Silva -

  9. QE4lOUoglbyWQUwm
    QE4lOUoglbyWQUwm
    cHHBBJPBr4bVv24U
    agDTTsHWFYyI2WBC
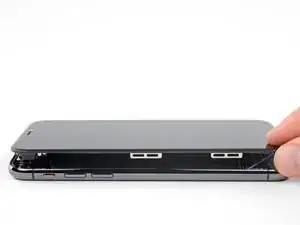
    • Schuif je openingsplectrum langs de linker onderhoek en via de linkerzijde van de iPhone naar boven. Snijd daarbij alle lijm door die het scherm aan het frame bevestigt.

    • Steek je plectrum niet dieper dan 3 mm in de opening. Zo voorkom je schade aan de onderdelen in de iPhone.

  10. mkLvBfvMoYsfQbGS
    • Er loopt een aantal makkelijk te beschadigen kabels langs de rechterkant van de iPhone. Steek je plectrum daar niet in de opening om te voorkomen dat je je toestel beschadigt.

    Wouldn’t it be better to put this part BEFORE the step where you have to pry open the phone?

    Jan D. Höllwarth -

  11. OEUEsoSAmOAWxAMR
    OEUEsoSAmOAWxAMR
    YOhTValkxrevLipu
    aSZ2MAdtw4ZImiCD
    • Steek je openingsplectrum opnieuw in de onderkant van de telefoon en schuif deze nu langs de rechter onderhoek en via de rechterzijkant omhoog om de lijm daar door te snijden.

    • Steek je plectrum ook hier niet dieper dan 3 mm in de opening om te voorkomen dat je de schermkabels beschadigt.

    If you have flat feeler gauges (for adjusting engine valve tappet clearance, ignition points … old school) the .003” thick gauge goes right in. Work your way up in thickness until you can get the pic or supplied pry tool in. Don’t insert metal feeler gauge in too far, just enough to hold crack open. I didn’t need to use the suction cup. I used a hot/cold gel pack heated in microwave to heat edges to soften glue a bit. Made sure it wasn’t so hot I couldn’t stand it on my skin.

    William Olstad -

  12. WfcjjEBfMZqEySEf
    WfcjjEBfMZqEySEf
    PCXKpWMWg6GWEViY
    McqYslJ4vV1SOOnm
    • De bovenkant van het scherm is bevestigd met zowel lijm als klemmen.

    • Schuif je openingsplectrum langs de bovenste hoek van het scherm, terwijl je het scherm voorzichtig naar beneden loopt of trekt, in de richting van de Lightning-poort.

    • Als je te veel kracht gebruikt, zullen de klemmen breken. Wees voorzichtig en heb geduld.

    • Steek je plectrum ook hier niet dieper dan 3 mm in de opening om te voorkomen dat je de voorste sensormodule beschadigt.

    • Schuif je plectrum naar de tegenoverliggende bovenste hoek en snijd alle lijm daartussen door.

    These are the best instructions I’ve ever read for anything.! Thank you!

    Peter Andrew -

  13. GnieimxVeXdJJobM
    • Trek aan het kleine uiteinde van de zuignap om deze van het scherm te verwijderen.

  14. XFu5RLJA6ncMAhxo
    XFu5RLJA6ncMAhxo
    nCGOAuVQLFmYsrOd
    XjQSuyqDe1k51mua
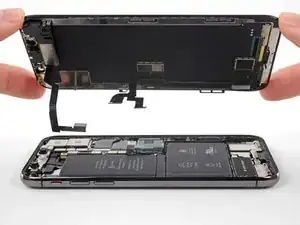
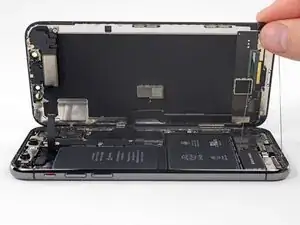
    • Open de iPhone door het scherm van links naar rechts open te klappen, alsof je de achterkant van een boek opent.

    • Probeer het scherm nog niet volledig los te krijgen, aangezien deze nog steeds aan het logic board van de iPhone verbonden is met een aantal kwetsbare lintkabels.

    • Zorg dat je, zoals je op de foto kunt zien, het frame inclusief het scherm uit het toestel haalt en voorkom dat het frame in de telefoon blijft hangen.

    • Laat het scherm op een object leunen, zodat je niet te veel spanning op de kabels zet en je nog steeds aan de telefoon kunt werken.

    • Tijdens de hermontage breng je het scherm in positie, op één lijn met de klemmen aan de bovenkant, en druk je de bovenkant van het scherm voorzichtig in de klemmen voordat je de rest van het scherm vastklikt. Als het scherm niet goed vastklikt, controleer je de klemmen om zeker te weten dat ze niet gebogen zijn.

    My phone came apart in a different way and looks not right the little box at the top of the display as actually bolted to the top of the frame body I think something went really wrong when I opened it.

    Mike Kostersitz -

    It opens like a book but be careful not to open it all the way — only as far as shown in the photo. Otherwise it will strain the thin cable that connects the sensor module and then no more FaceID for you (or, as it turns out me). This could have been made more explicit in the instructions.

    Richard Tucker -

    It opens like a book but be careful not to open it all the way  … the small stainless steel tabs that hold the screen around the metal frame, that are on the bend place (right side of the phone)… are tend to bend, you can straighten them back to 90 deg. but the plastic base that they are on? very fragile- watch out not to break the plastic bezel … it may come apart of the glass.

    dabur872 -

    Advice for re-assembly: Before closing up the phone with the seal, check if phone is powering up again and speaker, mic and sensors are still working. If done this check even before installing the board connector bracket in Step 13.

    Alexander Nowak -

  15. XWpMWTY4DJnfeUAy
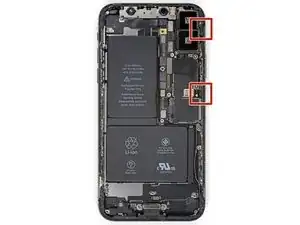
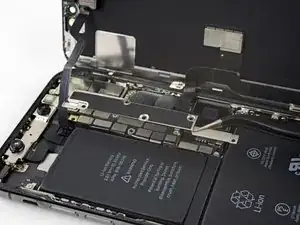
    • Verwijder de vijf Y000 schroeven die het beschermpaneel op het logic board bevestigen, met de volgende lengtes:

    • Drie 1.1 mm schroeven

    • Eén 3.1 mm schroef

    • Eén 3.7 mm schroef

    • Zorg dat je, tijdens deze reparatie, bijhoudt welke schroef waarvandaan komt, zodat je deze op de juiste plek weer terug kan schroeven. Zo voorkom je schade aan je iPhone.

    One thing I found helpful for replacing the screws was to use only the 000screwdriver tip, without the handle. This way, the tip isn’t magnetized and the screw doesn’t tend to ‘roll’ off the screwdriver tip (the screw has almost no mass, so the head (largest surface) is pulled around to the side of the screwdriver tip when magnetized).

    Rich May 23, 2020

    ungodly -

    My 3.1mm screw had a stripped head, could not remove it. (Factory defect, this iPhone was never opened)

    So I had to give up removing the display assembly, and jumped directly to battery replacement, Step 20.

    That was tricky as I had to keep the display at 90º with a risk of breaking display connectors, but hopefully the replacement went well.

    I would not recommend to do this but to follow the guide, but, in case someone encounters a similar issue, that could help!

    vingu -

    My 1.1mm screw had a stripped head. Used a 3mm steel drill to cut the head off (just 1 mm deep haha) so i could remove the bracket.

    Renout -

    Be careful on reassembly. Keep the screen supported and not moving. I had difficulty getting the screws in and ended up ruining the screen connectivity at the back of the screen where the ribbon cables go in near the center. I was trying to hand hold the screen and it ended up moving around too much.

    SETH GREEN -

    To keep track of the screws, I copy the photos showing their places, then arrange these photos on document in Pages, print it. Next I apply two sided sticky tape (the roll-on type). So all screws have their corresponding places …

    Max Glanzmann -

    不要将螺丝拧得太紧,因为这样会损伤主板导致各种奇奇怪怪的问题,比如屏幕不显示(显示黑色)但是触摸可以用等等,务必按照螺丝原来的顺序安装回去,我的iPhoneX就因为没有正确安装导致主板损坏,而iPhoneX是双层主板,这无疑增加了它的维修成本与费用

    bingshan888888 -

  16. SmLayTUTWhZPb5Kb
    • Verwijder het paneel.

    • Het kan zijn dat het paneel ietwat vastzit. Til het voorzichtig, maar wel met wat kracht, omhoog om het los te maken.

    • Tijdens de hermontage is dit een goed moment om je iPhone weer aan te zetten om alle functies te testen voordat je de telefoon weer helemaal sluit. Vergeet je telefoon niet weer uit te schakelen als je verdergaat met de reparatie.

    I tested it, then proceeded to close up the device without the bracket. Do I need to reopen and install? All connections are good?

    monastra7 -

    The bracket helps those many connectors underneath maintain good contact. Probably in the short term nothing bad will happen, but I’d hang onto the bracket and reinstall it when convenient.

    Jeff Suovanen -

    Agree with Jeff

    cgtyoder -

    I tested all imaginable functionality on the new OLED screen. Taptics are fine. Then, I noticed that the battery wasn't charging. Any ideas as to what could have gone wrong?

    Monica -

    for me, the replacement battery was completely dead, small panic when the power-on button was pressed, but quickly realised that this was the situation, and now watching the phone take a power cycle.

    James Stanbridge -

    Before clicking the screen assembly back, I tried to test the iPhone by pushing the start button, but nothing happened. After taking off the bracket, reseating the plugs I tried again - nothing happened! Then I plugged in the charging cable connected with the iMac, and it started immediately. So if the phone does not start using the startup button, it might just be a glitch when reconnecting the battery.

    Max Glanzmann -

  17. eJ1ACHc4FfhUTGYs
    eJ1ACHc4FfhUTGYs
    JGUunolihfMkY3fR
    • Gebruik de punt van een spudger of een schone vingernagel om de batterijaansluiting uit het contact op het logic board omhoog te duwen.

    • Zorg dat je de zwarte, siliconen afdichtingen rondom deze en andere aansluitingen niet beschadigt. Deze afdichtingen zorgen voor extra bescherming tegen water en stof.

    • Zorg dat je de aansluiting wegbuigt van het logic board om zo te voorkomen dat deze tijdens de reparatie per ongeluk contact maakt met het contact en zo de telefoon mogelijk aanzet.

    cosa può succedere se non si disconnette la scheda logica'?

    luca.valli -

    note: be careful not to crush or puncture your battery at this step!! I gave mine a minor dent, which I hope wont be a problem.. but something to keep in mind for fxlks in the future!

    Noal Balint -

    Thanks, already did it)

    Stephen Hedrick -

  18. cHVLkYDwhlp2A1Pw
    cHVLkYDwhlp2A1Pw
    K2c31fAgxStY4xjS
    • Gebruik de punt van een spudger of een vingernagel om de aansluiting van de sensormodule in het voorste paneel omhoog te duwen en te ontkoppelen.

  19. cpYKZSxRSWRr1pJ3
    cpYKZSxRSWRr1pJ3
    ROpbLqGuPSYmQUk2
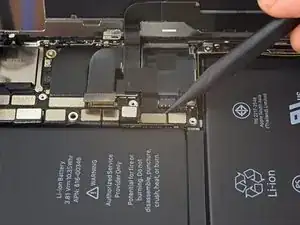
    • Gebruik de punt van een spudger of een vingernagel om de aansluiting van de OLED-schermkabel los te koppelen.

    • Om drukaansluitingen zoals deze weer aan te sluiten, positioneer je deze totdat op z'n plek lijkt te zitten en duw je één kant van de aansluiting omlaag tot deze vastklikt, om vervolgens hetzelfde te doen aan de andere kant. Druk niet op het midden, want als de aansluiting verkeerd zit, zul je de pinnen buigen en zo schade veroorzaken.

    Snap ‘em in like little Legos.

    Ray Johnson -

    Maybe the manual should flip step 17 and 18 (as the digitizer cable from 18, is in the way of the OLED cable of step 17) ?

    Renout -

  20. TD3L6MwMyjAtBQJu
    TD3L6MwMyjAtBQJu
    6ApXsETwRu6PQnKr
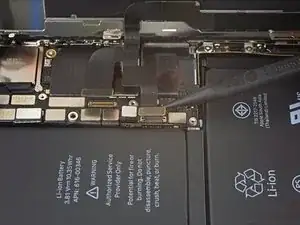
    • Gebruik de punt van een spudger om de aansluiting van de digitizerkabel uit het contact omhoog te duwen.

    • De inkeping waar deze aansluiting in zit, bemoeilijkt het opnieuw aansluiten van deze kabel. Neem je tijd en positioneer het met zorg, om het dan voorzichtig op z'n plek te drukken met het topje van je vinger—eerste de ene kant, dan de andere kant. Als het goed is, voel je het wanneer de aansluiting vastklikt.

    • Als er een deel van je scherm niet op aanraking reageert na de reparatie, ontkoppel je de batterij en sluit je deze aansluiting opnieuw aan. Zorg hierbij dat deze volledig op z'n plaats klikt en dat er geen stof of andere dingen in het contact zitten.

    This was probably the hardest part other than trying to get the screen off with the crappy suction cups. I re-installed the bracket only the find out that the touch screen would not respond to touch. Had to remove the five screws, remove the bracket and reseat the recessed screen connector. Reseating the bracket took another 10+ minutes. I carefully used the angled forceps to grab the cable and align the connector being careful not to damage the cable.

    Once you have the connector seated, I would reconnect the battery, power on the phone, and check the touch screen response before re-installing the bracket (step 13).

    Tawan Khamapirad -

    Yeah, this was probably the trickiest part of the reassembly. The power connector cable kept getting in the way so I moved it carefully but fully out of the way. Then it was a matter of fiddling around with it a bit and being careful not to force it on.

    Jeffrey Hoy -

    I was positive that I had messed something up, I had powered up the phone to test three different times and everything seemed find except there was no touch at all. On my fourth attempt, I carefully examined everything for dust and debris (blowing gently), and I did notice that a corner of the connector (more like part of the ribbon) was bent slightly, and I straightened it. I don't know if it was the ribbon or some tiny debris, but after reseating a fourth time, it worked.

    Pol Llovet -

    Very important part of the tutorial. Be careful and patience! In my case the screen and camera didn't respond after assemble, so I tried again to reconnect the connector like tutorial said and it worked well. Now my iPhone feel like a new one 💪🏼

    Efrain Maestre -

  21. T4COCwpNIPZglkVc
    T4COCwpNIPZglkVc
    q145rGUkFfAEwOf1
    EgtbW5Mf1lUuPrWK
    • De flexkabel van de sensormodule in het voorste paneel zit lichtjes vast op z'n plek.

    • Til de kabel voorzichtig omhoog totdat deze loskomt van de lijm eronder.

    Do this sensor affect face id?

    bonglkv -

    It is part of the face id part so yes. This is the ear piece too so if the ribbon tears there is a chance the ear piece will stop working as well.

    Stephen Patterson -

    Be super careful handling this ribbon particularly. I did a battery install and, when I was done, I had a phone with a new battery and no Face ID. That’s a $300 Apple repair, and no 3rd party shop will touch it. I believe the ribbon lays vertically (i.e., perpendicular to the “floor” of the phone, against the side edge of the battery. During the re-install, I must have forced the ribbon into position after seating the connector, causing fatal flexing of the ribbon. (Don’t know this for sure, but I see another comment saying that this cable is part of Face ID.) Anyway, bottom line: BE CAREFUL REMOVING AND REINSTALLING THIS RIBBON!

    Jonathan Pines -

    My flex cable was more than lightly adhered in place. I needed to use a guitar pic or similar to help encourage adhesive to separate. I wouldn’t pull too hard like shown in pictures unless you had just the right grip on the ribbon cable so as to avoid damaging flex cable. See note above (5/31/20)

    William Olstad -

    Bizarre — it turns out my whole front panel sensor assembly came entire off of the front screen and is stuck to the logic board.

    Karl Jarvis -

    I also found the glue quite recluctant to release so I applied a second or two of heat using the wife's hair dryer which softened it and the cable lifted much easier then. Be careful not to apply too much heat though which could then impact other internal components.

    LosBenitos -

    Cho ít cồn 90° vào để mềm keo dễ tháo

    huuhaukimngan -

    my iphone x doesn't have a front panel sensor? in fact, it looks completely different than the picture???

    Kenneth McLeod -

    @kennethmcleod, most likely you've separated the screen frame from the screen itself. We see this most commonly when people neglect to remove the pentalobe screws next to the charging port. Usually the cure is to take out those screws, then repeat the screen removal process on the frame that's still attached to the phone.

    Jerry Wheeler -

    You don't need to disconnect the front sensor to change the screen. Just leave it connected and remove from the screen side.

    Anthony Boshell -

    I have damaged the front panel sensor assembly flex cable. Does it carry multiple channels of info or is it just one solid piece that can be soldered back together? If not, will the phone still work except Face ID?

    Bodger Rabbit -

  22. 6ik3wBhFQRTApGki

    I tried this and broke the cable can it still repair

    Alexis Rodriguez -

    At this point I would have found it easier to remove the glue from the edges than later on when I was reassembling it. I bought the kit that had the replacement glue in it.

    Grant -

    Excellent guide! Would love to have a link to moving the sensor assembly from the old display to the new here.

    Nicole -

    CAUTION:

    Removing the Taptic Engine or Speaker in next step is optional and the guide continues as this was per se needed.

    Unnecessary work and also If you remove the speaker you lose the adhesive gasket and this is not included in the scope of delivery of the "Battery replacement" offering.

    So do not remove and avoid losing waterproofing.

    Julian Gonzalez -

    Just to confirm the face id is not affected when replacing the earpiece assembly? Am I correct

    mubeen.2011@hotmail.co.uk -

    Sorry for the late response, but you are NOT correct. Replacing the earpiece speaker assembly will result in the loss of Face ID functionality. That's the whole assembly, including the speaker, dot projector and flood illuminator. If you unsolder the speaker from the assembly, that can be replaced by itself without losing Face ID, but any other part will cause it to quit working.

    Jerry Wheeler -

    That cable on the left does not exist on my iphone x, wtf? The linked video does not user the exact tools of the kit and ends in the middle of the procedure. Consequently my phone did not work after the „repair“. Won‘t even close properly and the display is not working anymore. That‘s some money down the toilet. So everyone, who is not really good at repairing, think hard if you really wanna try. I have to buy a new phone now.

    Heiner Seidl -

Conclusie

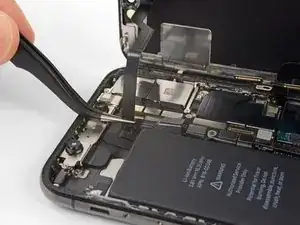
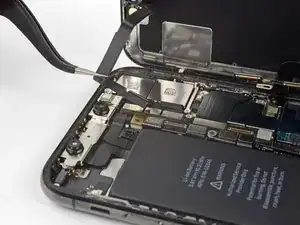
Om je toestel weer in elkaar te zetten, volg je deze instructies in omgekeerde volgorde.

Jeff Suovanen

Lid sinds: 06/08/13

442718 Reputatie

Een commentaar

Meh, i had to Replace the sensors and camera unit thingy too, but i managed it without advice, the iPhone X is nicer to repair as any other iPhone.

Thanks for the detailed step by step description. :)

(the iphone 8 teardown for example lacks extremely much Details)

GotWaffles ? -