Inleiding

De iPhone XS gebruikt zowel de hoofdspeaker als de oorstukspeaker om stereo-geluid voort te brengen. Gebruik deze handleiding alleen om de hoofdspeaker aan de onderkant van de telefoon te vervangen. Het vervangen van deze speaker kan problemen zoals geluidsverlies, slechte geluidskwaliteit of vervormd geluid oplossen.

  1. mJDscmIaTthcdZPn
    • Ontlaad, voordat je begint, de batterij van je iPhone tot onder de 25%. Een geladen lithium-ion batterij kan in brand vliegen en/of exploderen als deze per ongeluk wordt doorboord of beschadigd.

    • Schakel je iPhone uit voordat je met de demontage begint.

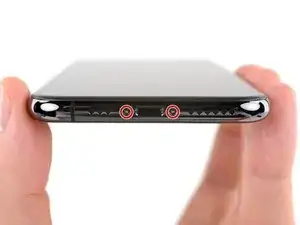
    • Verwijder de twee 6.9 mm lange pentalobe schroeven aan de onderkant van de iPhone.

    • Het openen van het scherm van de iPhone zal de waterdichtheid van de telefoon aantasten. Zorg er daarom voor dat je vervangende pakkingen hebt voordat je verdergaat of wees extra voorzichtig met de blootstelling aan water als je ervoor kiest de waterdichte pakkingen niet te vervangen.

    Der Original Akku ist codiert. Egal, ob man einen zweiten Apple Original Akku oder einen neuen Fremdakku einbaut erscheint bereits in den Einstellungen eine "Wichtige Batterienachricht" mit einem roten Punkt. "Unbekanntes Bauteil" und die "Informationen zum Batteriezustand" sind nicht verfügbar. Diese Nachricht verbleibt immer und nervt auf Dauer immens.

    Der Akku muss angelernt werden und dieses können von jetzt an nur authorisierte Apple Servicebetriebe und diesen ist es durch Apple verboten die notwendige Info weiterzugeben.

    Dies ist nicht zu verwechseln mit der bereits bekannten Rekalibrierung seit iOS 14.5.

    Seit dieser neuen Codierung kostet der Akkutausch bei Apple auch nicht mehr 75 € sondern aktuell 99 € (Stand Novmber 2023 in Deutschland).

    Damit sind künftig alle nicht authorisierten Servicebetriebe raus - denn wer will schon dauernd diese Mitteilung auf dem Bildschirm haben?

    Überlegt vorher, ob unter diesen Bedingungen ein eigener Akkutausch noch sinnvoll ist .....

    Manfred Wachtel -

    Lieben Dank @manfredwachtel ! Mehr Infos dazu haben wir auch in unserem Blog zusammengefasst: https://de.ifixit.com/News/78890/teileko...

    Sandra Hiller -

  2. 6UPwoloGBO4tmVoS
    6UPwoloGBO4tmVoS
    BmSYPJmOy6dbHipF
    3EOdQPAGOmiuhoKU
    • Je kunt de onderdelen in je telefoon gemakkelijk beschadigen met het te diep inbrengen van je openingsplectrum. Volg deze stap om je plectrum te markeren en schade aan je toestel te voorkomen.

    • Plaats op 3 mm van de punt van je plectrum een markering met een stift.

    • Je kunt op iedere punt voor een andere markering kiezen.

    • Als alternatief kun je ook een munt als markering gebruiken in plaats van een stift. Plak hierbij de munt op de plectrum zodat de munt tegen je telefoon aandrukt zodra deze een bepaalde diepte bereikt.

    Got to step 2 and realized the fix kit doesn't include an opening pick! Looks like a guitar pick, and I have those lying around. Is that expected? Looks like the pick is used in many steps below. There's a little blue crowbar that isn't mentioned in the instructions. Perhaps that replaces the opening pick?

    Sloan Looney -

    Hi! I can't see which guide you were using when writing this comment. Can you reply here with which guide and fix kit you used?

    Clay Eickemeyer -

    I see you posted this in Meta. I hope it's resolved soon! In the meantime, a guitar pick may work well enough for your repair.

    Clay Eickemeyer -

    what fix kit?

    Meow Purr -

    My fix kit didn't include an opening pick either

    WILLIAM HARRIS -

    Make sure you check inside the black boxes after emptying them. My pick was stuck inside one of the boxes.

    AndyF -

    My AliExpress refurbished screen came with a pick that has a coin-like circle that pops out, so no modification was necessary

    Gijs Leegwater -

    the picture shows 3 cm but the description says 3 mm's. Which one is it?

    John Pena -

    That is a misunderstanding. It is a ruler with a scale for cm, it shows 0.3 cm, i.e. 3 mm.

    VauWeh -

    Oh, come ON!

    Big Ed -

    It will ALWAYS be millimeters on a phone, but this step is ridiculous, skip it!

    Leif DeWolf -

    @leifdewolf I wouldn't skip it for a first repair.

    Gabriel-Science -

    It's not an Ifixit KIT if it doesn't include everything. You'll need to order the opening pic separately. Or head to Walmart like myself and look for guitar pics. Hopefully, this will work just as well.

    Jaleeljb97@icloud.com -

    No pick in mine as well. It’s really not clear that you have to order this separately when ordering an IPhone SE 202/2022 screen repair kit. Is this the case?

    Jackson Castiglione -

    Frustrated, I ordered a compact package where everything was encapsulated. Useless suction tools could not separate the screen. If it is unable to decouple the screen, then why sucking suction tools you have provided.

    Shourob Datta -

    For my kit the triangle pick was stuck inside the box with the screen not with the other tools maybe it's also there for you

    Henry Scheibehenne -

    Y’all are getting far, FAR too detailed with some of this stuff…. Measuring and marking the pick that you won’t actually use to open the device?!? lol that’s kinda funny. Just heat it up, grab a spudger, and the back just pops right off! The iFixit tech need to stick to the KISS method more often, you know KEEP IT SIMPLE STUPID!!! Like l, for reals, I’ve been doing this stuff for YEARS and using iFixit guides regularly and this is just ridiculous at this point!

    Leif DeWolf -

    Will the phone still work if the sensor assembly on the back of the screen is damaged?

    Mutshidzi Rambau -

    I don't have a pick, but how much better are these picks than an old credit card for opening an iPhone 13 mini?

    mike eng -

    The pick in my iFixIt kit was packed with the battery, not with the rest of the toolkit.

    Tony Houlihan -

  3. QajCoHNQunxeJV2V
    QajCoHNQunxeJV2V
    1HyrON1VAh1uTbEN
    3eVMJBkpKguxEmwE
    • Als het scherm van je iPhone gebarsten is, kun je wat tape over de barsten plakken om te voorkomen dat het scherm verder beschadigd raakt tijdens dit proces. Zo verklein je ook het risico op fysieke schade.

    • Plak een aantal lagen tape op het scherm van de iPhone tot het gehele scherm bedekt is.

    • We raden je ten sterkste aan om tijdens deze stap een veiligheidsbril te dragen zodat je je ogen beschermt tegen eventueel loskomende glasscherven.

    • Als het je in de volgende stappen niet lukt om de zuignap op het scherm te bevestigen, kun je ervoor kiezen om een stuk duct tape in een handvatvorm op het scherm te plakken. Hiermee kun je dan het scherm omhoog tillen om een opening te creëren.

    • Als alternatief kun je er ook voor kiezen om de zuignap met secondelijm op het scherm vast te plakken.

  4. pigEY2k6BCTAOZuk
    pigEY2k6BCTAOZuk
    2yUjJasphSr5KEcZ
    qJo2Tgnxb3cpuPMP
    • De volgende twee stappen introduceren de anti-klem, een handige tool die we aanraden aan iedereen die regelmatig reparaties uitvoert. Als je de Anti-Klem niet gebruikt, sla dan de volgende drie stappen over voor een alternatieve methode.

    • Voor uitgebreider instructies voor het gebruik van de Anti-Klem, lees je deze handleiding door.

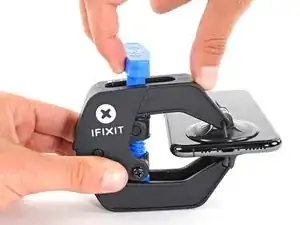
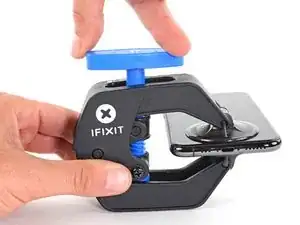
    • Trek de blauwe hendel naar achteren zodat de anti-klem vrij kan bewegen. (Op deze manier deactiveer je de openingsstand van de anti-klem.)

    • Schuif de armen over de linker- of rechterzijde van je iPhone.

    • Plaats de zuignappen dichtbij de onderkant van de telefoon—één op de voorkant en één aan de achterkant.

    • Druk beide zuignappen aan, om zuigkracht uit te oefenen op de gewenste plek.

    • Als het oppervlak waarop de zuignappen zich moeten vastzuigen te glad is, kun je wat tape gebruiken voor meer grip.

    The anti clamp is a much needed tool

    It makes opening the phone a breeze.

    Lon

    [deleted] -

  5. TTmqljctmMw6bJpX
    TTmqljctmMw6bJpX
    iVRRmPwckdpiwuMQ
    ZaWfSklEIBPUFAsN
    • Trek het blauwe handvat naar voren om de armen van de anti-klem te vergrendelen.

    • Draai het handvat 360 graden met de klok mee of tot de zuignappen uit beginnen te rekken.

    • Zorg dat de zuignappen op één lijn met elkaar zitten voordat je begint met het openen van het toestel. Als je ziet dat de zuignappen niet meer op één lijn zitten, maak je ze los en breng je ze weer op de juiste positie aan.

  6. UyOgOJxUobyYwysw
    UyOgOJxUobyYwysw
    LxMpeXmlnlCbNaSS
    O1SQSJJBPEig4tTU
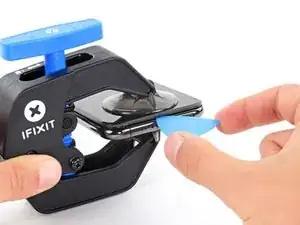
    • Verwarm een iOpener en plaats deze tussen de armen van de anti-klem op je telefoon.

    • Je kunt ook een föhn, heteluchtpistool, of een kookplaat gebruiken, maar wees bij het gebruik hiervan extra voorzichtig. Te veel warmte kan tot warmteschade leiden. Vooral het scherm en de batterij zijn hier erg vatbaar voor.

    • Vouw de iOpener zodat deze op de onderkant van de iPhone komt te liggen.

    • Geef de lijm een minuutje de tijd om los te komen zodat de anti-klem een opening kan creëren.

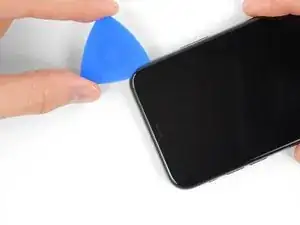
    • Steek een plectrum in de opening onder het scherm en de plastic rand, en niet onder het scherm zelf.

    • Als de anti-klem er niet in slaagt een opening te creëren die groot genoeg is voor je plectrum gebruik je meer warmte en draai je het blauwe handvat een kwartslag met de klok mee.

    • Draai het handvat nooit verder dan een kwartslag per keer en wacht een minuut voordat je de anti-klem weer besluit aan te draaien. Laat de anti-klem het werk voor je doen.

    • Sla de volgende drie stappen over.

  7. rsIlLoGIMkqXTonL
    • Het verwarmen van de onderkant van de iPhone helpt de lijm, die het scherm op z'n plek houdt, te verzachten, wat het makkelijker maakt om de telefoon te openen.

    • Gebruik een föhn of een warmtepistool, of prepareer een iOpener en leg deze op de onderkant van de iPhone gedurende ongeveer een minuut om zo de lijm die eronder zit te verzachten.

  8. yfBgjBWqqta2eDhd
    yfBgjBWqqta2eDhd
    QAYokBSN1igpaUY1
    • Als je een enkele zuignap met handvat gebruikt, druk deze dan vast aan de onderkant van de telefoon, maar vermijd het bolle deel van het glas.

  9. 3oowQXLS2cpbXYhF
    3oowQXLS2cpbXYhF
    qcV3HUNTQXXIaVSh
    M1k5yNXnJBaGYaLb
    • Trek de zuignap omhoog met een stevige, constante kracht om zo een kleine opening tussen het voorste paneel en de achterste behuizing te creëren.

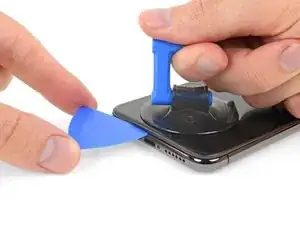
    • Steek een openingsplectrum in de opening onder de plastic rand van het scherm, niet onder het scherm.

    • De waterdichte lijm die het scherm op z'n plek houdt is erg sterk; het creëren van de opening kan dus heel wat kracht vereisen. Als je moeite hebt met het openen van de telefoon, dien dan meer warmte toe en wiebel het scherm op en neer om de lijm te verzachten totdat de opening groot genoeg is voor je tool.

    It seems like I need a third hand to do this. To hold the phone; hold the suction cup; and push the pick in the space.

    haroldappel -

  10. IC6KHfoNSHdLtGnH
    IC6KHfoNSHdLtGnH
    ZDoxkKXSvYqNnVAW
    RLi6OJUMchroyTyk
    • Schuif je openingsplectrum langs de linker onderhoek en via de linkerzijde van de iPhone naar boven. Snijd daarbij alle lijm door die het scherm aan het frame bevestigt.

    • Steek je plectrum niet dieper dan 3 mm in de opening. Zo voorkom je schade aan de onderdelen in de iPhone.

  11. RZFUjnwK2yiWBiYJ
    • Er loopt een aantal makkelijk te beschadigen kabels langs de rechterkant van de iPhone. Steek je plectrum daar niet in de opening om te voorkomen dat je je toestel beschadigt.

  12. T26FJlQBnfAMf3Is
    T26FJlQBnfAMf3Is
    QlgDmcf3JaGPRChp
    1H1tlRpPnndJDFsK
    • Steek je openingsplectrum opnieuw in de onderkant van de telefoon en schuif deze nu langs de rechter onderhoek en via de rechterzijkant omhoog. Snijd ook hier alle lijm door die je onderweg tegenkomt.

    • Steek je plectrum ook hier niet dieper dan 3 mm in de opening om te voorkomen dat je de schermkabels beschadigt.

  13. GEKit4qRRMMpN6XC
    GEKit4qRRMMpN6XC
    w5TVy6xbAoVaBMnw
    wyB1Fb2BaLUgyt2b
    • De bovenkant van het scherm is bevestigd met zowel lijm als klemmen.

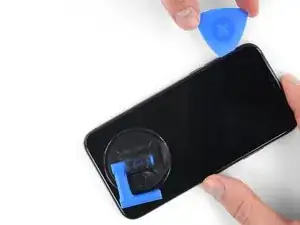
    • Schuif je openingsplectrum langs de bovenste hoek van het scherm, terwijl je het scherm voorzichtig naar beneden loopt of trekt, in de richting van de Lightning-poort.

    • Als je te veel kracht gebruikt, zullen de klemmen breken. Wees voorzichtig en heb geduld.

    • Steek je plectrum ook hier niet dieper dan 3 mm in de opening om te voorkomen dat je de voorste sensormodule beschadigt.

    • Schuif je plectrum naar de tegenoverliggende bovenste hoek en snijd alle lijm daartussen door.

  14. UMIpiElOirXOEjSZ
    • Trek aan het kleine uiteinde van de zuignap om deze van het scherm te verwijderen.

  15. 2QvAfp1AjYv5GBlI
    2QvAfp1AjYv5GBlI
    adXPfNlWHInE2vrp
    HkgqsYkE3KSKidUA
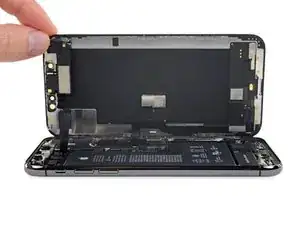
    • Open de iPhone door het scherm van links naar rechts open te klappen, alsof je de achterkant van een boek opent.

    • Probeer het scherm nog niet volledig los te krijgen, aangezien deze nog steeds aan het logic board van de iPhone verbonden is met een aantal kwetsbare lintkabels.

    • Laat het scherm op een object leunen, zodat je niet te veel spanning op de kabels zet en je nog steeds aan de telefoon kunt werken.

    • Tijdens de hermontage breng je het scherm in positie, op één lijn met de klemmen aan de bovenkant, en druk je de bovenkant van het scherm voorzichtig in de klemmen voordat je de rest van het scherm vastklikt. Als het scherm niet goed vastklikt, controleer je de klemmen om zeker te weten dat ze niet gebogen zijn.

    Open from the LEFT. Photo confused me and I came very close to damaging my phone by opening from the wrong side.

    charlotte -

  16. L4SHpLOnFmSHNbUt
    L4SHpLOnFmSHNbUt
    klZrCyRh3mOhe1vi
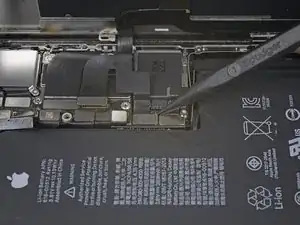
    • Verwijder de vijf schroeven die het paneel op de logic board-aansluiting bevestigen, met de volgende lengtes:

    • Drie 1.0 mm Y000 schroeven

    • Eén 1.3 mm Y000 schroef

    • Eén 3.7 mm Phillips schroef

    • Zorg dat je, tijdens deze reparatie, bijhoudt welke schroef waarvandaan komt, zodat je deze op de juiste plek weer terug kan schroeven. Zo voorkom je schade aan je iPhone.

    The ribbon makes the 1.3 mm screw a little tricky. Use one hand to hold the display at a 90 degree or smaller angle to create the slack necessary to get the screw driver in place.

    charlotte -

    I tracked my screws by using my kids fridge magnets to hold each screw size and placing a piece of masking tape below with the screw size.

    charlotte -

    I stripped a screw ugh

    Tresia -

    Where can i buy a One 1.3 mm Y000 screw

    Ismail -

    FYI: I used a tiny piece of scotch tape to hold those 1mm screws in place while aligning the magnetic screwdriver. Otherwise they are so tiny the magnetic bit pulls them right out the hole.

    Jeff Miller -

  17. NRS1ETl65K3UsXxu
    • Verwijder het paneel.

    • Het kan zijn dat het paneel ietwat vastzit. Til het voorzichtig, maar wel met wat kracht, omhoog om het los te maken.

    • Tijdens de hermontage is dit een goed moment om je iPhone weer aan te zetten om alle functies te testen voordat je de telefoon weer helemaal sluit. Vergeet je telefoon niet weer uit te schakelen als je verdergaat met de reparatie.

    During reassembly, pause here to check function. Gently reattach the top of the display to the base to test face ID.

    charlotte -

  18. GcwlxqG2c3tMI2eP
    GcwlxqG2c3tMI2eP
    yaKE452pmB6DtZfq
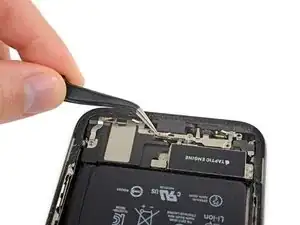
    • Gebruik een spudger of een schone vingernagel om de batterijaansluiting uit het contact op het logic board omhoog te duwen.

    • Zorg dat je de zwarte, siliconen afdichtingen rondom deze en andere aansluitingen niet beschadigt. Deze afdichtingen zorgen voor extra bescherming tegen water en stof.

    • Zorg dat je de aansluiting wegbuigt van het logic board om zo te voorkomen dat deze tijdens de reparatie per ongeluk contact maakt met het contact en zo de telefoon mogelijk aanzet.

  19. 2PD5soUZSe3ZQyTK
    2PD5soUZSe3ZQyTK
    VfJmQ2o6MWIwj2rH
    • Gebruik een spudger of een vingernagel om de aansluiting van de sensormodule in het voorste paneel omhoog te duwen en te ontkoppelen.

    In my phone the connector made poor contact with the socket resulting in no sound audible through the phone receiver/headset. There was an overhang of insulation close to the socket which I believe may have prevented a good connection. So if you have these kinds of audio problems you might see if this is the problem.

    goblazers -

  20. asLYVcjUtcHdcKoa
    asLYVcjUtcHdcKoa
    GWSI1d2iAZSLC5fx
    • Gebruik een spudger of een vingernagel om de aansluiting van de OLED-schermkabel los te koppelen.

    • Om drukaansluitingen zoals deze weer aan te sluiten, positioneer je deze totdat op z'n plek lijkt te zitten en duw je één kant van de aansluiting omlaag tot deze vastklikt, om vervolgens hetzelfde te doen aan de andere kant. Druk niet op het midden, want als de aansluiting verkeerd zit, zul je de pinnen buigen en zo schade veroorzaken.

    Shine a bright light here to help you align the connector. Eventually, the right side snapped in first.

    charlotte -

    On reassembly, use the pad of your fingertip to reconnect.

    charlotte -

  21. cOJMACcMMHtkE2tl
    cOJMACcMMHtkE2tl
    qs6qVlhbERRPsSqZ
    • Gebruik een spudger of een vingernagel om de aansluiting van de digitizerkabel uit het contact omhoog te duwen.

    • De inkeping waar deze aansluiting in zit, bemoeilijkt het opnieuw aansluiten van deze kabel. Neem je tijd en positioneer het met zorg, om het dan voorzichtig op z'n plek te drukken met het topje van je vinger—eerste de ene kant, dan de andere kant. Als het goed is, voel je het wanneer de aansluiting vastklikt.

    • Als er een deel van je scherm niet op aanraking reageert na de reparatie, ontkoppel je de batterij en sluit je deze aansluiting opnieuw aan. Zorg hierbij dat deze volledig op z'n plaats klikt en dat er geen stof of andere dingen in het contact zitten.

    Reassembly: reconnecting the press connectors upon reassembly was so hard, even for the ones not seated in a recessed location !! It took me two days to get them reconnected. What helped me was to shine bright lights on all sides of the iPhone and then hold the iPhone vertically like a book and press it in that way. They are now all in, but the touchscreen functionality has disappeared :( so I will need to reconnect that one.

    natialollie -

  22. NJPdFYTHitL2hafV
    NJPdFYTHitL2hafV
    aWAYZqlHNmxAtebd
    PxaTvWgCPXqUXVOh
    • De flexkabel van de sensormodule in het voorste paneel zit lichtjes vast op z'n plek.

    • Til de kabel voorzichtig omhoog totdat deze loskomt van de lijm eronder.

    Will replacing camera and sensors fix damaged face I'd

    Siddhartha Chowdhury -

    No, FaceID will be disabled because the original sensors are paired with the logic board.

    Arthur Shi -

  23. ryfagYOqsXowIIsl

    I wish the reassembly directions were separate. I forgot to pause here to do the waterproof seal.

    charlotte -

    Geez, I blazed right past that small line to replace the waterproof seal. Needs to be called out much larger.

    Jeff Miller -

  24. TNXxUSJI15dXnRJe
    TNXxUSJI15dXnRJe
    TISlLxxWODcDdBXN
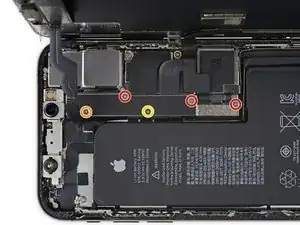
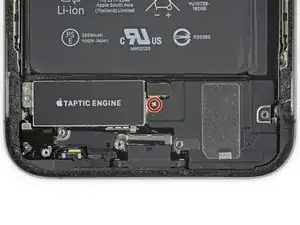
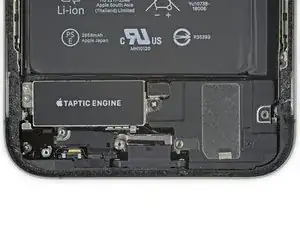
    • Verwijder de vijf schroeven die de twee plaatjes onder de trilmotor en de hoofdspeaker bevestigen:

    • Eén 1.0 mm tri-point Y000 schroef

    • Twee 1.3 mm Phillips schroeven

    • Eén 1.7 mm Phillips schroef

    • Eén 1.8 mm Phillips schroef

    Bonjour,

    Plus pratique avec une Y000. Dans mon cas c’était impossible en Y00.

    Bonne journée. :)

    Pascal Prugna -

    got stuck on the 1.8 mm screw and had to abort. The Phillips head provided “PH000” didn’t quite fit and stripped the screw.

    Jimmy Zhang -

    kit doesn’t come with the right screwdrivers for this step!! :(

    R.J. -

    I ended up skipping this step through 32. It’s not necessary to take the speaker and taptic thing off. I just used the thin black spudger flat edge and pried under the battery on the L-shaped edge and dislodged the adhesive and then did the same on the top edge. You will end up bending the old battery but that’s ok—just don’t poke it. keep poking the flat edge of the spudger in there kind of like a knife to break the adhesive. once you get at least two spots of the adhesive pulled, the rest comes up quite easily when you lift the whole battery.

    R.J. -

    I agree with R.J. The bracket screws are minute. They are much easier to remove than to put back. Avoid taking them out if you can.

    Kevin Bennett -

  25. KbfNpf2AeWeyvNgI
    KbfNpf2AeWeyvNgI
    LWaYT1kefoBIrwwa
    t5MotCPcUfsxxJtZ
    • De plaatjes zitten lichtjes vast op hun plek.

    • Til ze voorzichtig omhoog om ze los te maken en wees voorzichtig dat je ze hierbij niet buigt.

    • Indien nodig kun je wat warmte toedienen met een föhn of warmtepistool om de lijm te verzachten. (Het gebruik van een iOpener is niet slim, aangezien dit de veercontacten aan de bovenkant kan buigen.)

  26. Age4nV2joDRMAeXy
    Age4nV2joDRMAeXy
    VLQnraFrCUoArdjP
    • Verwijder de 1.9 mm Phillips schroef die het paneel op de speakeraansluiting bevestigt.

    screew is 1,81mm

    Boni Zei -

    The tools that you provided is not able to move the screw

    Gary P -

  27. wLlgPJHlWGjfkIJ6
    • Verwijder het paneel van de speakeraansluiting.

  28. JJSKifHEUa6LkWMj
    JJSKifHEUa6LkWMj
    dUcOG1nbmbQRctDs
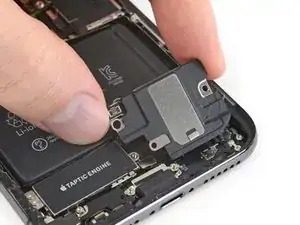
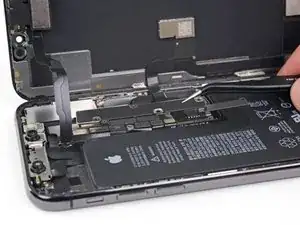
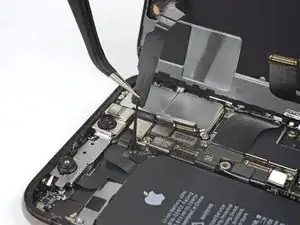
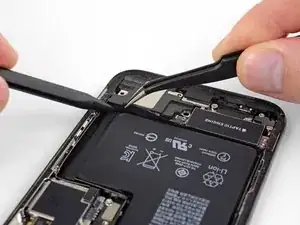
    • Gebruik de punt van een spudger om de speakeraansluiting omhoog te duwen en los te koppelen.

  29. NIcfFiQXxEynfXu1
    NIcfFiQXxEynfXu1
    i6oMRyw1uLRWwLaF
    • Zorg dat je bij het omhoogduwen van de speaker niet ook de schermflexkabel die je zojuist los hebt gekoppeld, beschadigt. Indien nodig kun je de kabel in de richting van de batterij buigen, zodat de speaker de ruimte heeft om eruit gehaald te worden.

    • Steek een spudger onder de bovenkant van de speaker, dichtbij de zijkant van de behuizing van de iPhone.

    • Duw de bovenkant van de speaker voorzichtig omhoog en til de speaker lichtjes omhoog.

    • Zorg dat je bij het herinstalleren van de speaker checkt of de flexkabel van de speaker niet vast komt te zitten onder de speaker.

  30. omQySevx5E2a5wBp
    omQySevx5E2a5wBp
    GtlMHEgw4uRc4BGD
    • Gebruik, bij het omhoog duwen van de speaker, een pincet om de plastic "bumper strip" aan de bovenkant van de speaker weg te halen.

    • Indien nodig kun je wat warmte gebruiken om de lijm onder de bumper strip te verzachten en het losmaken te vergemakkelijken.

  31. F6k5WmqErIyJFu3V
    F6k5WmqErIyJFu3V
    ANh2lLVyYODjNFXO
    RFt4kUmqsK6BWdQw
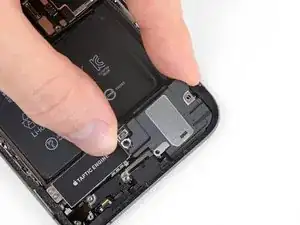
    • Pak de speaker aan beide kanten vast en wiebel deze heen en weer om deze zo los te maken van de lijm die 'm aan de onderkant van de iPhone bevestigt.

    • Trek de speaker weg van de onderkant van de iPhone totdat deze gescheiden is van de gelijmde afdichting.

  32. CYYvYRHUGKYDXrVZ
    CYYvYRHUGKYDXrVZ
    R342awPUBbHCWc5C
    • Verwijder de speaker.

    • De gelijmde afdichting van de speaker is niet herbruikbaar. Gebruik een pincet om alle lijmresten aldaar te verwijderen.

    • Om te zorgen dat je telefoon beschermd blijft tegen water- en stofschade, is het handig om tijdens de remontage de afdichting te vervangen. Maak de plek schoon met wat isopropyl alcohol en een stuk stofvrij doek of een koffiefilter om ervoor te zorgen dat de afdichting goed kan hechten. Breng een nieuwe afdichting aan op de speaker en installeer dan pas de speaker.

    Why is the speaker gasket not included or offered as required parts when you sell a battery?

    Daryl -

    I thought my speaker gasket was also missing, however looking back into the part box I found it tucked under the flap at the other (unopened) side of the box. Glad I took a second (and closer) look. IFIXIT needs to do a better job securing very small parts as it is very easy for these types of parts to get jostled during shipping and then could fall out or stuck in the box unnoticed. I've purchased iFixit products for more than 10 years and am super satisfied their quality in parts and provided instructions. Hopefully they'll make some adjustments to their shipping containers as I'd love to continue using them.

    gelatofanatic -

    My speaker gasket was stuck to the inside of the box also. Unfortunately it has the back peal removed and has stuck itself to the cardboard box. I tried to remove it but it was firmly attached. Bummer. This is my first iFixIt. Please package it more carefully as the other person said.

    Austin Abercrombie -

    I can't find mine in the part box. Is it possible it was excluded?

    Jeff Feazell -

    It might have fallen out. Search in the crevasses of the box. If you still cannot find it contact iFixit.

    Dane Elliott-Dyson -

    Update to last comment, I looked again at the listing for the battery with and without the "fix it kit". I ordered without, and apparently, the speaker gasket is part of the kit. Will need to order separately and take the phone apart again and replace the seal and battery adhesive again to install the gasket.

    Jeff Feazell -

    It's kind of ridiculous that the gasket is ONLY included with the kit, that includes a bunch of tools that I already have too many of (yes, I've bought several screen kits...). The fact is, to properly do the repair, you require the gasket. As such, it really should be included with the battery part and not only sold with the entire kit. Most of us do not need yet a nother suction cup, more screwdrivers (ok, maybe the bits), etc. My first few orders, I bought the kit because the extra cost gave me more bits, handle, spudgers (always need more), etc. However, I didn't need any of those for this repair so I opted for only the part - the battery.

    I am so irked that I have to redo this again just because ifixit put the gasket with the kit and not the part that requires it. It's not even highlighted AT ALL that the gasket is required and not included. I'll have to find a way to bring this up to ifixit.

    Jim Shaw -

Conclusie

Vergelijk je vervangende onderdeel met het originele onderdeel — het kan zijn dat je meerdere onderdelen mee over moet zetten of beschermlagen voor de lijm moet verwijderen voordat je het nieuwe onderdeel kunt installeren.

Om je toestel weer in elkaar te zetten, volg je deze instructies in omgekeerde volgorde.

Breng je e-afval naar een R2 of e-Stewards gecertificeerde recycler.

Ging je reparatie niet zoals gepland? Check dan onze Antwoordencommunity voor hulp bij het oplossen van je probleem.

Jeff Suovanen

Lid sinds: 06/08/13

442718 Reputatie

2 commentaren

hi there need a little help need the bracket part where the five screws go one of the tabs brock on the one i have

william albertson -

Had the same problem. One of the little tab / springs was damaged on the bracket below the main speaker. Didn't think it would be that much of an issue until I started using phone. On occasion, pressure on the lower part of screen creates crazy phantom touchscreen activity. Cannot locate a replacement anywhere on the site.

ELLO WEE -