Inleiding

Let op: verwijder altijd eerst de stekker uit het stopcontact voordat je begint met demonteren.

  1. 5H1Yv6UHiPMcfY5L
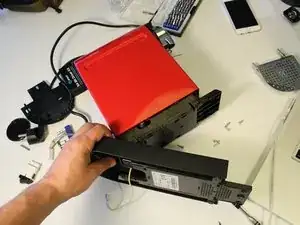
    • De CitiZ is een compact koffiezetapparaat. Om het te openen is een speciaal gereedschap nodig dat Nespresso niet verkoopt. Maar iFixit heeft het antwoord: gebruik gewoon ond ovalen bitje! Ze willen ons uit onze eigen machines houden!

    • Je kunt zelfs je eigen speciale gereedschap maken.

    • Je kunt ermee aan de slag met een nijptang. De tang die ik gebruikte is niet ideaal. Je wilt namelijk iets dat in de verzonken gleuven past.

    Try a 3 mm socket - it worked on my machine.

    howard.marsh37 -

    The tool is a socket or box spanner with an oval hole opening; they are available from amazon. I have two types: one is a 1inch long tube with hexagon head for using in a removable bit screwdriver handle, the other is an L-shaped tubular tool with the opening at each end.

    Robert Cooper -

    Hi, I have a CitiZ and it’s not turning on. Which internal component is likely to be causing the problem? I have an old Magimix I could use some of those parts. Any help would be appreciated. Thank you.

    Georgia -

    Try replacing the condensators: Nespresso CitiZ condensators vervangen.

    VauWeh -

  2. exXFQCWBO5FOk4mH
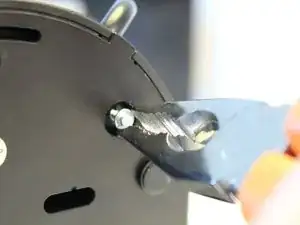
    • Er zitten zes ovale schroeven aan de onderkant van de behuizing. De schroeven zien eruit als klinknagels, maar ze zijn eigenlijk ovaal.

    • Deze schroeven kun je het beste met een speciaal ovaal bitje los maken. Je kunt ze eventueel voorzichtig verwijderen met een tang. Neem de tijd, want dit is niet ideaal.

    • Als een tang niet werkt, kun je proberen een BIC-pen met behulp van secondelijm in de vorm van een schroef te laten smelten of kun je een zelfgemaakt bitje gebruiken.

    The 2018 and above version of the Pro tech toolkit comes with an appropriate bit for exactly these screws. You can also buy the bit separately.

    HunGredy -

    8in crescent wrench used end on worked really well for the oval head screws

    David Carpenter -

    Seeing the recommendation, I heated the end of the BIC pen with a lighter and while hot pressed it against the oval screw, let cool then applied pressure and turned gently, the procedure for each screw worked.

    Brian Watkins -

    Snip cutters worked for me

    fruitfulandmultiply -

    I first didn't believe that this really works but since I had one around I tried it: pressing the tip of a BIC ballpoint pen lightly heated over a candle into the opening, letting it cool down and then starting to turn the whole thing indeed worked! That "tool" isn't very stable and quickly wears out, i.e. I had to repeat the procedure every second screw but it saved me from constructing or ordering a special tool for it. Brilliant! :-)

    mmo -

  3. EZSWGLvUjM13TuwE
    EZSWGLvUjM13TuwE
    UEMhOhESZkHTscIx
    gvFCBOXhKJ1wWudd
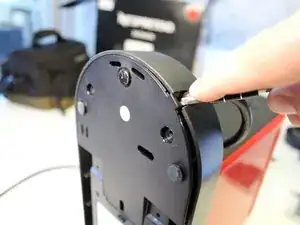
    • Nu de schroeven verwijderd zijn, kun je met een schroevendraaier of spudger de lipjes loswrikken die de onderste behuizing vasthouden.

    • De gemakkelijkste plek om binnen te komen is bij de voedingskabel. Pas op dat je er niet in prikt. (En zorg ervoor dat je de stekker uit het stopcontact haalt!)

  4. EwrJ6vJhsLFVAEb1
    • Open voorzichtig de onderkant en leg het apparaat op zijn kant.

    In the picture background there is a box of a Nespresso Inissia, however the machine actually being handled (KRUPS XN7006) is a CitiZ machine.

    Hugo Catarino -

  5. xLdiAeaGwiioDmE3
    • De plastic trekontlastingsbeugel op de voedingskabel is moeilijk te verwijderen. Steek een kleine platte schroevendraaier in de kleine gleuf aan één kant om het lipje los te maken.

  6. K5yNnjxPOttPonNj
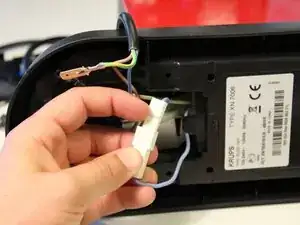
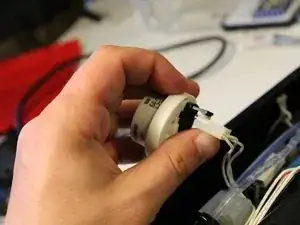
    • Nespresso maakt veel gebruik van steekverbindingen in deze machine.

    • Pak één kant stevig vast met je tang en trek met je vingers aan de andere kant van de connector. Meestal zit er een klein palletje op de stekker, wanneer je die induwt komt de stekker makkelijk los. Trek niet aan de kabel, want je kunt deze lostrekken van de aansluiting.

  7. FMmrMVpL2WuARSqH
    • Koppel de blauwe neutrale draad los.

    • Verwijder de aan-uitschakelaar uit de behuizing.

  8. gGUPeFmmlGEcAhQN
    • Pak de aansluitingen van de voedingskabel stevig vast en koppel ze los van de voedingsschakelaar.

  9. cZGeypSM6vaNxRjX
    • Steek de punt van een spudger in de siliconen slang en schuif deze van de nippel.

  10. iBnayJCbUOHL1Ujg
    iBnayJCbUOHL1Ujg
    E3THfPBpEwv2TOHa
    • Haal de resterende slangen en draden door de onderste behuizing om deze los te maken van de hoofdunit.

    • Verwijder de onderste behuizing.

  11. SFIvUGxyXQ2MIVuZ
    SFIvUGxyXQ2MIVuZ
    VUfTZX46Z3XHRDcT
    OlTaZ5ygXPPLLfGi
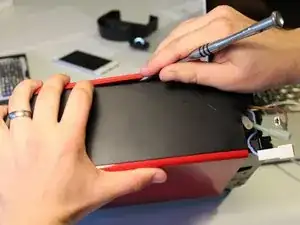
    • Voor het verwijderen van de buitenkant zul je enige kracht moeten gebruiken.

    • Er zit een reeks lipjes aan alle vier de zijden van de behuizing.

    • Gebruik eerst een platte schroevendraaier of spudger om het eerste lipje los te maken.

    • Herhaal deze stap rondom de gehele behuizing om alle lipjes los te maken.

    My model (with control buttons at the top front, either side of the lever) is designed to remove the right cover (looking from the spout end) first.

    Mark H -

  12. 6vxWqWFZT6eGcnx1
    6vxWqWFZT6eGcnx1
    1X3fT32OGXsveggA
    lvYpoRECxZTbGB4P
    • Blijf wrikken!

    On my model, it is necessary to first pry off the spout cover, held in place by a clip either side and one at the top, offset to the left as you look at the spout.

    Mark H -

  13. ZYm5yeW4SKUjPM6T
    • Verwijder de buitenkant.

  14. 1GRqLKuLBBLVbUF1
    • Haal de draden van de bedieningsknoppen uit de behuizing.

  15. TCFhCqrscQHkFuWy
    TCFhCqrscQHkFuWy
    cRsTwEdOaPevQD2v
    • Verwijder het blauwe slangetje van de flowmeter.

    • Dit onderdeel, dat de waterstroom meet, wordt in de onderdelenlijsten van Nespresso een flowmeter of watermeter genoemd. Het origineelnummer van DeLonghi is 5213225251.

    • Verwijder de datakabel van de sensor.

  16. SQ34KQA5hsipbVTw
    • De aanvoerslang van de pomp maakt gebruik van een slimme klem. Verwijder deze klem met je tang. Er is niet veel kracht voor nodig.

    • Herhaal dit voor de klem waarmee de klep aan de boiler is bevestigd.

  17. I1u6EbmLGnYeEULX
    • Verwijder het T-stuk (de kleppenmodule) uit de machine.

    Is there a general name for this type of connector - the metal doohickey on the end of the tube, plus the retaining clip?

    Michael Kwun -

  18. 1ckOJJedhiKSqMUL
    • Maak de voedingskabel los van de steekconnector aan de kant van de waterpomp.

  19. 4lOx2CRVBYhSLpDU
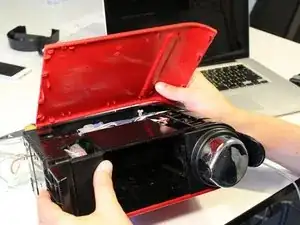
    • Verwijder het zijpaneel aan de andere kant van het apparaat. De posities van de lipjes zijn gelijk aan die van het eerste zijpaneel.

  20. ETalZJGNYnvFACjm
    ETalZJGNYnvFACjm
    AXQC2QSGrvjYRYxe
    NFouuEQOmhJO2nYy
    • Maak de lipjes los waarmee de bovenplaat aan de behuizing is bevestigd.

  21. HKPiFqJiEADXbnRy
    HKPiFqJiEADXbnRy
    QPyvxDBCnBhPcNX2
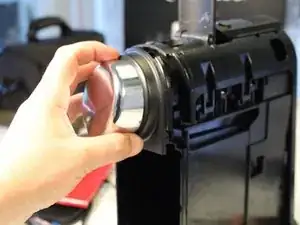
    • Verwijder de koffieuitloop aan de voorzijde..

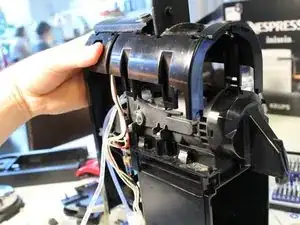
    • Verwijder de bovenste behuizing. Wees voorzichtig, de kabels van de knoppen zitten vast in de behuizing. Ontwar de kabels en plaats de bovenkant naast het frame.

    • Je kunt de bovenkast pas volledig verwijderen als de printplaat is verwijderd. (De kabels van de knoppen kunnen niet van de hoofdprintplaat worden losgekoppeld).

  22. B1jiguUO1guLxOlu
    • Verwijder het plastic deksel van de printplaat.

  23. uJGbiHtmuDNoFEV2
    uJGbiHtmuDNoFEV2
    L1uYKsxTsaEUXo2Q
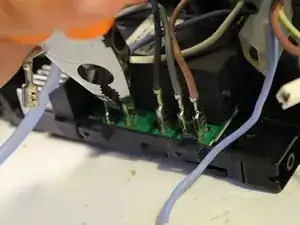
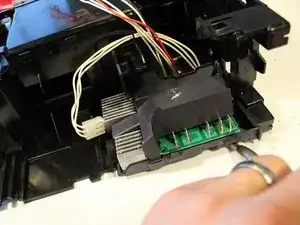
    • Stroomkabels, van links naar rechts: verwarmingselement (wit), nul (blauw), pomp (donkergrijs), pompmassa? (lichtgrijs), Plus (bruin).

    • Maak elke kabel los met een punttang.

  24. AMBAL2phWvLtbcfR
    AMBAL2phWvLtbcfR
    aS3Q4T4ayJJyK53T
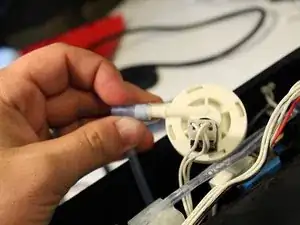
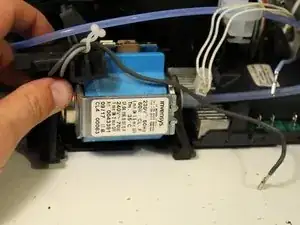
    • Schuif de waterpomp eruit. De rubberen trillingsdemper dient tevens als montagebeugel die netjes uit het plastic frame schuift.

  25. wjAvusfGrs4ZfUuj
    • Verwijder de (nogal overdreven grote) siliconen montagebeugel die de koffietoevoerleiding op zijn plaats houdt.

  26. vWarx6K4mOVfoaue
    • Maak de vergrendelingen los en schuif de verwarmingsmodule uit het frame.

    Wo sind diese Rasten. Ich bekomme Heizeinheit nicht entfernt. Das Teil sitzt drin wie angeschraubt.

    Danke für jeden Tip.

    blck 77 -

    Hat sich erledigt. Ich habe die Clipse gefunden. Die liegen jetzt auf meinem Küchenboden. Und siehe da, plötzlich geht alles ganz einfach ;)

    Ich kann immer noch nicht genau sagen, wo die Clipse überall waren. Ein Bild mit ein paar markierungen wäre hilfreich.

    blck 77 -

    The latches referred to are very difficult to locate. I see the heating assembly slides towards the left side in a frame. But I cannot locate the latches.

    Lisa W -

    I did locate the latches. One near the rear of the frame, and two on the other side near the bottom. I wish I could post a picture to help the next guy find these quicker!

    Lisa W -

  27. VqLSY4gpts1nvxXX
    VqLSY4gpts1nvxXX
    TXhqotZ5OUeRt6Cu
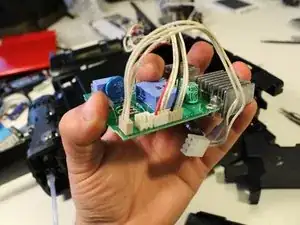
    • Maak de vergrendeling aan de rechterkant van de printplaat los en hef deze er voorzichtig uit.

    • Gebruik niet te veel kracht op de plastic beugel bovenop de printplaat, want er zitten twee kwetsbare condensatoren linksachter op de printplaat.

  28. yh4AogqEEVR5CO6W
    • De resterende kabels kunnen niet van het moederbord worden verwijderd. Probeer het niet!

  29. DKyUhAUZWym31sKx
    • De BTB12 AC 12 Amp triac heeft een groot koellichaam nodig dat op de hoofdprintplaat is geklonken.

  30. YlaRFgjVZU3BE1hW
    • Dit is het resultaat!

Kyle Wiens

23465 Reputatie

40 commentaren

A tool or a bit for those oval-head screws can often be bought at suppliers for coffee automates e.g. branded "Jura", "AEG", "Siemens", "Krups"

VauWeh -

Where is the heating element then?

Junhao Eric Tan -

Hi Junaho.

Did you have a look to Step 26 ?

Christophe S -

I see, my bad.

Junhao Eric Tan -

Mistankely, I plugged my Nespresso Inssignia to 220v, now is not turning on. Do you know if it has a fuse that may have to be replaced? Thank you in advance!

Cristian -

Is there any way to turn up the heat? Needs to be over 190F during extraction to get the best flavor and mine appears to be outputting closer to 160F.

J Will -

My Citiz is leaking took it apart and water leaking from a few areas. Any suggestions?

Theresa Gajecki -

our machine quit crimping coffee cups so no coffee, only water. any ideas?

Tory April 7

Victoria Brust -

Does anyone know what voltage is used at the switches on top? (On/Off, Lungo, Espresso).

Thinking about adding an ESP8266 there.

tim1992 -

Be careful this is non-isolated power supply. You will have 110V on every pin (Based that you are connected to earth.)

R M -

FYI

Power cables, from left to right: heat (white), neutral (blue), pump (dark grey), **line also (grey) as directly connected to ->**, line (brown).

Alexander Judd -

Hi please my one is leaking from underneath any digestion?

christeatro -

Hi there my one is a magimix and is leaking from underneath any suggestion.?

christeatro -

Open it and have a look!

VauWeh -

In the picture background there is a box of a Nespresso Inissia, however the machine actually being handled (KRUPS XN7006) is a CitiZ machine. This teardown is actually a Nespresso CitiZ teardown, not a Nespresso Inissia teardown.

Hugo Catarino -

I have taken a citiz apart to replace a brewing unit which was leaking water into the capsule tray. This seems to be a common problem. Ireplaced the brewing unit and fixed the problem. However i had a look at the old brewing unit and discovered to my annoyance that the real problem was the filter which the capsule pushes against under pressure and which pierces the top of the capsule.. It just pops out but nowhere can I find a replacement for this piece alone. You have to buy the full brewing unit. Anyway it would be useful if your stripdown could go this far as it would at least identify this piece

Frank Duffy -

I am trying to diagnose my machine. Top part of capsule is not getting punctured. Lack of any good flow. Some water is found in the capsule tray. I have seen the same symptom elsewhere, when someone says “water is leaking in the tray”, how much water (all of some)? Where did you source your brewing unit (in the US)? I don’t wish to pay out $50 and find it is the wrong type for the machine (Nespresso Citiz with frother - Type D122, not a Krups as shown above). Thanks in advance.

Dennis Mellina -

Anyone know what the brass compression tube fitting is called that slots within the retaining clip is called (in steps 16 & 17)?

Andrew Jenkins -

Has anybody thought of replacing the vibration pump with a rotary one?

Vladimir Vanek -

No, why? A rotary ump and 15 bar? Puuh…

VauWeh -

Could be possible to remove the outer shell without dismounting the base? I’d like to give them a paint job dismounting the less possible

Doctor Apple -

Our C110 machine (one of the original models) stopped heating above lukewarm and the pump seemed to run fine. I did a continuity test between the white wire that goes from the “heat” connection on the board to the heater, and the “Line” connection on the board and it appears to be OK whether I touch the light blue or red wires. Does that indicate my heater is OK?

Bud Shaw -

!&&* this one is ok,

Nespresso type D122 power not on but power plug put in line pump motor continues working what reason . Thanks

Hameed Ummer -

Can you get a better pump and replace the one they use? I’d like to get a stronger one that is also quieter if anyone know where to get them.

Manlius Renovations -

The pump is a Invensys CL4, now ARS CL4. (Google for it). What do you mean with “stronger"? It IS strong, making a pressure of about 16 bar, and more pressure does not make sense. If you want to have a change, try a ULKA EX4, but there will not be a great difference. Look for the right voltage.

If the pump does not work well, maybe its worth to carefully open it and clean it.

VauWeh -

Why is there no instructions for tearing down the brewing unit? Lots of problems with water leak and other stuff involve parts or seals in the brewing unit.

andersmard -

Hi my machine coffee disperse no power light. But the milk frother side have power. May I know why no power going to the coffee side

Bill Ong -

Did you ever find a cure? I tried to descale my Citiz but think messed up and after a large hiss and puff of steam the machine now does nothing! although the milk froth unit still powers up!

Can it be repaired? if so how?

Thanks

Nigel Maxey -

I need parts! Brown o-ring at the watertank base.

leandro foresto -

I needed to open up my Citiz (2021 model), to prime the pump. The usual means of priming the pump failed.

Disconnecting the silicon tube from the reservoir inlet allowed me connect a syringe and force water to the boiler once the pump switched on.

Pieter -

Where can I purchase the button switches for this unit?

Fred Eichel -

Maybe to late for @fredeichel : This shop has many parts.

VauWeh -

Is it possible to tighten the brewing unit so it clamps the pods more tightly?

ehjones -

You could disassemble the internals of the brewing unit. There is a kind of round flat spring in there. It is a flat metal ring with a gap (i.e. no full circle). It has got a wave form around its circumference. If you pull it apart so that the "amplitudes" of the waves become bigger. the pressure to the coffee pods may become somewhat greater.

It may only have little effect though, and maybe only for overcoming pod tolerances.

fredo47 -

According to my knowledge, this is not possible.

Maybe VauWeh knows something.

Martin -

@ehjones I don't think that this is possible. See this thread, last answer. But there is a solution: replace the brewing unit.

VauWeh -

Hi,

I have citiz type c110, I'm trying to find a replacement o ring, do you know the dimensions of the o ring or where I can buy one?

Thank you!

Yalon Szewach -

I removed and cleaned the defuser plate and it's still leaking, so I guess the leak has something to do with the o ring

Yalon Szewach -