
Inleiding
Is de batterijduur van uw toestel onbruikbaar geworden? Lijkt de batterij te weigeren op te laden? Een defecte batterij is mogelijk de oorzaak van deze problemen. Naarmate de batterij meer laad- en ontlaad cycli ondergaat, houdt deze minder lading vast.
Onderdelen
-
-
Steek het plastic openingsgereedschap in de spleet tussen het deksel en de rubberen rug met de aan/uit knop.
-
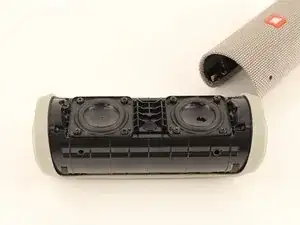
Wrik de behuizing los, te beginnen met de zijkant zonder de volume- en bluetooth-knoppen.
-
Trek het deksel eraf met uw duimen.
-
-
-
Verwijder vier 13 mm JIS #0-schroeven waarmee de rubberen rug aan de luidspreker is bevestigd, aan beide zijden van de binnenkant van de luidspreker.
-
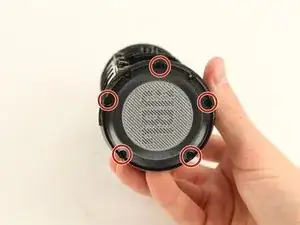
Gebruik het plastic openingsgereedschap om de clips los te maken die het centrale deel van de rubberen rug vasthouden.
-
Wrik het ene uiteinde van de rubberen rug weg met je duimen en deze zou dan los moeten komen.
-
-
-
Verwijder vijf 9 mm Phillips #1-schroeven van de kap tegenover de USB-poort.
-
Trek de kap er met uw handen af.
-
-
-
Verwijder twee 11 mm Phillips #1-schroeven op het batterijdeksel.
-
Trek het batterijklepje er met uw handen af.
-
-
-
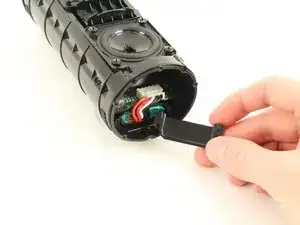
Verwijder de grote witte stekker die de draden van de batterij met het moederbord verbindt.
-
Trek de batterij er met uw handen uit.
-


Volg deze instructies in omgekeerde volgorde om uw apparaat weer in elkaar te zetten.
76 commentaren
Is the battery glued into the socket like the Flip 3?
Kenneth -
No it isn’t. but the black rubber around it makes it really hard to get out. try to push it from the otherside by removing the charging-port.
Be careful not to pierce the battery
Yes with me the battery was glued
Be careful and don’t do like me: my old battery was bloated, so I had to push from the other side, but when doing so, I ripped the ribbon cable from the power button… now trying to find a replacement cable
Did you find the cable of the power button?
I bought a 13pin cable for the buttons from here, but make sure it's the same number of pins for your cable as well: FFC/FPC Flat Flex Cable 13Pin 23Pin 33Pin 43Pin 53Pin Same Side 0.5mm Pitch AWM VW 1 20624 20798 80C 60V Length 15cm 5PCS
Afthrast -
très bon tutoriel, toute l’opération réussie à un bémol prêt, ma batterie aurait chauffé (?) et demeure inextricable de son logement soit elle a gonflé sous l’effet de la surchauffe, soit la bande noire en caoutchouc des extrémités de la batterie ont fondu.
Philippe -
Va voir le truc du WD-40 dans les commentaires de l’étape 5, c’est comme ça que j’en suis venu à bout.
Am I correct to assume that the speaker will no longer be water proof after performing this? or would it still be able to keep the water out even after the repair?
Important suggested edit to these instructions - make sure to pry off clips/ridges from BOTH sides before attempting removal of the cover.
I interpreted these instructions as saying you only needed to pry clips from one side - then peel off cover. Doing this broke a clip from the other side. Bummer. I'd like others to avoid that.
k9612 -
If you do break a clip - save it. They are relatively easy to glue back into the cover.
k9612 -
My Flip4 had a single long clip on the non-button side that ran the entire length of the rubber spine. The other side (with play/ vol buttons) had three seperate clips (middle and both sides) as mentioned above.
takentrashout -
What if my speaker battery dies very fast and makes weird crackling noise, is it counted as faulty battery?
Jayden Koh -
Yes. I first thought one of the drivers was defective.
Paul Sommer -
What was the fix in the end ?
Jack Mulcahy -
I used the flared edge of a metal measuring spoon handle since I didn’t have an opening tool. Worked great! Replacement battery from iFixit is on order. Thanks for the guide!
Greg -
My battery was glued. Tried it anyway to remove. Battery exploded!!!!
Don't go on if the battery is glued.
darthvader007 -