Inleiding

Gebruik deze handleiding om de gehele schermmodule van je MacBook Pro te vervangen. Zo repareer je een gebarsten of anderszins kapot scherm.

Ontlaad de batterij van je toestel, voor je eigen veiligheid, tot onder de 25% voordat je met deze procedure begint.

Let op: na het installeren van een nieuw scherm kan het voorkomen dat de True Tone-functie niet meer werkt.

Sommige afbeeldingen die in deze handleiding zijn gebruikt, zijn gemaakt van een ander model en kunnen dus visueel lichtjes afwijken. Dit heeft echter geen invloed op de reparatieprocedure.

  1. sLGCwxfH5Z1fVqiP
    • Zorg dat je, voordat je met deze procedure begint, de Auto Boot-functie van de MacBook uitschakelt. De Auto Boot zorgt ervoor dat je laptop aan gaat bij het openen van het scherm en kan dus per ongeluk worden geactiveerd tijdens de reparatie. Gebruik deze handleiding om de Auto Boot-functie uit te schakelen.

    • Als je MacBook op Big Sur v11.1 of nieuwer draait, kan het zijn dat het uitschakelen van de Auto Boot-functie niet werkt. Ga in dat geval gewoon verder met de aankomende stappen, maar zorg wel dat je de batterij loskoppelt zodra je de laptop hebt geopend.

    • Schakel je toestel volledig uit en koppel alle kabels, inclusief oplader, los. Klap het scherm dicht en klap de laptop om zodat deze op z'n kop komt te liggen.

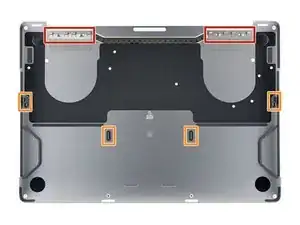
    • Gebruik een P5 Pentalobe-schroevendraaier om de zes schroeven, die de onderste behuizing bevestigen, te verwijderen:

    • Twee 6.7 mm lange schroeven

    • Vier 3.4 mm lange schroeven

    • Zorg dat je tijdens deze reparatie goed bijhoudt welke schroeven waar vandaan komen zodat je zeker weet dat je de juiste schroeven op de juiste plek terugplaatst en zo voorkomt dat je je toestel beschadigt.

  2. osaHpsUCcqYJ5vkG
    osaHpsUCcqYJ5vkG
    NboVOdHFBNHFOJPr
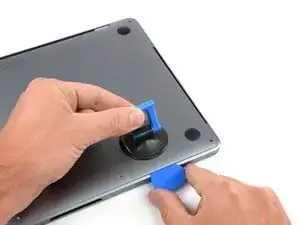
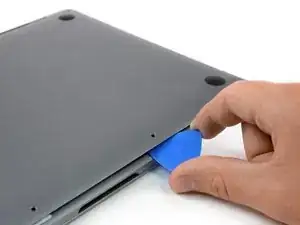
    • Druk een zuignap op de onderste behuizing, dicht bij de voorkant van de MacBook Pro.

    • Til de zuignap omhoog om zo een kleine opening te creëren tussen de onderste behuizing en het chassis.

  3. hAHYIDBFvJ4WNxf2
    hAHYIDBFvJ4WNxf2
    psLt1wKSkYhQNYHd
    UK5yIrxfcfRZGhqX
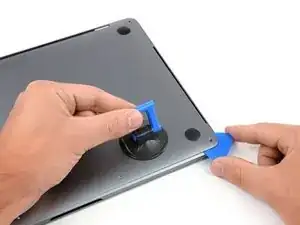
    • Steek de punt van een openingsplectrum in de opening tussen de onderste behuizing en het chassis.

    • Schuif je openingsplectrum rondom de dichtstbijzijnde hoek en tot halverwege de zijkant van de behuizing omhoog.

    • Dit zorgt ervoor dat een van de verborgen klemmen die de onderste behuizing aan het chassis bevestigt los wordt gemaakt. Als het goed is, hoor en voel je de klem vrijkomen.

  4. ISWfetPgvKBsjOuU
    ISWfetPgvKBsjOuU
    wUQs1NsoXumTrLUN
    YjPRQuBO3PgmxHZ2
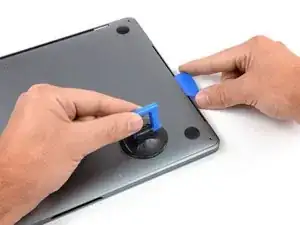
    • Herhaal de instructies uit de vorige stap aan de andere kant van de laptop. Schuif je openingsplectrum onder de onderste behuizing, langs de hoek en tot halverwege de zijkant omhoog om de behuizing uit de tweede klem te verlossen.

  5. JBYHNMxfrfyDYIAS
    JBYHNMxfrfyDYIAS
    buRCKFSn4k1aNdcQ
    3rpxVUDIFteVN6Gp
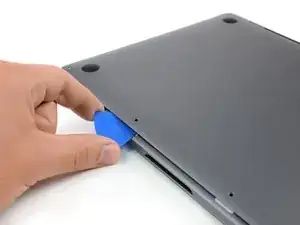
    • Steek je openingsplectrum opnieuw onder de voorkant van de onderste behuizing, dicht bij een van de twee middelste schroefgaten.

    • Draai je plectrum naar links of rechts om de de behuizing uit de derde klem te verlossen.

    • Herhaal deze stap bij de andere twee middelste schroefgaten en zorg dat de behuizing uit de vierde klem loskomt.

  6. dGMQvsHgheHZuSMs
    dGMQvsHgheHZuSMs
    vtTeKNQv4hK1mfJ5
    UKBDcHJSTtaPlDRT
    • Trek de onderste behuizing met wat kracht richting de voorkant van de MacBook (van de scharnieren weg) om de behuizing uit de laatste klem te verlossen.

    • Trek eerst een hoek naar beneden en dan de andere hoek.

    • Trek naar de zijkant—niet omhoog.

    • Dit kan aardig wat kracht vereisen.

    How much force are we talking. I am giving it hell.

    Chris MacCoy -

    you probably didn't pop the nubbins further in the front (as i did until i looked at the next step), a.k.a. one actually has to lift the front up quite a bit!

    powerfinger -

  7. QE5DDkPTCUxkMojR
    QE5DDkPTCUxkMojR
    IsIJ1d6SwI1DSZq6
    V4ZAwLEAhuHqYWWq
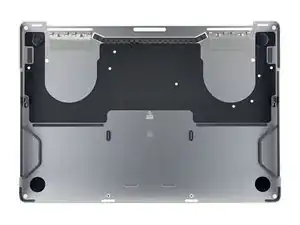
    • Verwijder de onderste behuizing.

    • Om de onderste behuizing weer te installeren:

    • Breng je deze op de juiste plek boven de body aan en zorg je dat de klemmen nabij de scharnieren naast de scharnieren komen te zitten. Druk de behuizing omlaag en schuif deze richting de scharnier. De behuizing zou moeten stoppen met schuiven zodra deze in de klemmen vast zit.

    • Als de schuivende klemmen eenmaal vastzitten en de onderste behuizing op de juiste positie zit, druk je de behuizing stevig naar beneden om deze in de vier klemmen te bevestigen. Als het goed is hoor en voel je de behuizing in de klemmen klikken.

  8. 5HZMhBjrioUj5lL6
    5HZMhBjrioUj5lL6
    EPhIVvuNvBaLRTE6
    • Peuter het grote stuk tape dat aan de zijkant van het logic board het dichtst bij de batterij over de batterijaansluiting heen geplakt is, los.

    • Verwijder de tape.

    It’s probably best to keep up with this tape until you’re done, but my iFixit battery came with this tape already installed

    Spencer Pennington -

  9. kaRhnoaZYErSUvLf
    kaRhnoaZYErSUvLf
    Nef2wjSqIEPJxaWL
    • Peuter het kleine stuk tape dat over de datakabelaansluiting van het batterijbord heen zit voorzichtig los.

    • De tape is in de lintkabel geïntegreerd en zal dus niet volledig loskomen. Peuter deze in ieder geval zo ver los dat je de aansluiting kunt bereiken.

  10. t5QBGUw6LpBCoPHc
    t5QBGUw6LpBCoPHc
    6sjTkPKRATTmNuCM
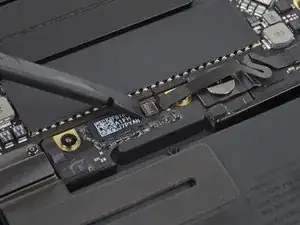
    • Gebruik de punt van je spudger om de kleine zwarte sluitklep die de kabel in de aansluiting houdt, omhoog te klappen.

    Be very careful here. It is easy to break the whole connector off the battery board, which is what I did. Luckily the connector is part of the replacement battery, so you just need to remove the connector from the cable. The pictures here should provide more detail so you can see better what is going on.

    Mark Hayden -

    thanks a lot !!!!! great help :)

    der gute Geist -

    any advice on replacing the locking Mechanism?

    Latifah Boldon -

    The picture of the black flap that holds the connector should be enlarged with an arrow pointing the direction to open or close. I learned which way and how it functions only after breaking the flap.

    Victor M -

  11. 2bersiQZgUKN1NMO
    2bersiQZgUKN1NMO
    5hQYuIWHnCmArPDg
    • Koppel de datakabel van het batterijbord los door deze uit het contact te schuiven.

    • Schuif deze parallel aan het logic board en in de richting van de kabel.

    As simple as this step might seem, the golden leads will disapper the moment you remove it as it has some adhesive under the black strip that covers it. Ensure you peel it back enough to display the golden leads after swapping the batteries out.

    Harish Prasanna -

    Your battery may come with this ribbon cable. In that case, disconnect the other end.

    bencottrill -

  12. QcIDoURXUwuHwaPm
    QcIDoURXUwuHwaPm
    ZmvLtlhYsOxYHuLw
    • Vouw de datakabel van het batterijbord naar de zijkant zodat deze uit de weg ligt.

    I don't recall removing this cable from the laptop. I see that when actually putting the new battery in, the cable is attached already where it was detached and the right end needs to be reconnected.

    durphym -

    unfortunately the instructions to removing this cable are absent and I tried to pry the tab up instead of out and I damaged my board. Now no battery will work but it still functions with only with power cord. So be careful!

    Laloyd -

    same here 😞

    Latifah Boldon -

  13. AeJIpXPThW6iLJfx
    • Gebruik een T5 Torx-schroevendraaier om de 3.7 mm lange pannenkoekschroef, die de stroomaansluiting van de batterij bevestigt, los te draaien.

  14. XGJ1kgie42wG3Qx6
    XGJ1kgie42wG3Qx6
    XGaY2hUpcsfZgnQW
    • Gebruik een spudger om de stroomaansluiting van de batterij omhoog te duwen en de batterij zo los te koppelen.

    • Til de aansluiting zo hoog dat deze zeker weten geen contact meer kan maken met het contact. Als deze namelijk per ongeluk contact maakt tijdens de reparatie kan dit je MacBook Pro beschadigen.

    To completely avoid accidental contacts I recommend to wrap this connector in a piece of paper and hold it in place with tape.

    Do not put tape directly on the contact underside, as that may leave some glue that would affect the contact conductivity.

    Sergio Ballestrero -

    I put a piece of tape on the underside of the connector (sticky side up) to insure against accidental battery contact. If you put tape on the logic board side of the connection, some insulating padding material might accidentally stick to the tape when the tape is removed during reassembly.

    W. Smith -

  15. yNHrAaGME3XGgqaM
    yNHrAaGME3XGgqaM
    EPqjYX1pCBmS5Gsg
    iU2BjKmAtQYPJfPI
    • Gebruik een T3 Torx-schroeven om de vier 1.9 mm lange schroeven die de plastic covers bovenop de schermscharnieren bevestigen.

    • Verwijder beide plastic scharniercovers.

    I can't open it with T3 screwdriver..The screws are smaller.. Anyone knows which screwdriver will work?

    Kailash -

  16. BphDrMIHMU4WfAUA
    BphDrMIHMU4WfAUA
    WFDcfnabYEe3uFR4
    • Verwijder de twee 2.9 mm lange T3 Torx-schroeven die de aluminium cover bovenop de hoofdschermkabel bevestigen.

    • Verwijder de cover.

  17. QFa3RgJJDPnkXKTY
    QFa3RgJJDPnkXKTY
    YCCafBGikPcPEDFH
    • Verwijder de twee 1.7 mm lange T3 Torx-schroeven die de aluminium beugel bovenop de flexaansluiting van de schermkabel bevestigen.

    • Verwijder de beugel.

  18. TgWPIZDNFMlLbvSf
    TgWPIZDNFMlLbvSf
    Y3edDG13ZQHSneGV
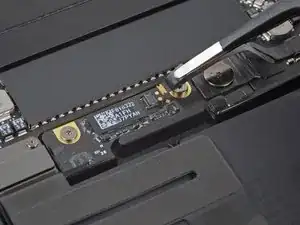
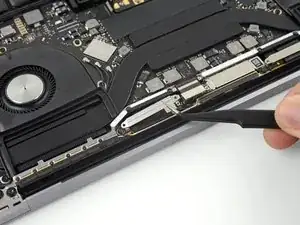
    • Wrik de flexkabel van het schermbord in een rechte beweging uit het contact omhoog om deze los te koppelen.

  19. 2rtkEkjhvNmuiShE
    2rtkEkjhvNmuiShE
    kPWWPo3aBr5PX1mL
    4XeUWhDNWe6ce6T1
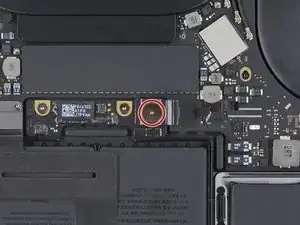
    • Verwijder de vier 1.5 mm lange T3 Torx-schroeven die de twee aluminium beugels bovenop de twee schermbordkabels bevestigen.

    • Gebruik een pincet om de twee aluminium beugels te verwijderen.

    this step is completely unnecessary, there is no reason what so ever that this would even need to be done, unless you want to desolder the board

    Jacob Whitney -

    If you are replacing the screen, and your replacement screen doesn't come with these pre-installed, you'll need to transfer them to the new screen.

    Some of the steps in these guides are shared with other guides, depending what brought you here you may not need to do this step.

    maccentric -

  20. c4V1gxjnxUbeABMU
    c4V1gxjnxUbeABMU
    JW6QHOvWCviSdlho
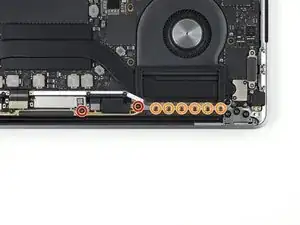
    • Verwijder de vier 3.9 mm lange T5 Torx-schroeven (twee aan elke kant) die de antennekabelmodule bevestigen.

    • Verwijder ook de twaalf 1.1 mm lange P2 Pentalobe-schroeven (zes aan elke kant).

  21. CL5XUQFupQxPhSXM
    CL5XUQFupQxPhSXM
    vJij4ZGXVXUyGDyo
    1DEhIsLSQqUFLpfe
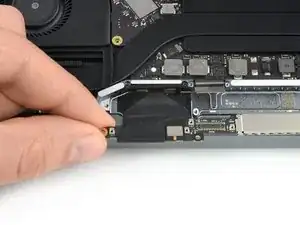
    • Koppel de drie antenne coaxkabels op voorzichtige wijze los door deze in een rechte beweging van het logic board omhoog te wrikken.

    • Schuif je pincet of de punt van je spudger onder iedere kabel totdat deze zich dicht bij het contact bevindt. Draai de tool vervolgens om of wrik deze omhoog om de aansluiting los te koppelen.

    • Om beide kabels weer aan te sluiten, breng je deze recht boven het contact aan en druk je deze op z'n plek.

  22. rSgUvEPGOmnCWnZv
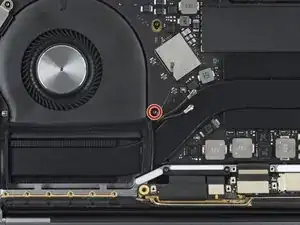
    • Verwijder de 2,8 mm lange T5 Torx-schroeven die de drie antenne coaxkabels op het moederbord bevestigen.

  23. 2KeT1au4LADWETJE
    2KeT1au4LADWETJE
    PCpFTX3I5hDBEdGf
    4ZFbFUS1QYgQXoNt
    • Gebruik een openingsplectrum om de antennekabelmodule in de op de afbeelding aangegeven gebieden omhoog te duwen.

    • Schuif je openingsplectrum niet heen en weer, aangezien er twee schermkabels lopen die op deze manier beschadigd zouden kunnen worden.

  24. HVqTy4fYBOLGXqIb
    HVqTy4fYBOLGXqIb
    ahmXV1RMxmfSlXW2
    FJgUwKrKReA3BPCp
    • Verwijder de antennemodule op voorzichtige wijze. Vergeet tegelijkertijd niet de antennekabelbundel onder de warmtepijp vandaan te begeleiden.

  25. l1EAeQaTZMDSTGUH
    • Verwijder de antennekabelmodule.

    • Zorg dat je de kabelbundel, bij het weer in elkaar zetten van je toestel, samenknijpt en weer onder de warmtepijp heen begeleidt, zodat deze op de juiste wijze op het bord bevestigd kan worden. Indien nodig kun je je tools gebruiken in deze stap, maar wees hierbij voorzichtig en forceer het niet.

  26. myFVAA4ljVSAZvnU
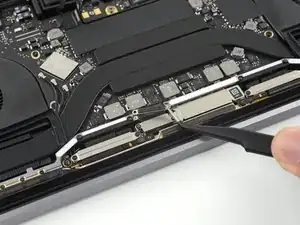
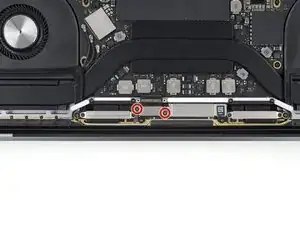
    • Verwijder de vier 3.9 mm lange T3 Torx-schroeven die de twee beschermveren over de schermkabel bevestigen.

    T4 works better there !

    Paul Garcia -

    I guess it depends on your tools. Maybe a worn T4 would fit, mine wouldn't. T3 it is.

    maccentric -

    Torx T3 da 3,9 isn't easy to find it in a tool kit, damned

    pbs pbs -

  27. Nml531uvTZwKerje
    Nml531uvTZwKerje
    vYcEToVPU5bC6fst
    RDVCXBhcW1AUDlEa
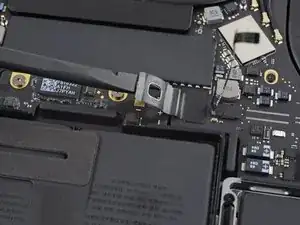
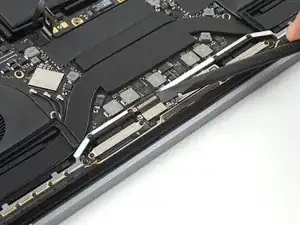
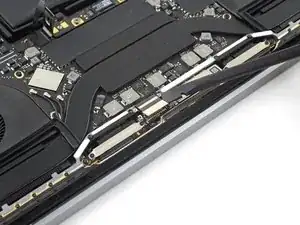
    • Pak de linkerkant van de schermkabelmodule vast en trek deze richting de onderkant van de MacBook en weg van de beschermveer.

    • Gebruik een pincet om de beschermveer van de schermkabels uit de inkeping te trekken.

    • Herhaal deze stap bij de rechter beschermveer van de schermkabelmodule.

  28. O4HbdRBn5KiSyukF
    O4HbdRBn5KiSyukF
    WcLsEYL3p3lJtPSH
    • Open het scherm volledig en zet je MacBook Pro op haar zijkant.

    • Houd de MacBook Pro vast met je vrije hand en verwijder de drie T8 Torx-schroeven van uit het onderste schermscharnier.

    • Verwijder de drie overige T8 Torx-schroeven van de bovenste schermscharnier.

  29. 1nIOYkB5sanH6bhG
    1nIOYkB5sanH6bhG
    aG3HFHTYqdkthWYn
    HIbZNJbnFW4tXW2J
    • Houd zowel het scherm als de main body van de MacBook Pro stevig vast. Beide onderdelen kunnen los van elkaar vallen in deze stap.

    • Duw beide helften van de MacBook Pro samen, zodat de scharnierbeugels uit de inkepingen in het chassis kunnen worden getild.

    • Duw de main body van de MacBook Pro van je weg terwijl je het scherm naar je toe trekt en scheid zo beide helften van elkaar.

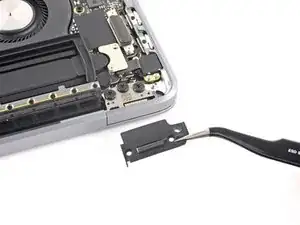
    • Verwijder de schermmodule en wees hierbij voorzichtig dat je de geen kabels meetrekt en scheurt.

    VERY IMPORTANT!!!!

    It is very common when replacing the screen to hit the touchbar connector and damage it. Be very careful.

    Unfortunately following this same tutorial I didn't have this information and damaged the touchbar.

    iFixit should highlight this information.

    https://www.youtube.com/watch?v=JNvuEPZh...

    Marcelo Juliani -

    Marcelo's comment is VERY IMPORTANT.

    This may be the trickiest part of the whole procedure.

    The long rectangle connector next to the pointed part of the hinge in the photo is EASILY damaged! (It's for the touch bar and apparently hard to get replaced.). I call that hinge the "LEFT hinge".

    What I did that worked better:
    1. When disassembling, move the other hinge first (the "RIGHT" one, NOT shown in the photo above.). Once that right hinge is out, you can slide the other (left) hinge sideways and out.

    2. When reassembling, first slide the left hinge (the one showed above photo), SIDEWAYS into the groove. This prevents damaging the long rectangle. Then push/snap the right hinge in place. It will take some force.

    Clem Wang -

    What worked best for me in terms of not damaging that connector, was to slightly close the screen. You'll see the hinge pull away past the touchbar connector without coming close to touching it, mitigating that problem altogether.

    Brick -

Conclusie

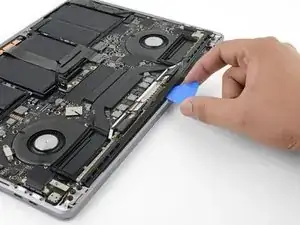
Vergelijk je nieuwe onderdeel met het originele onderdeel om te zien of je nog meer onderdelen mee over moet zetten of om te zien of je beschermfolie moet verwijderen voordat je je nieuwe onderdeel kunt plaatsen.

Volg deze instructies in omgekeerde volgorde om je toestel weer in elkaar te zetten.

Breng je e-afval naar een door R2 of e-Stewards gecertified recycle-station.

Ging je reparatie niet zoals gepland? Bezoek dan onze probleemoplossingspagina of stel je vraag op ons Antwoordenforum voor hulp bij het oplossen van je probleem.

Mocht je na het plaatsen van je nieuwe scherm problemen ondervinden met de True Tone-functie, het licht van de Touch Bar of de backlight van het toetsenbord, probeer dan de SMC en de NVRAM/PRAM van je Mac te resetten.

Carsten Frauenheim

Lid sinds: 10/03/20

145350 Reputatie

15 commentaren

I'm not sure if I just stripped the screws a bit, but for steps 17 and 19 (the display cable covers), a T4 Torx worked better than a T3 Torx for both removing and reinstalling the screws.

Harry Yu -

Harry, sometimes a T4 driver may fit better into some MacBook T3 screws, but it depends on the specific bit used and the tolerances on the specific screw in the machine. Thanks for your insight—I'll add a note to the guide!

Carsten Frauenheim -

Did the repair go OK for you? Did the True Tone work at all?

Gary Ogilvie -

Just finished doing this and when the computer boots the apple logo looks the correct brightness. Halfway through the boot process, the screen gets really dim, even through brightness is set to max. Not sure the cause of this, will report back if I figure it out.

maccentric -

Did you ever figure out what has caused this? I am about to do this repair so wanted to do some research first.

Gary Ogilvie -

II have exactly the same problem. When starting up, the logo appears in normal brightness, then the screen goes dark, as if software were controlling it. I can't get rid of this. Have you been able to solve the problem in the meantime?

Roberto -

I take it this is also the guide to change the display cable ( MacBook Air 13" (Late 2018-Late 2020) Display Cable) in case the monitor goes displaying black giant bar ?

mbaillargeon -

Hello, i can’t do the step 18 in reverse :i can’t connect the LCD cable…

ulysse28candelier02 -

Hola , a mi me ocurre lo mismo con el brillo se atenúa muchísimo probare este consejo ,gracias .

Alberto -

Just fitted a replacement display to this. Screen “works” but the laptop is only sending output to hdmi. Desktop etc showing on external. No internal display showing in display settings. There is an image on the internal display, the Ventura desktop and boot progress bar so without an external display hooked up it looks like the Mac has frozen mid boot.

Any ideas. Tried resetting nvram but that doesn’t seem to work. At least the Mac won’t do the usual 2nd reboot while keys are held down.

Andrew Stephens -

Hi, thanks for the tutorial. I after reassembling the mac won't start, nothing happens, not even the caracteristic sound when i plug the charger. Maybe i did something wrong replugging the battery ?

Roland -

did you figure out what was wrong? did your mac boot?

Mm Oo -

I can't open any screws with T3 screwdriver, the screws are very small. Its a A2251 Mackbook pro 13 2020 model.. Anyone knows which screwdriver will work please help..

Kailash -

My camera is not working since i repaired the display. Any suggestions why?

Chris -

For a $100 less, is it feasible to replace only the display ? My upper case is in good condition and a refurbished display costs less than $150, which is almost half price compared to display+uppercase ! I have a A2251 (MacBook Pro 13’´ four ports 2020).

Thanks for your great website and guidelines !

Alx -