
Inleiding
Gebruik deze handleiding om de vastgelijmde batterij van je MacBook Pro op veilige wijze te verwijderen met behulp van een iFixit-batterijvervangingskit. De lijmverwijderaar in je kit zal de lijm die de batterij aan de behuizing bevestigt oplossen, waardoor je deze makkelijker kunt verwijderen.
Let op: De instructies in deze handleiding laten je zien hoe je de speakers, het moederbord en een aantal andere onderdelen vervangt alvorens aan de batterijvervanging te beginnen. Op die manier bescherm je de onderdelen tegen mogelijke schade die berokkend kan worden door de lijmverwijderaar. Als je een milde vloeistof gebruikt, zoals isopropylalcohol, kun je de onderdelen laten zitten en de stappen 6-45 overslaan.
Apple riep voor dit model de batterijen terug in juni 2019—dus voordat je je batterij vervangt, kun je checken of je in aanmerking komt voor een gratis vervanging door Apple.
iFixit-lijmverwijderaar is licht ontvlambaar. Voer deze procedure dus uit in een goed geventileerde ruimte. Rook niet tijdens het proces en werk niet in de buurt van een open vuur.
Om het risico op schade te minimaliseren, schakel je je MacBook uit en laat je je batterij volledig ontladen voordat je deze procedure start. Een geladen lithium-ion batterij kan een gevaarlijke en oncontroleerbare brand veroorzaken als deze per ongeluk wordt doorboord. Neem, als je batterij gezwollen is, de juiste voorzorgsmaatregelen.
-
-
Verwijder de volgende P5-pentalobe schroeven die de onderste behuizing aan de MacBook Pro bevestigen:
-
Acht 3.1 mm lange schroeven
-
Twee 2.3 mm lange schroeven
-
-
-
Til de onderste behuizing van de MacBook Pro af, tillend vanaf de scharnierkant van de laptop.
-
-
-
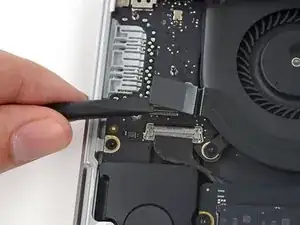
Til beide kanten van de batterijaansluiting voorzichtig omhoog om de aansluiting uit het contact op het logic board te duwen.
-
Buig de aansluiting naar achteren richting de batterij om zo te zorgen dat de aansluiting tijdens de reparatie geen contact maakt met het logic board en je laptop inschakelt.
-
-
-
Gebruik de punt van een spudger om de kabelaansluiting van de camera uit het contact op het logic board te duwen.
-
-
-
Gebruik je vingers om de AirPort-/Camerakabels van de ventilator af te trekken.
-
Trek de kabels ook op voorzichtige wijze uit de plastic kabelgoot.
-
-
-
Verwijder de vier 2.2 mm lange T5 Torx-schroeven die de covers over de kabelaansluitingen van het I/O-bord bevestigen.
-
-
-
Verwijder de linkse cover.
-
Gebruik het platte einde van een spudger om het linkereind van de I/O-bordkabel uit het contact op het logic board omhoog te duwen.
-
-
-
Verwijder de rechter cover.
-
Gebruik het platte einde van een spudger om het rechtereind van de I/O-bordkabel uit het contact op het logic board omhoog te duwen.
-
-
-
Trek de kabel van het I/O-bord los van de lijm die de kabel op de ventilator bevestigt.
-
Verwijder de kabel.
-
-
-
Gebruik een T5 Torx-schroevendraaier om de volgende drie schroeven, die de rechter ventilator aan het logic board bevestigen, los te draaien:
-
Eén 5.0 mm lange schroef met een 2.0 mm lange schouder.
-
Eén 4.0 mm lange schroef met een brede kop.
-
Eén 4.4 mm lange schroef.
-
-
-
Gebruik de punt van een spudger om de bevestigingsklem op het ZIF-contact van de lintkabel van de rechter ventilator omhoog te klappen.
-
-
-
Til de ventilator op en duw deze voorzichtig richting de achterkant van de MacBook om de kabel van de ventilator uit het contact te duwen.
-
Verwijder de ventilator.
-
-
-
Verwijder de volgende drie schroeven die de linker ventilator aan het logic board bevestigen:
-
Eén 3.6 mm lange T5 Torx-schroef met een brede kop.
-
Eén 5.0 mm lange T5 Torx-schroef met een 2.0 mm lange schouder.
-
Eén 4.4 mm lange T5 Torx-schroef.
-
-
-
Gebruik de punt van een spudger om de bevestigingsklem op het ZIF-contact van de lintkabel van de linker ventilator omhoog te klappen.
-
-
-
Til de ventilator omhoog en duw deze voorzichtig richting de achterkant van de MacBook om de ventilatorkabel uit het contact te bevrijden.
-
Verwijder de ventilator.
-
-
-
Til het einde van de SSD hoog genoeg op om deze over de speaker die er direct achter ligt heen te tillen.
-
Trek de SSD in een rechte beweging uit het contact op het logic board.
-
-
-
Gebruik de punt van een spudger om het sluitingsmechanisme op de I/O-bordaansluiting omhoog te klappen.
-
Draai de spudger om en gebruik het platte einde om de kabel van het I/O-bord uit het contact te schuiven.
-
-
-
Til de binnenkant van het I/O-bord lichtjes omhoog en trek deze richting het midden van de MacBook, weg van de zijkant van de behuizing.
-
Verwijder het I/O-bord.
-
-
-
Verwijder de twee 2.2 mm lange T5 Torx-schroeven die de cover over de touchpadkabelaansluiting op het logic board bevestigen.
-
Verwijder de cover.
-
-
-
Gebruik het platte einde van een spudger om de kabelaansluiting van het touchpad uit het contact op het logic board los te koppelen.
-
-
-
Verwijder de kleine rubberen bescherming die op de schroef zit aan het einde van het koellichaam.
-
-
-
Verwijder de volgende zes schroeven die de logic board module aan de bovenste behuizing bevestigen.
-
Eén 3.8 mm lange T5 Torx-schroef
-
Twee 5.7 mm lange T5 Torx-schroeven
-
Eén 5.6 mm lange T5 Torx-schroef (deze is zilver en heeft een grotere kop dan de andere)
-
Eén 2.6 mm lange T5 Torx-schroef
-
Eén 3.2 mm lange T5 Torx-schroef
-
-
-
De volgende stappen laten in detail zien hoe je de zes gemarkeerde aansluitingen los koppelt. Zorg dat je iedere stap goed leest, aangezien deze aansluitingen alle verschillende zijn en dus verschillende instructies vereisen.
-
Microfoonkabel
-
Linkerspeakerkabel
-
Datakabel van het toestenbord
-
Rechterspeakerkabel
-
Backlightkabel van het toetsenbord
-
Schermdatakabel
-
-
-
Gebruik de punt van een spudger om de sluitklem op het ZIF-contact, waar de lintkabel van de microfoon in is geplaatst, omhoog te klappen.
-
Trek de lintkabel van de microfoon uit het contact. Zorg dat je deze parallel aan het logic board trekt.
-
-
-
Gebruik het platte einde van een spudger om de linker speakeraansluiting uit het contact op het logic board omhoog te duwen.
-
Vouw de kabel op voorzichtige wijze omhoog en uit de buurt van het logic board.
-
-
-
Trek de tape die over de bovenkant van de datakabelaansluiting van het toetsenbord heen is geplakt los.
-
-
-
Gebruik de punt van een spudger om de sluitklem van het ZIF-contact waar de datakabel van het toetsenbord mee is verbonden omhoog te duwen.
-
Trek de datakabel van het toetsenbord uit het ZIF-contact. Zorg dat je parallel aan het logic board trekt en niet omhoog.
-
-
-
Gebruik de punt van een spudger om de rechter speakeraansluiting uit het contact op het logic board omhoog te duwen.
-
Vouw de kabel op voorzichtige wijze uit de weg van het logic board.
-
-
-
Gebruik de punt van een spudger om de aansluiting van de backlight van het toetsenbord uit het contact op het logic board omhoog te duwen.
-
-
-
Gebruik de punt van een spudger om het slot op de schermdatakabel omhoog te klappen en deze richting de kant van de MagSafe 2-stroompoort te draaien.
-
-
-
Trek de schermdatakabel in een rechte beweging uit het contact op het logic board.
-
Buig de schermdatakabel richting de schermscharnieren om de schroeven op het MagSafe 2-bord bloot te leggen.
-
-
-
Til de volledige logic board module omhoog en trek deze weg van de muur van de bovenste behuizing.
-
-
-
Verwijder de volgende schroeven, die de linkerspeaker aan de bovenste behuizing bevestigen:
-
Eén 2.7 mm lange T5 Torx-schroef
-
Eén 6.9 mm lange T5 Torx-schroef (met 4.5 mm lange schouder)
-
Eén 5.6 mm lange T5 Torx-schroef
-
-
-
Verwijder de linkerspeaker door deze lichtjes van de zijkant van de bovenste behuizing en weg onder de aluminium rand die het blokkeert weg te trekken.
-
-
-
Verwijder de volgende schroeven die de rechterspeaker aan de bovenste behuizing bevestigen:
-
Eén 2.7 mm lange T5 Torx-schroef
-
Eén 6.9 mm lange T5 Torx-schroef (met 4.5 mm lange schouder)
-
Eén 5.6 mm lange T5 Torx-schroef
-
-
-
Verwijder de rechterspeaker door deze lichtjes weg te trekken van de zijkant van de bovenste behuizing en weg onder de aluminium rand die de speaker blokkeert.
-
-
-
Trek de tape die over de lintkabelaansluiting van het trackpad heen is geplakt, in de buurt van de voorkant van de MacBook Pro, los.
-
-
-
Gebruik de punt van een spudger om de zwarte sluitklem op de ZIF-aansluiting van de lintkabel van het trackpad omhoog te klappen.
-
-
-
Steek een openingsplectrum tussen de lintkabel van het trackpad en de batterij.
-
Schuif je plectrum voorzichtig onder de lintkabel en beweeg deze over de hele lengte om de kabel van de lijm die het aan de batterij bevestigt te scheiden.
-
-
-
Om je scherm te beschermen, plaats je een laag aluminiumfolie tussen het scherm en het toetsenbord en laat je deze gedurende het gehele proces daar zitten.
-
-
-
Met de voorkant van de MacBook Pro naar je toe wijzend, til je de rechterkant op en leg je deze op een boek of een stuk schuim, zodat deze een lichte hoek beschrijft.
-
-
-
Nu je MacBook Pro voorbereid is, is het tijd om je zelf voor te bereiden.
-
Draag oogbescherming bij het gebruiken en toedienen van de lijmverwijderaar. (Oogbescherming wordt ook in je kit meegeleverd.)
-
Draag geen contactlenzen zonder oogbescherming.
-
Er zitten ook beschermende handschoenen in je kit. Als je bang bent voor mogelijke huidirritaties, kun je nu je handschoenen aantrekken.
-
-
-
Trek de zwarte, rubberen stopper van het flesje met lijmverwijderaar.
-
Gebruik een schaar om de verzegelde top van de dop af te knippen.
-
-
-
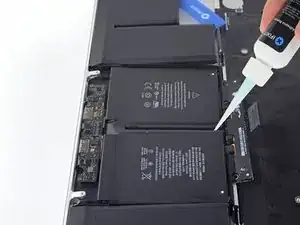
Verdeel een aantal druppels lijmverwijderaar over de zijkant van de buitenste rechter batterijcel, aan de opgetilde kant van de laptop.
-
Wacht 2-3 minuten om de lijmverwijderaar onder de batterij te laten intrekken voordat je verder gaat met de volgende stap.
-
-
-
Schuif een hoek van een plastic kaart onder de buitenkant van de batterijcel.
-
Schuif de kaart verder onder de batterijcel om deze van de lijm te scheiden die het aan de bovenste behuizing van de MacBook Pro vasthoudt.
-
-
-
Til de batterijcel op om deze van de bovenste behuizing van de MacBook Pro te scheiden, maar probeer deze nog niet volledig te verwijderen.
-
Laat je plastic kaart onder de batterijcel zitten om te voorkomen dat de lijm zich weer aan de bovenste behuizing gaat hechten.
-
-
-
Verdeel een aantal druppels lijmverwijderaar over de opgetilde zijkant van de naastgelegen batterijcel.
-
Wacht 2-3 minuten om de lijmverwijderaar in te laten trekken onder de batterijcel voordat je verder gaat met de volgende stap.
-
-
-
Schuif een hoek van je plastic kaart onder de tweede batterijcel.
-
Duw de kaart onder de tweede batterijcel en schuif deze heen en weer om de lijm eronder van de batterijcel te scheiden.
-
Laat de plastic kaart onder beide cellen zitten (of kantel deze uit de laptop) om te voorkomen dat de lijm zich opnieuw aan de batterijcel en de behuizing gaat hechten.
-
-
-
Het is tijd om om te draaien. Verwijder het boek of stuk schuim onder je laptop en plaats deze onder de andere kant van je MacBook Pro.
-
-
-
Herhaal de procedure van de vorige stappen om de twee batterijcellen aan deze kant van de behuizing te scheiden:
-
Dien lijmverwijderaar toe langs de opgetilde zijkant van de buitenste linker batterijcel en wacht 2-3 minuten om dit in te laten trekken.
-
Schuif een hoek van een plastic kaart volledig onder de batterijcel om deze van de behuizing te scheiden.
-
Doe hetzelfde bij de naastgelegen batterijcel.
-
Laat je plastic kaart onder de cellen zitten of kantel deze naar de zijkant van de laptop om te voorkomen dat de lijm zich opnieuw aan de cellen gaat hechten.
-
-
-
Met de linkerkant van je MacBook Pro nog steeds opgetild, dien je een aantal druppels lijmverwijderaar toe tussen de middelste twee batterijcellen.
-
Wacht 2-3 minuten om de lijmverwijderaar in te laten trekken en ga dan pas verder.
-
-
-
Schuif een hoek van een plastic kaart onder de middelste twee batterijcellen en onder de opgetilde kant van de rechtse middelste batterijcel.
-
Schuif de kaart verder onder de batterijcel om de lijm die het bevestigt door te snijden.
-
Probeer deze batterijcel nog niet volledig te verwijderen. Laat je plastic kaart op z'n plek zitten om te voorkomen dat de lijm zich opnieuw aan de cel gaat hechten.
-
-
-
Draai de twee losgemaakte rechter batterijcellen om en leg deze over de rand van de MacBook Pro als je dat nog niet hebt gedaan. Dit geeft je toegang tot de buitenste zijkant van de middelste cel.
-
-
-
Duw een hoek van je plastic kaart onder het plastic batterijframe en onder de nog steeds vastgelijmde zijkant van de onderste middelste batterijcel.
-
Schuif je kaart helemaal onder de batterijcel en laat deze zitten om te voorkomen dat de lijm zich opnieuw aan de cel gaat hechten.
-
-
-
Verwijder de eerste plastic kaart die je onder de rechtse middelste batterijcel hebt geplaatst.
-
Duw de andere kaart iets verder onder de batterijcel en laat deze zitten om te voorkomen dat de lijm zich opnieuw gaat hechten als je verder gaat.
-
-
-
Verwijder je boek of blok schuim.
-
Met de voorkant van de MacBook Pro naar je toe gericht, til je de rechterkant op en leg je er een object onder zodat deze opgetild blijft.
-
-
-
Dien een aantal druppels lijmverwijderaar toe tussen de twee middelste cellen zodat het onder de resterende batterijcel loopt.
-
Wacht 2-3 minuten om de lijmverwijderaar in te laten trekken voordat je verdergaat.
-
-
-
Schuif een hoek van een plastic kaart onder de opgetilde kant van de laatste batterijcel.
-
Duw de kaart verder onder de batterijcel om de lijm door te snijden die het nog aan de behuizing bevestigt.
-
Probeer de cel nog niet volledig te scheiden. Laat je plastic kaart op z'n plek zitten om te voorkomen dat de lijm zich opnieuw aan de cel gaat hechten.
-
-
-
Til de twee buitenste linker batterijcellen op en kantel deze uit de laptop om jezelf toegang te verschaffen tot de buitenkant van de laatste vastzittende batterijcel.
-
-
-
Herhaal het proces dat je bij de rechtse middelste batterijcel hebt voltrokken om de ook de linkse middelste batterijcel te scheiden van de lijm:
-
Duw een hoek van je plastic kaart onder het plastic batterijframe en onder de laatste vastgelijmde batterijcel.
-
Schuif je kaart helemaal onder de batterijcel en laat deze daar zitten om te voorkomen dat de lijm zich opnieuw gaat hechten.
-
-
-
Draai, nu je twee kaarten onder de laatste twee middelste cellen hebt geschoven, de kaarten om en til deze op om de batterijcellen, inclusief plastic frame en het batterijbord, volledig los te krijgen uit de behuizing van de MacBook Pro.
-
-
-
Til de batterij omhoog en verwijder deze uit de laptop.
-
Met een beetje geluk kun je de oude lijmstrips met je vingers uit de behuizing trekken.
-
Als dit niet lukt, dien je lijmverwijderaar toe op iedere kleefstrip en wacht je 2-3 minuten. Vervolgens schraap je de strips eruit met een plastic tool. Dit kan wat moeite kosten, dus wees geduldig.
-
Maak je laptop schoon en verwijder alle lijmverwijderaar die nog aanwezig is. Laat je MacBook Pro vervolgens een aantal minuten drogen.
-
Kalibreer je nieuwe batterij: laad deze op tot 100% en laat deze nog minstens 2 uur doorladen. Trek de oplader eruit en gebruik je laptop totdat deze zichzelf uitschakelt als gevolg van een lege batterij. Wacht minstens 5 uur en laad je laptop tot slot nog een keer ononderbroken op tot 100%.
-


Om je toestel weer in elkaar te zetten, volg je deze instructies in omgekeerde volgorde.

238 commentaren
Do I need to remove all these things just to replace the battery or can I just remove the connectors above the battery than the battery?
Tony -
I just went through this process yesterday, and today wondered why I needed to take all that crap out, because I don’t remember anything blocking the battery removal, that would require removing the speakers, logic board, etc. I think it’s because of the acetone adhesive solvent. It’s powerful stuff that can easily damage the system. Maybe, if you are able to get the battery out without the solvent, you can skip all the other stuff. I will say, however, that in my system, it seemed like the adhesive is real solid. It felt like I was pressing the card up against aluminum studs in the frame, until the solvent loosened it up. If you try to remove the battery without the solvent, be very careful not to use excessive force and warp your frame.
See the post I just added, it seems that this is all to be able to remove one of the speaker cables, which I don’t think in necessary. I really don’t like messing with delicate connectors and ribbon cables that I don’t have to.
I have done this job before. I remember that it was easy - did it on the kitchen bar.
In hindsight, I didn't have to take out all the crap. I must have used a different guide. Son of a gun, wasted time. I easily got the battery out without "adhesive remover". Hilarious if "adhesive remover" is acetone, a chemical availabe just about anywhere. Note to self, iFixit needs to be second opinioned. I think this guide is written to make it seem like you need a lot of special tools to do this job. Not true - just a few drivers, usually provided with any battery.
I thought this too and didn't wanna do all that work with the solvent. All I removed was the battery connector and the trackpad cable before attempting to remove the battery. The adhesive Apple uses is bewilderingly strong. I thought I could pry it off with a strong paperclip and a screwdriver but it bent both. I ended up using the backend of a hammer and that worked surprisingly well. But it was super janky and I ended up puncturing the battery outer plastic. It didn't catch fire or anything but you can definitly smell the battery juices or whatever so i opened up my window. If you somewhat know what you're doing and accept the risk of setting fire to your house you can get away with not using solvent but I highly recommend doing so as the battery I ended up pulling out of my MacBook is all mangled. And if you use the solvent you have to take everything out. Apple will be Apple.
I made it within 1 hour doing Steps 1-5, then Steps 46-50.
I removed battery heating the aluminium frame in the location of battery pack on the opposite side of the frame with NTE HG-300D Mini Heat Gun, and then gently peeling this battery pack with plastic spudger. You may need to reheat the area several times.
For 2 central battery elements you can't heat aluminium frame because they are below touchpad, so I peeled batteries a little bit with spudger, heated the underneath gently, and then peeled it again. Also dental floss could help cutting the glue underneath the battery.
Thanks for your fast approach, worked fine for me as well! I did not use any glue dissolver at all.
Same for me, about an hour. I didn’t use a heat gun, just finagled the tip of the adhesive dissolver around the edges and otherwise followed the directions using the plastic cards. That dissolver is great stuff, worked twice as fast as the instructions.
Thanks for posting your short version. I did mine in about an hour with dental floss and the plastic cards. No heat. No solvent.
So glad I read the comments before going down the path of insanity.
I followed your comment to skip most of the steps and just remove the keyboard cable and the batteries. The replacement of batteries revived my water damaged MacBook Pro which stucked in boot loop.
In the beginning I tried to avoid “finagled“ situation thus only dripped a drop or 2 of dissolver each time. I also use a thin tip to induct the dissolver into the gap. But it’s very hard to do the flossing work and very slow. For the last 2 central pieces I had to drip 10 or more drops for each line of tapes which eventually helped me to remove them.
For someone who can’t order ifixit dissolver, I got my “Arctic Thermal Material Remover” from canadacomputers.com. It may not be perfect but helps. I didn’t use heat gun.
Great article, thanks!
Yan -
Did the same yesterday; took me closer to 4-5 hours as I was being “exceedingly careful”, as it was my wife’s laptop and she’d been hit with a “perfect storm”: battery died and backup was corrupt (backups.db reported a size of 0, and Migration Assistant hung while trying to look for it). o_O Otherwise, everything worked well, laptop is operational again, and my wife’s files have been backed up, migrated to another laptop, and the backed up again - so she currently has 4x copies of all her files. \o/
Zathras -
I’d recommend to do steps 26 and 27 and remove both ends of the touch pad cable!
If you are careful and tilt the whole Powerbook a bit downwards the solvent doesn’t pose any risk as it will run away from the speakers tec..
Did it nearly the same way (without heating). I also loosened the two accessible screws of the two speakers and bent them up a bit to avoid contact with the spreading dissolver and to better slide the plastic cards under the batteries. You just have to make sure that nothing splashes onto the other components when you tilt the dissolver bottle. If you are anxious, you can also protect them with a non-conductive, acetone-resistant cover.
Martin -
After reading through all of the steps, and seeing this comment, I opted to try this approach. Now, my laptop is getting quite old, so I suspect the adhesive has lost some of its original vigor. I did not need to use heat, dental floss, or the adhesive remover and was able to follow the instructions using the plastic cards to remove the battery without any damage to the laptop.
I followed the same steps and used fishing line to "rip" the glue between the battery and case. Found a video that showed it on youtube. It worked great!
Had to have a friend hold the computer in place for one "battery block" to "cut" it, but other than that, it was quite easy. :)
ssssaaaa -
>>I made it within 1 hour doing Steps 1-5, then Steps 46-50.
I also used that method - I very carefully used the minimum amount of solvent to incrementally loosen the battery for removal.
I was concerned about using heat since the old battery was pretty badly swollen - I used the solvent instead.
CCC -
Just finished this repair, I also did not remove all the components. I have never used a heat gun before, but I had a hair dryer lying around and that did the trick. I used the hair dryer even on the middle two cells and it seemed to come loose with the plastic card tools just fine.
The dental floss suggestion is interesting. I did this (1-5, 26-27, 46-50) using IPA. Using the plastic cards from the kit, the side cells came out pretty easy, but the central cells took a while. Doing 26&27 was probably not necessary
These batteries appear to be actual Apple batteries. How did iFixit remove them from the case? If iFixit didn't, were they able to get replacement batteries directly from Apple (since the adhesive is already installed)?
plink53 -
No idea, but check About This Mac… > System Report > Power; on the one I just replaced, Manufacturer reads “ifixit”.
Zathras -
The number of screws listed here is wrong on my model. I had four of the smaller size.
anonymous 1286 -
The hinge side of this lower case takes four (4), shorter-lengthed 2.3 mm screws. The longer, 3.1mm screws will thread into the holes, but after tightening, they sit slightly 'proud' of the aluminum case and will scratch and catch on surfaces they come in contact with.
sethphineas -
Just to add to my comment above (I can't edit it because it's anonymous), my MacBook Pro is a mid-2015 15in model 2.8GHz (A1398; EMC2881). For the bottom case it uses six 3.1mm screws, and four 2.3mm screws at the clutch/hinge side of the MacBook Pro. I tried using a 3.1mm screw at the clutch/hinge end, as described in the main article, and they don't fit. It has to be four 2.3mm screws.
anonymous 1286 -
agreed with above 1286...
I have the Mid 2015/A1398/EMC 2909. the hinge end and two middle side screws used a 1.2x50mm screwdriver while the 'opening' end 4 screws used the T3 screwdriver. I guess different builds used different sized screws!!
Tj Bennett -
The instructions below have you basically taking ALL of the guts out of case. I’ve been doing my own apple repairs since before ifixit was a thing and this one is a handful. My battery was swelling and I wanted to remove it before it burst or bent the case so I took it out without having a replacement and it occurs to me that aside from using the solvent (liquid) to remove the adhesive, you could probably do this only taking the trackpad ribbon out. I have mine reassembled now and will research the best battery to buy but I think installation will take about 5 minutes. See if you can slip a plastic gift card under the battery and wag/saw the adhesive out without the solvent before you go through all of this. It might work. Note, don’t bend or put too much stress on the battery and certainly don’t puncture it…
br1ansk -
Battery Recall for 15-inch MacBook Pro Retina mid-2015. Check Apple’s site for recalls, and put in your serial number. They replaced my swelling battery for free, regardless of warranty.
Steve -
As we are only replacing the battery, you can safely skip steps 6-26 and 28-48, no need to disassemble the computer to pull out the battery. Use nail polisher remover I was able to pull a super bloated battery out, without disassembling my MacBook.
John Sikking -
I qualified for the recall. These bloated batteries are dangerous! DO NOT, UNDER ANY CIRCUMSTANCES, PUNCTURE THE BATTERIES!
Thanks for the heads-up on the recall.
Datajockeys -
For battery replacement, I also chose NOT to remove everything, and NOT to use the solvent. I used an iFixit heating tube (from the iPad kits) to soften the adhesive from the keyboard face… NOT the battery itself! Used the iFixit cards. I have four, so the real work is possible BETWEEN two other cards — reduces the chance of puncturing the battery. Worked fine, took a little while, but no problems.
Steve -
I’m having a problem trying to get the screws off. I have a set of pentalobe screwdriver set. I found one screwdriver that fits perfectly on one set of screws, but I am unable to unscrew it. I tried using some force pushing the screwdriver into the screw, but nothing happens. Any suggestions?
henry_k_wong -
All the screws on mine are the same length for some reason.
ccfman2004 -
I would recommend the first step is: Run the battery down to ZERO before doing any next step. This reduces risk to you, people nearby, to the MBP and greatly reduces the risk of fire. Step 2 should be: Double-check that the battery is at zero.
I like others listed below and on YouTube, disagree with these full tear down 70+ steps being the only focus. I get that I have to be careful not to get the acetone solvent near the speakers. I skipped 25+ steps by: tilting the MBP away from the speakers and using very little acetone solvent. More pressure with the plastic cards and only a few drops of solvent. While giving the full set of instructions is fine it should be very clear that you can (at the user’s own risk) do this.
Kenneth Schleede -
As above—I consider full disassembly to be far riskier to fragile cables and connectors than the risk for solvent spillage. I did steps 1-5 and 46-74. No issues. I HIGHLY recommend the iFixit magnetic Project Mat. It’s a white marker board surface gridded into squares and invaluable for labeling part sizes/steps in disassembly.
philtrit -
As above too. I benefitted from the advice. From step 51 onwards, I found a easier way using tip from China battery seller. Use a 2” width plastic scraper/plastic paint scraper to poke under the battery. Use moderate strength to poke and avoid rough handling of the battery so as not to puncture it. There is no need to pry the battery to avoid stressing it, just use a firm poking action under the battery and the double sided tape adhesive will yield. After 5 min of such poking, the entire battery pack can be removed without the hassle of pouring the adhesive remover from step 51 onwards. Get a scraper with a stronger handle so that it is more comfortable to poke.
https://www.aliexpress.com/item/32889670...
Emma Pn -
Heads up as you go…we (husband/wife team) had a notebook that when screws/covers were removed, we marked the step # and actually taped the screws into the notebook noted by the step number. This was very helpful on reassembly and we knew we would be using the exact screw into the original screw hole.
Ann Brainard -
After replacing the batteries myself, I wouldn’t even consider doing it again. Not that it’s difficult to do—that’s not the issue. The issue is aftermarket batteries. I’ve been using notebooks for well over 30 years, and never had satisfaction with aftermarket batteries.
Modern lithium batteries are an amazing technological feat, but a dangerous one. So even putting aside that I’ve never found any aftermarket batteries with quality anywhere near original, I learned “cheap” aftermarket lithium batteries are downright dangerous.
After doing research into what’s involved with manufacturing lithium batteries, I know there are so many corners to cut, you’ll end up with junk regardless of what you pay.
A week after replacing my batteries with those from iFixit, they showed clear signs of failure. Thank goodness iFixit refunded my money.
After having Apple replace my batteries, everything is back to like-new. For my $199, I got not only excellent batteries, but a new keyboard and trackpad as well. That’s it’s done!!!
AnnoniMoose -
Which of the following companies make their own LiIon cells, Apple, Dell, DeWalt, Milwaukee, Tesla, Trek? Ans: NONE OF THEM. All these companies buy their LiIon cells from companies that will sell to iFixit or any other legitimate company. If you want quality, either do the research or pay through the nose for OEM. And note the Apple battery recall. Apple messes up too.
Bartwick -
I found an Apple Support link that said MBP battery replacement was $199, but the 2 Apple Stores near my house would not provide any appointments. Instead, I scheduled an appointment with and “Apple Authorized Service Provider” & that repair center quoted about $750 to replace the battery.
I refused, went home, & opened a chat with Apple Support.
After a lengthy & painful chat session where the Apple tech didn’t want to provide a battery replacement quote (he feared other issues with the MBPr), he finally gave me an Apple price of just under $650 to replace the battery.
Did you go into an Apple store, or mail it in? I’m struggling to reconcile a price of $199 to get a battery + keyboard + trackpad against what I was just quoted 2 weeks ago. The new track pad & keyboard might have been due to repair tech error. i.e. they trashed those repairing your batter & had to toss them in.
Bartt.Shelton@gmail.com -
I took mine in after being quoted for a $199 replacement of battery and keyboard, only to have the repair refused as they found a "water sensor" triggered and now I'm left with my AUD$5,000 laptop with messed up keys. Shame on me for not getting this repaired during COVID while under warranty. This is the first time I've truly been disappointed in Apple, but suppose it was bound to happen someday. I was quoted US$ 1479 to replace the battery and keyboard and the sensor (likely the logic board is replaced as well) if I were to send it in to the US repair center. Any chance these sensors can be triggered by humidity?
C0RT -
I 1000% recommend watching this video and performing the battery replacement without all these steps from this guide and without using the acetone solvent. https://www.youtube.com/watch?v=ImonCWcc... (15" inch Retina MacBook Pro A1398 Mid 2015 Disassembly Battery Replacement Repair)
The video is narrated well and the guy goes slow and zooms in where appropriate. Instead of removing all components, he simply removes the track pad cable, battery cable, and unscrews two of the speaker screws on each side. From there, you can lift up the speaker arms where the video guy uses a thin pry tool to push through the sticky tape. No solvent is needed except for residual sticky stuff leftover.
Instead of the thin pry tool, I just used the plastic cards that came with this ifixit kit. It takes a little force and wiggle/jiggle so take your time using the corner of the card to start.
This method makes a difficult 2-3hr job into a much easier 1hr job.
Spencer -
+1 for this approach! I watched the video that Spencer mentioned. It took me a little over an hour, and it was stress-free. https://youtu.be/ImonCWcc1xk
Chris Wicklas -
Another +1 - I followed the video pretty exactly (after having already gone through steps 1-5 here). I'm not sure it's necessary to clean off the adhesive residue as thoroughly as he demonstrates in the video, but the instructions were clear and the end results were good - trackpad still working fine and new battery already charged to 50%.
Jeff Zinn -
Glad I read these comments before plunging into the iFixit instructions.
+1 for skipping the iFixit instructions and using the youtube video linked by Spencer.
I followed the instructions and had my battery replacement done succesfully.
Instead of the metal spatula like thing he used - I used the plastic ifixit credit card things that came with my battery kit.
It took about 15 minutes of wiggling under the battery to free it from the adhesive but it wasn't too bad.
I did remove the residual adhesive as he indicated with isopropyl alcohol - but after finishing my installation I realized it was completely unnecessary. You can install the new battery over the residual gunk and skip that step.
picardo -
Yes! This YouTube tutorial works great and it was really easy to replace the battery. I needed about 75 minutes.
Perform steps 1-5,
Then skip to step 41.
In 41 + 43 do not unscrew the red marked screws.
In 42 an 45 just lift the speakers, do not remove them.
Skip 44
Up from 53, I did not use the glue remover, the plastic cards were enough.
In step 63 watch out to start from the middle. This prevents you from peeling up the lower „platform“.
Great job :-)
weekendiac -
It’s now February 2024, and the batteries Apple installed have all swelled up just like the originals. Doing a bit of research on the manufacturer, Simplo, I no longer trust them either. Microsoft used Simplo in their tablets, with countless users complaining about bad batteries. A few days ago, I read a post saying Apple now charges $250 instead of the $200 I paid less than three years ago. WOW! Even if Apple would replace my batteries, there’s no way I’m going that route again. Too bad my MacBook won’t boot without batteries. I don’t need them; I don’t want them. I also don’t want a newer MacBook. What to do???
AnnoniMoose -
真是非常有幫助的教學,我成功的把兩個喇叭都換成新的了,感恩
eternitybridge -
And further on, to December 2024, I was quoted €322 ($337 US at today's rate) for a battery replacement for my mid-2015 MBP by an “Apple Authorized Service Provider” in Portugal. The repair apparently requires a new keyboard and trackpad as it's all considered to be one part. Hmm. That is an outrageous price. And this is a replacement of a replacement, the first one being carried out in 2021 in the UK at a price of £199.
Hence why I ended up here on the iFixit site.
John Howarth -
Tip: While not strictly necessary, having a metric digital caliper on hand makes this job significantly easier. A number of the screws are so close in length that it can be hard to tell them apart by eye, and the tolerances are only within a few tenths of a mm
R Henning -