Inleiding

Gebruik deze handleiding om de rechterspeaker te vervangen.

  1. SrDNTSYqyhGMRNDC
    • Nu het scharnier zich vrij kan bewegen, zal het lastiger zijn om aan je iMac te werken. Om die reden hebben we de iMac-reparatiewig gemaakt, hoewel het ook mogelijk is de reparatie zonder de wig te voltooien.

    • Als je gebruikmaakt van de kartonnen iFixit-reparatiewig raden we je aan deze handeiding te gebruiken om de wig in elkaar te vouwen.

    • Voordat je begint met de reparatie aan je iMac: Verwijder de stekker van je iMac uit het stopcontact en houd de aan-uitknop gedurende tien seconden ingedrukt om de condensatoren van de stroomvoorziening te ontladen.

    • Wees erg voorzichtig en voorkom dat je de pinnen van de condensator of openliggende soldeerverbindingen aan de achterkant van de stroomvoorziening aanraakt. Pak de printplaat alleen bij de randen vast.

    The wedge is an extremely tight fit for this model. I was worried that the amount of force needed to use it as shown might damage the stand, so I used it with the long side down instead. It worked fine that way and didn’t need anywhere near as much force to insert.

    roberttrevellyan -

    Here’s a good YouTube vid on upgrading the RAM: Can a Normal Person Upgrade the RAM in the 2017 21.5" iMac?

    Dan -

    Here are a couple tips from me:

    1) Expose the adhesive to extreme temperatures. I did this by transporting my iMac in my car, screen-down on a piece of cardboard on a cold February morning (in Chicago). When I went to pick up the iMac, the screen practically fell off the chassis. I would have been distraught by this if I hadn’t already planned this replacement. So it was a happy accident.

    2) Remember to expell the residual power from the power supply by pushing the power button while the iMac is unplugged. This does NOT guarantee it’s safe to touch, but when I accidentally brushed the solder and exposed capacitors, I didn’t get shocked.

    jerrid_foiles -

    Instead of using the wedge, I placed the iMac faced up with the top side (web cam) facing me while I ran the pizza roller around. It worked out great!

    Sam Fung -

    “All iMacs also come with a traditional hard drive” mine doesn’t!! it’s HDD bay is completely empty, no SATA cable or anything. I guess I’ll have to upgrade the PCIe SSD instead.

    Chris Hughes -

    There is no replacement glass for this model, it is part of the LCD and impossible to remove or replace- the entire LCD has to be replaced unfortunately if the glass is cracked or damaged. You will have to Google search for a replacement. Also be careful with some of the lock tight tork screws as I broke one of my screw mounts taking one out.

    Phil Tesone -

    I used this service wedge but also found it a very tight fit. The same stabilization can be achieved by using a big rolled up towel.

    Ernst -

    While this is a good instruction guide, I recommend to also look at OWC’s instruction video about drive installation, before starting the exercise. Those install videos are very detailed and useful.

    Ernst -

    Main advice: TAKE YOUR TIME with the pizza roller.

    Make several passes, until you really feel like there's no more sticker in the way. Stay away from the camera though (approx. 1inch / 2.5cm on both sides). This will reduce the work left with the plastic card. Adhesive is really on the edge of the screen so there is absolutely no need to go any further than the recommended 1cm / 3/8inch depth.

    Where are the sensitive parts?

    Facing your iMac, imagine you're looking at a watch. There are antennas on 1, 2 and 4 o'clock. Do not insert any metal piece there (nor anywhere else, btw). Other than that AND the screen cables underneath the camera, not much danger.

    Froggy Manny -

  2. QPZ14vf5mNSObPx1
    QPZ14vf5mNSObPx1
    1KAQXZNy65Y1ferW
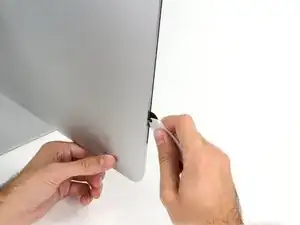
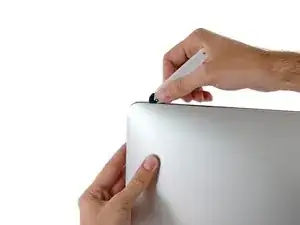
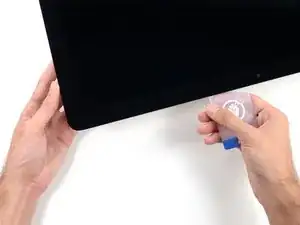
    • Begin aan de linkerkant van het scherm, in de buurt van de aan-uitknop, en steek je iMac-openingstool in de naad tussen het glazen paneel en de achterste behuizing.

    • De hub op de iMac-openingstool zal ervoor zorgen dat je je tool niet te ver in de computer kunt steken. Als je een andere tool gebruikt, steek deze dan niet verder dan ongeveer 9.5 mm (3/8") in het scherm. Als je dat niet doet, riskeer je het beschadigen van de antennekabels.

    Don’t get too worried about starting exactly where the picture says. The glue is stronger in some parts so just start wherever is easier and then work slowly and patiently around in the direction shown.

    Richard Cook -

    As this guide doesn’t cover replacing the adhesive strips, I found referring to the following was useful (noting that it’s not for the same model of iMac, so the modification they mention wasn’t necessary): iMac Intel 21.5" EMC 2544 Vervanging van de kleefstrips

    Alan Digby -

    It is very easy to crack the glass in front of the LCD during this step. I used the guitar pick, maybe it was too thick… crack is just on the frame but anyway it is disappointing :(

    Nikolay -

    This part of the exercise should be done with extreme patience. I took my sweet time with the opening tool, rolling it through the entire panel and enclosure gap over and over again, until I was very sure no parts were sticking together anymore. And when I thought I was I done, I decided to do it over again.

    Ernst -

    You can "warm up" the adhesive before try to cut it with the tool using a hair dryer. Heat the edges for about a minute, keep moving it so you don't cause stress in the glass. Also the above note.. use the tool and then the cards. Do not use a guitar pick or other objects as the thickness will cause you to break the front glass, which is a bonded part of the display (expensive).

    Carl Schultz -

    Merci pour ce conseil

    bry nicolas -

  3. SdaoaCo1EmiD4NqV
    SdaoaCo1EmiD4NqV
    eOsvYmvle2iDrZvZ
    LS2Bi6uDXDmSSIOJ
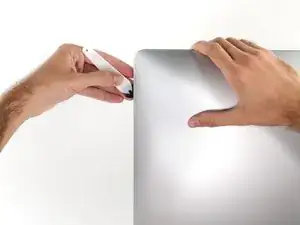
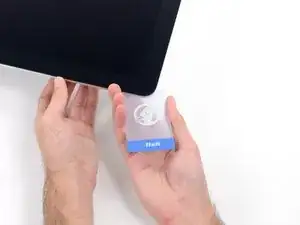
    • Gebruik je tool als een pizzasnijder—rol deze door de opening en het zal de schuimen lijm in het midden doorsnijden.

    • Zorg dat je altijd met het handvat achter het wiel blijft. Als je trekt, kan het zijn dat het wiel van het handvat los komt.

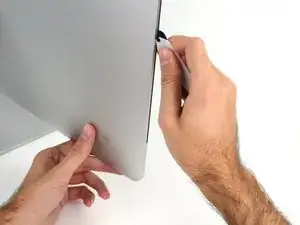
    • Duw je tool langs de linkerzijde van het scherm omhoog.

    Erreur de traduction: "de bas en haut" et non de" haut en bas" sur le côté gauche de l'écran

    Moreau -

    If re-opening a screen that was opened and re-attached using iFixit’s adhesive strips, I would strongly recommend heating it first with an iOpener, heat gun or hair dryer. 20 minutes after attaching with the iFixit adhesive I tried to open it again with the pizza slicer to fix something and cracked the screen on the left-hand side.

    plasticpool -

  4. r1eMkSSjJdpmWr1B
    r1eMkSSjJdpmWr1B
    d6iAMVdqVUdnvYnD
    PsnDnjYNWucTLycx
    • Ga door en rol je tool omhoog en langs de linker bovenhoek.

    Ne pincez pas l’écran avec l’autre main. Vous exercez une pression inutile sur le verre et empêchez la roulette de couper le joint.

    phfoglia -

  5. sZNVaGR3f2vruyLS
    sZNVaGR3f2vruyLS
    HDO3QbYuc4krqwHX
    • Snijd de lijm in de linker bovenhoek van het scherm door.

  6. vSKcLcMFSZoPp6Gp
    vSKcLcMFSZoPp6Gp
    uiuQPD3lViaQODlB
    • Ga verder met je tool langs de bovenkant van het scherm.

    • Het kan handig zijn om je tool af en toe even heen en weer te rollen om zo zeker te weten dat je de lijm in de opening zo ver als mogelijk door weet te snijden.

    In this step can I cut along the display without make any damage to the front camera?

    arisnordico -

    Hi! Actually - there is no need to cut the tape around the camera area - there is no tape to cut at all! And so, the way go is easy - just pass 10 mm to the left and to the right from camera and start cutting!

    P.S. Just did the whole procedure to replace a RAM and to add SSD on PSIe an hour ago! Seems to be different reading the instructions... you know - 2/10 and so on. But it's really not that hard, trust me. I'll give it 5/10.

    P.P.S. By the way there is one trick to pass the difficult steps. Any action which requires pulling smth (motherboard, speaker, power supply unit) from the narrow crack (or should i say - slit?) at the bottom of your Imac is really not so easy.

    And the trick is to first remove a thin metal stripe with some kind of insulation on it which held by 5 small (very small!!) screws at the bottom of your Imac. After you done it - it's easy to pull everything! Pay attention to the fact that one of this 5 screws at the center are more shortly than others.

    dv1977 -

    I did all steps like this manuell but now the Display wont work only some colered strips are to see! Whats happend??

    Can anybody help me ? Maybe the connector cable is broken?

    djfanta -

    Check both connectors, probably one of them not seated well

    pzhivulin -

    You can add a SATA SSD if you already have a PCIe SSD Factory?

    kaserlik -

    If you're changing cracked EMC 2638 display to new assembly, there's two more steps:

    Step 24: Use the tip of a spudger to flip up the metal retaining bracket on the display data cable.

    Carefully pull the display data cable from its socket on the display assembly.

    Step 25: Use the tip of a spudger to unplug bracket of the thermal sensor small cable near display data cable.

    Carefully remove scotch tape covering thermal sensor. Using iSesamo or flat tip of the spudger carefully peel the thermal sensor away.

    pzhivulin -

    omg - forgot to switch the termal sensor from the old display...

    now fan runs like crazy...

    Andrei Balotescu -

    The key thing is to never put any force on the opening tool when working through the tape. Just roll it back and forth with ease.

    Ernst -

  7. eDPbRqQfKjS4oUnZ
    eDPbRqQfKjS4oUnZ
    qm5g46NqRXJjxaVm
    krs4wdofACqDD6Ju
    • Duw je tool richting en rondom de rechter bovenhoek van het scherm.

  8. 3c3b2XusJDWQekW6
    3c3b2XusJDWQekW6
    NGOHPeVZ52OQCRWQ
    • Rol je tool langs de rechterzijde van het scherm naar beneden.

  9. SAgRGwk3lGGO3ZCH
    SAgRGwk3lGGO3ZCH
    1DLPSpBELT2mxJok
    • Rol je tool tot slot richting de rechter onderhoek van het scherm.

    • Op dit moment wil je je tool nog een rondje langs het gehele scherm laten maken om zeker te weten dat je zo veel mogelijk lijm door hebt weten te snijden.

    Yes, do it many times to loosen the adhesive.

    Noah Ralston -

    Would be good data to show the 3 areas (wifi antennas where the "tape" is larger and covers them. The rest of the "tape" is 1.4" and easy. Also after removing the display, be sure to remove the old "tape" from both the display and the rubber parts of the case. Use the spudger to start an end and it should pull off easily. Careful on the baackside of the display as you can scratch off the black paint/covering.

    Carl Schultz -

  10. HVK2HNgts1D53wOs
    HVK2HNgts1D53wOs
    QrZMXcap4the5yXk
    hZXQgXJhIoKTxBwH
    • Hoewel je openingstool het leeuwendeel van het werk al heeft gedaan, zal het scherm nog steeds lichtjes aan de behuizing vastgelijmd zitten. Een plastic kaart is tot slot nodig om de laatste stukken lijm los te maken.

    • Zet je iMac op een tafel met het scherm naar boven.

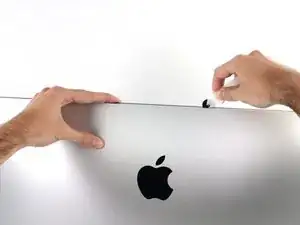
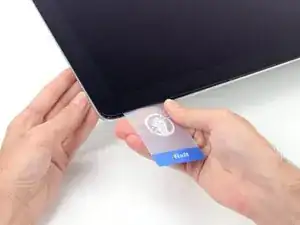
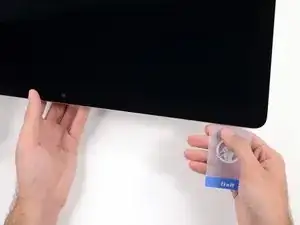
    • Steek vervolgens een plastic kaart tussen het scherm en het frame, beginnend in de rechter bovenhoek van de iMac.

    • Wees voorzichtig en zorg dat je je kaart niet verder dan ongeveer 9.5 mm (3/8") in de computer steekt, aangezien je in dat geval riskeert onderdelen in de computer te beschadigen.

    this step is extremely important NOT to stick in the cards too far….. doing so, you risk a 600 euro replacement as I experienced………

    Edgar Broekema -

    I drew a 3/8” line on my cards with a marker first.

    Max Romano -

    I’m reading this on the EU store, please change all measurements to cm/mm.

    Morgana Devina -

    @ifixit The next batch of cards you create should have a line printed on the card 3/8” in from the edges. Would make a nice reference.

    Richard Giratd -

    Here’s where OWC provides glass removal suction cups, which is a better solution than plastic cards.

    The suction cups help to easily lift the glass panel, without risking the damaging of any internal wiring that the plastic cards could cause.

    Ernst -

    Better to remove stand wedge at this point? Can’t see from pics

    derekrobinson -

  11. wUjiMGtv2IpkNB5p
    wUjiMGtv2IpkNB5p
    LncJQeQQOAvg3CMA
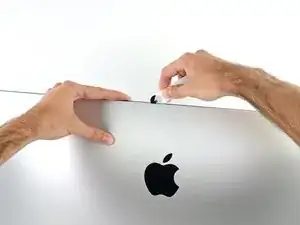
    • Draai je plastic kaart om een opening tussen het scherm en het frame te maken.

    • Ga langzaam en voorzichtig te werken en voorkom dat je te veel druk op het glas zet. Je hebt een opening van ruim een halve centimeter nodig.

    This part must be done very carefully or you can damage the flat cable from display, despite it was under a iron cover.

    Cassio Machado -

  12. qmVJHqIxctiuCbE5
    qmVJHqIxctiuCbE5
    6PF3COgq44osRMSX
    1nZLqZWsCa1xRTOR
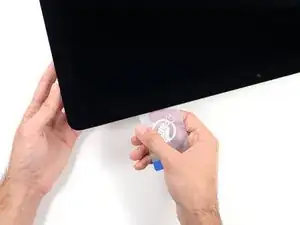
    • Schuif de kaart richting het midden van het scherm om de laatste stukken lijm rondom de rechter bovenhoek van het scherm door te snijden.

    • Zorg dat je vóór de iSight-camera stopt om schade aan de camera te voorkomen,.

    You don't need to do it like this, simply open the iMac bendidng the LCD completely and use the pizza cutter to remove the adhesive.

    Felix -

    Using glass removal suction cups will avoid running this risk of damaging the camera (or any wiring).

    Ernst -

  13. pwG3JFqqfxxQXLID
    pwG3JFqqfxxQXLID
    wKv4nNrdklsj61AD
    • Steek je plastic kaart in de opening bij de rechter bovenhoek en laat je kaart daar zitten om te voorkomen dat de lijm zich opnieuw hecht.

  14. B1l4C4H1WK3CwfsH
    B1l4C4H1WK3CwfsH
    5gnKwfWW1K2gnkAY
    dU3V1S5PiPpZoiRX
    • Steek een tweede plastic kaart in de opening tussen het scherm en het frame, nu bij de linker bovenhoek van de iMac.

  15. 1eeYyLOXUgoVdMcU
    1eeYyLOXUgoVdMcU
    XNwnBG1I3otkGVaj
    • Draai je kaart voorzichtig om om de ruimte tussen het scherm en het frame te vergroten.

    • Zorg dat je de kaart, net als aan de andere kant van het scherm, rustig en langzaam draait om te voorkomen dat je te veel druk op het glas van het scherm zet.

  16. 1AtMSKY35dfSoyov
    1AtMSKY35dfSoyov
    eYI56QJhkhMLdtyx
    oVDneBvJQXNCvQpC
    • Schuif je plastic kaart richting het midden van het scherm en stop ook hier net voor de iSight-camera.

  17. KlhOFUANthUfPZrW
    KlhOFUANthUfPZrW
    KGDDBwLWXguRGlso
    • Duw je plastic kaart opnieuw in de opening bij de linker bovenhoek.

  18. xXVPepFcNBfFlYLm
    xXVPepFcNBfFlYLm
    mJWDXXcMCnL6OwqX
    lGcKi3n1DVFdANJw
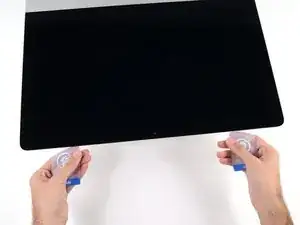
    • Draai de kaarten, als je deze in de opening in de hoeken geplaatst hebt (zie afbeelding), om de opening tussen het scherm en de behuizing te vergroten.

    • Als er nog stukken zijn waar de lijm nog vastzit, stop je met het draaien van de kaarten en gebruik je een van je kaarten om de lijm in het desbetreffende gebied door te snijden.

    • Til de bovenkant van het scherm rustig van het frame weg.

    • Til het scherm slechts een aantal centimeters op, aangezien het scherm nog steeds met het moederbord in de iMac verbonden is door middel van data- en stroomkabels.

  19. OHrDRCyrMC1cUGLi
    OHrDRCyrMC1cUGLi
    T63ZLhEPNFe4ZxCU
    2RPghHkKPbf4ZJKv
    • Gebruik een pincet om de metalen vergrendeling op de schermdatakabel omhoog te klappen.

    • Trek de schermdatakabel voorzichtig uit het contact op het moederbord.

    • Zorg dat je de schermdatakabel in een rechte beweging uit het contact wegtrekt.

    Does anyone know where to find a replacement display cable for the 2014?

    PN: 923-00047

    PBMedic is out of stock

    Brian Hernandez -

  20. RxQmtXvRiwN2ghuG
    RxQmtXvRiwN2ghuG
    YWVFQeaXe1PNSF1N
    • Gebruik een hand om het scherm omhoog te houden en gebruik je andere hand om de voedingskabel van het scherm los te koppelen.

    • Til het scherm ver genoeg omhoog om makkelijk bij de aansluiting te kunnen, maar niet zo ver dat je de kabels op spanning zet en de aansluitingen kunt beschadigen (ongeveer 15 cm).

  21. ESZ2DreaDb5ZwEl3
    ESZ2DreaDb5ZwEl3
    ZEWEWQPhFQSBHjjN
    • Til het scherm op tot het bijna rechtop staat.

    • De onderkant van het scherm is nog steeds door middel van lijm met het frame verbonden en werkt nu als een soort scharnier. Je kunt de lijm losmaken door het scherm een aantal keer op en neer te bewegen.

  22. BOHxvIulNTGP55FD
    BOHxvIulNTGP55FD
    hHDCPjccYCGRIRVe
    CZp1SESTvngRHBBY
    • Ga voorzichtig te werk en voorkom dat je de uiteinden van de condensatoren of de blootliggende soldeerverbindingen aan de achterkant van het voedingsbord (met rood gemarkeerd) aanraakt.

    • Pak de kleine lip aan het eind van een van de kleefstrips aan de onderkant van het scherm vast en trek de strip richting de bovenkant van de iMac om deze te verwijderen.

    • Herhaal deze stap om ook de andere kleefstrip te verwijderen.

    • Als een van de kleefstrips afbreekt voordat je de strip hebt kunnen verwijderen, pak je een plastic kaart en snijd je de rest van de kleefstrip door.

    Anyone else notice this iMac is different than the one in Step 20. The cables are in different places. I just saw one on YT like this, in a different country.

    Thomas Tommy -

  23. IOV2Z2aELB1YrTXA
    IOV2Z2aELB1YrTXA
    UmTLYETZuhKRLBH3
    YJf2M2kwAZXiKJUv
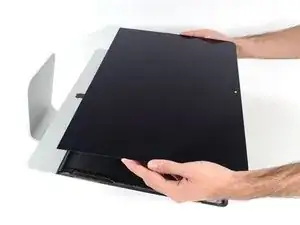
    • Til het scherm van het frame omhoog en scheid het van de iMac.

    • Mogelijk moet je het scherm vanaf een kant optillen om het scherm los te trekken van de resterende lijm.

    • Ga erg voorzichtig te werk met het scherm. Het scherm is zwaar, groot en bestaat volledig uit glas.

    • Als je het scherm vervangt door een nieuw scherm is het mogelijk nodig dat je sommige onderdelen van je oude naar je nieuwe scherm overzet.

    • Gebruik onze handleiding voor het vervangen van de kleefstrips om je toestel weer op de juiste wijze in elkaar te zetten.

  24. QMqfyRTWUxyD6PaN
    QMqfyRTWUxyD6PaN
    mphdji2lKIR3CwWS
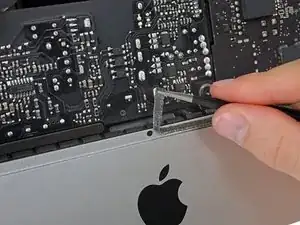
    • Verwijder de vijf kruiskopschroeven die de onderste ondersteuningsbeugel op z'n plek houden:

    • Vier 3.2 mm lange schroeven

    • Eén 1.7 mm lange schroef

    • Op sommige EMC 2544-modellen hebben alle schroeven dezelfde lengte.

    • Het kan voorkomen dat je de kleefstrip van het scherm aan de onderkant van de behuizing omhoog moet trekken om bij de schroeven te kunnen.

    I used the CR-V 4.0 standard screwdriver head to help peel away the adhesive lining. My fingers were too big to grab it, and my fingernails too short to get the removal started. This 4 screw head worked perfectly.

    airshack -

  25. NUQ4YmOm2RlEEAAO
    • Verwijder de onderste ondersteuningsbeugel uit de behuizing van de iMac.

    Of all the parts of this entire procedure, replacing this one piece is the hardest part! The screws are tiny and they just don’t seem to want to grab the support piece. Also it seems to perform no function which is also annoying.

    John M -

    I left mine out. LOL

    jerrid_foiles -

    Line up the screw holes and press on the bracket from the back to help the screws grab. If your fingers are too big, press with the flat side of your spudger. As long as there’s no gap between the bracket and the iMac’s frame, the screws should grab easily.

    Jeff Suovanen -

    I put it in at a slight angle lining up the right hand side holes, screwed in the two screws and gently pressed my finger behind it on the rest

    jmorphett5 -

    If you only want to replace the HD and RAM, take a big shortcut and leave the logic board in, as well as all the parts needed to remove it (speaker, power supply etc). Once the display is removed, just take out the fan and the top two logic board screw. There is than sufficient space to gently remove and insert the two ram modules. HD can easily be replaced with an SSD by just removing the HD mounting brackets...

    diddl14 -

    Voces mudaram de modelo iMac, desta foto para proxima, esse modelo desta foto nao tem slot nvme. O da proxima foto sim. Voces me fizeram comprar un nvme por engano...

    tgb4rr0s tege -

  26. jyUFFDgJIyNgSOiS
    jyUFFDgJIyNgSOiS
    VX5ADWa14ICJRgRj
    UQsRMGk33FebPvhS
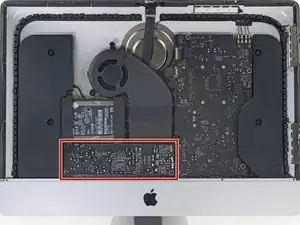
    • Gebruik de punt van je spudger om de beide zijden van de rechterspeakeraansluiting om en om uit het contact op het moederbord te lopen.

  27. bIRT1ufcK55E3QYO
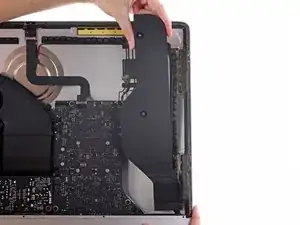
    • Verwijder de twee 10 mm lange T10-schroeven die de rechterspeaker in de achterste behuizing bevestigen.

  28. Xr6PUupvk1uatPHd
    Xr6PUupvk1uatPHd
    SmLnGtTZAYONdLLt
    • Steek de punt van je spudger tussen de rechterspeaker en de antennekabel die in een kabelgoot aan de rechterzijde van de speaker zit.

    • Schuif je spudger langs de rechterzijde van de speaker naar beneden om de antennekabel uit de kabelgoot te verwijderen.

    • Als het je niet lukt je spudger langs de zijkant van de speaker te schuiven, kun je de speaker ook met beleid een stukje wegtrekken uit de behuizing zodat je bij de antennekabel kunt.

  29. dnhrk1KeoWew1LZC
    dnhrk1KeoWew1LZC
    OdDL4a3vDxUD2VV6
    • Til de rechterspeaker in een rechte beweging omhoog en verwijder deze uit de iMac.

    • Het kan handig zijn om de bovenkant van de speaker van de behuizing weg te tillen om de speaker uit de iMac te verwijderen.

Conclusie

Volg bovenstaande instructies in omgekeerde volgorde om je toestel weer in elkaar te zetten. Bekijk onze handleiding voor het vervangen van de kleefstrip rondom het scherm om het scherm weer terug te kunnen plaatsen.

Walter Galan

703036 Reputatie

0 commentaren