Inleiding

Als het scherm van je iPhone 11 gebarsten is, niet meer reageert op aanraking of geen beeld toont wanneer je iPhone aanstaat, kun je deze handleiding gebruiken om je iPhone weer te laten functioneren door midden van een nieuw scherm, a.k.a. schermmodule.

Als de achterkant van je nieuwe scherm al een dunne, metalen LCD-beschermplaat bevat, volg je deze kortere handleiding voor een makkelijkere reparatieprocedure. Als het scherm er echter niet bij zit, blijf lezen—deze handleiding zal je laten zien hoe je je scherm vervangt terwijl je de LCD-beschermplaat laat zitten.

De gecombineerde speaker in het oorstuk + de sensormodule die aan de achterkant van het scherm vastzitten, zijn in de fabriek exclusief aan jouw iPhone gekoppeld—daarom moet je deze handleiding gebruiken om ook deze modules over te zetten naar je nieuwe scherm. Deze module bevat de infraroodschijnwerper, welke onderdeel is van de biometrische Face ID-beveiligingsfeature. Als deze wordt beschadigd of vervangen, zal de Face ID-functie niet langer functioneren. Zorg er daarom voor dat er geen onderdelen beschadigd raken gedurende deze reparatie. Als er wel iets beschadigd raakt, kan alleen Apple de Face ID- functie herstellen.

Note: de True Tone functie zal ook niet langer functioneren na het vervangen van een scherm, zelfs als je een origineel Apple-scherm gebruikt.

  1. T2yIKTYtWTOpeGir
    T2yIKTYtWTOpeGir
    1BRQlG3vB6hGYvKS
    • Ontlaad de batterij van je iPhone, voordat je begint, tot onder de 25%. Een opgeladen lithium-ion batterij kan in brand vliegen of exploderen als deze per ongeluk wordt doorboord.

    • Zet je iPhone uit voordat je begint met het demonteren van de telefoon.

    • Verwijder de twee 6.7 mm lange pentalobe schroeven aan de onderkant van de iPhone.

    • Het openen van het scherm van de iPhone zal de waterdichte sluitingen aantasten. Zorg dat je vervangende sluitingen hebt voordat je verder gaat, of zorg ervoor dat je ieder contact met vloeistoffen vermijdt als je je iPhone in elkaar zet zonder vervangende waterdichte sluitingen.

    the right screws wouldn’t come off

    Yusef San Inocencio -

    ok one came of but my right wont come of either!!!!

    Aisa Jawara -

    Hello guys, I still haven't found away to power off the iphone without using the screen. Cheers!

    danielaguirre93 -

    You can try this.

    Quickly Press and release the volume up button.

    then Quickly Press and release the volume down button.

    then press and hold the power button and wait until it turns off.

    worked for me :D

    Benóný Egilson -

    Where does one get replacement seals? Is this the same as the display assembly adhesive?

    Brian Baker -

    not of the screwdrivers i have seem to be able to turn the screws

    Aisa Jawara -

    how do you change battery of an iPhone 11 and still the battery health shows, do you use a software for that?

    Great Me -

    Battery health won’t show on a non Apple battery.

    DON’T forget to discharge old battery before removing it. Very impressive fire (and smoke!) if you puncture it. Ask me how I know

    Doug Harrowing -

  2. 6UPwoloGBO4tmVoS
    6UPwoloGBO4tmVoS
    BmSYPJmOy6dbHipF
    3EOdQPAGOmiuhoKU
    • Je kunt de onderdelen in je telefoon gemakkelijk beschadigen met het te diep inbrengen van je openingsplectrum. Volg deze stap om je plectrum te markeren en schade aan je toestel te voorkomen.

    • Plaats op 3 mm van de punt van je plectrum een markering met een stift.

    • Je kunt op iedere punt voor een andere markering kiezen.

    • Als alternatief kun je ook een munt als markering gebruiken in plaats van een stift. Plak hierbij de munt op de plectrum zodat de munt tegen je telefoon aandrukt zodra deze een bepaalde diepte bereikt.

    Got to step 2 and realized the fix kit doesn't include an opening pick! Looks like a guitar pick, and I have those lying around. Is that expected? Looks like the pick is used in many steps below. There's a little blue crowbar that isn't mentioned in the instructions. Perhaps that replaces the opening pick?

    Sloan Looney -

    Hi! I can't see which guide you were using when writing this comment. Can you reply here with which guide and fix kit you used?

    Clay Eickemeyer -

    I see you posted this in Meta. I hope it's resolved soon! In the meantime, a guitar pick may work well enough for your repair.

    Clay Eickemeyer -

    what fix kit?

    Meow Purr -

    My fix kit didn't include an opening pick either

    WILLIAM HARRIS -

    Make sure you check inside the black boxes after emptying them. My pick was stuck inside one of the boxes.

    AndyF -

    My AliExpress refurbished screen came with a pick that has a coin-like circle that pops out, so no modification was necessary

    Gijs Leegwater -

    the picture shows 3 cm but the description says 3 mm's. Which one is it?

    John Pena -

    That is a misunderstanding. It is a ruler with a scale for cm, it shows 0.3 cm, i.e. 3 mm.

    VauWeh -

    Oh, come ON!

    Big Ed -

    It will ALWAYS be millimeters on a phone, but this step is ridiculous, skip it!

    Leif DeWolf -

    @leifdewolf I wouldn't skip it for a first repair.

    Gabriel-Science -

    It's not an Ifixit KIT if it doesn't include everything. You'll need to order the opening pic separately. Or head to Walmart like myself and look for guitar pics. Hopefully, this will work just as well.

    Jaleeljb97@icloud.com -

    No pick in mine as well. It’s really not clear that you have to order this separately when ordering an IPhone SE 202/2022 screen repair kit. Is this the case?

    Jackson Castiglione -

    Frustrated, I ordered a compact package where everything was encapsulated. Useless suction tools could not separate the screen. If it is unable to decouple the screen, then why sucking suction tools you have provided.

    Shourob Datta -

    For my kit the triangle pick was stuck inside the box with the screen not with the other tools maybe it's also there for you

    Henry Scheibehenne -

    Y’all are getting far, FAR too detailed with some of this stuff…. Measuring and marking the pick that you won’t actually use to open the device?!? lol that’s kinda funny. Just heat it up, grab a spudger, and the back just pops right off! The iFixit tech need to stick to the KISS method more often, you know KEEP IT SIMPLE STUPID!!! Like l, for reals, I’ve been doing this stuff for YEARS and using iFixit guides regularly and this is just ridiculous at this point!

    Leif DeWolf -

    Will the phone still work if the sensor assembly on the back of the screen is damaged?

    Mutshidzi Rambau -

    I don't have a pick, but how much better are these picks than an old credit card for opening an iPhone 13 mini?

    mike eng -

    The pick in my iFixIt kit was packed with the battery, not with the rest of the toolkit.

    Tony Houlihan -

  3. FLq6W2khWOq4uAQr
    FLq6W2khWOq4uAQr
    2XIfBVvS5Ty5QtZF
    4Df24ZLS6kBFTyVU
    • Als het scherm van je iPhone gebarsten is, kun je wat tape over de barsten plakken om te voorkomen dat het scherm verder beschadigd raakt tijdens dit proces. Zo verklein je ook het risico op fysieke schade.

    • Plak een aantal lagen tape op het scherm van de iPhone tot het gehele scherm bedekt is.

    • We raden je ten sterkste aan om tijdens deze stap een veiligheidsbril te dragen zodat je je ogen beschermt tegen eventueel loskomende glasscherven.

    • Als het je in de volgende stappen niet lukt om de zuignap op het scherm te bevestigen, kun je ervoor kiezen om een stuk duct tape in een handvatvorm op het scherm te plakken. Hiermee kun je dan het scherm omhoog tillen om een opening te creëren.

    • Als alternatief kun je er ook voor kiezen om de zuignap met secondelijm op het scherm vast te plakken.

  4. 4fhdeZSxwgTn4VgI
    4fhdeZSxwgTn4VgI
    BxknskOQsXXo6dog
    NEQnchvrYpEJPYKS
    • De volgende twee stappen introduceren de Anti-Klem, een handige tool die we aanraden aan iedereen die regelmatig reparaties uitvoert. Als je de Anti-Klem niet gebruikt, sla dan de volgende drie stappen over voor een alternatieve methode.

    • Voor uitgebreider instructies voor het gebruik van de Anti-Klem, lees je deze handleiding door.

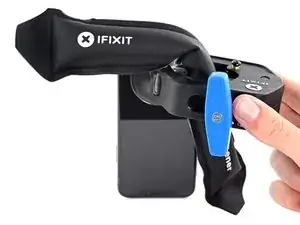
    • Trek de blauwe hendel naar achteren zodat de anti-klem vrij kan bewegen. (Op deze manier deactiveer je de openingsstand van de anti-klem.)

    • Schuif de armen over de linker- of rechterzijde van je iPhone.

    • Plaats de zuignappen dichtbij de onderkant van de telefoon—één op de voorkant en één aan de achterkant.

    • Druk beide zuignappen aan, om zuigkracht uit te oefenen op de gewenste plek.

    • Als het oppervlak waarop de zuignappen zich moeten vastzuigen te glad is, kun je wat tape gebruiken voor meer grip.

  5. DtDpThOATcyQb4yT
    DtDpThOATcyQb4yT
    MAGI2JXwXnS5LvCO
    NgpQQ6M1sP5xBcXQ
    • Trek het blauwe handvat naar voren om de armen van de anti-klem te vergrendelen.

    • Draai het handvat 360 graden met de klok mee of tot de zuignappen uit beginnen te rekken.

    • Zorg dat de zuignappen op één lijn met elkaar zitten voordat je begint met het openen van het toestel. Als je ziet dat de zuignappen niet meer op één lijn zitten, maak je ze los en breng je ze weer op de juiste positie aan.

  6. oRZ6AXaleqoRTKND
    oRZ6AXaleqoRTKND
    bDhAC4ImHIc3XQdf
    HTQodvWRCjulrPCR
    • Verwarm een iOpener en plaats deze tussen de armen van de anti-klem op je telefoon.

    • Je kunt ook een föhn, heteluchtpistool, of een kookplaat gebruiken, maar wees bij het gebruik hiervan extra voorzichtig. Te veel warmte kan tot warmteschade leiden. Vooral het scherm en de batterij zijn hier erg vatbaar voor.

    • Vouw de iOpener zodat deze op de onderkant van de iPhone komt te liggen.

    • Geef de lijm een minuutje de tijd om los te komen zodat de anti-klem een opening kan creëren.

    • Steek een plectrum in de opening onder het scherm en de plastic rand, en niet onder het scherm zelf.

    • Als de anti-klem er niet in slaagt een opening te creëren die groot genoeg is voor je plectrum gebruik je meer warmte en draai je het blauwe handvat een kwartslag met de klok mee.

    • Draai het handvat nooit verder dan een kwartslag per keer en wacht een minuut voordat je de anti-klem weer besluit aan te draaien. Laat de anti-klem het werk voor je doen.

    • Sla de volgende drie stappen over.

    Any suggestions if the screen is broken and the anti-clamp just separates the screen from the bezel?

    Nathan Friedly -

  7. yQbwAmoITNyEmrSn
    • Het verwarmen van de onderkant van de iPhone helpt de lijm, die het scherm vasthoudt, te verzachten waardoor het makkelijker wordt om deze te openen.

    • Gebruik een föhn of warmtepistool of prepareer een iOpener en leg deze op de onderkant van de iPhone gedurende een minuut.

    어짜피 못쓰고 버릴 거라면, 이것보다 인두기를 직접 대는 방식을 추천 합니다. 어짜피 유리라 연기나 반응도 없고 무엇보다 금방 열기가 올라와요.

    코딩의달인 -

    Gut gehen auch Kirschkernsäckchen. Damit hatte ich Erfolg!

    Hoetgen -

  8. aJCRTiaUBHVMoAUV
    aJCRTiaUBHVMoAUV
    YhJejcEpMhlQpvWX
    • Als je een enkele zuignap gebruikt, druk deze dan op de onderkant van de telefoon en zorg dat je de gebogen hoeken van de telefoon vermijdt.

  9. MKShqPOGkjD2vOPp
    MKShqPOGkjD2vOPp
    dJknkSwVsVBaZabR
    XgeYpSK2b4NpndCh
    • Trek met een stevige en constante kracht aan de zuignap om zo een kleine opening te creëren tussen het schermpaneel en de achterste behuizing.

    • Steek een openingsplectrum in de opening onder de plastic rand van het scherm, niet onder het scherm.

    • De waterdichte lijm die het scherm op z'n plek houdt is erg sterk: het vereist dan ook veel kracht om deze te openen. Als je moeite hebt met het openen, dien dan meer warmte toe en wiebel het scherm omhoog en omlaag om zo de lijm te verzwakken totdat je opening groot genoeg is om je tool in te brengen.

    This turned out to be the most difficult part for me. My old ifixit suction cup didn't suck hard enough to generate enough force to pry the display from the case. I ended up applying heat at least a dozen times, and I had to pull up on the suction cup forcefully over and over and over while repositioning it several times. I finally had success inserting my pick into the tiny gap after 30 or so rapid tugs on the suction cup.

    matthew r -

    I pulled the screen by accident instead of the bottom layer, now what?

    Alvaro -

    I have the same question

    Konstantinos Solakoglou -

    After heating (I used a hair dryer for 4-5 mins, moving around whole frame, to make sure was pretty hot, then let sit for 1 minute), insert a razor blade between the bezel and the frame, at the bottom edge. Lever upwards, the screen will easily pull away. You won’t even need the suction cup.

    Damian -

  10. BiTGA23MOOmtexSG
    BiTGA23MOOmtexSG
    l5NWMTOshIlqjNtG
    IfJRwFLPwsBL4klh
    • Schuif je openingsplectrum om de linker onderhoek heen en langs de linkerzijde van de iPhone omhoog en snijd daarmee de lijm door die het scherm vasthoudt.

    • Steek je plectrum niet dieper dan 3 mm in de opening. Zo voorkom je schade aan de onderdelen in de iPhone.

  11. FCPAxbSlJhdAIRLG
    • Er loopt een aantal makkelijk te beschadigen kabels langs de rechterkant van de iPhone. Steek je plectrum daar niet in de opening om te voorkomen dat je je toestel beschadigt.

  12. K5iUxKTkELONJBVf
    K5iUxKTkELONJBVf
    ZhlLOMfaksHRxZJV
    yy5WtAu2UqSpCUTX
    • Steek je plectrum opnieuw in de opening aan de onderkant van de iPhone en schuif deze om de rechter onderhoek heen en langs de rechterzijde omhoog om ook daar de lijm door te snijden.

    • Steek je plectrum ook hier niet dieper dan 3 mm in de opening om te voorkomen dat je de schermkabels beschadigt.

    Instructions are confusing as the last step says not to insert at certain points, while this says to slide all the way up the right side - is it that sliding is ok but inserting isn't (whatever that might mean) or just not more than 3mm?

    Peter Hill -

    Just slide slightly and the display will rise without problems on all iPhone models, sometimes if I have long nails I even insert a fingernail and lift the display.

    Tonynox -

  13. J1ZVUrqQ61e4NOZ1
    J1ZVUrqQ61e4NOZ1
    HsxeMCkPLyCeHKpI
    tegZUpHyY4wGd2Ww
    • De bovenkant van het scherm is vastgemaakt met zowel lijm als klemmen.

    • Trek de rechterhoek van het scherm voorzichtig een klein stukje naar beneden (in de richting van de Lightning-poort).

    • Steek je plectrum in de rechter bovenhoek van de telefoon.

  14. 5mKceYJffKEaQo4L
    5mKceYJffKEaQo4L
    kQQD2XkOMWjrOjMu
    • Trek het scherm vervolgens nog iets verder naar beneden (in de richting van de Lightning-poort) om zo een opening te creëren waar je plectrum in past.

    • Schuif je plectrum naar de linker bovenhoek en snijd de overgebleven lijm die het scherm nog vasthoudt ook door.

    • Steek je plectrum ook hier niet dieper dan 3 mm in de opening om te voorkomen dat je de Face ID-sensormodule beschadigt.

  15. 24nVgAyDKPTICLhV
    • Trek aan de kleine uitstulping op de zuignap om deze los te maken van het scherm.

  16. IDOegN1rKCFFJMBF
    IDOegN1rKCFFJMBF
    QcgYHgKIt6XMTsnK
    xVdpJyR6i213HsJ2
    • Open de iPhone door het scherm open te klappen vanaf de linkerzijde, zoals je de achterkant van een boek zou openklappen.

    • Probeer het scherm er niet volledig af te halen, aangezien het scherm nog steeds met een aantal kwetsbare lintkabels aan het moederbord vastzit.

    • Laat het scherm tegen iets stevigs aanleunen.

    • Tijdens het hermonteren van de telefoon leg je het scherm in de juiste positie, positioneer je de klemmen aan de bovenkant en druk je de bovenkant voorzichtig vast voordat je de rest van het scherm vastklikt. Als het niet klikt, controleer je de klemmen langs de buitenkant van de telefoon en het scherm om te kijken of deze niet zijn gebogen.

    $@$*. i tore the display cables. what do i do now?

    Crystal F -

  17. KxoYscx1ItVaLely
    KxoYscx1ItVaLely
    ZA5AX6xqq3r5qUNN
    • Om de schroeven, die in de volgende stap worden besproken, te kunnen bereiken, kantel je het scherm door de onderste zijkant lichtjes op te tillen.

    • Wees voorzichtig dat je de schermkabels niet afklemt of scheurt.

  18. fPaVWtYy3NJ53YvD
    fPaVWtYy3NJ53YvD
    jFRf1tI5V4hicZKU
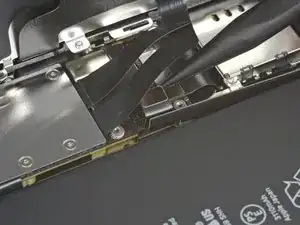
    • Gebruik een Y000 schroevendraaier om de drie 1.1 mm lange schroeven, die het paneel boven de batterijaansluiting bevestigen, te verwijderen.

    • Zorg dat je, tijdens deze reparatie, goed bijhoudt welke schroef waar vandaan komt en dat je zorgt dat deze op dezelfde plek weer terugkomt.

    • Tijdens het weer in elkaar zetten van je telefoon is dit een goed moment om je iPhone weer even aan te zetten en te testen of alles werkt, voordat je je telefoon weer sluit. Vergeet je iPhone niet weer uit te zetten voordat je verdergaat.

    During reassembly, I had to connect my phone to the charger before it would power up.

    Austin Culberson -

    Die Schrauben sind wahnsinnig kurz, tatsächlich winzig klein. Nach dem Herausdrehen könnte es im ersten Moment so aussehen, als habe man die Schrauben ausgebohrt anstatt herauszudrehen, sie sind jedoch sehr schnell gelöst und liegen dann entweder im Gehäuse oder sind neben dem Gehäuse herausgefallen. In jedem Fall sollten sie nie auf den Boden fallen, da sie dann kaum mehr auffindbar wären.

    Bernd Sonneck -

    I got to this point thinking/hoping I could eek by with a Y1 orY0 or even a PH000 driver but no such luck. The Y000 is in fact necessary. Finishing this repair will have to wait for now.

    ALSO thanks Apple, there is ABSOLUTELY no reason AT. ALL. to use so many random, oddball screw heads, BUT to make self repairs more difficult and expensive. A real F-U to the consumer!

    John M -

  19. HKBUYhWeIUlYLqdG
    • Verwijder het paneel.

  20. XN1PHiCYxtERqDgF
    XN1PHiCYxtERqDgF
    XKgOIM6e2mmR1ecq
    • Gebruik een spudger of een schone nagel om de batterijaansluiting uit het contact op het logic board te duwen.

    • Zorg dat je de zwarte siliconen afdichting om de aansluitingen heen niet beschadigt. Deze afdichtingen bieden extra bescherming tegen water en stof.

    • Buig de aansluiting voorzichtig weg van het logic board om te voorkomen dat deze tijdens de reparatie per ongeluk contact maakt.

  21. kMZitLQGk2hTRk6G
    kMZitLQGk2hTRk6G
    Cdvg2fNT2Lf21uEE
    • Gebruik een Y000 schroevendraaier om de vijf 1.1 mm schroeven die het paneel boven het logic board bevestigen, los te schroeven.

    Die Schrauben sind wahnsinnig kurz, tatsächlich winzig klein. Nach dem Herausdrehen könnte es im ersten Moment so aussehen, als habe man die Schrauben ausgebohrt anstatt herauszudrehen, sie sind jedoch sehr schnell gelöst und liegen dann entweder im Gehäuse oder sind neben dem Gehäuse herausgefallen. In jedem Fall sollten sie nie auf den Boden fallen, da sie dann kaum mehr auffindbar wären.

    Bernd Sonneck -

  22. hwCpiXUDeKoMTWEh
    • Verwijder het paneel.

  23. IFoKtCq1UVwNZXJv
    IFoKtCq1UVwNZXJv
    FRZEdrhrUWadPZFT
    iT2xWjWSHH5EdMbq
    • Gebruik een spudger of een nagel om de kabelaansluiting van het LCD-scherm te ontkoppelen.

    • Ontkoppel ook de digitizeraansluiting die ernaast zit.

    Be mindful when reconnecting LCD panel connector and digitizer connector. It’s looks very similar. These 2 ribbon connectors a slightly different.

    Pay attention.

    Josmaknolavic -

    내 아이폰이 디스플레이 분리 단계를 거친 후, 전원이 들어오지 않습니다. 층전기를 꽂아도 배터리에 미세한 전기 반응이 느껴지지 않고, 탭틱 엔진도 작동하지 않게 되었습니다. cpu 온도는 여전히 뜨껍습니다. 내 마더보드가 디스플레이 분리 후 갑자기 고장난건가요?

    Protoncal -

    Hast Du das Problem gelöst?

    Bernd Sonneck -

    커넥터 핀을 빼거나 다시 넣기 위해 구부러졌을 수 있습니다. 핀이 구부러진 경우 돋보기 등으로 살펴보고, 그렇다면 적절한 매장에 가져가세요.

    Hampter -

    Hier war mein Problem schon gelöst. Durch einen Sturz hat sich der Touchscreen Stecker gelöst. Wieder eingesteckt funktionierte die Touch-Eingabe wieder.

    Hoetgen -

  24. FXVmdXMPZpEU2F5j
    FXVmdXMPZpEU2F5j
    BxKUHpGvITeIEOQL
    • Gebruik de punt van een spudger of een nagel om de aansluiting van de sensormodule van het scherm los te koppelen.

    There needs to be an extra step between 24 and 25 for reassembly, telling folks to apply adhesive here. I got the thing almost all the way put back together before realizing that the adhesive was a single piece that needs the cables to be disconnected in order to apply it.

    Nathan Friedly -

  25. VoZNhVF2Va3NVwit

    After this step its probably a good idea to test the new screen (you dont have to plug in the front camera assembly)

    Richard Kraus -

    Not a technician, so correct me if I'm wrong: I think that it's at this step of reassembly (before you reattach the screen) that you apply waterproof glue, if you have it.

    Athanasius Pernath -

    You are both correct. Testing the screen before putting on adhesive means the screen can be returned if faulty. Many places will not accept a screen return that has adhesive on it.

    So if it works apply adhesive at this point. When testing don’t just rely on Apple logo test touch functionality also .

    Daniel -

  26. c6KLaRqIueRjBTgF
    • Verwijder de vier schroeven die de speaker/sensormodule bevestigen:

    • Drie 1.6 mm Phillips schroeven

    • Eén 1.3 mm Y000 schroef

    Correct me if I am wrong but you no longer need to do this as of IOS 15.2 as apple doesnt disable Face ID on 3rd party repairs

    Oliver Pressello -

    For red screw use 000 Phillips screw

    Torsten -

    Bonjour, je n'arriva pas à retirer les trois vis cruciformes. vous aurez une astuce ?

    Sedrick Azebaze -

  27. kYVNaZrgZMhtMCXL
    kYVNaZrgZMhtMCXL
    nwamPbIXeL1OewgJ
    RnjYEKHkwPDfATDD
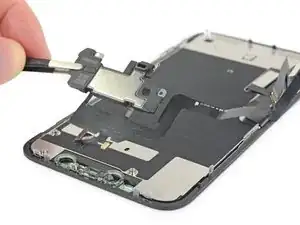
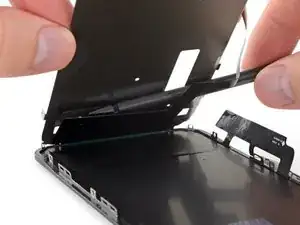
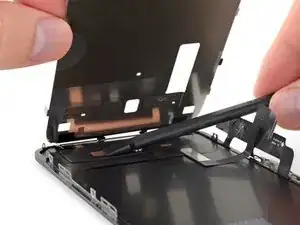
    • Gebruik de punt van een spudger om de bovenkant van de speaker voorzichtig omhoog te duwen.

    • Draai de speakermodule vervolgens om — richting de onderkant en weg van de bovenkant van het scherm.

    • De speaker blijft vastzitten met zeer dunne lintkabels. Wees voorzichtig dat je de kabels niet afklemt of beschadigt.

    스피커 어셈블러가 끊어 졌습니다. 연결하거나 구할 방법이 있을까요?

    코딩의달인 -

  28. xfUHGAfxC4XQewxL
    • Gebruik een föhn of warmtepistool of prepareer een iOpener en leg deze op de voorste bovenkant van het scherm gedurende 1-2 minuten om zo de lijm die de sensors vasthoudt te verzachten.

    Sometimes this won't be sufficient for the glue to melt. I ripped the ambient cable twice trying to remove it from the greenish plastic piece (the one with two round holes on the two sides). Here's a less risky procedure: take off the plastic piece together with the rest of the speaker + front sensors, as a block. Then when reassembling, remove the plastic piece from the new screen, and apply the whole block instead.

    Athanasius Pernath -

  29. bwXuCcEMEB1YeDuI
    bwXuCcEMEB1YeDuI
    4vpEnJnhOv2gDdLV
    YQPQG2yANhuqASYR
    • Schuif voorzichtig de punt van je openingsplectrum onder de flexkabel onder de microfoon.

    • Kantel je plectrum vervolgens lichtjes om de microfoon los te krijgen en zorg daarbij dat je de flexkabel niet afklemt of beschadigt.

    • Gebruik, indien nodig, de punt van een spudger om de microfoon definitief los te krijgen uit de inkeping in het voorste paneel.

    This step was a little bit confusing. I thought that the entire ribbon assm should be removed once the speaker was detached. The entire assm doesn’t actually come off until Step 30.

    Andre LeBlanc -

    Be careful in the next few steps, as you can easily damage some parts. Make sure that you operate gently, and that you don't pull, twist or apply too much pressure on the components.

    Athanasius Pernath -

  30. dXZ3PHSBGHLEvaLM
    dXZ3PHSBGHLEvaLM
    ENJqTZ4wTQ1X4uUB
    • Gebruik een pincet om het kleine plaatje dat over de omgevingslichtsensor zit, in een rechte beweging omhoog te liften.

    As you remove it, familiarise with its position. It will be hard to put it back into place. If you pay close attention to how it comes out, it will be easier to put it back

    Athanasius Pernath -

  31. qyhj5vpN62hd25d5
    qyhj5vpN62hd25d5
    SUHMfqCo2aAR1pSw
    • Gebruik een pincet om de omgevingslichtsensor los te wiebelen en deze uit z'n inkeping in het scherm te tillen.

    • Als de sensor niet na een aantal seconde losgewiebeld is, dien dan wat meer warmte toe en probeer het nog eens.

    • De sensor blijft nog steeds verbonden met de rest van de sensormodule via een erg dunnen flexkabel. Wees voorzichtig dat je deze niet afklemt of beschadigt.

  32. wb6W2SWkoFbmgPjS
    wb6W2SWkoFbmgPjS
    xhy3trMJUKSBPfJo
    sKLITAxVAEeNPLu2
    • Schuif een openingsplectrum, van links naar rechts, onder de flexkabel en onder de nabijheidssensor + infraroodschijnwerper.

    • Wiebel voorzichtig je plectrum omhoog en omlaag om de module van de inkeping in het voorste paneel te scheiden.

    • Het kan helpen om de speaker, tijdens deze stappen, uit de weg te tillen om jezelf zo een betere toegang te verschaffen. Wees hierbij wel voorzichtig dat je, terwijl je dit doet, niet aan de dunne flexkabel trekt.

  33. sSfLtFMiJbEoBxdc
    sSfLtFMiJbEoBxdc
    GJvrQZVwkH6MoFqI
    6ntOJfMeAsUcrAFv
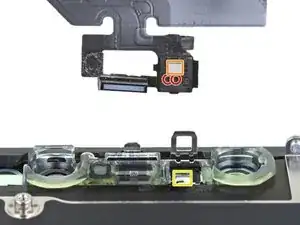
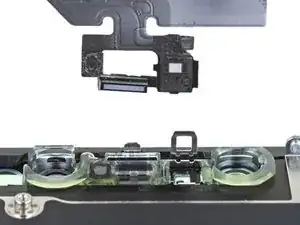
    • Verwijder de oorstukspeaker en de voorste sensormodule.

    • Check, tijdens het weer in elkaar zetten van je toestel, de positie van de zwarte, plasticen module die de volgende componenten bevat:

    • Nabijheidssensor

    • Infraroodschijnwerper

    • De module moet zodanig zijn gepositioneerd dat deze componenten niet in de weg worden gezeten door lijm of andere soorten kleefmiddel.

    Also, your iPhone 11 will now display a notification that the screen on it is not original.

    Rob -

    Also if I‘m using an original Display? Will coping screen data with iCopy help? Or is there any other solution to get rid of this?

    Katrin -

    How about LCD shield plate removal instructions?

    Os Reini -

    When I reinstall this assembly on the new (ifixit) screen, once all the sensors are in their holes and you fold the speaker back over, the screw holes don't line up, OR the speaker doesn't fit snugly. You can move the speaker so its no longer snug, and the screw holes line up. Is there a trick to this?

    John M -

    My replacement screen didn't come with the transparent plastic bits surrounding the front camera, infrared and earpiece speaker... I wonder what would have turned up if I didn't purchase the " original" version in that dodgy shop... lol. If this is your case, you need to clean the glass off this piece of plastic and metal, try not to damage the earpiece protection included on top of that piece, and go back to that shop for a good argument! Got some pics if needed.

    Simon Villaeys -

    Correction: I finally got rid of the earpiece protection because I hadn't noticed that was included in the replacement screen, although of much lower quality than the "real" original.

    Simon Villaeys -

    In addition: be veeeeeery gentle on the heat gun, I accidentally melted a bit of the plastic in the "plastic and metal piece"... Made the ambient light sensor fit kinda loose. :/

    Simon Villaeys -

    Thanks a lot ! My son's iphone is reborned, and I'm upskilled !

    Jean-Philippe d'HAUSEN -

  34. LErxnWwmQ6AGr2Kj
    LErxnWwmQ6AGr2Kj
    EwUPPqr1142GBaRv
    gFxrnm5vMsYI1CTj
    • Gebruik een Y000-schroevendraaier om de 1.1 mm schroeven die de LCD-plaat bevestigen, te verwijderen:

    • Drie schroeven die dichtbij de schermkabels zitten

    • Nog twee schroeven aan de andere kant

    • Duw je schroevendraaier stevig in de schroef bij het losdraaien. Indien nodig, kun je je spudger gebruiken om de schroef van achteren te ondersteunen, zodat je meer kracht op de schroef kunt zetten zonder het plaatje te verbuigen.

    There is two more screws at the bottom !

    ubrunner -

    L’appui sur les vis est réellement important, au risque de foirer celles-ci. N’hésitez donc pas à appuyer, en faisant contre-poids du côté opposé bien évidemment.

    Tristan Nans -

    This is the bit that was difficult. The tri'point screwdriver y0000 barely fits this tricky size. It could have been the cheap screwdriver that came with the screen replacement kit. Stripped 2 screws, drilled out with an appropriate size drill bit ' frame still intact. I had more success using a size 0.7mm flathead screwdriver.

    noname -

  35. 1CnhgaMGZO2r5iLf
    1CnhgaMGZO2r5iLf
    vGnGCFRBYSwY1MvE
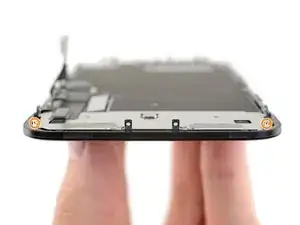
    • Verwijder de overige 1.1 mm Y000-schroeven aan de boven- en onderkant van de LCD-plaat:

    • Twee schroeven dichtbij de uitsnedes voor de camera

    • Twee schroeven bij de onderste hoeken

  36. uDReDhFA2bXRCmGY
    uDReDhFA2bXRCmGY
    3OquLX6XiiokcWmj
    • Gebruik wat warmte van een iOpener (of föhn / warmtepistool) aan de achterkant van het scherm om de lijm, die de schermkabels bevestigt aan de LCD-plaat, te verzachten.

  37. jUeKbHyLYRvGYJsL
    jUeKbHyLYRvGYJsL
    w1BKSNmonggoONeE
    • Schuif een openingsplectrum tussen de schermkabels en de LCD-plaat.

    • Schuif het in de richting van de onderkant van het scherm om de schermkabels langzaam los te krijgen.

    • Stop als je het einde van de eerste kabel hebt bereikt.

  38. fcgR2GHWiHSdC13g
    fcgR2GHWiHSdC13g
    T6giiyp3fn63fVkN
    Wl6pGKQ4ARdIfbCB
    • Gebruik opnieuw je openingsplectrum. Schuif 'm deze keer tussen de twee kabels.

    • Schuif de openingsplectrum richting de onderkant van het scherm om de twee kabels van elkaar te scheiden.

  39. ebZhaRcBGUTPHBmU
    ebZhaRcBGUTPHBmU
    qqSplMxIQyhShwLp
    • Pak de kabels vast bij de 90° hoek en peuter ze voorzichtig uit elkaar.

  40. yUBidA5PHmIuND3A
    yUBidA5PHmIuND3A
    1erlLVnZwKTYFxVF
    • Scheid dan voorzichtig de gehele digitizerkabel van de LCD-plaat en vouw het open tot buiten het scherm.

    Be very careful of all parts of the ribbon cable connected to the screen, especially the segment close to the top, as it can tear easily at this

    crtrue -

  41. nkFO3PQleSRFUECt
    nkFO3PQleSRFUECt
    UyMn2VyuE4OrTSgM
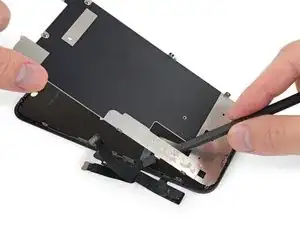
    • Steek, aan de bovenkant, een openingsplectrum onder de LCD-plaat en draai de plectrum een klein beetje om de plaat van het scherm los te krijgen.

  42. qSMxGj4yxRj3J5Yh
    qSMxGj4yxRj3J5Yh
    ZpwYy4EgYDZbXFqt
    • Pak de LCD-plaat vast aan de bovenkant en tilt het een aantal graden naar boven.

    • Druk, met je spudger, voorzichtig op het onderste deel van de schermkabel en duw het zo door de uitsnede in de LCD-plaat.

  43. xAeYRm6WGKRSWj2L
    xAeYRm6WGKRSWj2L
    jXPBpfu5YkGrevZ1
    pLKbrLHHUQvuNTsO
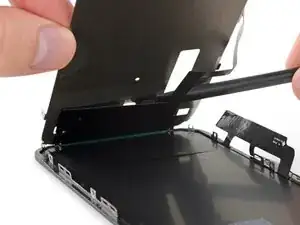
    • Lift de bovenkant van de LCD-plaat verder omhoog en begeleid de rest van de schermkabel door de uitsnede in de plaat.

  44. rwMpFGFiGRCyTCAK
    rwMpFGFiGRCyTCAK
    m3qLyiEQORG4VRDH
    2EcKI2U1qeIrwc3P
    • Til de LCD-plaat nog verder omhoog, totdat je de rest van de schermkabel, die aan de achterkant van de plaat vast zit, kunt zien.

    • Schuif een spudger tussen de LCD-plaat en de schermkabel en scheid ze volledig van elkaar.

  45. I1CskVXDHR6Tfsux
    I1CskVXDHR6Tfsux
    tDfKre6SyCpPgoMY
    cMPjSNJlHEmNaYUW
    • Bij het verder omhoog liften van de LCD-plaat, kun je de pinnen aan de onderkant zien.

    • Zorg er, bij het in elkaar zetten van het scherm, voor dat deze pinnen (a.k.a. EMI-fingers) op de juiste wijze in het LCD-frame schuiven, zoals op de foto te zien is.

    hello whaty if one of the golden contact pins ( i guess it is) to be exact right one has freyed up a bit and looks messy. could it cause harm or it is not very important?

    thetroll1401 -

    On reassembly leave the adhesive cover on the digitizer cable so that it doesn’t get caught on the LCD shield while working the other cable in place and positioning the shield on the frame. When you are ready to stick the digitizer cable to the shield remove the protective plastic.

    pgrobin -

  46. ISJKZTNwdCZN3VRM
    • Verwijder de LCD-plaat.

  47. k1xqLVCC1ZKI46wY
    • De LCD en de digitizer blijven over.

    Tech nor working my iphone xr

    Mohammed Chand -

Conclusie

Vergelijk je vervangende onderdeel met het originele onderdeel — het kan zijn dat je meerdere onderdelen mee over moet zetten of beschermlagen voor de lijm moet verwijderen voordat je het nieuwe onderdeel kunt installeren.

Om je toestel weer in elkaar te zetten, volg je deze instructies in omgekeerde volgorde.

Breng je e-afval naar een R2 of e-Stewards gecertificeerde recycler.

Ging je reparatie niet zoals gepland? Bezoek dan onze uitgebreide iPhone-probleemoplossingsbibliotheek of de specifieke iPhone 11 gaat niet meer aan-pagina. Je kunt ook onze algemene probleemoplossingspagina raadplegen of je vraag stellen op ons iPhone 11-antwoordenforum voor hulp bij het oplossen van je probleem.

Jeff Suovanen

Lid sinds: 06/08/13

442718 Reputatie

24 commentaren

I am a repair technician from California, and I use your company’s tools and I gotta say that I love them. Very sleek, and the powerful magnetic bits help me get the job done. I did 5 repairs yesterday and each one finished was a good feeling of satisfaction. In the future, if you guys decide to make some sort of in-depth manual for the newer iPhones, that would be great because diagrams are not only a great way for me to sharpen my own skills, but will help make training new techs a breeze.

Cheers all the way from Fresno!

anthony_brletic -

Hi, I replaced the display independently, not in the Apple service, to my disappointment I found a message in the device that warned me that the part is not original, consequently the FaceID was disabled. Can you tell me about ear? Thank you

954kuki -

Getting a message saying not genuine is known issue. there is no workaround yet. as far as face ID not working, you need to check for tear on the flex as you probably damaged it during transfer. If it’s broken, there is no way to fix.

iFIX smartphone -

The Important Display Message can be removed, check here: https://www.youtube.com/watch?v=bLo0_p7O...

Ricky LV -

Great repair guide. My only issues:

1. There are no instructions for removing the metal panel from the back of the old screen (nor how to reinstall it).

2. There are no instructions for removing the old, black adhesive from around the edge of the old case (nor the much needed instructions for reinstalling the new adhesive without damaging it or compromising the purpose of replacing this adhesive). This info is also missing from the adhesive replacement page for the iPhone 11.

I was able to patiently work my way through both of these issues and complete the repair on an iPhone 11. Covering these issues as additional steps of the repair guide would be very helpful for future iFixers.

Ryan R. Smith -

Anyone have the phone randomly reboot after screen replacement? All aspects work on the phone after replacement. It just randomly goes black and then restarts

Cory Schumacher -

Maybe just a bad battery connection or a stained/bent connector

Richard Kraus -

I am a repair tech at a repair shop we do more but thats what we are called and i love you’re tools, they are just perfect for everything and all i can say really is, be super careful with the screen and the prox flex, they can be eaisly ripped and really ruin you’re day because to restore the face id with a new prox requires micro sodering but other then that just be careful

Zach Mentz -

I find the OEM screen looks more yellowish, is it me only?

Victor Santana -

OEM screens tend to have the colors a little bit off, could also be caused by disabled true tone.

Richard Kraus -

Overall a very useful repair guide, there´s just one issue I came across:

Different display manufactors.

Been looking around, due to some issues and so far I´ve seen some different manufactors for the iPhone 11 (and the XR):

Toshiba (the print on the display starts with C11 or F7C, as seen on the last picture)

LG (DTP or C3F)

Sharp (DKH)

someone else stumbled across this?

Günter Scherf -

Apple doesnt offer new displays, however afaik the original apple product manufacturer foxconn refurbishes original screens. Or you could just get a refurbished screen from somewhere else…

Richard Kraus -

For iphone 11, on the flex if there is a square code QRC is DTP and a rectangle is C11

Didier -

Awesome guide, thank you very much! By the way, after the replacement the true tone function will most likely be disabled, which can as far as i know only be fixed by copying the firmware from the old screen over to the new one with a programmer (for example Qianli iCopy Plus). Also, the phone will notify you that the screen is not genuine after every restart and it will always show a notification in the settings. The only way to get around that is to swap the chip on the display cable with a hot air station and solder paste (not worth the hustle in my opinion, i dont mind the one notification in settings). https://www.youtube.com/watch?v=agq2HPK-...

Cheers!

Richard Kraus -

Hi, since replacing my screen my ear speaker has been very muffed/static. Is there any way I can fix this? Thanks

caoife98 -

I’d suggest checking the mesh under the earpiece for dirt and stuff that could be blocking the sound and maybe trying to refit it, maybe it’s not properly seated. Could also be fixed by just reseating the earpiece flex…

Richard Kraus -

completed the guide. thx. my iphone claimed the screen is not original. anyway, seems to work correct

Miguel Cretu -

Hello I was wondering if anyone could help me. I recently replaced the screen of an iphone 11. The phone was good for the first couple of days but now the customer is having some issues. His display is something randomly scrolling up, mainly while watching videos and sometimes the screens just starts to act crazy and press random things. I’ve been doing some research and I found that something i could do is reset the phone to factory settings. However i’m unsure if this is like a software or a hardware issue. Any advice is helpful, thanks!

Andres -

From my experience this sound like a ghost touch issue. Usually caused by a loose/broken/dirty connection or an overly tight screw somewhere. It's unlikely, but if you installed a screen protector afterwards, it may have a fingerprint or dirt between the protector and the phone screen. Same thing happened when we did my sisters phone at our store, a connection was loose and a screw was a little bit tight. Maybe a more experienced tech could offer more in-depth insight.

Teejay R -

Hello, I followed the guide and repairs. My phone will not come on. Unless sitting on the charger and then I only get the Apple logo for a few seconds and it does this repeatedly. Any guess on where I went wrong? Thanks

Coty Alred -

I put yall iPhone screen on now my phone wouldn’t up n it’s say iPhone battery not genuine with my phone

Darius -

Hi all, Im still trying to get a better understanding of the different types of "screen repair" that can be done.

From what I understand, it is possible to perform a replacement of ONLY the "front glass/screen" with 3rd party, non-OEM screens that you can purcahse online) OR you can replace BOTH the screen and digitizer.

ALot of 3rd party sellers sell a "screen replacement" but I am not sure exactly what I need to look for.

My front screen is cracked but the damage that is visible is purely physical (II don't see /experience any altered pixels, flashing colors etc, just dealing with a iphone with a cracked front screen). BUT in addition to the physical damage, the right side of my iphone 11 (specifically a small area that covers the "&" sign and letter "i" on my keyboard are non-responsive.

Now, is the item Im commenting on going to fix my touch issue? If not, which Ifixit replacement part(s) will resolve this? if at all.

thanks

patrick c -

The ribbon cables used on this screen are incredibly weak, when compared to the apple ones. Did this whole thing and had the phone fully working. Made sure the cables were in the right spot and started pressing the screen in just for the display cable to split in half from a couple pounds of pressure. Absolutely livid. Waste of money and time. You can really tear these cables apart with the tiniest fold.

Thomas Rucci -

Installation guide was a success, no issues there. Touchscreen accuracy and repeatability is lacking on iPhone 11

Snakey23 -