Inleiding

iPhone-batterijen zijn in staat om ongeveer 80% van hun batterijcapaciteit gedurende 500 oplaadcycli te behouden. Dit duurt voor de gemiddelde gebruiker vaak 18-24 maanden. Daarna kan het zijn dat je je iPhone vaker op moet laden en dat iOS je waarschuwt dat de performance van de telefoon achteruit is gegaan, wat betekent dat je telefoon langzamer wordt. Gebruik daarom deze handleiding om de batterij van je iPhone te vervangen en deze weer nieuw leven in te blazen.

Neem, als je batterij gezwollen is, de juiste voorzorgsmaatregelen.

Let op: Het kan voorkomen dat je iPhone, na het voltooien van deze reparatie, een waarschuwing toont over de "echtheid" van de batterij, zelfs als je gebruik hebt gemaakt van een officiële Apple-batterij. Als je iPhone op normale wijze werkt, kun je deze waarschuwing echter negeren.

Je zult vervangende kleefstrips nodig hebben om sommige onderdelen te (her)bevestigen bij het weer in elkaar zetten van je toestel.

  1. JVwauFGp15pboki4
    JVwauFGp15pboki4
    6ZrVNyXTV2DYTb13
    • Ontlaad de batterij van je iPhone, voordat je met deze handleiding begint, tot onder de 25%. Een geladen lithium-ion batterij kan in brand vliegen en/of exploderen als deze per ongeluk wordt doorboord.

    • Schakel je iPhone uit voordat je begint met het demonteren van je toestel.

    • Verwijder de twee 6.7 mm lange pentalobe-schroeven aan de onderkant van je iPhone.

    is it oem apple battery, because at some photo shows(Ifixit) and another shows (apple) ... wait your answer?

    karim -

    BEWARE! This screen isn’t the same as older iPhone models’ screens. The iPhone mini 12-screen comes with a thin plastic frame around the screen on its back. Thus, make sure you don’t insert the pick in between the screen and its plastic frame, as you’ll seperate the screen and leave the plastic frame still sitting in the phone’s metal housing (this cost me 100 dollars…). Carefully heat the sides of the metal housing and do not heat directly on the glass, as doing so will potentially loosen the glue from the plastic frame stuck to the screen. My suggestion is that you watch a video of this repair as this step-by-step-guide is undercooked.

    Dan -

    This is an excellent comment. Following this step-by-step guide to the letter will break your screen; it's by far the worst iFixit guide I've seen to date.

    Dormouse -

    Yup, that’s what happened to me. I will be reading the comments next time

    pinballnc -

    Ive finished mine and Soooo absolutely dont do this yourself🙌🏽 unless your a mechanic because first of all they didnt send me all of the right tools🤗 and secondly the battery they gave me has an overly large component so it wont fit into my phone. And the absolute HASSEL i had to go through to even just get the package was insane it was a whole month of struggling just for the stuff to not even be right, in conclusion will NEVER order from here again..🤗

    Chanell -

  2. 6UPwoloGBO4tmVoS
    6UPwoloGBO4tmVoS
    BmSYPJmOy6dbHipF
    3EOdQPAGOmiuhoKU
    • Je kunt de onderdelen in je telefoon gemakkelijk beschadigen met het te diep inbrengen van je openingsplectrum. Volg deze stap om je plectrum te markeren en schade aan je toestel te voorkomen.

    • Plaats op 3 mm van de punt van je plectrum een markering met een stift.

    • Je kunt op iedere punt voor een andere markering kiezen.

    • Als alternatief kun je ook een munt als markering gebruiken in plaats van een stift. Plak hierbij de munt op de plectrum zodat de munt tegen je telefoon aandrukt zodra deze een bepaalde diepte bereikt.

    Got to step 2 and realized the fix kit doesn't include an opening pick! Looks like a guitar pick, and I have those lying around. Is that expected? Looks like the pick is used in many steps below. There's a little blue crowbar that isn't mentioned in the instructions. Perhaps that replaces the opening pick?

    Sloan Looney -

    Hi! I can't see which guide you were using when writing this comment. Can you reply here with which guide and fix kit you used?

    Clay Eickemeyer -

    I see you posted this in Meta. I hope it's resolved soon! In the meantime, a guitar pick may work well enough for your repair.

    Clay Eickemeyer -

    what fix kit?

    Meow Purr -

    My fix kit didn't include an opening pick either

    WILLIAM HARRIS -

    Make sure you check inside the black boxes after emptying them. My pick was stuck inside one of the boxes.

    AndyF -

    My AliExpress refurbished screen came with a pick that has a coin-like circle that pops out, so no modification was necessary

    Gijs Leegwater -

    the picture shows 3 cm but the description says 3 mm's. Which one is it?

    John Pena -

    That is a misunderstanding. It is a ruler with a scale for cm, it shows 0.3 cm, i.e. 3 mm.

    VauWeh -

    Oh, come ON!

    Big Ed -

    It will ALWAYS be millimeters on a phone, but this step is ridiculous, skip it!

    Leif DeWolf -

    @leifdewolf I wouldn't skip it for a first repair.

    Gabriel-Science -

    It's not an Ifixit KIT if it doesn't include everything. You'll need to order the opening pic separately. Or head to Walmart like myself and look for guitar pics. Hopefully, this will work just as well.

    Jaleeljb97@icloud.com -

    No pick in mine as well. It’s really not clear that you have to order this separately when ordering an IPhone SE 202/2022 screen repair kit. Is this the case?

    Jackson Castiglione -

    Frustrated, I ordered a compact package where everything was encapsulated. Useless suction tools could not separate the screen. If it is unable to decouple the screen, then why sucking suction tools you have provided.

    Shourob Datta -

    For my kit the triangle pick was stuck inside the box with the screen not with the other tools maybe it's also there for you

    Henry Scheibehenne -

    Y’all are getting far, FAR too detailed with some of this stuff…. Measuring and marking the pick that you won’t actually use to open the device?!? lol that’s kinda funny. Just heat it up, grab a spudger, and the back just pops right off! The iFixit tech need to stick to the KISS method more often, you know KEEP IT SIMPLE STUPID!!! Like l, for reals, I’ve been doing this stuff for YEARS and using iFixit guides regularly and this is just ridiculous at this point!

    Leif DeWolf -

    Will the phone still work if the sensor assembly on the back of the screen is damaged?

    Mutshidzi Rambau -

    I don't have a pick, but how much better are these picks than an old credit card for opening an iPhone 13 mini?

    mike eng -

    The pick in my iFixIt kit was packed with the battery, not with the rest of the toolkit.

    Tony Houlihan -

  3. 1CjogrubnNxIGvrd
    1CjogrubnNxIGvrd
    pXY5VoUJ1hFuERqR
    Q1eZoASRSIbOibcj
    • Als je iPhone een gebarsten scherm heeft, kun je wat tape over de barsten plakken om te voorkomen dat het scherm verder beschadigd raakt tijdens dit proces. Zo verklein je ook het risico op fysieke schade.

    • Plak een aantal lagen tape op het scherm van de iPhone tot het gehele scherm bedekt is.

    • We raden je ten sterkste aan om tijdens deze stap een veiligheidsbril te dragen zodat je je ogen beschermt tegen eventueel loskomende glasscherven.

    • Als het je in de volgende stappen niet lukt om de zuignap op het scherm te bevestigen, kun je ervoor kiezen om een stuk duct tape in een handvatvorm op het scherm te plakken. Hiermee kun je dan het scherm omhoog tillen om een opening te creëren.

    • Als alternatief kun je er ook voor kiezen om de zuignap met secondelijm op het scherm vast te plakken.

  4. 5SDAKLhJ2tKixZi2
    5SDAKLhJ2tKixZi2
    ptSQJmqMjcBBW1st
    Rb3dmudH5T5hUrmc
    • In de volgende drie stappen leggen we uit hoe je de anti-klem het best kunt gebruiken. De anti-klem is een tool die we gemaakt hebben om de openingsprocedure te vergemakkelijken. Als je geen gebruik maakt van de anti-klem, kun je de volgende drie stappen overslaan en de alternatieve methode gebruiken.

    • Voor meer gedetailleerde instructies over het gebruik van de anti-klem verwijzen we je door naar deze handleiding.

    • Trek het blauwe handvat naar achteren om de armen van de anti-klem te ontgrendelen.

    • Schuif de armen over de linker- of rechterzijde van je iPhone.

    • Plaats de zuignappen aan de onderkant van de glazen achterkant—één aan de voorkant en één aan de achterkant.

    • Druk de zuignappen aan zodat je zeker weet dat ze zich goed vastzuigen.

    • Als het oppervlak te glad of onregelmatig is en de zuignappen zich niet goed vast willen zuigen, kun je wat tape gebruiken om te zorgen dat de zuignappen meer grip hebben.

  5. FsT3FA5QaEWxaiEg
    FsT3FA5QaEWxaiEg
    1idtRJHPlsFJBJES
    xf6uNSGb6GPTDJQd
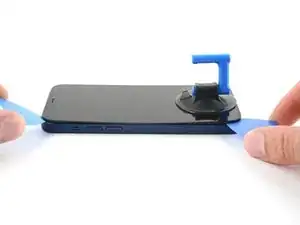
    • Trek het blauwe handvat naar voren om de armen van de anti-klem te vergrendelen.

    • Draai het handvat 360 graden met de klok mee of tot de zuignappen uit beginnen te rekken.

    • Zorg dat de zuignappen op één lijn met elkaar zitten voordat je begint met het openen van het toestel. Als je ziet dat de zuignappen niet meer op één lijn zitten, maak je ze los en breng je ze weer op de juiste positie aan.

  6. DpZCL6axAepLaTCc
    DpZCL6axAepLaTCc
    atEF2NMTghnIiSsM
    ALaITu6uDhQqZvXN
    • Zorg dat je iPhone op een stevig object rust (zoals een boek met harde kaft) zodat de telefoon parallel aan je werkoppervlak blijft liggen en je er met twee handen aan kunt werken. Dit maakt het uitvoeren van de volgende stappen gemakkelijker.

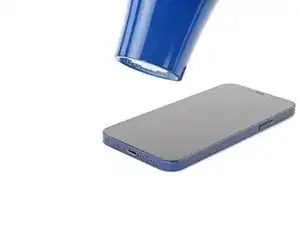
    • Gebruik een föhn om de onderkant van de iPhone te verwarmen en de lijm die het scherm vasthoudt te verzwakken. Het glas zou iets te warm moeten zijn om comfortabel aan te raken.

    • Voor meer gedetailleerde instructies over het gebruik van een föhn om de lijm in een toestel te verzwakken, verwijzen we je door naar deze handleiding.

    • Geef de lijm ongeveer een minuutje de tijd om los te komen en trek het toestel vervolgens rustig uit elkaar tot je een opening hebt gecreëerd.

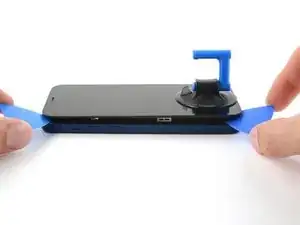
    • Steek een openingsplectrum in de opening onder de rand van het scherm.

    • Als het niet lukt een opening te creëren die groot genoeg is om een openingsplectrum in te steken, raden we je aan meer warmte te gebruiken en het handvat van de anti-klem een kwartslag aan te draaien.

    • Draai het handvat nooit verder dan een kwartslag per keer en wacht een minuut voordat je de anti-klem weer besluit aan te draaien. Laat de anti-klem het werk voor je doen.

    • Sla de volgende drie stappen over.

  7. qIfcdOsDsjmJl2VY
    • Het openen van de iPhone zal de waterdichte pakkingen rondom het scherm aantasten. Zorg dus dat je nieuwe kleefstrips klaar hebt liggen of vermijd blootstelling aan water als je besluit de kleefstrip niet te vervangen.

    • Het verwarmen van de onderkant van de telefoon helpt bij het verzwakken van de lijm die het scherm vasthoudt, wat het makkelijker maakt om het scherm te openen.

    • Gebruik een föhn of een heteluchtpistool en leg deze gedurende 90 seconden op de onderkant van de telefoon om de lijm eronder te verzwakken.
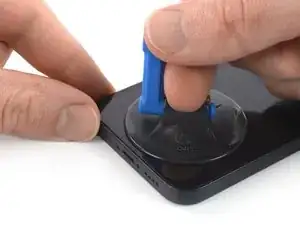
    • Richt je föhn niet te lang op een plek, aangezien dit tot schade kan leiden.

    • Als je moeite hebt met het openen van de telefoon nadat je deze stap hebt voltooid, kan het zijn dat de lijm al weer is afgekoeld. Zorg in dat geval dat je je toestel nog een keer verwarmt om de lijm te verzwakken.

    you need to clarify that you're heating the metal frame, not the glass. I gently heated the glass front with a heat gun and proceeded to pull the display apart, destroying it. :-(

    Jim Harger -

    Don't heat up the display for too long or else you could destroy the display like I did. Now I have a phone with a giant white stripe. So don't be a fool like me. 1 to 2 minutes is enough!

    K T -

  8. MKV3OGqZaxNHEhUc
    MKV3OGqZaxNHEhUc
    hHhDVWStBbPQpiZN

    I would recommend starting with a bottom corner, not the bottom middle. If the adhesive isn't softened enough, you will pull the middle out but the sides will still be stuck on, causing extreme flex to the panel and damage to the panel down the middle (white bars down the middle in a worst case). I did this to my phone.

    Drew Kosir -

  9. nQTSoddbEVTMfZHR
    nQTSoddbEVTMfZHR
    KlrDYepF3DQrMwU5
    jdiUyLciFyBYDGOm
    • Trek de zuignap met een stevige, constante kracht omhoog om zo een kleine opening tussen het voorste paneel en de achterste behuizing te creëren.

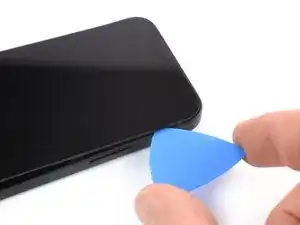
    • Steek een openingsplectrum in de opening onder de plastic rand van het scherm.

    • De waterdichte kleefstrip die het scherm op z'n plek houdt is erg sterk, waardoor het creëren van deze opening aardig wat kracht kan vereisen. Als je moeite hebt met het creëren van een opening, kun je meer warmte toedienen en het scherm vervolgens heen en weer wiebelen om een opening te creëren waar je tool in past.

    I ended up separating my screen rather than getting under the scren casing.. BE CAREFUL TO MAKE SURE YOU ARE UNDER THE PLASTIC PART - otherwise you just ruin your screen... No mention of this precaution here and as a result, my phone is more broken than when I started

    Tyler Ludwig -

    Hi, I don’t get it. Should the plastic part stay with the display or with the phone?

    Paul -

    The plastic frame should stay with the display.

    Carsten Frauenheim -

    Be sure you see two layers: glas and plastic (Step 6, Clamp, last picture). You have to go underneath the plastic frame otherwise you are tearing your displayglas off the frame and destroy your OLED!

    Johnny RS -

    Broke the screen. Too bad. I've done maybe 5 battery replacements before. But this one is very very tight. Got a new phone. :P

    Gilles van Leeuwen -

    Same thing, I broke my screen too. I think the warning should be in all caps and show more clearly where is the right place to put the pick and where is not — without the need to click on the link.

    Judging by amount of people who reported it here (and should also account for those who didn't bother to report), I'd say that there is a problem with instructions.

    It is honestly not so hard if you know what does mistake looks like and that it is possible to separate the screen so easily from the frame. I repaired more than a dozen phones — screens and batteries — and this is the first time I made such a mistake that costs 100+euros.

    Axel Mort -

    something, broke my screen by inserting the pick in between. also wish the hair dryer has pointed to the side rather than the display. damaged my display after replacing battery, so my phone is more broken than when I started

    Ghalia Naseer -

    I had the plastic and glass break and separate, without even using the pick, it separated while I was just trying to create the small gap.

    This was despite heating it for 5 minutes, till the screen was too hot to touch. They really need to have a video tutorial showing the full process so people can see exactly what mistakes to avoid making.

    I am now not sure if it is worth putting anymore money into this phone, since a $90 fix is now $250 due to my now newly broken screen.

    Akiller47 -

  10. bv1agNYR2AZSRh4i
    bv1agNYR2AZSRh4i
    QKZUYPEDGXwEWFW2
    • Gebruik een föhn om de rechterzijde van de iPhone gedurende 90 seconden te verwarmen. Het scherm moet net iets te warm zijn om comfortabel aan te kunnen raken.

    The pictures show the left side. I know that the left side is the correct one to heat, but for others it might be confusing. 😊

    Donát Viosz -

    @dviosz You mean the right edge! The picture shows the left edge but the right edge is the correct one to heat. As described in the text next to it. Opening the phone from the left will damage it!

    catchMyException -

    Yeah, sorry, you are right! (tried to make something less confusing and created more confusion by accident… 😃 )

    Donát Viosz -

    THIS ONE HERE (lolz)

    weebeast -

  11. A1oBwCyETfZ3eBwg
    A1oBwCyETfZ3eBwg
    nOJW3MH4vbghr4vJ
    kLNvCWTAVyBPWgjF
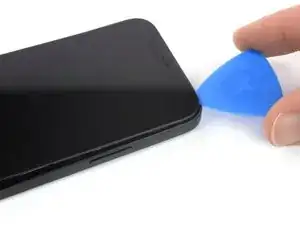
    • Schuif je openingsplectrum langs de rechter onderhoek van het scherm en langs de rechterzijde omhoog en snijd onderweg alle lijm door die je tegenkomt.

    • Steek je plectrum niet dieper dan 3 mm in het toestel om te voorkomen dat je de onderdelen in de telefoon beschadigt.

    Be very careful your tool does NOT go in between the screen and the screen frame but rather in between the screen frame and the phone frame. If not you will damage the screen and need a new one. This has happened to MANY people. The screen is attached to the screen frame with an adhesive that can also be accidentally pried apart if not done carefully. This is probably more likely if your tool is too thin, if you dont heat enough, or dont suction and pull enough to create a big enough separation between the screen frame and the phone frame.

    Ezra Gilbert -

    Yes, this happens to me, too. It took a long time until I could remove the screen using a heat gun with a heat gun set to 120°C (after trying first with 90° and 100°). Now the right side of the display shows white stripes and the touch doesn't react. -> New display necessary...

    Bernd Löhr -

    same as @bernd lohr.

    Ghalia Naseer -

  12. jlAuMwmQ6WRMXnpn
    • Gebruik een föhn om de bovenkant van de iPhone gedurende 90 seconden te verwarmen. Het scherm zou net iets te warm moeten zijn om comfortabel aan te kunnen raken.

  13. luVslv2EJDPHjdFY
    luVslv2EJDPHjdFY
    bhGJkCcPB6iwKJWR
    tMyUCZXybbOw6SsY
    • De bovenkant van het scherm is met zowel lijm als klemmen bevestigd.

    • Steek je plectrum onder de rechter bovenhoek van het schermpaneel.

    • Schuif je plectrum om de rechter bovenhoek heen. Het kan zijn dat je wat weerstand voelt vanwege de klemmen die het scherm vasthouden.

    • Steek je plectrum niet dieper dan 3 mm in het toestel om te voorkomen dat je de voorste sensormodule beschadigt.

    • Deze stap wordt iets makkelijker als je de schermmodule in de richting van de onderkant van de telefoon trekt.

    • Schuif je plectrum langs de bovenkant van de telefoon en snijd alle lijm door die je onderweg tegenkomt.

  14. bn6svgDdnTZqo1Li
    bn6svgDdnTZqo1Li
    ZM3kLhdMRgUEI2rG
    • Gebruik een föhn om de bovenkant van de iPhone gedurende 90 seconden te verwarmen. Het scherm zou net iets te warm moeten zijn om comfortabel aan te kunnen raken.

  15. 2h6ZO1ahtoicpFKF
    • Er loopt een makkelijk te beschadigen kabel langs de linkerkant van de iPhone. Steek je plectrum daar niet in de opening, aangezien je daarmee riskeert de kabel te beschadigen.

    There are two cables, one near the top, another lower than the middle on the left side. Further steps show where the second one is, but this picture doesn't show it...

    mesanos -

    Welches Ersatzteil benötige ich, wenn die obere Verbindung gerissen ist?

    Claudia T. -

    If the inside of your phone looks different than these photos (like me) then you may have only removed the top layer of the screen assembly. The bottom layer should pry up easily enough with tweezers.

    macro -

    I accidentally tore the cables off. What can I do?

    Alma Hernandez -

    The display flexy is in the middle of the left side, please update the picture showing the flexy connected and highlight in red, so other users don't damage it as I did :(

    Juan David Zuluaga -

    Updated -- thank you! Does this look better?

    Spencer Pennington -

  16. uNtM2YKyVD2BKNwq
    uNtM2YKyVD2BKNwq
    OyXrlHMUOR2dqtME
    • Steek een tweede openingsplectrum in de linker benedenhoek van de iPhone.

    • Draai beide plectrums tegelijkertijd naar de zijkant om het scherm los te maken uit de klemmen aan de linkerzijde van de telefoon.

    • Zet langzaam maar zeker meer kracht bij het draaien van de plectrums.

    • Als je moeite hebt met het losmaken van de lijm verwarm je de linkerzijde nog een keer.

    Don't go from just one corner (like on the right side). I've done that (forgot this step) and broke my screen.

    Donát Viosz -

  17. GKjjmXfhwhaIRErW
    GKjjmXfhwhaIRErW
    2JqHTqMrNqKn2oIC
    Bgygc1XwrnZIXYqP
    • Draai de iPhone zodat de rechterzijde naar je toe wijst.

    • Open de iPhone door het scherm van de rechterkant omhoog te zwaaien, zoals je zou doen met een boek.

    • Probeer het scherm echter nog niet volledig los te koppelen van de telefoon, aangezien er een aantal kwestbare lintkabels met het logic board van de iPhone zijn verbonden.

    • Laat het scherm tegen iets rechtopstaands leunen om deze omhoog te laten staan terwijl je verder werkt aan de telefoon.

    • Leg het scherm, tijdens het weer in elkaar zetten van je telefoon, op de juiste positie, breng de klemmen op de juiste positie langs de bovenkant aan en druk de bovenkant vervolgens voorzichtig vast voordat je de rest van het scherm bevestigt. Als het scherm niet vastklikt, check je de staat van de klemmen en buig je ze eventueel terug.

  18. s32v5LyOyuYgWKwK
    s32v5LyOyuYgWKwK
    LZTDcUatrTtkQdMX
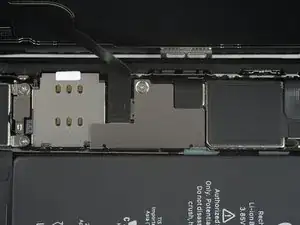
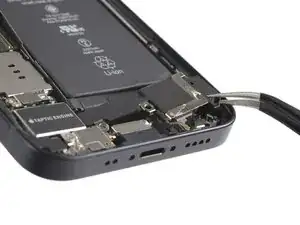
    • Verwijder de 1.25 mm lange Y000-schroef die de cover over de batterij- en de schermaansluiting bevestigt.

    • Zorg dat je, tijdens deze reparatie, goed bijhoudt welke schroeven waar vandaan komen zodat je zeker weet dat je de schroeven op de juiste plek terugplaatst. Zo voorkom je schade aan je iPhone.

    • Tijdens het weer in elkaar zetten van je toestel is dit een goed moment om je iPhone aan te zetten en alle functies te testen voordat je je scherm weer terugzet. Zorg dat je je iPhone weer uitschakelt voordat je verdergaat met het voltooien van deze procedure.

    hallo, ich sehe in Schritt 17 nur EINE markierte Schraube... (?)

    marrei1964 -

    So i got the kit how do you expect with the tools you gave me i should get that tiny screw out?? Its requires a 3 way screw i have a 4 and 2 5 ways 🤔

    Chanell -

    This Shield is garbage and once it's taken out it's next to impossible to get back in. I'm not even going to put the shield back in I'm just going to put kapton tape over it and call it good.

    Zach Benson -

  19. sSx1WV2GJT4GTDvI
    sSx1WV2GJT4GTDvI
    XJvryN6fwJQrk14F
    • Gebruik een pincet om het plaatje over de scherm- en batterijaansluiting te verwijderen.

    • Er bevinden zich twee kleine scharniertjes aan de rechterzijde van het plaatje. Zorg dat je deze, tijdens het weer terugplaatsen van de cover, met de andere delen van de scharnieren verbindt.

  20. lQtM3wSEjFBP4bUT
    lQtM3wSEjFBP4bUT
    cAGmO4Gkg5y1sdJM
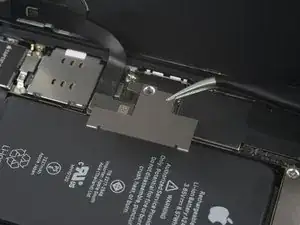
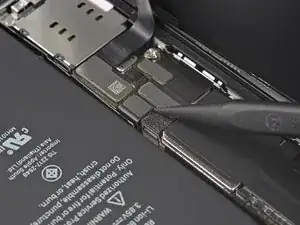
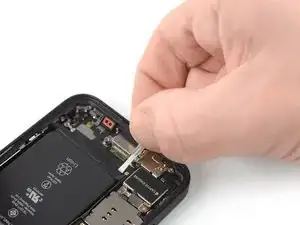
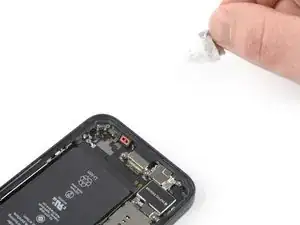
    • Gebruik een spudger of een schone nagel om de batterijaansluiting uit het contact op het logic board omhoog te duwen.

    • Probeer te voorkomen dat je de zwarte, siliconen zegel om deze en andere aansluitingen heen beschadigt. Deze zegels bieden extra bescherming tegen stof- en waterindringing.

    • Buig de aansluiting lichtjes van het logic board weg om te voorkomen dat deze per ongeluk contact maakt met het contact en op die manier de telefoon in zou kunnen schakelen.

  21. Bg2WOTycx6pQSryg
    Bg2WOTycx6pQSryg
    IMpe3jXIrjPmFpZ3
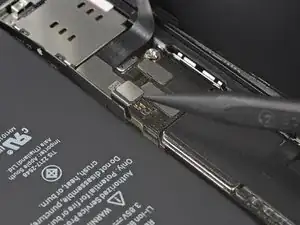
    • Gebruik een spudger of een van je schone nagels om de kabelaansluiting van het OLED-paneel uit het contact op het logic board omhoog te duwen.

    • Om drukaansluitingen zoals deze weer aan te sluiten, breng je deze op de juiste plek aan, druk je een kant naar beneden tot deze zich vastklikt en herhaal je dit aan de andere kant. Druk niet het midden van de aansluiting. Als je dit wel doet, riskeer je het buigen van de pinnen, wat tot permanente schade kan leiden.

  22. nPYF4uJRS6rlvqj5
    nPYF4uJRS6rlvqj5
    CvgjiiCJADpTTDXb
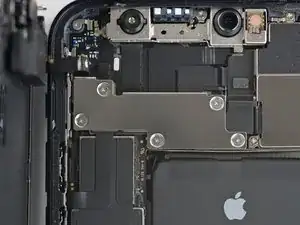
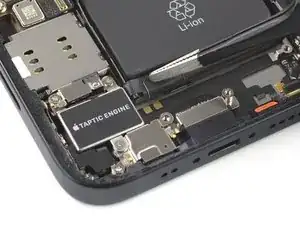
    • Verwijder de vijf 1 mm lange Y000-schroeven die de cover van de voorste sensormodule bevestigen.

    There is an error here. There are different screws. 2 large and 3 small.

    zeidin09 -

    what 3 are the small ones? I don't know anymore

    Thomas Klep -

    in case anyone else reads this, the 3 small ones screw directly onto the board. the two longer ones screw into standoffs (the two top screws, based on the picture above)

    Skyejobs -

  23. uQjgeWT2KXfFZYOA
    uQjgeWT2KXfFZYOA
    OTkQXcHJLAQwguIy
    • Gebruik een pincet om de beugel van de voorste sensormodule te verwijderen.

  24. GZpFOHpLepHvKBKQ
    GZpFOHpLepHvKBKQ
    bRxWP1dlhidDyEDy
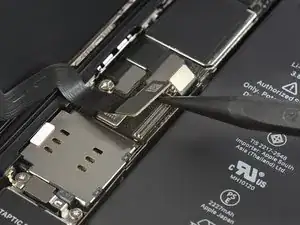
    • Gebruik een spudger of een van je schone nagels om de kabelaansluiting van de voorste sensormodule los te koppelen.

  25. 6WvMQVuRTVALGms5
  26. pYZMIXpWMncYTXB2
    pYZMIXpWMncYTXB2
    1Lb14GBcFCcbjEGV
    • Verwijder de vier 1.5 mm lange Phillips #000 schroeven die de speaker in het toestel bevestigen.

  27. ZY4plW2TuMj4XZbT
    ZY4plW2TuMj4XZbT
    DMnyDZUBsRcu4B16
    • Gebruik een pincet om de speaker uit het toestel te verwijderen.

  28. IXFdefICht1JmsCX
    IXFdefICht1JmsCX
    aRDFj32xSi2aOrXH
    • Trek de treklip van de eerste kleefstrips los van de onderkant van de batterij.

    • Werk niet met scherpe of metalen tools in de buurt van de batterij. Een doorboorde batterij kan gevaarlijke chemicaliën lekken of in brand vliegen.

  29. RbRZYsTTrZ5YU4jR
    RbRZYsTTrZ5YU4jR
    D6sBxcLgi4odOHZU
    CGdtKBeZpeL4esnV
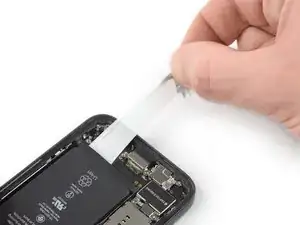
    • Pak de treklip met je vingers vast en trek deze langzaam onder de batterij vandaag, in de richtig van de onderkant van de iPhone.

    • Trek hard genoeg om een constante spanning op de kleefstrip te houden, maar forceer het niet. Geef het genoeg tijd om zichzelf uit te rekken en onder de batterij vandaag te komen.

    • Druk de batterij tijdens deze stap niet naar beneden. Houd de iPhone in plaats daarvan vast aan de zijkanten van het frame.

    • Probeer de kleefstrips tijdens het trekken vlak en ongerimpeld te houden. Probeer de strip in gelijke mate weg te trekken in plaats van enkel in het midden of aan een kant te trekken.

    • Trek de strip in een zo laag mogelijk hoek weg zodat het niet op de rand van de batterij scheurt.

    • Als een van kleefstrips scheurt of breekt, probeer je deze met je vingers of een pincet met botte uiteinden weer te herpakken, om vervolgens verder te gaan met trekken—wrik echter niet onder de batterij om de kleefstrip opnieuw vast te pakken.

    • Als een van de kleefstrips onder de batterij afbreekt en niet opnieuw kan worden gepakt, ga je verder met het verwijderen van de andere kleefstripsom vervolgens verder te gaan met de volgende stappen.

    Top side of battery have pull tabs too*

    rbhbokka -

  30. Ov15jwZUshuZqlvD
    Ov15jwZUshuZqlvD
    Bqo3LHPAULJXOaLY
    • Pak de brede treklip met je vingers vast en trek deze langzaam maar zeker onder de batterij vandaan, in de richting van de onderkant van de iPhone.

  31. m4Dco3nTwYRFXt23
    m4Dco3nTwYRFXt23
    VU14BAv6eAFeWRwP
    iTTTpcM1EvWRFdTF
    • Pak de treklip met je vingers vast en trek deze langzaam maar zeker onder de batterij vandaan, in de richting van de iPhone's onderkant.

    • Herhaal de vorige procedure bij de twee overige kleeftrips.

    • Als de kleefstrips onder de batterij scheuren of afbreken en niet meer kunnen worden vastgepakt, kun je ervoor kiezen om wat isopropyl alcohol (>90%) onder de zijkant van de batterij toe te dienen, in de buurt van de gebroken kleefstrip(s).

    • Wacht ongeveer een minuutje zodat de alcohol in kan trekken en de lijm kan verzwakken.

    • Gebruik het platte einde van je spudger om de batterij op voorzichtige wijze omhoog te tillen.

    • Probeer de batterij zo rustig en gedecideerd mogelijk uit het toestel te verwijderen. Als je veel weerstand voelt, kun je wat meer isopropyl alcohol toedienen om de lijm te verzwakken. Probeer te allen tijde te voorkomen dat je de batterij met je tools doorboort of vervormt.

  32. ErjPBxpvRlydekgR
    ErjPBxpvRlydekgR
    F6vE16AJCBHKNyYq
    • Verwijder de batterij.

    • Als er nog wat alcohol onder de batterij zit, kun je dit nu wegvegen of laat je het rustig drogen voordat je je nieuwe batterij bevestigt.

    • Gebruik deze handleiding om de kleefstrips onder de batterij te vervangen.

    • Voer, na het weer in elkaar zetten van je toestel, een geforceerde herstart uit. Dit kan een aantal veelvoorkomende problemen voorkomen en probleemoplossing vergemakkelijken.

    I just buy this phone 5 months ago..and the battery health is 90%, why? I need to change the battery or not?

    andy terry -

    **before you install the new battery, plug the battery into the port, making it much easier to do than after you adhere the new battery into the phone. I found that the aftermarket battery terminal was longer than the factory batt, which complicated plugging it into the power terminal.

    Ryan Jung -

    Soooo absolutely dont do this yourself🙌🏽 unless your a mechanic because first of all they didnt send me all of the right tools🤗 and secondly the battery they gave me has an overly large component so it wont fit into my phone. And the absolute HASSEL i had to go through to even just get the package was insane it was a whole month of struggling just for the stuff to not even be right, in conclusion will NEVER order from here again..🤗

    Chanell -

    You can use a thin small long screwdriver to roll the adhesive tape around it once you have detached enough of it, it prevents it from ripping so that you don't have to use ethanol.

    Lucioh -

    You should specifically mention that the other two adhesive tabs are at the top of the battery

    pinballnc -

Conclusie

Zet je toestel, indien mogelijk, aan en test je reparaties voordat je de kleefstrips aanbrengt en je je toestel weer sluit.

Bevestig je nieuwe batterij met vooraf op maat gesneden kleefstrips of dubbelzijdige tape. Om je batterij op de juiste positie te bevestigen, breng je de nieuwe kleefstrips in het toestel aan op de plek van de oude kleefstrips en niet direct op de batterij. Vervolgens druk je de batterij op de juiste plek vast.

Om je toestel weer in elkaar te zetten, volg je deze instructies in omgekeerde volgorde. Breng nieuwe kleefstrips aan waar nodig nadat je de voorheen gelijmde gebieden met wat isopropyl alcohol (>90%) schoon hebt weten te maken.

Kalibreer je nieuwe batterij na het voltooien van deze handleiding. Dit zorgt voor een optimale performance.

Breng je e-afval naar een door R2 of e-Stewards gecertificeerde recycler.

Ging je reparatie niet zoals gepland? Bezoek dan onze pagina over probleemoplossing of stel je vraag op ons iPhone 12 mini antwoordenforum voor hulp bij het oplossen van je probleem.

Dominik Schnabelrauch

Lid sinds: 23/11/16

236585 Reputatie

23 commentaren

If you replace the battery (even with a first party one) you will need to go to Apple, unfortunately, as is for the new iPhone 13 models.

Roman -

Since iOS 17, I believe, they have a self-registering mechanism. OS will start a wizard to register replaced first-party battery without going to the store

rbhbokka -

I don't think it's stated clearly enough that the display adhesive is VERY strong and you might think you've gotton a big enough gap when sticking in a pick will actually separate the layers of the screen and break it (defintely not speaking from experience). Make sure the phone is totally, thoroughly heated and be very, very careful.

Wesley Halliwell -

+1

Tried it without the clamp for two hours and couldn‘t get it open. With clamp, it was opened within 30 minutes.

Overall battery replacement worked well, the instructions were clear enough to follow along. Would do this again… but with the clamp. ;)

schmurian -

same pried in between layer and then realized after after i separated the bottom corners that needed to go deeper

Simon Milburn -

This comment should be pinned to the top of this article / this scenario pinned in bright red... I've replaced previous iphone screens and it was nothing like this. I also ruined my screen by prying in between the screen layers and not underneath as I could not comprehend just how insanely strong the adhesive is even after many rounds of heating. Give the ~100$ cost of apple repair and the 50$ cost of this kit, i would NOT risk doing this repair, no way.

James Chase -

is it oem apple battery, because at some photo shows(Ifixit) and another shows (apple) ... wait your answer?

karim -

Hi karim,

the batteries that you can buy for iPhones in our shop are not OEM.

Dominik Schnabelrauch -

you should always ask the shop where you go if you will receive a warning message saying the battery was not changed by apple. unless the shop knows how to properly install the right batteries, you will get that message.

nicholas houllis -

I have a problem every time I soldered the cell to the new battery it no longer works could you help me with a tip!!! I've been watching the video more than 100 times I'm interested in learning, but even so the original flex burns

andy terry -

Ich habe bereits einige Akkus getauscht. Aber das Display vom 12 mini ist wirklich heftig verklebt. Ich habe kaputt gemacht.. keine Chance. Durch das erwärmen hat sich das Glas von der Platine gelöst oder ich habe es durchs hebeln getrennt.. Jedenfalls zeigt das Display nichts mehr an. Also nochmal der Hinweis. Überlegt es euch gut! evtl sind 99€ für einen Akkutausch bei Apple besser investiert.

Möhre -

Fantastic instructions, thank you very much. The phone was already partially opened due to the battery being really bloated. So I did not need to use the dedicated tools.

Nino -

Don't do this repair, just don't. The battery adhesive is very strong, but that's not the problem. When you finally get the battery replaced, you will have a permanent badge notification on your settings app that indicates that you are not using an OEM battery. But that's not even the problem. When I did this repair, I was connecting the new battery and sparks and smoke came out, and now my screen has a line across it. Obviously this is user error to an extent, but I have replaced iphone batteries around 15 times, no exageration, and I've been WAY rougher than I was in this case and nothing bad happened. I still have no idea what I did to make this happen, I can guarantee the battery connector only touched the area on the board where it was supposed to connect. I couldn't tell you if this is because it's not an OEM battery, or if Apple is making these phones more fragile on the inside (though I suspect it's a bit of both), but ultimately it's just not worth it do attempt this repair, go to an Apple store.

Zac Soldaat -

This is a solid guide. I was able to replace my battery with the fix kit and these instructions. Unfortunately, I destroyed my display in the process. Probably the same issue that Wesley pointed out here.

I'm guessing I didn't have the adhesive loosened enough along the right-hand side. I was sliding the pick up along that edge, apparently hulked out on it, and a crack shot across the screen. I applied more heat and carried on from there. Once everything was reconnected, I hit the power button and could feel the haptic feedback from the phone booting up, but there was nothing on the display.

Learn from my mistake and be absolutely sure the adhesive is softened enough that you don't have to apply much force to separate the screen from the body (and maybe pick up the Anti-Clamp, I think I would have had a better time with that thing).

Seth Blagg -

I performed this repair twice. First time, I damaged the screen slightly before realizing the thin plastic frame around the screen was not coming up. If you are not sure you are getting the pick under the plastic, then don’t proceed. Take more time to heat and suction. On the second iPhone I pulled out the infrared thermometer, turned my hairdryer to max and kept the iPhone at a nice toasty 140 degrees Fahrenheit while letting the Anti-Clamp do it's work. Still took slightly over 30 minutes to get the screen off. The extra heat also seemed to help keep the screen adhesive stay in good shape and attached to the base. I did not feel the need to replace it which saved me an hour.

Jonathan Flower -

First time success. Display damage can be caused only if you are not patient enough and apply force uneven, screen glass is as strong as the adhesive, if adhesive is warm enough, screen will come out with just constant tension.
Tricky part is to remove all leftovers of adhesive, in my case most of it left inside of the case and needed a lot of alcohol to clean it fully.

rbhbokka -

iFixit, you need to update this tutorial with better warnings. Kinda feel like you glossed over the difficulty to sell your kit.

Like others have said, this is REALLY tough. Do not recommend. Busted my screen — I believe I didn't get the pick under the plastic, so it tore some parts when I opened it. I'd recommend ONLY trying this if you're willing to break your phone.

sjthompsonjr -

I think they should include the whole process of taking apart AND PUTTING BACK TOGETHER. The cleaning of the old gasket took almost 2HOURS TO REMOVE, THIS IS THE SECOND IPHONE I HAVE WORKED ON WITH IFIXIT. PART OF THE PROCESS SHOULD BE PUTTING BACK TOGETHER AND WAY TO CLEAN OLD SCREEN GASKET, IF THIS KEEPS UP I WILL START USING YOU TUBE ONLY FROM NOW ON!!!!!

PAUL WHEELER -

So how do you put the screen back on? Maybe i overlooked it but i didnt see that section.

Chanell -

The screen frame/bezel stayed attached to the phone. This worked out fine and the replacement screen adhesive still worked. You just have to improvise with the guide. Also Clampy is awesome and is clearly far superior to the one included in the kit.

Ross -

Unfortunately, this was not successful and the phone is now broken. The reason was that it was not the adhesive between the bezel and the display that came loose, but the adhesive between the display and the circuit board with the sensors and the mounting bracket - it opened easily, but unfortunately in the wrong places. I used a processor controlled hot air system. I have no idea what the reason for that was. So please be careful and Check that Part

R Sch -

@paulwheele61622 exactly, this is half of a tutorial.

pinballnc -

@rsch86129 I had similar issues, with the adhesive holding the screen assembly together giving out, causing the layers to separate. This was despite heating the edge for 3-4 minutes, till it was too hot to hold.

The battery seems to work, as I get haptic responses from the phone, but the display is now broken.

While the guide has warnings, I don't think they emphasise just how easy it is to break the screen, due to the strength of the adhesive.

I really wish I had come to this comment section and seen how much trouble people had, as I wouldn't have bought the replacement battery.

What was supposed to be a simple $90 fix is now $250.

Akiller47 -