
Inleiding
Leer met behulp van deze handleiding hoe je het scherm van je iPhone 5s vervangt. Dit onderdeel wordt geleverd met de vooraf geïnstalleerde naar voren gerichte camera, oorstukspeaker en sensorkabel, wat reparaties gemakkelijker maakt.
Het enige wat je zelf moet doen is het verwijderen van het oude scherm en het overzetten van de thuisknop uit je oude naar je nieuw scherm, zodat de Touch ID-functie (vingerafdrukherkenning) behouden blijft.
-
-
Zet je iPhone volledig uit voordat je hem uit elkaar gaat halen.
-
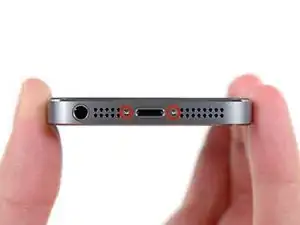
Verwijder de twee 3.9 mm lange pentalobe schroefjes aan beide zijden van de Lightning-aansluiting.
-
-
-
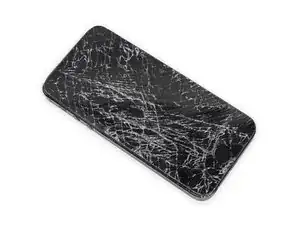
Als het scherm van je telefoon is gebroken, gebruik dan tape om de scherven aan elkaar te plakken. Zo voorkom je extra beschadigingen en letsel.
-
Gebruik lagen helder plakband om het scherm weer tot één geheel te maken.
-
-
-
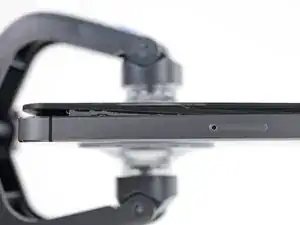
Ongeacht welke tool je gebruikt, zul je de complete schermmodule uit de telefoon moeten krijgen.
-
Als het glazen scherm los begint te komen van het plasticen frame, zoals je op de eerste foto kunt zien, schuif je een plastic openingstool tussen het plastic frame en de metalen telefoon om de metalen klemmen uit de behuizing te klikken.
-
-
-
Trek het blauwe handvat naar achteren om de armen van de anti-klem te ontgrendelen.
-
Schuif de armen over de linker- of rechterzijde van de iPhone heen.
-
Positioneer de zuignappen in de buurt van de onderkant van de iPhone en net boven de thuisknop. De ene zuignap komt aan de voorkant en de andere zuignap komt aan de achterkant te zitten.
-
Druk beide zuignappen aan zodat ze zich stevig vastzuigen.
-
-
-
Trek het blauwe handvat naar voren om de armen te vergrendelen.
-
Draai het handvat 360 graden met de klok mee, of totdat de zuignappen uit beginnen te rekken.
-
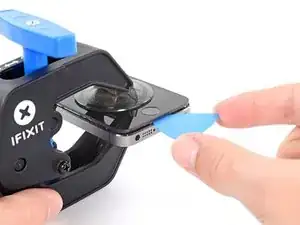
Als de anti-klem een opening heeft weten te creëren die groot genoeg is, breng je een openingsplectrum in de opening onder het scherm aan.
-
Sla de volgende twee stappen over.
-
-
-
Als je geen anti-klem hebt, kun je een enkele zuignap gebruiken om het scherm uit de behuizing los te krijgen:
-
Plaats de zuignap net boven de thuisknop.
-
-
-
Terwijl je de behuizing naar beneden drukt, trek je aan de zuignap om het scherm los te trekken uit de behuizing.
-
Gebruik een plastic openingstool om de behuizing langs de rand naar beneden los te drukken terwijl je blijft trekken aan de zuignap.
-
-
-
Trek aan het kleine nopje om de zuignap los te maken van het scherm.
-
Verwijder de zuignap voorzichtig van het scherm.
-
-
-
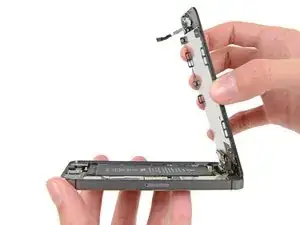
Open de telefoon nét genoeg om toegang te krijgen tot het metalen plaatje dat over de thuisknopkabel is geplaatst.
-
Alleen de originele homeknop kan gebruik maken van de Touch ID-functie. Als je de kabel kapot trekt en een nieuwe homeknop moet installeren, heb je alleen een 'gewone' homeknop, zonder de Touch ID-functies.
-
Gebruik de punt van een spudger om het plaatje los te werken en gebruik vervolgens een pincet om deze voorzichtig weg te halen.
-
-
-
Als je de connector eenmaal los hebt gemaakt, klap het scherm dan voorzichtig omhoog vanaf de kant waar de thuisknop zit, waarbij je de bovenkant van de telefoon als een scharnier gebruikt.
-
Open de telefoon totdat het scherm ongeveer een hoek van 90º beschrijft en laat deze dan tegen een object leunen zodat deze blijft staan terwijl je verder werkt aan de telefoon.
-
Plaats eventueel een elastiek om het scherm en het object heen, zodat deze blijft staan terwijl je eraan werkt. Dit voorkomt ook dat er onnodige druk op de schermkabels komt te staan.
-
Eventueel kun je ook een niet-geopend blikje drinken gebruiken om het scherm omhoog te houden.
-
-
-
Verwijder de twee 1.6 mm lange Phillips #000 schroeven die het metalen plaatje over de batterijaansluiting aan het logic board bevestigen.
-
-
-
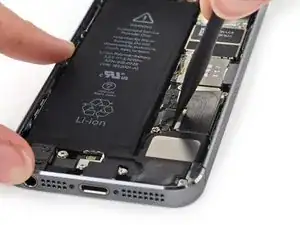
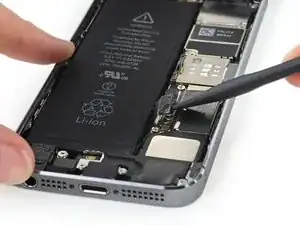
Gebruik het platte einde van een spudger om de batterijaansluiting uit het contact op het logic board op voorzichtige wijze omhoog te duwen.
-
-
-
Verwijder de volgende schroeven om de beschermingsplaat los te maken van de behuizing:
-
Eén 1.7 mm lange Phillips #000 schroef
-
Eén 1.2 mm lange Phillips #000 schroef
-
Eén 1.3 mm lange Phillips #000 schroef
-
Nog één 1.7 mm lange Phillips #000 schroef
-
-
-
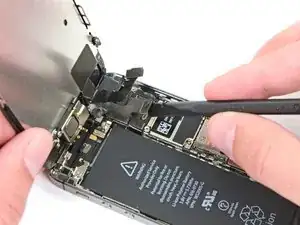
Verwijder het metalen plaatje over de kabel van de voorste paneelmodule van het logic board.
-
-
-
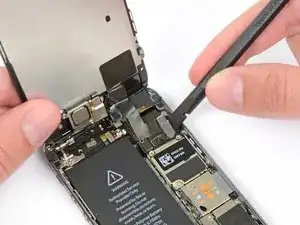
Gebruik een spudger of je nagel om de naar voren gerichte camera- en sensorkabel los te koppelen.
-
-
-
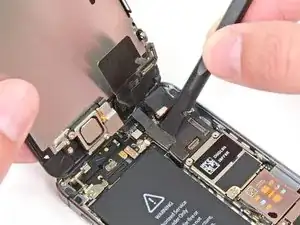
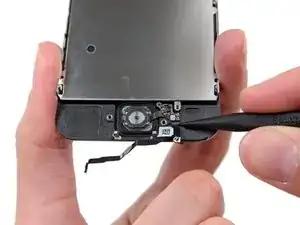
Verwijder de losse kruiskopschroef die de kabel van de thuisknop op zijn plaats houdt.
-
Als je vervangende onderdeel deze schroef en dit veercontact niet bevat, zul je deze over moeten zetten van de oude naar de nieuwe kabel.
-
-
-
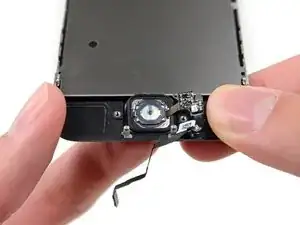
Verwijder twee 1,4 mm. kruiskopschroeven die de beugel van de thuisknop op zijn plaats houden.
-
-
-
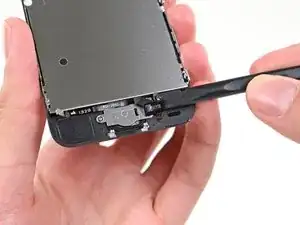
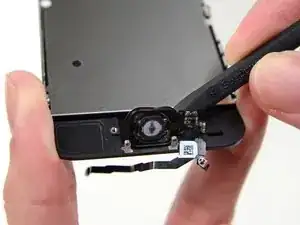
Gebruik de punt van een plastic priem om de kabel los te werken van de behuizing.
-
Werk je plastic priem zachtjes onder de kabel, zodat je de kabel los kan maken van de behuizing.
-
-
-
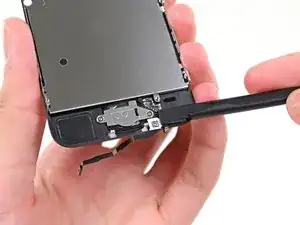
Druk voorzichtig op de thuisknop om hem aan de linkerbovenkant los te maken van het scherm. De knop zit vast met een soort heel dunne rubberen sticker.
-


Volg bovenstaande instructies in omgekeerde volgorde om je toestel weer in elkaar te zetten.
Vergelijk je vervangende onderdeel met het originele onderdeel — het kan zijn dat je meerdere onderdelen mee over moet zetten of beschermlagen voor de lijm moet verwijderen voordat je het nieuwe onderdeel kunt installeren.
Breng je e-afval naar een R2 of e-Stewards gecertificeerd recycle-station].
Ging je reparatie niet zoals gepland? Check dan ons antwoordenforum voor hulp bij het oplossen van je probleem.

81 commentaren
Excellent guide, many thanks to the author and commenters. I replaced the rear facing camera at the same time and had no issues with parts or tools.
Agree with the comment from Nathan for Step 17 to be careful not to displace the captive spring, it would have slipped away from me if I had not read the comment. Tricky to manouvere that part.
Get the magnetic mat, makes things a lot easier. Thanks again.
Matt -
It would be helpful if the guide used tools that were listed as required when purchasing the replacement screen. When I ordered the screen, the site suggested the iopener, which i purchased. It was not involved in the repair though the iclack tool was referenced.
lkboak -
Hi, i have problem with my earpiece speaker after i reassemble my screen, it doesn't work and i should talk with the speaker, why it happen and what should i do???
Tanks.
This same thing happened to me. I had to take the front camera/sensor assembly out of my old device and use it with the new display assembly. Thankfully that part wasn't damaged or I would have been screwed.
Jorden -
I used a white terrycloth hand towel as my work surface and to position and retain all the screws and part in their relative positions, so I didn't mix things up. I also magnetized the screwdriver tips and that made it very easy to deal with these tiny, tiny screws.
Magnus Dalen -
For a secure working, put a small pot with lid on your workplace. When the battery starts burning, throw it in the pot, close it with the lid and get the pot safely out of the building, e.g. on the balcony or throw it out of the window. Do not try to extinct the battery with water, just let it burn out outside. This might take some hours.
Raymond Willems -
This is a really helpful one! My battery caught fire but luckily it was only one cell and not the entire battery. So it was done after a few seconds and I could go on with the replacement.
Matthias Blab -
Directions should say “use the P2 screwdriver head.”
William Kolb -
This step should have included that information. It was very helpful and important. Thank you very much.
Jeffery -
ifixit supplied a set of replacement philips screws (marked “Liberate!”). Thanks but I’m sticking with the pentalobe since they fit more securely than philips which have a chance of stripping if not held with the right amount of pressure.
Don Libes -
What are you supposed to do if the screws are stripped or won’t come out. No luck with the tweezers either.
ibrokeit -
Yep i‘ve had the same problem. One screw out, one that won‘t budge!!!
Stennett -
“cheater” reading glasses are a big help. Carolyn
Carolyn Green -
In this step, it is the P02 screwdriver from the kit (see that the nib has five sides , exactly for ‘pentalobe’ screws). All the other steps involving screws it was the Philips 000 (there was a third screwdriver Y 000 in the kit which I did not use). Did not have any problems at all removing and readding screws back through the process.
Andre Silva -
I'm trying to fix my 5s’s but one has some water damage, and impeccable screen but won't turn on,then I have another one that has no water damage, screens a bit busted but won't turn because of the screen. If I use the good screen from the water damaged phone would it work?
samuel.m.fudge -
After removing the phone from a very good plastic case and before I started the repair I cleaned the entire phone with a soft cloth misted with rubbing alcohol. That removes all the grunge which builds up in the seams of the phone and the small spaces inside the case. Having a clean phone to work on makes the job a lot easier and prevents grunge from falling into the phone.
David Park -
General comment about the screwdriver tips and reassembly: If you get a screw nicely set in place using tweezers and then use the screwdriver, the magnet will probably pull the screw out before you can tighten it. If this is a problem use just the tip (without the handle) to start the screw, then tighten using the handle.
Kevin Patfield -
DO NOT disconnect the screen.
Benjamin Piscopo -
Having two SE’s needing batteries, I ordered an extra battery. The extra battery did not come with the Phillips replacement screws. It would be helpful if every battery came with a set of case replacement screws.
Dorothy Campbell -
Upon reassembly I found it useful to squeeze the phone right above the screws so everything lines up nice. I noticed that when I didn’t do this the new Phillips screws were trying to go in crooked. So just holding the phone together helps.
Samara Sullivan -
hello i am replacing my iphone 5s battery but i am stucked because the adhesive broke whiles pulling it out
before i started i made sure my battery was 0% but i am afraid that when i mistakenly puncture it with the spudger it might catch fire
please is the battery capable of catching fire when it has no power (0%)?
please can someone give me the honest answers before i continue
thank you
George Rockson -
The screws in my iPhoneSE were not P2 (1,2mm) but P1 (0,8mm). I had to order an extra screwdriver which is not available at iFixit.
Tadeus Nawka -
Instructions were fine until removing the battery , No adhesive strip at the bottom of the battery . Unable to remove battery as the battery was stuck sold with adhesive but could not get at the adhesive strip to remove battery . seems whoever put the battery together did not put a strip across the bottom . Had the phone from new and this was the first time I tried to replace the battery . Now I need a new phone
J Caley -
Instructions fine until removing the battery . No strip at bottom of the battery hence impossible to get at the adhesive strips around the battery . This must have been done in the factory as I have had the phone from new and this was the first time the battery was being replaced . Cheesed off as I now need a new phone
J Caley -
30 minutes - to an hour? I gave up after removing the screws and spending an hour trying to lift the display with a suction pad.
harwood -
iPhone 5s maderbored
Rahan Ali -