Inleiding
Leer hoe je het scherm van je iPhone 7 Plus vervangt. Dit onderdeel wordt geleverd met reeds vooraf geïnstalleerde voorste module, oorstukspeaker en het EMI-schild, wat reparaties vergemakkelijkt.
Om je thuisknop te laten werken, zul je de thuisknop van je oude scherm moeten verwijderen en deze over moeten zetten naar je nieuwe scherm.
Gereedschap
Onderdelen
-
-
Schakel je iPhone uit voordat je met de demontage begint.
-
Verwijder de twee 3.4 mm pentalobe schroeven aan de onderkant van de iPhone.
-
-
-
Als het glas van je scherm gebroken is, kun je het verder breken van het glas en lichamelijke schade tijdens de reparatie voorkomen door het glas te beplakken met tape.
-
Leg overlappende stukken doorzichtige tape over het scherm van de iPhone totdat het volledig is beplakt.
-
Als het gebroken scherm het onmogelijk maakt om een zuignap vast te laten zuigen op het scherm, kun je proberen een sterk stuk tape (zoals ducttape) dubbel te vouwen in een handvat, dit op het scherm te plakken en zo het scherm omhoog te tillen.
-
-
-
Gebruik een föhn of een warmtepistool, of prepareer een iOpener en leg deze op de onderkant van de iPhone gedurende ongeveer een minuut om zo de lijm die eronder zit te verzachten.
-
-
-
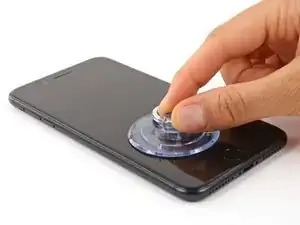
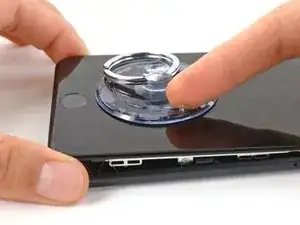
Trek de zuignap omhoog met een stevige, constante kracht om zo een kleine opening tussen het voorste paneel en de achterste behuizing te creëren.
-
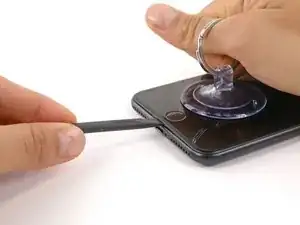
Steek het platte einde van een spudger in de opening.
-
Draai je spudger lichtjes omhoog terwijl je aan de zuignap trekt, om de opening tussen het scherm en de achterste behuizing iets te vergroten.
-
-
-
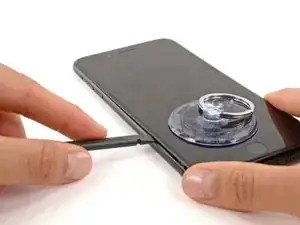
Steek het platte einde van de spudger aan de onderkant van de iPhone tussen het voorste paneel en de achterste behuizing .
-
Schuif je spudger langs de linkerkant van de telefoon omhoog, beginnend bij de onderkant en in de richting van de volumeknoppen en de stilteknop, en snijd onderweg alle lijm door die het scherm op z'n plek houdt.
-
-
-
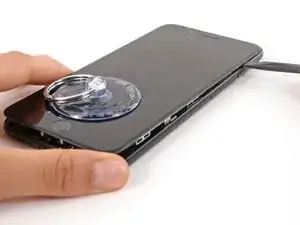
Verwijder de spudger uit de linkerkant van de telefoon en steek het platte eind in de rechter onderhoek.
-
Schuif de spudger langs de rechterkant van de telefoon omhoog naar de rechter bovenhoek en snijd alle lijm die het scherm vasthoudt door.
-
-
-
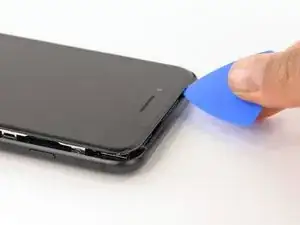
Schuif een openingsplectrum onder het scherm en langs de bovenkant van de telefoon om de laatste lijm door te snijden.
-
-
-
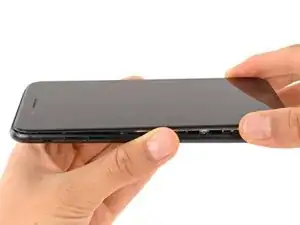
Trek de schermmodule lichtjes weg van de bovenkant van de telefoon om deze los te krijgen uit de plastic klemmen die de module aan de achterste behuizing bevestigen.
-
Open de iPhone door het scherm open te slaan vanaf de linkerkant, net zoals je de achterkant van een boek zou openslaan.
-
-
-
Verwijder de volgende vier tri-point Y000 schroeven die het plaatje op de onderste schermkabel aan het logic board bevestigen:
-
Drie 1.2 mm schroeven
-
Eén 2.6 mm schroef
-
-
-
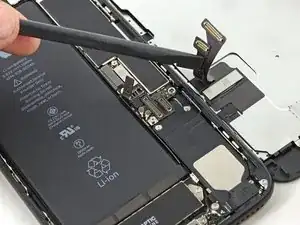
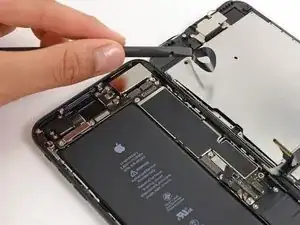
Gebruik de punt van een spudger om de batterijaansluiting uit het contact op het logic board omhoog te duwen.
-
-
-
Gebruik het platte einde van een spudger of je nagel om de twee onderste schermaansluitingen los te koppelen door deze in een rechte beweging uit het contact op het logic board omhoog te duwen.
-
-
-
Verwijder de drie tri-point Y000 schroeven die het plaatje bovenop de aansluiting van de sensormodule in het voorste paneel bevestigen:
-
Eén 1.3 mm schroef
-
Twee 1.0 mm schroeven
-
Verwijder het plaatje.
-
-
-
Koppel de aansluiting van de sensormodule in het voorste paneel los van het contact op het logic board.
-
-
-
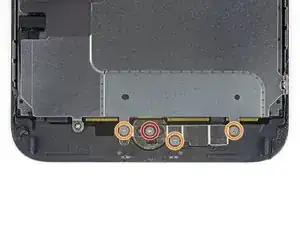
Verwijder de vier Y000 schroeven die het plaatje op de thuisknop/Touch ID-sensor bevestigen:
-
Eén 1.1 mm schroef
-
Drie 1.3 mm schroeven
-
-
-
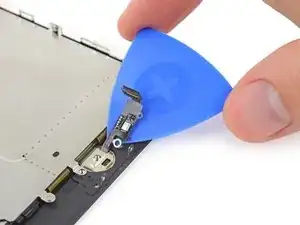
Gebruik een openingstool om deze onder de linkerkant van de kabelaansluiting van de thuisknop te duwen en deze zo uit het contact omhoog te duwen.
-
-
-
Duw de onderliggende aansluiting voorzichtig omhoog en haal deze uit de buurt van de thuisknop/Touch ID-kabel.
-
Als je aansluiting niet gemakkelijk omhoog komt, kun je een föhn of een iOpener gebruiken om deze te verwarmen en de lijm die de aansluiting vasthoudt zo te verzachten, om het vervolgens nog eens te proberen.
-
-
-
Draai de schermmodule om. Gebruik een föhn of prepareer een iOpener en leg deze op de onderkant van het scherm gedurende ongeveer 90 seconden om zo de lijm eronder te verzachten.
-
-
-
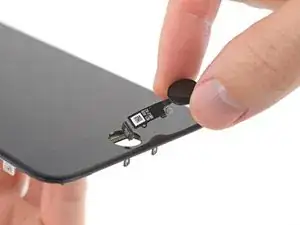
Gebruik een openingsplectrum om de lijm die de kabel van de thuisknop/Touch ID-sensor aan de achterkant van het schermpaneel vasthoudt, los te maken.
-
-
-
Verwijder de thuisknop/Touch ID-sensormodule door deze door het gat in de voorkant van het scherm te begeleiden.
-
Vergelijk je nieuwe onderdeel met het originele onderdeel om te zien of je nog meer onderdelen van je oude naar je nieuwe onderdeel over moet zetten of om te zien of je beschermfolie moet verwijderen voordat je je nieuwe onderdeel kunt bevestigen.
Om je toestel weer in elkaar te zetten, volg je deze instructies in omgekeerde volgorde.
Breng je e-afval naar een door R2 of e-Stewards gecertificeerde recycler.
Ging je reparatie niet zoals gepland? Bezoek dan onze pagina over probleemoplossing of stel je vraag op ons antwoordenforum voor hulp bij het oplossen van je probleem.
60 commentaren
Only the glass is broken on my screen. I don't need a new digitizer. Is there a way to just replace the glass? Seems like that would be much cheaper. Thanks!
Unfortunately, by the nature of the technology, cracked glass likely means your digitizer is out of commission (does touch still register on the cracked screen?). Below that is the LCD, and that might not be broken (if the image is fine, then the LCD is likely fine). The problem is that these components are VERY VERY difficult to separate. This makes the individual replacements a nightmare. I hate to say anything is impossible, but separating these components will feel impossible without expensive tools and extensive knowledge. It will also likely end in a mess of broken components. When there is a will, there is a way. But the separation project will demand a lot of will.
Our store is having trouble with the earpiece speaker working after screen repair on just the 7 Plus, not with the 7. We have tried different techniques and still get figure what we are doing wrong. Has anyone else had this problem and know the solution?
Joe Cox -
My earpiece speaker also won't work with new screen... this is frustrating. Any solution
Ben -
There are some connections for the earpiece speaker that can be a little tricky to get properly connected during reassembly. If you look at the third photo in step 22 of the iPhone 7 Plus teardown you can see four copper pads on the cable, and four protruding copper connections on the speaker. For starters, make sure that these are all clean. When reassembling, make sure that the metal pads on the cable firmly touch the metal pins on the speaker. These are actually electrical connections, and are a little tougher to seat properly because they don't snap in like press or ZIF connectors. If the metal is all lined up and pressed against each other, then electricity should be flowing and sound should result! If the earpiece speaker was not removed and this guide was followed as is, it is most likely an issue with the connectors in step 19 of this guide.
I am an amateur and have successfully transferred all components to a replacement screen earphone and home button as well as the large metal bracket on the back without a problem. During the process though the flex cable for the ear piece gave me some issue because the flex cable is actually 2 separate pieces that are held together by some adhesive. Underneath it there are some connectors that have to line up perfectly. If you are doing repairs on a hot surface that adhesive will become more likely to separate when you try to relieve it from the broken screen. Keep that in mind. If it does come separated like mine did during replacement simply line the connectors up and give it a squeeze for a few seconds to get the adhesive to take then let it cool down before re installation.
Make sure when you are connecting the earpiece ribbon cable you attach it the correct way. It seems like it should be connected with the excess of the ribbon cable going upwards but that is incorrect and will render the speaker useless. You have to make sure when you connect it the the excess is going downwards. This will make the ribbon cable appear as though it is twisted tangled but that is how it has to be connected. I wish I could upload pictures
why do you need to change the touch ID sensor? if your replacement screen comes with a touch ID, do you still need to swap it?
kjding -
For security reasons, each iPhone's Touch ID sensor is uniquely paired to the logic board at the factory. If you replace your screen without transferring over your original home button, you will lose Touch ID functionality. If your replacement screen came with a replacement home button anyway, take it off and carefully replace it with your original home button.
For the 7, the home button also must detect a fingerprint in order for the home button functionality to work. Because the security feature turns off the TouchID function, the iPhone stops trying to detect a fingerprint and makes the home button not work at all. You want to keep the original home button and be careful not to rip the cable because for this particular generation of iPhone, there is no replacing the home button.





















The recommendation of discharging the battery is completely unnecessary. Even a 25% charged battery can explode. Completely ridiculous suggestion.
pargoff -
The risk of thermal runaway on these batteries decreases with the battery's SOC (state of charge). Below 50% charge the risk is fairly low, and at 25% charge the risk of a thermal event is near zero. If I recall correctly, the same suggestion appears in Apple's official (non-public) service manuals for the iPhone.
Jeff Suovanen -
@jeffsu Yes, that is correct. Apple does require all certified staff to discharge the battery below 25%. This is an industry standard for all LiION batteries. If you don’t want to do this, just make sure to not puncture the battery and disconnect it first thing.
iHelpU.Tech -
Hang on a second here, doesn’t the Ifixit part I ordered come with the seals? The display assembly? It doesn’t. Now I have to wait another week?!
Vanessa Pinter -
How do you turn off if the screen isn’t responding to touch?
adam -
The replacement battery came with the seal—but how do you put it on???
lkollar -
Instructions for replacing the seal are here: Vervanging van de kleefstrips van een iPhone-scherm
bester -
I just found the instructions on how to install the seals AFTER I was completed and had to figure it out. Maybe, just maybe you should link this somewhere on the guild instead of buried in a comment. Just a thought.
Charles Meitin -
Step 1 is: Read through all the steps and comments or the method prior to starting on this Step 1. There's a lot of much needed information and experience that you can learn from which will reduce the chance of struggling, wasting time or even breaking your device.
My favourites are:
Use a hot water bottle.
Label all screws you remove with their size and location on a piece of paper with double sided sticky tape.
Test the lightning assembly at step 13
There is a Standoff driver bit in the box, don't use a screwdriver.
etc...
Neil Eriksen -
A tip for looking out for all those little screws. I used an ice block tray, for all the little screws etc. I numbered each with the step number, as in the instructions, but not all steps have bits to look out for. Where two different size screws are used I had a tray for each size and marked step a and step b. For this I coloured each tray sticker with the colour of the screw as shown in the instructions. All this worked a treat with no confusion or using the wrong part.
Herb
Herb Adler -
The screw size for those with a screw set is P2.
Gareth Flandro -