
Inleiding
De trilmotor zorgt voor de trillingen en haptische feedbackfuncties van je iPhone. Volg deze handleiding om de trilmotor in een iPhone 7 te verwijderen en/of vervangen.
Deze handleiding toont je hoe je de schermmodule volledig verwijdert; dit heeft als doel te voorkomen dat je de schermkabels per ongeluk vastklemt of beschadigt tijdens het werken. Als je denkt dat je de trilmotor kunt verwijderen zonder de schermkabels in gevaar te brengen, kun je de stappen die je tonen hoe je de schermkabels loskoppelt, overslaan.
-
-
Schakel je iPhone uit voordat je begint deze uit elkaar te halen.
-
Verwijder de twee 3.4 mm pentalobe schroeven aan de onderkant van de iPhone.
-
-
-
Trek de blauwe hendel naar achteren zodat de anti-klem vrij kan bewegen. (Op deze manier deactiveer je de openingsstand van de anti-klem.)
-
Schuif de armen over de linker- of rechterzijde van je iPhone.
-
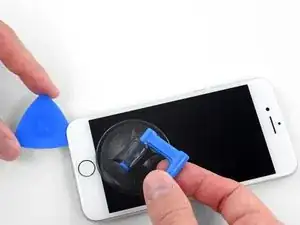
Plaats de zuignappen dichtbij de onderkant van de telefoon—één op de voorkant en één aan de achterkant.
-
Druk beide zuignappen aan, om zuigkracht uit te oefenen op de gewenste plek.
-
-
-
Trek het blauwe handvat naar voren om de armen van de anti-klem te vergrendelen.
-
Draai het handvat 360 graden met de klok mee of tot de zuignappen uit beginnen te rekken.
-
Zorg dat de zuignappen op één lijn met elkaar zitten voordat je begint met het openen van het toestel. Als je ziet dat de zuignappen niet meer op één lijn zitten, maak je ze los en breng je ze weer op de juiste positie aan.
-
-
-
Verwarm een iOpener en plaats deze tussen de armen van de anti-klem op je telefoon.
-
Vouw de iOpener zodat deze op de onderkant van de iPhone komt te liggen.
-
Geef de lijm een minuutje de tijd om los te komen zodat de anti-klem een opening kan creëren.
-
Steek een plectrum in de opening onder het scherm.
-
Sla de volgende drie stappen over.
-
-
-
Het verwarmen van de onderkant van de iPhone helpt de lijm, die het scherm op z'n plek houdt, te verzachten, wat het makkelijker maakt om de telefoon te openen.
-
Gebruik een föhn of een warmtepistool, of prepareer een iOpener en leg deze op de onderkant van de iPhone gedurende ongeveer 90 seconden om zo de lijm die eronder zit te verzachten.
-
-
-
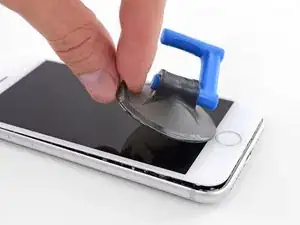
Trek de zuignap omhoog met een stevige, constante kracht om zo een kleine opening tussen het voorste paneel en het frame van de telefoon te creëren.
-
Steek een openingsplectrum in de opening.
-
-
-
Schuif je openingsplectrum langs de linkerkant van de telefoon omhoog, beginnend bij de onderkant en in de richting van de volumeknoppen en de stilteknop, en snijd onderweg alle lijm door die het scherm op z'n plek houdt.
-
Stop in de buurt van de linker bovenhoek van het scherm.
-
-
-
Steek je openingsplectrum opnieuw in de rechter onderhoek van de iPhone en schuif deze nu langs de rechterzijkant omhoog. Snijd ook hier alle lijm door die je onderweg tegenkomt.
-
-
-
Trek met beleid aan de zuignap om zo de onderkant van het scherm op te tillen.
-
Trek aan het kleine lipje op de zuignap om deze van het voorste paneel te kunnen verwijderen.
-
-
-
Steek een openingsplectrum onder het scherm en schuif deze langs de linker onderhoek en linkerzijde omhoog om de laatste lijm door te snijden.
-
-
-
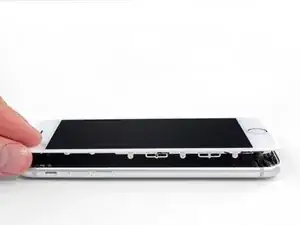
Schuif de schermmodule een beetje omlaag (weg van de bovenkant van de telefoon) om deze los te krijgen uit de klemmen die het scherm aan de achterste behuizing bevestigen.
-
-
-
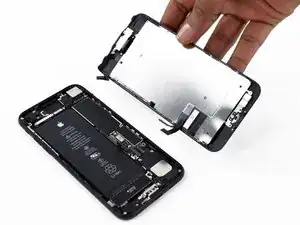
Open de iPhone door het scherm van de linkerkant naar rechts te kantelen, alsof je de achterste kaft van een boek opent.
-
Om het scherm open te houden en aan de telefoon te kunnen werken, kun je het scherm tegen een object laten leunen.
-
-
-
Verwijder de vier tri-point Y000-schroeven die het plaatje op de onderste batterijaansluiting bevestigen, met de volgende lengtes:
-
Drie 1.2 mm schroeven
-
Eén 2.4 mm schroef
-
-
-
Gebruik de punt van een spudger om de batterijaansluiting uit het contact op het logic board omhoog te duwen.
-
-
-
Gebruik een spudger of je nagel om de twee onderste schermaansluitingen los te koppelen door deze in een rechte beweging uit het contact op het logic board omhoog te duwen.
-
-
-
Verwijder de twee 1.3 mm Phillips #000 schroeven die het plaatje bovenop de aansluiting van de sensormodule in het voorste paneel bevestigen.
-
Het kan voorkomen dat sommige van deze modellen Y000-schroeven bevatten. Apple heeft op een gegeven moment gekozen deze specifieke schroeven in plaats van de Phillips-schroeven te gaan gebruiken.
-
-
-
Koppel de aansluiting van de sensormodule in het voorste paneel los van het contact op het logic board.
-
-
-
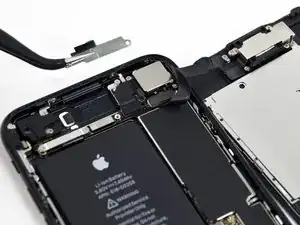
Verwijder de twee 1.9 mm Phillips schroeven die de barometrische ventilatieopening aan het achterste behuizing bevestigen.
-
-
-
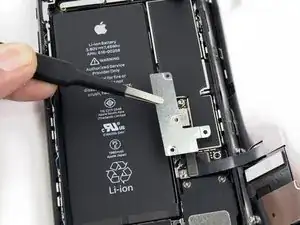
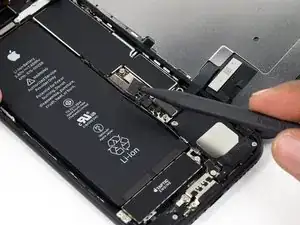
Gebruik het platte einde van een spudger om de trilmotoraansluiting los te koppelen van het contact op het logic board.
-
-
-
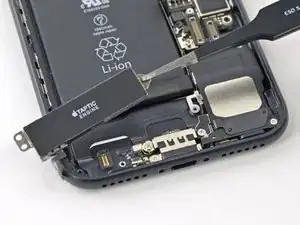
Verwijder de drie 1.6 mm Phillips schroeven die de trilmotor aan de achterste behuizing bevestigen.
-


Om je toestel weer in elkaar te zetten, volg je deze instructies in omgekeerde volgorde.

20 commentaren
Good job and prof.
Bravo!!!!!!!!¡!
omanvaal -
Thank you for your amazing instruction, it was my first phone repair ever! iPhone is fully functional again!
Can anyone confirm 7/7P's pentalobe screws have a ring of seal near the screw head?
Cooper Chase -
Confirmed, the screws have a black ring seal around the head.
rcheing -
Can’t get the display front
Bernadette Pfeifer -
From personal experience, I highly recommend before doing this procedure or any other, that you do a backup of your phone (preferably local) in case your procedure goes south.
ballina5ny -
I purchased the repair tools with the replacement battery from iFixit. The tools include a screw driver and three heads none were labeled 3.4 mm. I think the one that fit the pentalobe screws was labeled Y000. The guide should identify the screw driver head supplied by the kit not 3.4mm.
Mark Lieberman -
in the iphone 7 replacement battery kit from iFixit, the screwdriver that fits the 3.4 mm pentalobe screws is labeled P2 (and not Y000)
Jan-Tijn Oppermann -
3.4 mm is the height of the screw and is not related to the screw driver code.
Ahmad Vaziri -
the screwdriver PH000 does not work i wasted two screws and now they dont have the 4 cross mark they are now a circle, i buyed it all from Paraguay and it doesnt work, had to assembly back the parts because i got stuck like i mention with some screws, well im just going to send to a professional to install, thanks
Martin Frutos, Nuñez -
The bottom screws are Pentalobe, not Phillips.
Bram Driesen -
Before starting, I would recommend backing up your Iphone’s data just in case.
Jon Moylan -
If you managed to make it to this section, just send the phone into apple for 50 + 6 dollars shipping. The ribbon cables on the screen are designed to break. I can literally twist on the rest of the cable and it won’t fall apart but there is a diagonal section where it snaps. This is the fault of apple and the fault of ifixit for misrepresenting the fragility of the cables.
Ryan Huebert -
Had to reheat it a few times for a minute each with a hairdryer to get the seal to break after pulling and rocking the suction
Cynthia Lamb -
I’m technically challenged. Is there a premier national service who can professionally install a replacement battery got my 7 +?
Richard -
Do the screws come out in total?
YVES THEUGELS -
They may come out or may not. If you loosen as much as you can and they don't come out you should still be able to pry open the bottom. Once you get the screen off you can then push the screws out from the inside.
Anthony Falabella -
Is it the P2 you should use for the bottom??
YVES THEUGELS -
I heated the bottom of the phone with a hairdryer and then used a syringe to put a couple of drops of acetone directly into the bottom two screw holes. I GENTLY pulled on the screen with the suction cup and used the pry tool to GENTLY separate the screen. The sealant is applied around the entire display so be very careful pulling it off so you don’t break the fragile display cables.
Anthony Scaminaci -
At first it was very difficult to open, per instructions. I used a heat/ice pack and nuked it for 1 minute. The pry tool wasn’t working so I carefully used my pocket knife to wedge the cover open. The rest of the procedure went well until I cracked the glass while trying to get the top right corner to pop off. Other than that mistake, all went well. Tip: before setting the new battery, attach the battery connector first and leave enough room for the taptic engine, or better yet, place the taptic engine before adhering the replacement battery. This way you’ll have a small gap between the two, whereas mine barely fit. Good job on hosting the video, Gwendyl.
Klaus Preiss -
I love the fact that the screw bit and shaft are magnetic! I almost lost a screw and found it attached to the magnet.
I used a heat/ice pack and nuked it for 1 minute. At first the display cover was very difficult to open with the pry tool, per instructions. The pry tool wasn’t working so I carefully used the blade of my pocket knife to wedge the cover open. The rest of the procedure went well until I cracked the glass while trying to get the top right corner to pop off. Other than that mistake, all went well. Tip: before setting the new battery, attach the battery connector first and leave enough room for the taptic engine, or better yet, see the taptic engine in place before adhering the replacement battery. This way you’ll have a small gap between the two, whereas mine barely fit because I placed it almost too low.
Good job on hosting the video, Gwendyl.
Klaus Preiss -
I replaced the lightning connector assembly and reassembled. The old one did not 'click' into the cable and had corrosion inside, it needed the cable to be placed in a specific way to charge. The new part - does not recognize that a charger is plugged in at all.
I backtracked the assembly - took it apart, put it back again - and find that every thing on the part works - the mic, speakers, taptic engine.
The original problem with the cable still persists. Any ideas?
H K -
get a new batt to replace whilst you 're at it
Graham Sargerson -