Inleiding

Als het scherm van je iPhone XS is gebarsten, niet reageert op aanraking of geen beeld geeft terwijl je telefoon aanstaat, kun je deze handleiding gebruiken om je telefoon weer werkend te krijgen met een nieuw scherm, ook bekend als de schermmodule.

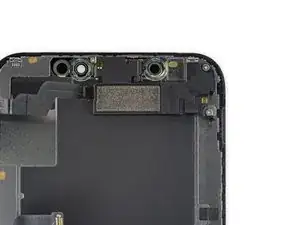
De gecombineerde oorstukspeaker + sensormodule die aan de achterkant van het scherm is bevestigd, is in de fabriek specifiek gelinkt aan jouw individuele iPhone

Deze module zul je dus moeten overzetten naar je nieuwe scherm. De module bevat de infraroodschijnwerper, die onderdeel is van de biometrische Face ID veiligheidsfeature. Als deze wordt beschadigd of vervangen, zal de Face ID-functie ophouden met functioneren. Wees daarom extra voorzichtig dat je geen van deze onderdelen beschadigt tijdens deze procedure. Als je ze wel beschadigt, kan alleen Apple de Face ID-functie herstellen.

NB: True Tone functies worden uitgeschakeld na een schermvervanging, zelfs wanneer je een origineel Apple scherm gebruikt.

  1. mJDscmIaTthcdZPn
    • Ontlaad, voordat je begint, de batterij van je iPhone tot onder de 25%. Een geladen lithium-ion batterij kan in brand vliegen en/of exploderen als deze per ongeluk wordt doorboord of beschadigd.

    • Schakel je iPhone uit voordat je met de demontage begint.

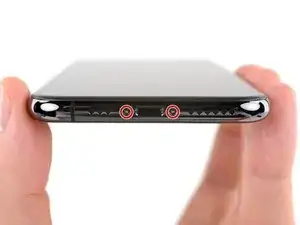
    • Verwijder de twee 6.9 mm lange pentalobe schroeven aan de onderkant van de iPhone.

    • Het openen van het scherm van de iPhone zal de waterdichtheid van de telefoon aantasten. Zorg er daarom voor dat je vervangende pakkingen hebt voordat je verdergaat of wees extra voorzichtig met de blootstelling aan water als je ervoor kiest de waterdichte pakkingen niet te vervangen.

    Der Original Akku ist codiert. Egal, ob man einen zweiten Apple Original Akku oder einen neuen Fremdakku einbaut erscheint bereits in den Einstellungen eine "Wichtige Batterienachricht" mit einem roten Punkt. "Unbekanntes Bauteil" und die "Informationen zum Batteriezustand" sind nicht verfügbar. Diese Nachricht verbleibt immer und nervt auf Dauer immens.

    Der Akku muss angelernt werden und dieses können von jetzt an nur authorisierte Apple Servicebetriebe und diesen ist es durch Apple verboten die notwendige Info weiterzugeben.

    Dies ist nicht zu verwechseln mit der bereits bekannten Rekalibrierung seit iOS 14.5.

    Seit dieser neuen Codierung kostet der Akkutausch bei Apple auch nicht mehr 75 € sondern aktuell 99 € (Stand Novmber 2023 in Deutschland).

    Damit sind künftig alle nicht authorisierten Servicebetriebe raus - denn wer will schon dauernd diese Mitteilung auf dem Bildschirm haben?

    Überlegt vorher, ob unter diesen Bedingungen ein eigener Akkutausch noch sinnvoll ist .....

    Manfred Wachtel -

    Lieben Dank @manfredwachtel ! Mehr Infos dazu haben wir auch in unserem Blog zusammengefasst: https://de.ifixit.com/News/78890/teileko...

    Sandra Hiller -

  2. voNWTD25eWiGUdu3
    voNWTD25eWiGUdu3
    XTM1CepRnVkDnbfI
    NgVMfmOgJwEalMFF
    • Wanneer je iPhone-scherm gebarsten is, kun je verdere schade beperken en lichamelijke schade voorkomen door je scherm af te plakken voorafgaand aan de reparatie.

    • Plak je iPhone-scherm af met overlappende lagen tape totdat het volledige oppervlak is afgedekt.

    • De tape houdt de losse scherven bij elkaar en biedt een betrouwbare structuur bij het wrikken en omhoogtillen van het scherm.

    • Draag tijdens de reparatie een veiligheidsbril om je ogen te beschermen tegen mogelijk loskomende glasscherven.

    • Als het gebroken glas het plaatsen van een zuignap bemoeilijkt, kun je proberen een steviger stuk tape (zoals ducttape) in een van de zuignappen te vouwen om zo het scherm omhoog te tillen.

    How to detect my Iphone what screen it is, OLED or LCD?

    sabrihakulii -

    It’s OLED. You can find the specs here, https://support.apple.com/en-us/HT201296

    When you find your phone, at the bottom of the description click on, See the tech specs…

    mcr4u2 -

    The included suction cups were stiff and worthless. They would not lift the screen. Also, I tried every type of tape on the screen to help the suction cups stick without success. Heavy duty suction cups were for my bathroom also failed. However, I had an old GoPro mount with some preapplied double sided 3M VSB tape and stuck that on the screen near the bottom. Magic! This method had the added bonus of being able to use a GoPro attachment as a handle to lift the screen, and propped up the screen like a kickstand in step 12.

    Tawan Khamapirad -

    Very cool! Thanks

    Antonio -

    My screen was pretty stuck… would not budge. Heated, super glued the suction cup, tried gorilla tape. Ended up doing the GoPro mount with 3M VSB tape method mentioned. Worked great. That 3M tape is the bomb.

    Rich Wachtel -

    The included suction cup took a few tries but ended up working for me.

    charlotte -

    If you have flat feeler gauges (for adjusting engine valve tappet clearance, ignition points … old school) the .003 thick goes right in. Work your way up until you can get the pick or supplied pry tool in.

    William Olstad -

    where can I buy 3M VSB plis!!

    gerardo artigas cuellar -

    3M VHB tape is at auto stores and other big box stores, or online.

    nicO -

    I used the tweezers that came with the replacement screen and jammed one of them into the glass and that eventually worked. Heating with a blow dryer is also important. The suction cup was helpful in loosening the adhesive for sure, but just not enough to get the display to come out.

    J Olin -

  3. QajCoHNQunxeJV2V
    QajCoHNQunxeJV2V
    1HyrON1VAh1uTbEN
    3eVMJBkpKguxEmwE
    • Als het scherm van je iPhone gebarsten is, kun je wat tape over de barsten plakken om te voorkomen dat het scherm verder beschadigd raakt tijdens dit proces. Zo verklein je ook het risico op fysieke schade.

    • Plak een aantal lagen tape op het scherm van de iPhone tot het gehele scherm bedekt is.

    • We raden je ten sterkste aan om tijdens deze stap een veiligheidsbril te dragen zodat je je ogen beschermt tegen eventueel loskomende glasscherven.

    • Als het je in de volgende stappen niet lukt om de zuignap op het scherm te bevestigen, kun je ervoor kiezen om een stuk duct tape in een handvatvorm op het scherm te plakken. Hiermee kun je dan het scherm omhoog tillen om een opening te creëren.

    • Als alternatief kun je er ook voor kiezen om de zuignap met secondelijm op het scherm vast te plakken.

  4. pigEY2k6BCTAOZuk
    pigEY2k6BCTAOZuk
    2yUjJasphSr5KEcZ
    qJo2Tgnxb3cpuPMP
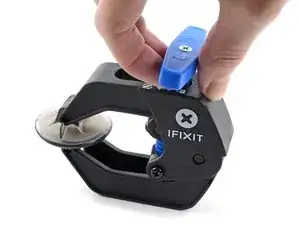
    • De volgende twee stappen introduceren de anti-klem, een handige tool die we aanraden aan iedereen die regelmatig reparaties uitvoert. Als je de Anti-Klem niet gebruikt, sla dan de volgende drie stappen over voor een alternatieve methode.

    • Voor uitgebreider instructies voor het gebruik van de Anti-Klem, lees je deze handleiding door.

    • Trek de blauwe hendel naar achteren zodat de anti-klem vrij kan bewegen. (Op deze manier deactiveer je de openingsstand van de anti-klem.)

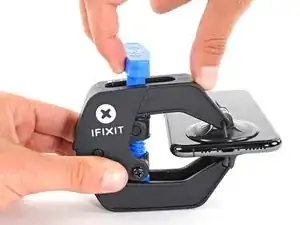
    • Schuif de armen over de linker- of rechterzijde van je iPhone.

    • Plaats de zuignappen dichtbij de onderkant van de telefoon—één op de voorkant en één aan de achterkant.

    • Druk beide zuignappen aan, om zuigkracht uit te oefenen op de gewenste plek.

    • Als het oppervlak waarop de zuignappen zich moeten vastzuigen te glad is, kun je wat tape gebruiken voor meer grip.

    The anti clamp is a much needed tool

    It makes opening the phone a breeze.

    Lon

    [deleted] -

  5. TTmqljctmMw6bJpX
    TTmqljctmMw6bJpX
    iVRRmPwckdpiwuMQ
    ZaWfSklEIBPUFAsN
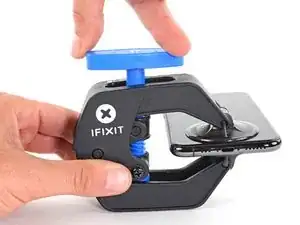
    • Trek het blauwe handvat naar voren om de armen van de anti-klem te vergrendelen.

    • Draai het handvat 360 graden met de klok mee of tot de zuignappen uit beginnen te rekken.

    • Zorg dat de zuignappen op één lijn met elkaar zitten voordat je begint met het openen van het toestel. Als je ziet dat de zuignappen niet meer op één lijn zitten, maak je ze los en breng je ze weer op de juiste positie aan.

  6. UyOgOJxUobyYwysw
    UyOgOJxUobyYwysw
    LxMpeXmlnlCbNaSS
    O1SQSJJBPEig4tTU
    • Verwarm een iOpener en plaats deze tussen de armen van de anti-klem op je telefoon.

    • Je kunt ook een föhn, heteluchtpistool, of een kookplaat gebruiken, maar wees bij het gebruik hiervan extra voorzichtig. Te veel warmte kan tot warmteschade leiden. Vooral het scherm en de batterij zijn hier erg vatbaar voor.

    • Vouw de iOpener zodat deze op de onderkant van de iPhone komt te liggen.

    • Geef de lijm een minuutje de tijd om los te komen zodat de anti-klem een opening kan creëren.

    • Steek een plectrum in de opening onder het scherm en de plastic rand, en niet onder het scherm zelf.

    • Als de anti-klem er niet in slaagt een opening te creëren die groot genoeg is voor je plectrum gebruik je meer warmte en draai je het blauwe handvat een kwartslag met de klok mee.

    • Draai het handvat nooit verder dan een kwartslag per keer en wacht een minuut voordat je de anti-klem weer besluit aan te draaien. Laat de anti-klem het werk voor je doen.

    • Sla de volgende drie stappen over.

  7. rsIlLoGIMkqXTonL
    • Het verwarmen van de onderkant van de iPhone helpt de lijm, die het scherm op z'n plek houdt, te verzachten, wat het makkelijker maakt om de telefoon te openen.

    • Gebruik een föhn of een warmtepistool, of prepareer een iOpener en leg deze op de onderkant van de iPhone gedurende ongeveer een minuut om zo de lijm die eronder zit te verzachten.

  8. yfBgjBWqqta2eDhd
    yfBgjBWqqta2eDhd
    QAYokBSN1igpaUY1
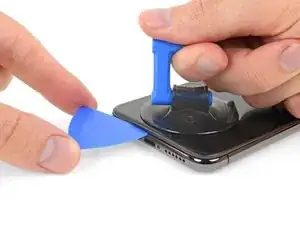
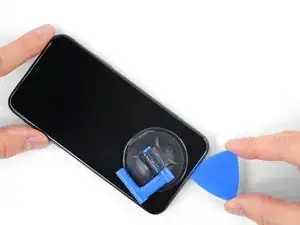
    • Als je een enkele zuignap met handvat gebruikt, druk deze dan vast aan de onderkant van de telefoon, maar vermijd het bolle deel van het glas.

  9. 3oowQXLS2cpbXYhF
    3oowQXLS2cpbXYhF
    qcV3HUNTQXXIaVSh
    M1k5yNXnJBaGYaLb
    • Trek de zuignap omhoog met een stevige, constante kracht om zo een kleine opening tussen het voorste paneel en de achterste behuizing te creëren.

    • Steek een openingsplectrum in de opening onder de plastic rand van het scherm, niet onder het scherm.

    • De waterdichte lijm die het scherm op z'n plek houdt is erg sterk; het creëren van de opening kan dus heel wat kracht vereisen. Als je moeite hebt met het openen van de telefoon, dien dan meer warmte toe en wiebel het scherm op en neer om de lijm te verzachten totdat de opening groot genoeg is voor je tool.

    It seems like I need a third hand to do this. To hold the phone; hold the suction cup; and push the pick in the space.

    haroldappel -

  10. IC6KHfoNSHdLtGnH
    IC6KHfoNSHdLtGnH
    ZDoxkKXSvYqNnVAW
    RLi6OJUMchroyTyk
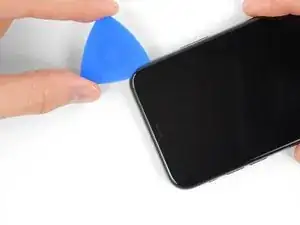
    • Schuif je openingsplectrum langs de linker onderhoek en via de linkerzijde van de iPhone naar boven. Snijd daarbij alle lijm door die het scherm aan het frame bevestigt.

    • Steek je plectrum niet dieper dan 3 mm in de opening. Zo voorkom je schade aan de onderdelen in de iPhone.

  11. RZFUjnwK2yiWBiYJ
    • Er loopt een aantal makkelijk te beschadigen kabels langs de rechterkant van de iPhone. Steek je plectrum daar niet in de opening om te voorkomen dat je je toestel beschadigt.

  12. T26FJlQBnfAMf3Is
    T26FJlQBnfAMf3Is
    QlgDmcf3JaGPRChp
    1H1tlRpPnndJDFsK
    • Steek je openingsplectrum opnieuw in de onderkant van de telefoon en schuif deze nu langs de rechter onderhoek en via de rechterzijkant omhoog. Snijd ook hier alle lijm door die je onderweg tegenkomt.

    • Steek je plectrum ook hier niet dieper dan 3 mm in de opening om te voorkomen dat je de schermkabels beschadigt.

  13. GEKit4qRRMMpN6XC
    GEKit4qRRMMpN6XC
    w5TVy6xbAoVaBMnw
    wyB1Fb2BaLUgyt2b
    • De bovenkant van het scherm is bevestigd met zowel lijm als klemmen.

    • Schuif je openingsplectrum langs de bovenste hoek van het scherm, terwijl je het scherm voorzichtig naar beneden loopt of trekt, in de richting van de Lightning-poort.

    • Als je te veel kracht gebruikt, zullen de klemmen breken. Wees voorzichtig en heb geduld.

    • Steek je plectrum ook hier niet dieper dan 3 mm in de opening om te voorkomen dat je de voorste sensormodule beschadigt.

    • Schuif je plectrum naar de tegenoverliggende bovenste hoek en snijd alle lijm daartussen door.

  14. UMIpiElOirXOEjSZ
    • Trek aan het kleine uiteinde van de zuignap om deze van het scherm te verwijderen.

  15. 2QvAfp1AjYv5GBlI
    2QvAfp1AjYv5GBlI
    adXPfNlWHInE2vrp
    HkgqsYkE3KSKidUA
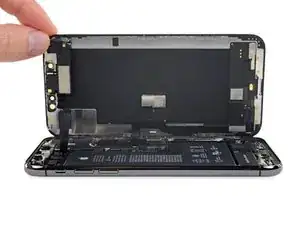
    • Open de iPhone door het scherm van links naar rechts open te klappen, alsof je de achterkant van een boek opent.

    • Probeer het scherm nog niet volledig los te krijgen, aangezien deze nog steeds aan het logic board van de iPhone verbonden is met een aantal kwetsbare lintkabels.

    • Laat het scherm op een object leunen, zodat je niet te veel spanning op de kabels zet en je nog steeds aan de telefoon kunt werken.

    • Tijdens de hermontage breng je het scherm in positie, op één lijn met de klemmen aan de bovenkant, en druk je de bovenkant van het scherm voorzichtig in de klemmen voordat je de rest van het scherm vastklikt. Als het scherm niet goed vastklikt, controleer je de klemmen om zeker te weten dat ze niet gebogen zijn.

    Open from the LEFT. Photo confused me and I came very close to damaging my phone by opening from the wrong side.

    charlotte -

  16. L4SHpLOnFmSHNbUt
    L4SHpLOnFmSHNbUt
    klZrCyRh3mOhe1vi
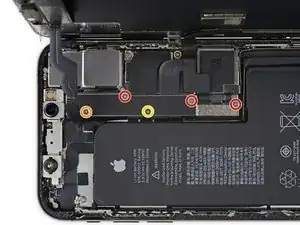
    • Verwijder de vijf schroeven die het paneel op de logic board-aansluiting bevestigen, met de volgende lengtes:

    • Drie 1.0 mm Y000 schroeven

    • Eén 1.3 mm Y000 schroef

    • Eén 3.7 mm Phillips schroef

    • Zorg dat je, tijdens deze reparatie, bijhoudt welke schroef waarvandaan komt, zodat je deze op de juiste plek weer terug kan schroeven. Zo voorkom je schade aan je iPhone.

    The ribbon makes the 1.3 mm screw a little tricky. Use one hand to hold the display at a 90 degree or smaller angle to create the slack necessary to get the screw driver in place.

    charlotte -

    I tracked my screws by using my kids fridge magnets to hold each screw size and placing a piece of masking tape below with the screw size.

    charlotte -

    I stripped a screw ugh

    Tresia -

    Where can i buy a One 1.3 mm Y000 screw

    Ismail -

    FYI: I used a tiny piece of scotch tape to hold those 1mm screws in place while aligning the magnetic screwdriver. Otherwise they are so tiny the magnetic bit pulls them right out the hole.

    Jeff Miller -

  17. NRS1ETl65K3UsXxu
    • Verwijder het paneel.

    • Het kan zijn dat het paneel ietwat vastzit. Til het voorzichtig, maar wel met wat kracht, omhoog om het los te maken.

    • Tijdens de hermontage is dit een goed moment om je iPhone weer aan te zetten om alle functies te testen voordat je de telefoon weer helemaal sluit. Vergeet je telefoon niet weer uit te schakelen als je verdergaat met de reparatie.

    During reassembly, pause here to check function. Gently reattach the top of the display to the base to test face ID.

    charlotte -

  18. GcwlxqG2c3tMI2eP
    GcwlxqG2c3tMI2eP
    yaKE452pmB6DtZfq
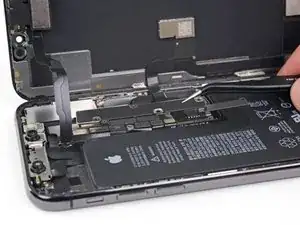
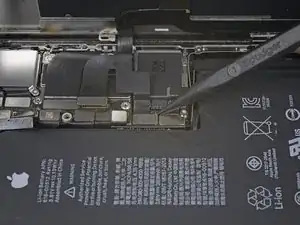
    • Gebruik een spudger of een schone vingernagel om de batterijaansluiting uit het contact op het logic board omhoog te duwen.

    • Zorg dat je de zwarte, siliconen afdichtingen rondom deze en andere aansluitingen niet beschadigt. Deze afdichtingen zorgen voor extra bescherming tegen water en stof.

    • Zorg dat je de aansluiting wegbuigt van het logic board om zo te voorkomen dat deze tijdens de reparatie per ongeluk contact maakt met het contact en zo de telefoon mogelijk aanzet.

  19. 2PD5soUZSe3ZQyTK
    2PD5soUZSe3ZQyTK
    VfJmQ2o6MWIwj2rH
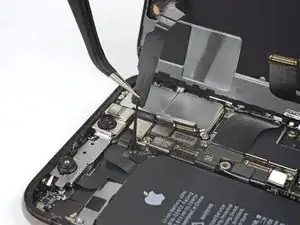
    • Gebruik een spudger of een vingernagel om de aansluiting van de sensormodule in het voorste paneel omhoog te duwen en te ontkoppelen.

    In my phone the connector made poor contact with the socket resulting in no sound audible through the phone receiver/headset. There was an overhang of insulation close to the socket which I believe may have prevented a good connection. So if you have these kinds of audio problems you might see if this is the problem.

    goblazers -

  20. asLYVcjUtcHdcKoa
    asLYVcjUtcHdcKoa
    GWSI1d2iAZSLC5fx
    • Gebruik een spudger of een vingernagel om de aansluiting van de OLED-schermkabel los te koppelen.

    • Om drukaansluitingen zoals deze weer aan te sluiten, positioneer je deze totdat op z'n plek lijkt te zitten en duw je één kant van de aansluiting omlaag tot deze vastklikt, om vervolgens hetzelfde te doen aan de andere kant. Druk niet op het midden, want als de aansluiting verkeerd zit, zul je de pinnen buigen en zo schade veroorzaken.

    Shine a bright light here to help you align the connector. Eventually, the right side snapped in first.

    charlotte -

    On reassembly, use the pad of your fingertip to reconnect.

    charlotte -

  21. cOJMACcMMHtkE2tl
    cOJMACcMMHtkE2tl
    qs6qVlhbERRPsSqZ
    • Gebruik een spudger of een vingernagel om de aansluiting van de digitizerkabel uit het contact omhoog te duwen.

    • De inkeping waar deze aansluiting in zit, bemoeilijkt het opnieuw aansluiten van deze kabel. Neem je tijd en positioneer het met zorg, om het dan voorzichtig op z'n plek te drukken met het topje van je vinger—eerste de ene kant, dan de andere kant. Als het goed is, voel je het wanneer de aansluiting vastklikt.

    • Als er een deel van je scherm niet op aanraking reageert na de reparatie, ontkoppel je de batterij en sluit je deze aansluiting opnieuw aan. Zorg hierbij dat deze volledig op z'n plaats klikt en dat er geen stof of andere dingen in het contact zitten.

    Reassembly: reconnecting the press connectors upon reassembly was so hard, even for the ones not seated in a recessed location !! It took me two days to get them reconnected. What helped me was to shine bright lights on all sides of the iPhone and then hold the iPhone vertically like a book and press it in that way. They are now all in, but the touchscreen functionality has disappeared :( so I will need to reconnect that one.

    natialollie -

  22. NJPdFYTHitL2hafV
    NJPdFYTHitL2hafV
    aWAYZqlHNmxAtebd
    PxaTvWgCPXqUXVOh
    • De flexkabel van de sensormodule in het voorste paneel zit lichtjes vast op z'n plek.

    • Til de kabel voorzichtig omhoog totdat deze loskomt van de lijm eronder.

    Will replacing camera and sensors fix damaged face I'd

    Siddhartha Chowdhury -

    No, FaceID will be disabled because the original sensors are paired with the logic board.

    Arthur Shi -

  23. ryfagYOqsXowIIsl

    I wish the reassembly directions were separate. I forgot to pause here to do the waterproof seal.

    charlotte -

    Geez, I blazed right past that small line to replace the waterproof seal. Needs to be called out much larger.

    Jeff Miller -

  24. FUvNwySgPhymYqtR
    FUvNwySgPhymYqtR
    4UDZQUtaGT2amRiN
    • Peuter het stuk tape dat over de verborgen schroef in rechter onderhoek van de speakerbehuizing zit los. Deze kun je vinden aan de achterkant van de schermmodule.

  25. KripaDJxf5HRWoEw
    KripaDJxf5HRWoEw
    VXTMvFdREf4sDQVB
    • Verwijder de drie Y000 schroeven die de speaker-/sensormodule bevestigen:

    • Eén 1.3 mm schroef

    • Eén 1.4 mm schroef

    • Eén 1.9 mm schroef

    While disassembling, I missed that these are all Y000. Prior list specifies in the bullets, but this list specifies in the text preceding the bullets.

    charlotte -

  26. lBw1h6knFScttafQ
    lBw1h6knFScttafQ
    aRLSimurGRhipHsV
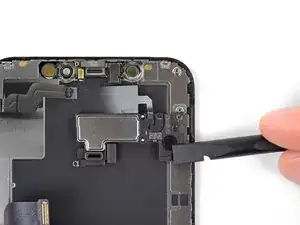
    • De oorstukspeaker zit lichtjes vast.

    • Steek een spudger voorzichtig onder de bovenkant van de speakermodule om deze vervolgens rustig te naar onderen te kantelen—weg van de bovenkant van het scherm.

    • De speaker blijft vastzitten met een erg dunne flexkabel. Wees voorzichtig dat je deze niet klemt of beschadigt.

  27. 3rC3x6IlIBN1K1Vm
    • Gebruik een föhn of een warmtepistool of prepareer een iOpener en leg deze aan de voorkant op de bovenkant van het scherm gedurende een minuut om zo de lijm die de sensoren bevestigt te verzachten.

  28. vAQq63TjRHQJWf2F
    vAQq63TjRHQJWf2F
    pSitruvtRPphu35A
    Jj5RCYoCCeUfKgNc
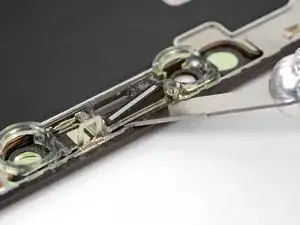
    • Schuif de zijkant van een openingsplectrum voorzichtig onder de flexkabel die onder de microfoon ligt.

    • Kantel je plectrum dan rustig om de microfoon los te krijgen. Zorg ervoor dat je de flexkabel niet afklemt of beschadigt.

    • Indien nodig kun je de punt van een spudger gebruiken om de microfoon uit de inkeping in het voorste paneel te krijgen. Als je de microfoon niet of moeilijk los krijgt, kun je wat extra warmte gebruiken om de lijm verder te verzachten.

  29. BPa1gHCHuVk2gP2F
    BPa1gHCHuVk2gP2F
    vQ5vtadpHns1o1DV
    mkswwCBg66D6gV5B
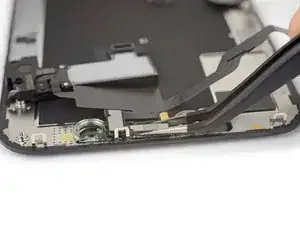
    • Schuif je openingsplectrum van links naar rechts onder de flexkabel en de nabijheidssensor- en infraroodschijnwerpermodules door.

    • Wiebel rustig met je plectrum en til deze lichtjes op om de module op deze wijze uit de inkeping in het voorste paneel te tillen.

    • Het is erg handig om de speaker uit de inkeping te tillen en deze weg te duwen, om zo een betere toegang te hebben tot de rest van de telefoon. Wees voorzichtig dat je hier niet te hard aan de dunne flexkabel trekt.

  30. ncfcCvRuvBVB5aSI
    ncfcCvRuvBVB5aSI
    JFBhZd5EMUSDxDMK
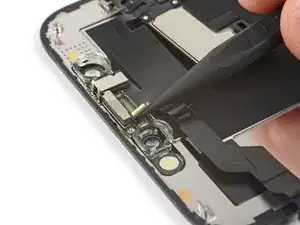
    • Gebruik een pincet om de omgevingslichtsensor heen en weer te wiebelen om deze zo uit z'n inkeping in het scherm te kunnen tillen.

    • Als de sensor na een aantal seconden niet loskomt door het wiebelen, gebruik dan meer warmte en probeer het opnieuw.

    • De sensor blijft verbonden met de rest van de sensormodule door middel van een erg dunne flexkabel. Zorg dat je deze niet afklemt of beschadigt.

  31. UWdiJvyiUekDmbTt
    UWdiJvyiUekDmbTt
    ElLcsCcOATQghLHK
    A6aRqe2Go6FWmHDt
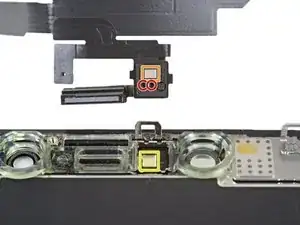
    • Als het je gelukt is de gehele omgevingslichtsensor te verwijderen, zoals op de foto getoond wordt, ga je verder met de volgende stappen.

    • Als de witte verdeelstrip is losgekomen, maar nog wel in het scherm zit, zoals je kunt zien op de tweede foto, zul je deze er voorzichtig uit moeten heffen langs de bovenkant van de telefoon met behulp van een dun mesje of een wriktool. Het opnieuw gebruiken van warmte kan deze stap vergemakkelijken.

    • Installeer, tijdens de remontage, eerst de verdeler in het scherm, daarbij zorgend dat deze in de juiste richting wijst (de voorkant zie je op de eerste foto, en de achterkant zie je op de derde foto).

    • Dan zet je de omgevingslichtsensor op de verdeler. Je zult de sensor op z'n plek moeten houden tijdens het vastdraaien van de schroeven die de oorstuk- en sensormodule bevestigen. Als de schroeven eenmaal vastzitten, zal de sensor blijven zitten en functioneren.

  32. ak6JaBaDE2aUXgwK
    ak6JaBaDE2aUXgwK
    XQJpxVdRVGJB3DWl
    EeBwK6gC1J5qebAZ
    • Verwijder de oorstukspeaker en voorste sensormodule.

    • Check, tijdens de remontage, de positie van de zwarte, plastic module die de volgende onderdelen bevat:

    • Nabijheidssensor

    • Infraroodlichtschijnwerper

    • De module moet zo zijn gepositioneerd dat deze onderdelen niet in de weg worden gezeten door lijm.

    This picture is upside down compared to the prior step, look carefully to ensure proper alignment.

    charlotte -

    What is that hole that is on the opposite side of the proximity sensor? Is it necessary any adhesives or special filter to put it back on the bracket?

    Rafael Gomez Prados -

    Hi Rafael! The hole is for the front-facing microphone. You should be able to reuse the existing adhesive on the screen. If you're transferring it, you can cut a square of double-sided tape such as Tesa tape, poke a generous hole in the center of the square, and apply it to the cable with the hole.

    Arthur Shi -

    Ich habe nicht darauf geachtet, wo ich das Plektrum ansetze und so das Display von dem eigentlichen Rahmen getrennt. Dadurch hatte ich etwas Schwierigkeiten... Es ging aber auch, die Sensoreinheit und den Rahmen im Nachhinein auszubauen und dann die Einheit aufs neue Display zu setzen. So oder so, es hat geklappt und das iPhone funktioniert wieder tadellos.

    J.D. -

Conclusie

Vergelijk je vervangende onderdeel met het originele onderdeel — het kan zijn dat je meerdere onderdelen mee over moet zetten of beschermlagen voor de lijm moet verwijderen, voordat je het nieuwe onderdeel kunt installeren.

Om je toestel weer in elkaar te zetten, volg je deze instructies in omgekeerde volgorde.

Breng je e-afval naar een R2 of e-Stewards gecertificeerde recycler.

Ging je reparatie niet zoals gepland? Check dan onze

Antwoordencommunity voor hulp bij het oplossen van je probleem.

Jeff Suovanen

Lid sinds: 06/08/13

442718 Reputatie

47 commentaren

It would be better if you provided some guidance on moving the iPhone XS Front Camera and Sensor Holder from the old display to the new one since the part you deliver does not include it. In order to remove it I ended up having to use my heat gun which warped the plastic and ultimately caused me to have to buy a replacement. Does it require adhesive? I still don’t know and it gets conveniently ignored in your guide and repair videos on YouTube. I’m quite frustrated.

Adam -

Sorry about that! That’s no fun at all. iFixit’s replacement screens are meant to include that component; I’ll ask for someone to check and make sure it’s not left out in the future. However, it’s normally pretty easy to remove using mild heat and/or a few drops of isopropyl alcohol, with some gentle wiggling and prying. Then you carefully position it on your new screen. Adhesive is helpful, but once you screw down the earpiece speaker over the top, it should be perfectly secure regardless.

Jeff Suovanen -

My phone screen feels a little loose after reassembly. Mostly in the top left area if I push it.. is this normal?

Jennifer Palacios -

Short answer: Yes. Long answer: If you have adhesive on it that can hold the screen down. If you don’t it’s $5 and super easy to put on. It is kind of normal for the screen to be a little warped, I have done replacements on iPhones without reapplying adhesive and when applying heat it can warp it a tiny bit. The adhesive can help with this a lot. I strongly recommend you get it to hold your screen down.

HeyJacksonY -

Thanks a lot for this great instruction!

Walter Fritz -

Sorry for a stupid question, is the digitizer and lcd screen one unit? Long story short, the screen is not cracked but the lcd somehow got damaged.

Reggie Chacon -

Hi Reggie,

The digitizer and OLED panel are pretty intricately attached to each other and are sold together as one unit. You may be able to replace the OLED panel without replacing the digitizer, but that would require specialty tools.

Arthur Shi -

Bello, Después que tengas un buen ojo y buen pulso.

Se ve y se siente igual que el original.

Lo mega recomiendo!

Jaime Fontanals -

Is there one time to make a video with a ‘really smashed’ screen?

You always show good screens on any repair you do videos or photographs.

This a positive critic, not a lament.

I hope you do understand what I mean.

JoeBlog -

Hi, I have one problem and I really hope to find somebody with answers. I need to replace an iPhone XS screen but…. My original screen doesnt have these metallic parts you use to clip it to the rest of the phone. The screen I have ordered had them and also was a tiny bit too long for my phone. This is all so very weird because I can't find any other types of screen online. Seems almost like my phone is a problem. Have you ever encountered such problem? You can reach me by email roza.francois@gmail.com

Roza et François X. -

Hi. i also have the problem like fracois. Could you help me please?! You can reach me by email under dcs.privat@gmail.com

Greetings,

Daniel

dcsprivat -

Where are you guys ordering parts from? Try taking pictures of both your phone and the old/new screens and post your question in our Answers forum—you’re more likely to get help there.

Jeff Suovanen -

It seems to me that the European models of the iPhone XS do not have the clips you mentioned (at least, I have mt9e2b/a and it has no clips). The display is much easier to replace since the earpiece speaker + sensor assembly is not fixed to the display; you can stop at around step 17 and reassemble. BUT you need the correct display module (without clips), or it won't go back together. So really the title of this guide should mention the specific iPhone XS models for which it's suitable.

Phil Atkin -

Hi Jeff. Thank you for your request.

1. I ordered the part on ifixit.

2. As soon as possible i will post both photos. I hope you can me help me soon, because i am struggeling with no having a mobil device at the moment.

Greetings,

Daniel

dcsprivat -

Thanks for the replacement and instructions, since I replaced the screen of my previous iPhone 6 and iPhone 4 and several more for friends, it just took me around 10 minutes.

Luckily I bought the complete set with the tools, I did not know they used Y000 screws and would not have had a screwdriver for it if there wasn’t one included.

Dominik -

Hello, thank you for the guide and kit, everything was great but there was a problem: the space where the square part with the Proximity sensor and Flood illuminator go, originally on the original Iphone screen had a square little mirror like part (like in your tut pictures), in your Oled replacement screen set it is round and much bigger. Is this a problem?

I ask this cause now the auto-brightness is finnicky, the Iphone dims hard like (brightness auto drops), i don’t think i damaged the ambient light sensor , i was extremely slow and methodical, removed the glue carefully from the two near parts before, didn’t strain the cable, the ambient light sensor came out easily enough, slowly but steadily. Also i think if it would be broken, it would not work and dim the brightness. Could it be related to the fact that the sensor is not glued down like it was before? The screws were carefully put back in the exact order and no glue fell into/onto the sensors. Thank you

frankenstar -

Hello.  After replacing the display every many while I use it it turns black screen, then I have to lock and unlock it and it lights up again.  Could you advise me something?  Or is the display faulty?  With the original it does not.  Thanks.

luchesa Martinez -

Is it impossible to install a new screen and make it flush with the sides? Using an iFixit replacement unit. No matter how well I align and how much I press, it’s raised… which is really annoying

Chris -

The install went ok - 2 things should be mentioned….1. does the blue film on the replacement screen need to be removed Yes or No, 2. IF the touch sensor is not working mention trying a hard restart 1st it would have saved me a ton of time and frustration… I assembled, reinstalled the old screen since it was working before, since it didn’t work either, disassembled, and reassembled the replacement part several times to troubleshoot why it wasn’t working. Those screws are sooo small its a wonder I didn’t lose any. None the less, after a hard restart, the touch sensor is working great and the phone is operating as designed. I was going to replace the back glass & ordered the part but there’s no way I am going into that after doing this- its not my phone. I put packing tape over the glass and put it back into the cover. A few hours of time is way cheaper than purchasing a new phone :)

teejayoh -

Thanks for the suggestion about the hard restart! If the blue film is lightly adhered to the replacement screen, it is a liner and should be removed.

Arthur Shi -

Super fantastic, company Ifixit <3 we love you, well I do at least, find it so sweet that I ordered a new screen, and I receive a small candy with the packet. Thanks, many times o7 great instruction!

Mads Yde -

The two screen connection modules with pins closest to the bottom are impossible to connect. They keep popping out making it impossible to put the cover on. Any tips?

The Entrepreneur Boi -

The screen replacement went flawlessly. All the functions work perfectly. I have no problems with 3D Touch, nor with FaceID. The only thing that doesn’t work any more is True Tone. Thank you for the guide.

Alexandru Fuicu -

Just replaced a cracked screen. Took some time but finally managed to do it. Now have a beautiful screen and and a perfectly working device.

Paul L.

paullevesque -

Great guide! Unfortunately I now have stripes across the screen (left-right). They are only visible on even grey backgrounds, so it’s not a big issue. Guess I bought a cheap screen, https://www.phone-parts.dk/iphone-xs-ska...

David Arbirk -

good day ,,,  when i were replaced the charger port, and after making the settings, the device make turns off and restarts.  !!?

7BK SMA -

I replaced my screen yesterday and the guides were perfect. Unfortunately, when I went to bed and had my screen on its dimmest setting I noticed that the colors were massively distorted toward the red end of the spectrum. I’m worried that I received a faulty product. The screen otherwise functions perfectly and colors are all normal at any other brightness setting. Please help!

max silverstein -

These are not authentic apple screen replacements. I’ve received two different replacement screens now and they’ve both had issues. The first worked mostly fine except when the screen brightness was on its lowest setting the screen would have a strong reddish hue and the resolution would get noisy. The replacement that was sent has different problems, and now I wish I had just kept the original. This one is over saturated, struggles to have even dimming at the lowest brightness setting, the glass itself is not perfectly smooth, and the screen is somehow strangely sensitive, which makes typing and general use of the phone more difficult. At this point I wish I just took it to a certified apple repair shop.

max silverstein -

Thanks again.Very clear, step by step. Doable in 60 minutes. All is working well from the first time!

Vlad.

Vadim -

When i lift my screen up and off. all the top mounted components are left behind still attached to the phone ( front camera etc)
also there is some sort of metal protection border in the inside around the perimeter of the phone. blocking access to some screws at the bottom.

has anyone come across this. i cant remove the protection plate.

gordonmsykes -

that is the display frame when you took the old display off you must have accidentally gone between the display and display frame. you will have to buy a new display because the display frame holds the display on the phone

Diesel Woods -

The earpiece speaker stopped working after transferring from old screen to new screen. Tried to be gentle with the cables, disconnected then cleaned the contacts on ribbon cable connector and its matching logic board connector. (Face ID does work though,)

Joel -

It would be really good to have some (shared) instructions on how to turn off the iPhone when the display and/or digitizer is not working; after all that's why we're doing this! Most guides I've seen say that the instructions are for turning off the phone, but actually they tell you how to force it to restart.

For iPhones without buttons, the sequence seems to be: briefly press volume up, briefly press volume down, press and hold the RH side button. Continue to hold when the display turns off... Continue to hold when the Apple logo shows, then the display will turn off again. Now release the side button. (This is similar to the restart sequence you'll find elsewhere, but those instructions will tell you to release the button when the Apple logo shows.) Clearly the display may be so damaged that you can't see the Apple logo, but you may well be able to tell when the display turns off entirely for the second time. If you can't see any visible change, try holding for about 20s altogether.

Phil Atkin -

Amazingly easy to follow. A successful repair and also lots of fun to accomplish.

Eric -

TOP!!!!! did it!!!

Fabio Mattioni -

Hello, My name is Michael and I am in search of some assistance. I recently broke my Iphone XS screen, and I am looking to buy a new one as soon as I can find the exact parts I need. If you sell these products, Please send me a message. If you don't sell these products, But you still know the answer then please message me with a link for a listing for the items that I need. Thanks in advance!!

Michael Lindsey -

Also, I am a decent problem solver, But I have never ever changed a Iphone screen. Does anyone know if this sounds like a bad idea? I have background experience with computers and and mobile devices. Id you know of a good tutorial Please DM me with the link. Thanks in advance!

Michael Lindsey -

Hi Michael!
You're at the right place! This page contains detailed step-by-step instructions on how to replace the screen for your iPhone XS. I'd suggest that you read through the guide to assess whether it's something you'd feel comfortable doing or not. You can also find the proper part to buy in the "what you need" section in that page. Best of luck!

Arthur Shi -

I have just replaced the screen on my iPhone Xs following this guide for disassembling and the youtube for reassembling without any issues. Great, clear and detailed description. Thank you for saving me from another expensive purchase!

Erik Polder -

Bonjour,

je n'arrive pas à enlever les premières vis de mon IPHONE XS, comment faire svp ?

JEAN -

Bonjour, quel est votre problème exactement? Vous n'avez pas l'outil qu'il faut? Les vis ne tournent pas? .......

HAMON -

Great post! I repaired my phone in an hour, and you can't tell. I would be careful removing anything near the camera as any damage will cause Face ID to no longer work.

Chaldun Al-Der -

Perfect, thank you. Instructions were very clear.

Bray Almini -

thnx ifixit...

Sanu Paul -

Geweldig duidelijk foto's en uitleg. Super!!!!!

Jan Stoffers -

These instructions where spot-on! Thanks! I managed to fix a 'ghost touch' by replacing the display! This saved me hundreds of euro's! (Repairshop: € 250,-, screen from Amazon: € 21,-)

Stephan Hubers -

Hi, I just swapped the screens on my kids phones becasue my daughters wasn't working on the top row, and my son had a new phone now. I have changed screens & batteries many times. Once I swapped the screen over, the 1,2 & 3 do not work on the keypad to log in to the phone. It looks like the whole top of the screen isn't responding. The top of the screen does respond to a tap to wake the phone though?

I have hard reset, I have removed and reconnected the digitizer cable. Any other ideas?

Chris Towlson -