Inleiding
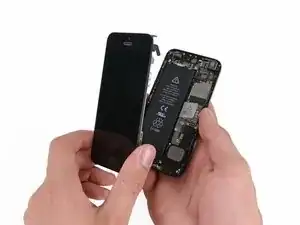
Leer met behulp van deze handleiding hoe je het scherm van de iPhone 5 vervangt. Dit onderdeel wordt geleverd met de vooraf geïnstalleerde naar voren gerichte camera, oorstukspeaker en LCD-beschermplaat, wat de reparatie vergemakkelijkt.
Het enige wat je zelf moet doen is het verwijderen van het oude scherm en het overzetten van je oude thuisknop naar je nieuwe scherm.
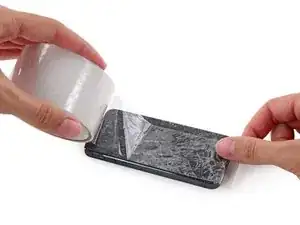
Nadat je het scherm met succes hebt vervangen, kun je het beschermen tegen krassen door middel van een schermbescherming.
-
-
Plak daarvoor overlappende stukken tape op het scherm van je telefoon, tot je de hele oppervlakte hebt bedekt.
-
-
-
Schakel je iPhone uit voordat je begint met de demontage.
-
Verwijder de twee 3.6 mm lange Pentalobe schroeven aan beide zijden van de Lightning-aansluiting.
-
-
-
Ongeacht welke tool je gebruikt moet je ervoor zorgen dat je het gehele scherm uit de telefoon tilt.
-
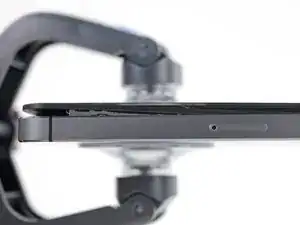
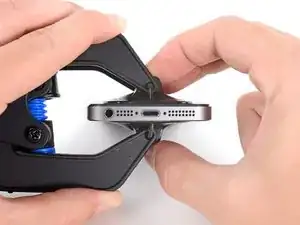
Als het glas zich scheidt van het plastic, zoals je kunt zien op de eerste foto, schuif je een plasticen openingstool tussen het plasticen frame en de metalen behuizing van de telefoon om de metalen klemmen los te krijgen uit de behuizing.
-
-
-
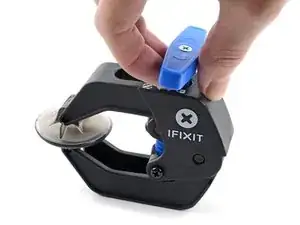
Trek de blauwe hendel naar achteren om de armen te ontgrendelen.
-
Schuif de armen over de linker- of rechterzijde van je iPhone.
-
Plaats de zuignappen dichtbij de onderkant van de telefoon—één op de voorkant en één aan de achterkant.
-
Druk beide zuignappen aan, om zuigkracht uit te oefenen op de gewenste plek.
-
-
-
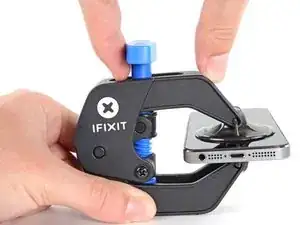
Trek het blauwe handvat naar voren om de armen van de anti-klem te vergrendelen.
-
Draai het handvat 360 graden met de klok mee of tot de zuignappen uit beginnen te rekken.
-
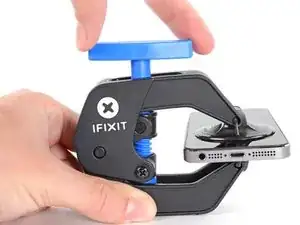
Zodra de anti-klem een opening heeft weten te creëren die groot genoeg is, steek je een openingsplectrum in de opening.
-
Als de anti-klem er niet in slaagt een opening te creëren die groot genoeg is voor je plectrum gebruik je meer warmte en draai je het blauwe handvat een kwartslag met de klok mee.
-
Sla de volgende twee stappen over.
-
-
-
Houd de iPhone met één hand naar beneden terwijl je trekt aan de zuignap, tot het scherm een beetje loskomt van de behuizing.
-
Gebruik een plastic openingsgereedschap om het scherm verder los te werken van de behuizing, terwijl je kracht blijft houden op de zuignap.
-
-
-
Ga verder met het omhoogwrikken van het voorste paneel langs beide zijkanten. Zorg hierbij dat je de klemmen aan de rechter- en linkerzijde losmaakt.
-
-
-
Als de klemmen aan de onder- en zijkanten van het voorste paneel eenmaal zijn losgemaakt, kun je de onderkant van de module wegtrekken van de achterste behuizing.
-
Til het scherm voorzichtig op tot een hoek van niet meer dan 90 graden en laat het vervolgens tegen een object aanleunen terwijl je verder werkt aan de telefoon.
-
Plaats eventueel een elastiek om het scherm en het object om ervoor te zorgen dat het scherm stevig blijft staan. Dit kan ook voorkomen dat er plotseling onnodige druk op de schermkabels komt te staan.
-
-
-
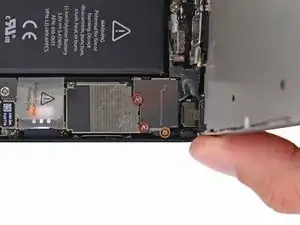
Verwijder de volgende twee schroeven die het metalen plaatje over de batterijaansluiting aan het logic board bevestigen:
-
Eén 1.8 mm lange Phillips schroef
-
Eén 1.6 mm lange Phillips schroef
-
-
-
Gebruik een plasticen openingstool om de batterijaansluiting op voorzichtige wijze uit het contact op het logic board omhoog te duwen.
-
-
-
Verwijder de volgende schroeven waarmee het metalen plaatje over de schermmodulekabel aan het logic board is bevestigd:
-
Twee 1.2 mm lange Phillips schroeven
-
Eén 1.6 mm lange Phillips schroef
-
-
-
Verwijder het plaatje over de schermkabel uit de behuizing door deze in de richting van de batterij te tillen en deze vervolgens los te halen.
-
-
-
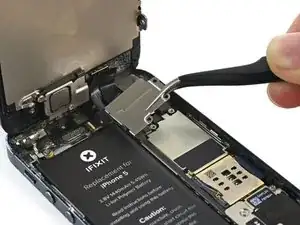
Gebruik een plasticen openingstool of je nagel om de volgende drie schermkabels los te koppelen:
-
De naar voren gerichte camera- en sensorkabel
-
LCD-kabel
-
Digitizerkabel
-


Om je toestel weer in elkaar te zetten, volg je deze stappen in omgekeerde volgorde.
38 commentaren
My brother in-law had water damage to his screen and the carrier was going to charge him and arm and a leg for a new phone so I ordered the complete display assembly from right here on iFixit that came with all the necessary tools. Took me a little over 5 minutes between repairing and chit chat to finish. It was a really easy repair and my brother in-law was never happier to have his phone back at a fraction of the cost the carrier was quoting.
Thanks for your guide for replace new touch screen
i had save one tiny screw from inside assembally :) :) :)
My display didn't shut down when i have a call and i put the phone near my ear! I plug my broken display and it work well but not the new one...please someone help! btw thanks for the guide and for the fast delivery
I know you posted this awhile ago, but if anyone else is wondering, how to fix the issue where the display won't turn off while on a phone call, You MUST transfer over the small plastic retaining brackets from the old display, and put them in the correct position! By correct position, I mean the two small transparent points need to line up with the receptors on your iPhone's front panel assembly (Camera, light sensor, mic).
This one is for Max:
Max, can you explain better what you mean by plastic retaining brackets? I'm about to swap my screen out and I wanna be able to do this
U need to scratch the paint in ur display where the proximity sensors are covered by it. After that use a black marker.
Having completed this repair using the rear camera part from Ifixit I have to comment that the camera is noticeably lower quality. Its not huge - You don't notice it looking at the photos scaled down to fit but viewing one for one there is significant detail lost. My staff member has an Iphone 5 bough at exactly the same time as mine so I was able to take a photo side by side on his and mine after my repair and when you view 1 for 1 pixel in product boxes on mine the text was just a colored blur where on his although you couldn't read the text it was more obviously text. Overall though its still better than having a camera that wouldn't focus at all and being that Apple seem to refuse to supply genuine spare parts (Which there has to be a low against??? - Imagine if a car manufacturer did that) its still good buying one from someone who gives good support. At the end of the day its a phone camera not an SLR and its still better than the older Iphone 4 camera.
matt -
The majority of product manufacturers are not required to provide parts, and apple will fix items under the various warranties it offers. Car manufacturers on the other hand are required to make parts available by law. It is part of the regulation of their industry. They get a lot of protection for their business model, but have some obligations too. It's why the EV1 was pulled, they didn't want to have to make the parts, and why there are so many Delorian parts.
William Leeper -
This is a great guide. However, I'm having a hard time popping the screen back into place. Everything works but I'm afraid of putting too much pressure least I crack it again. Any advice?
amciotola -
To avoid broken screens during reassembling:
Put the hooks of the screen in the right place in the housing, then close it loose, don't press it. Turn your phone upside down with the screen on a very flat surface (e.g. table). Now press the housing on the screen -> no more risk for braking the screen because of inhomogeneous force applied on the glass!
mondbewohner -
I hope folks read this comment before proceeding to attempt a Sleep/Wake button repair on the iPhone 5! Apple has an iPhone 5 Sleep/Wake button replacement program, free, for iPhone 5 devices manufactured through March 2013. See program details at https://www.apple.com/support/iphone5-sl.... Don't do this yourself if you don't need to. It's a difficult repair.
Mark Luscher -
I was willing to add the following important remark on top of this guide but, strangely, it has been refused! Here it is:
---
*Check if your Iphone 5 is eligible to the Apple special program for a free battery replacement (devices sold between September 2012 and January 2013, within a limited serial number range).
* If not, watch the video and use this guide [video|https://www.youtube.com/watch?v=6ogE8USs...]
---
And thus, as my Iphone 5 was eligible, I went to the Apple store of Le Louvre in Paris and the battery has been changed for free instead of 65 euros. Thanks to Mark!
revher -
Hi every one i drop my iphone5s 16gb
I replace 10!new screen but cant back to live i see on the "logic board" where u conect the screen i se damage HOW CANT FIX THAT WHITOUT LOST MA DATA ??? Thaks for anny hellp!!!!!
aliroberto01 -
Steps 12-15 seem to be not necessary for battery replacement. They are not required to remove and replace the battery and they at least DOUBLE the amount of work. Most of the time spent on this process involved working with those tiny screws and maneuvering them in place and screwing them down. Steps 12-15 are three of the five screws that you work with inside.
Also, there should be a note at the beginning of Step 2 that if you bought the iFixit kit that you should go directly to Step 6.
Bob Hatcher -
please wear safety helmet too, integral helmet and cover mouth with an N95 facemask underneath, just in case the battery punctures, explodes, you knock your head back to the wall and slam it back forward hitting the screw in your eye and and inhaling toxic fumes! can never be too careful ;-)
ibisiki -