
Inleiding
Zie hier hoe je het scherm van je iPhone 6 vervangt. Het scherm bevat onder andere een reeds geïnstalleerde naar voren gerichte camera, oorstukspeaker en LCD-beschermplaat, waardoor het makkelijker te vervangen is.
Het enige dat je moet doen is het oude scherm verwijderen en de oude thuisknop naar het nieuwe scherm overplaatsen.
Je kunt deze handleiding ook gebruiken om de beugel op de kabel van de voorste paneelmodule te vervangen.
-
-
Schakel je iPhone uit voordat je deze uit elkaar gaat halen.
-
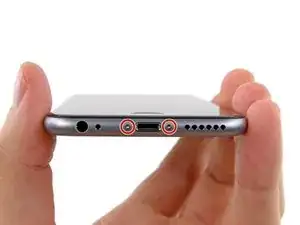
Verwijder de twee 3.6 mm lange P2 Pentalobe schroeven aan beide kanten van de Lightning-connector.
-
-
-
Als het glas van je scherm gebroken is, kun je het verder breken van het glas en lichamelijke schade tijdens de reparatie voorkomen door het glas te beplakken met tape.
-
Leg overlappende stukken doorzichtige tape over het scherm van de iPhone totdat het volledig is beplakt.
-
Als het gebroken scherm het onmogelijk maakt om een zuignap vast te laten zuigen op het scherm, kun je proberen een sterk stuk tape (zoals ducttape) dubbel te vouwen in een handvat, dit op het scherm te plakken en zo het scherm omhoog te tillen.
-
-
-
Trek de blauwe hendel naar achteren zodat de anti-klem vrij kan bewegen. (Op deze manier deactiveer je de openingsstand van de anti-klem.)
-
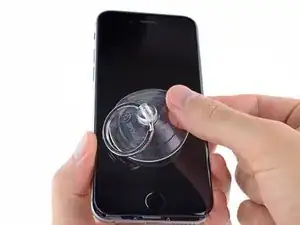
Schuif de armen over de linker- of rechterzijde van je iPhone.
-
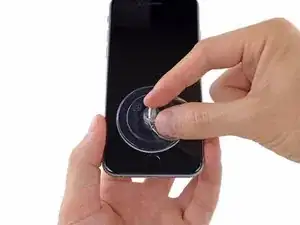
Plaats de zuignappen dichtbij de onderkant van de telefoon—één op de voorkant en één aan de achterkant.
-
Druk beide zuignappen aan, om zuigkracht uit te oefenen op de gewenste plek.
-
-
-
Trek het blauwe handvat naar voren om de armen van de anti-klem te vergrendelen.
-
Draai het handvat 360 graden met de klok mee of tot de zuignappen uit beginnen te rekken.
-
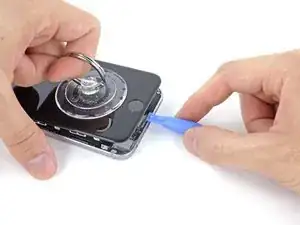
Zodra de anti-klem een opening heeft weten te creëren die groot genoeg is, steek je een openingsplectrum in de opening.
-
Sla de volgende drie stappen over.
-
-
-
Trek, terwijl je de iPhone met een hand stevig vasthoudt, aan de zuignap om de voorste paneelmodule een stukje van de achterste behuizing te scheiden.
-
Maak gebruik van een plasticen openingstool om de achterste behuizing naar beneden te duwen, weg van de schermmodule, terwijl je aan de zuignap blijft trekken.
-
-
-
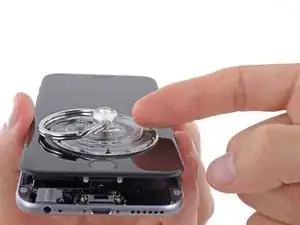
Trek aan het kleine lipje op de zuignap om de vacuüm op te heffen.
-
Verwijder de zuignap van de schermmodule.
-
-
-
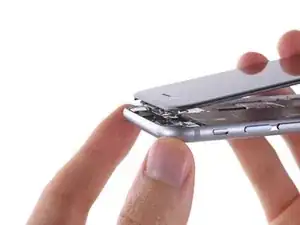
Open de iPhone door de onderkant van de schermmodule (waar de thuisknop zich bevindt) naar boven en weg van de achterste behuizing te kantelen, waarbij je de bovenkant van de telefoon als scharnier gebruikt.
-
-
-
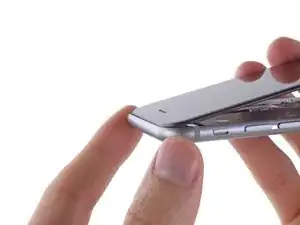
Open het scherm in een hoek van ongeveer 90º en laat deze tegen iets leunen waardoor het rechtop blijft staan terwijl jij aan de telefoon werkt.
-
Gebruik indien nodig ook een elastiek om het scherm vast te maken aan het object waar het tegenaan leunt. Dit voorkomt ook dat er teveel druk op de schermkabels komt te staan.
-
-
-
Verwijder de volgende Phillips schroeven van het plaatje op de batterijaansluiting:
-
Eén 2.2 mm lange schroef
-
Eén 3.2 mm lange schroef
-
-
-
Gebruik een plastic openingstool om de batterijaansluiting op subtiele wijze uit het contact op het logic board omhoog te duwen.
-
-
-
Verwijder de volgende vijf Phillips schroeven die het plaatje over de voorste paneelmodulekabel bevestigen:
-
Drie 1.2 mm lange schroeven
-
Eén 1.7 mm lange schroef
-
Eén 3.1 mm lange schroef
-
-
-
Gebruik een spudger of een nagel om de kabelaansluiting van de naar voren gerichte camera en de sensor los te koppelen.
-
-
-
Gebruik het platte einde van een spudger om de kabelaansluiting van de digitizer los te koppelen.
-
-
-
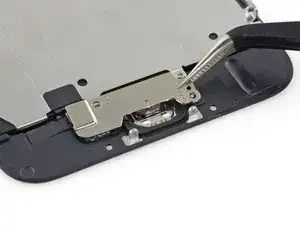
Verwijder de twee 1.9 mm lange Phillips schroeven die het plaatje over de thuisknop bevestigen.
-
-
-
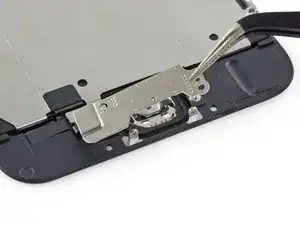
Gebruik de punt van een spudger om de kabelaansluiting van de thuisknop los te koppelen door deze van de thuisknop omhoog en weg te duwen.
-
-
-
Dien wat milde warmte toe (met een iOpener, warmtepistool of föhn) om de lijm die het membraan van de thuisknop vasthoudt, te verzachten.
-
Zet, met behulp van het topje van je vinger, een stevige, constante druk, vanaf de voorkant van het scherm, op de thuisknop, totdat het membraan loskomt van het voorste paneel.
-
-
-
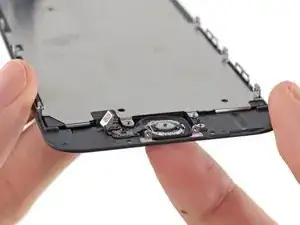
Duw de rest van de thuisknop ook los van het scherm door deze met een spudger langzaam omhoog te duwen.
-
-
-
Gebruik de punt van een spudger om de thuisknopkabel voorzichtig los te duwen van de lijm die het aan het voorste paneel bevestigt.
-
-
-
Als alle lijm eenmaal los is gemaakt, kun je de thuisknop van het voorste paneel verwijderen.
-


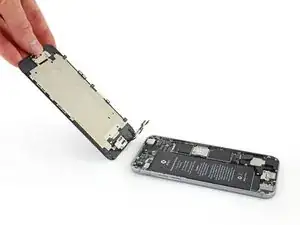


Om je toestel weer in elkaar te zetten, volg je deze instructies in omgekeerde volgorde.

186 commentaren
Its a good advice to remove the battery power before mounting the flex-cables.
There is power on the second logic-board (even if the phone is turned off) connector from top, misplacing it while assembly can cause short circuit.
peter -
Will the short circuit damage the logic board or the camera / earpiece assembly? I'm worried just encountered this very issue even though the phone was off. FF camera and earpiece not functioning.
Battery assembly is one of the important procedures working with manual is the best way to repair an iphone 6 screen
Good advice two: When removing the LCD back shield plate have in mind that the home button connector attached to the shield plate is Very fragile. Its adhered to the screen. Use very little force and do not heat the adhesive too much because then it become even More fragile.
I use ifixits metal spudger without heat but one small mistake and it can be teared.
peter -
I have now changed two of these on my phone from different suppliers and both haven't worked!
Could it be that both have been defective products or am I doing something wrong!?!?
Kieran -
Hi love what do you do or how do you get replacement cable the one on the screen if you break it I tried fixing my screen before I read your post and yes I tore that tiny cable crying now how do I fix that or even can I.
It was much easier to heat the home button connector at least with hair dryer for half a minute or so and then gently remove the thin cable with some thin spudger. Without heating it felt very firmly glued and much more likely to break
What seems to be the issue you face from the possibly defective parts?
There's so many non-Apple manufacturer's out there that it could be any set of issues. Low quality adhesive or misalignment of the bezzle has been my issue but most Non-Apple LCDs will work fine. And I'm surprised how fast the i6 and i6+ LCDs have came down in price without sacrificing quality. I think Apple's low $100 repair price point has something to do with it.
When reconnecting be VERY careful not to over tighten. The connectors on the screen that these 3.6mm Pentalobe screws lock with are notorious for breaking off
Blair Tryba -
what do i do if ive managed to tighten them too hard and now they wont come off?
kristian686 -
Before opening the phone, I gently warmed it using a buckwheat heating pad. This made removal of the adhesive strips (steps 20 to 24) easy.
Howard Bales -
Exactly what I did as well, the gently warming made the adhesive removal work like a charm. The heat as well help to lift the screen easily, no need for the prying tools for me to open te phone.
For the adhesive removal just pull it slowly to the bottom of the phone and keep in under tension.
On reassembly, turn on the phone after getting all connectors back in place to verify all is working fine before putting all screws back in their spot.
Maarten Vergauwen -
Thanks for the suggestion! I heated up a hot/cold pack, and it worked great.
Linda Chandler -
I put mine back together but mine looks very different than this one. Why is it that when I make a call I cannot hear through the ear piece and have to put it on speaker. Also my screen doesn't go black when my face touches it
Bailey Wilson -
Hey Bailey, which repair were you attempting? Is it possible you have a 6s, or maybe a 6 Plus? You may have better luck with faster troubleshooting if you post in our Answer Forum!
Sam Goldheart -
See its a long time ago you had this issue. You can try to remove the cable from front camera/sensor/earpiece from the motherboard port and gently push it back on. All the problems you relate to is thru the same cable. If this dont solve your problem, check if the earpiece is correctly placed onto the polarity poles, and that the proximity sensor is lying right down into the corresponding socket. If something is blocking the sensor, yeah then the screen wont turn on/off when you put it onto your ear.
Kenneth Hilstan -
I see in the preamble that when you replace your logic board, you would lose touch id functionality, so my question is what if you have the homebutton and thus the fingerprint reader for the logic board replacement, would touch id work?
socratesmens -
The guide for the iPhone6 battery replacement needs to be revised. There are a couple of issues.
1) While the battery cover has two screws, they are different lengths. Since they are very small, it can be hard to see the difference (until one tries to screw the smaller one into the longer hole). The video needs to mention this.
2) The application of the adhesive strip if very different from what is mentioned. Also, there is a “one piece plastic” applique, and it is very unforgiving. The video should show this process in more detail.
I believe the attention to this detail would help folks correctly install their iPhone 6 batteries, and with the recent Apple disclosed battery problem, would continue to show that iFixit is very committed to the end-user.
Gary Long -
I felt a bit silly getting stuck at the end of a long repair, unable to screw one of these last screws back in. What worked was gently pinching the phone above and below the screw, to make sure the screen and back were perfectly aligned.
Matt D -
Apple edits posts on their Communities website that link to this fix page justifying as follows:
“We’ve edited your post because following the procedures at the site you provided may lead to damage to the user’s device.”
What is certain is that following Apple Support’s advice of resetting our phones again and again never works whereas this fix works. Apparently Apple does not want people to know that their hardware fails and can be fixed, because then they would need to explain why they don’t offer neither the fixing service nor the fixing advice by directing us to this website.
Brice -
Before you get started, I suggest you confirm you are replacing the correct camera. If you are thinking of a camera, the front is the side of the device with the main lens. On an iPhone this is actually known as the rear facing camera. Once the phone is disassembled your orientation can be distorted and it is not that hard to fail to realize your are replacing the wrong camera. Doh!
William Miller -
I found it very useful to use a magnet sheet when doing these repairs. I use electrical tape or a sharpie to make a grid, and place each micro screw in a separate box on the grid.
I work directly over the magnet sheet, so that if something drops I have a better chance at not losing it.
If you do lose a screw, go over the work area with a fridge magnet. It will pick it up if it hasn’t popped too far away.
Megan Telliano -
I agree. The Magnetic Project Mat makes your project incredibly easier and keeps your screws/parts organized. Here is the link for anyone interested:
Magnetic Project Mat
Cooper -
or some masking tape with sticky side up and the ends folded underneath on a piece of paper, then you can write notes like
“1.4mm for FOO bracket →”
“7x2.3mm for EMI cover, different one by camera →”
The arrows point as appropriate.
If you drop something, put a flashlight on the floor & shine it across the floor — Turn off ceiling & other lights off to maximize the shadow from the flashlight.
Bass Clef -
These screws are tiny, and the first two are the biggest of the lot. Get a magnifying glass or good reader glasses.
Jennifer Porter -
Which torx is this T?
klemenecanze -
The screws are no torx screws they are Apple Pentalobe screws. You need to buy a Pentalobe screwdriver seen above.
Claes -
I have to use the P2 right?
Aman Singh -
The best advice I can give is not to perform this operation over carpet.
Bruce codding -
I'm an amateur, but I was able to replace the parts almost perfectly while looking at this explanation, thank you very much.
irichin.3.26 -
was fairly easy more nerves than anything, one thing one should have on hand is alcohol just in case its needed. also if one doesn’t get the entire tape strips out, use the alcohol like suggested and lift the battery up. Then can grab the remaining tape strips with tweezers and pull it out. Easy to put back together just make sure the connectors are in. The screws are tiny so take your time. I plugged it in and it started charging and it worked. Great to have my 6 back for a trip as I wanted to use it for the camera, also my game phone so nice to have a battery that lasts. Yes having a flat place to put the parts and put them in separate area so they don’t get mixed up. It took about a hour with hunting for a spare bottle of alcohol.
Greg Wischmeyer -
The first step should always to be to backup your phone as there is always a slim chance that even a simple battery replacement may render the phone inoperable and data on it lost.
Jim -
Please do not forget to remove the SIM-Card tray!!
Steffen Albrecht -
I didn’t need to remove my sim card tray when I did my iPhone 6 battery replacement. Why do you suggest to remove it?
Jim -
You dont need to remove sim card while battery replacement
bertan -
Did mine today, with iFixit battery and iFixit tool kit. Did not need suction cup, to open case, as it had partially sprung open on left, as a result of a badly swollen battery. Supported base and screen with a bookend and rubber bands. This kept these parts at a 90 degree angle, so that screen did not need to be removed. IFixit screwdriver tips were perfect fit. Somewhat difficult to remove battery adhesive strips, but slow and steady got it done, after mild heating with hair dryer. Took about 3 minutes to reposition battery connector…just a wee bit tricky, to position correctly. Was careful to place top of screen in place first, and remainder snapped into place with light pressure, and replaced the 2 pentalobe screws.
Will highly recommend iFixit for such a repair. Repair kit and battery, are first rate. I give this an 11, out of 10.?
Len Drasin -